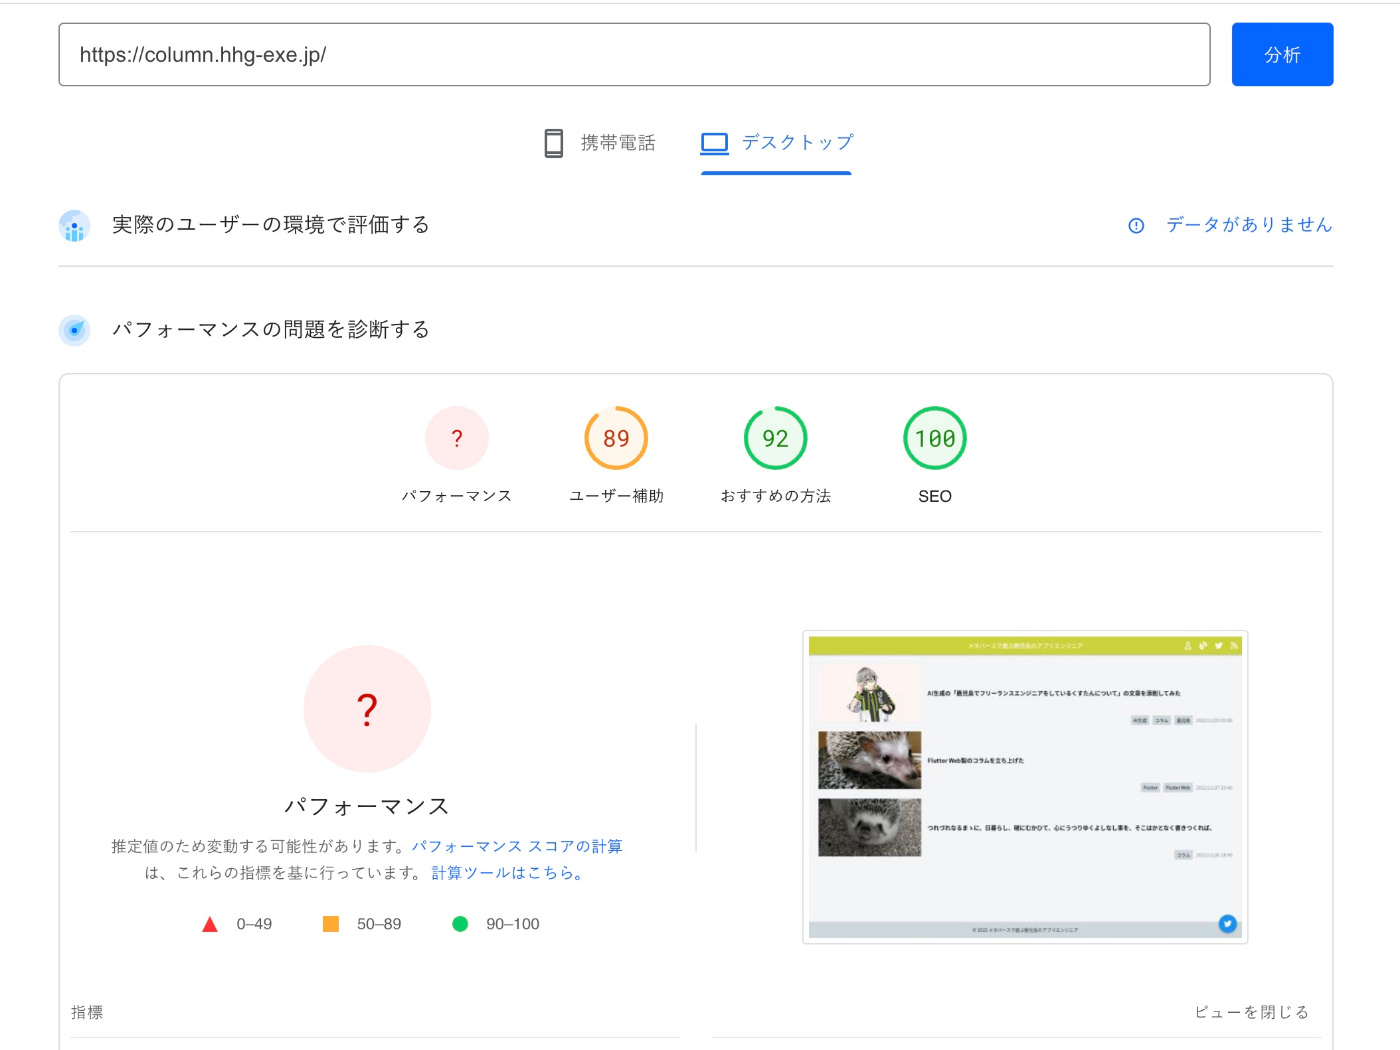
ヘッドレスCMS製のSPAなブログでSEOスコア100点取ってみた
CMS(WordPressやヘッドレスCMS) Advent Calendar 2022 最終日の記事です。
お試しでカレンダーを作ってみたのですが、想像以上の参加者・購読者がいたので嬉しい限りです!
前日までの記事を読んでいないほうは、ぜひ以下のリンクからそれぞれの記事を読んでみてください!
(そして、必ず戻ってきてくださいね!)
そんな最終日の記事はヘッドレスCMSでSEOスコア100点を取った記事です。

概要
先日、Flutter WebでSPAなブログを作成した記事を書きました。
その際に、SEOストア100点を取った話をしましたが、Flutterに関係のない要素については言及しませんでした。

今回はSEOストア100点を取った方法のうち、Flutterに関係なくすべてのSPAブログでできる対処を紹介していきます。
使ったツール
ブログ制作に使ったツールを紹介します。
(Flutter Webは除外しており、どのSPAブログでも対応できる構成なはず)
- Spearly CMS
- Firebase(Hosting, Cloud Functions
Spearly CMS
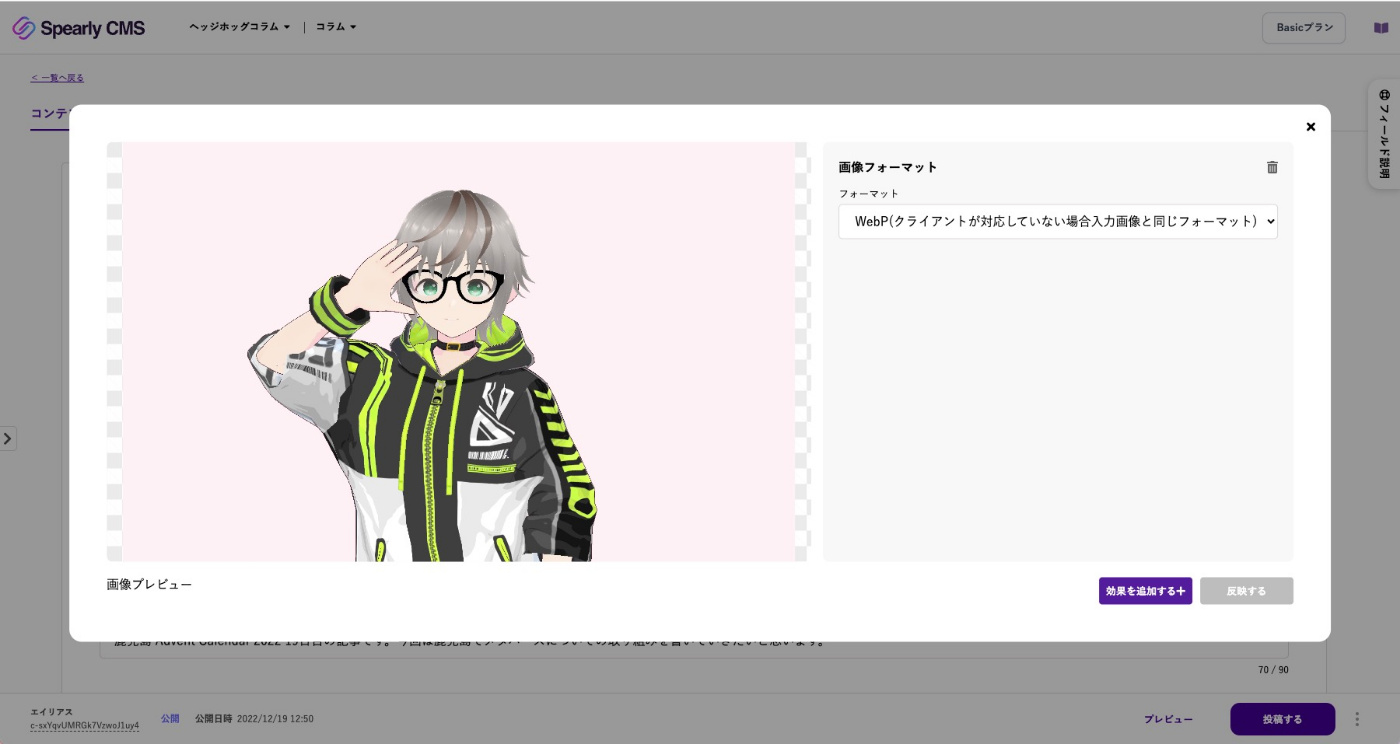
今回はアップロードした画像をWebP形式に変換する目的で利用しました。
他のヘッドレスCMSが気になる人は、今年のAdvent Calendarでちょうど比較記事が上がっているようなので、それを見たうえで気になるヘッドレスCMSを使うと良いでしょう。
なお、今回のブログは以下のようなコンテンツ構成で作成しています。

コンテンツの設計については、DBみたいなものなので詳細は割愛します。
今回の実装で必要なフィードタイプは以下のとおりです。
- タイトル(title)
- アイキャッチ(image)
- 概要(overview)
- 作成日(created_at)
Firebase(Hosting, Cloud Functions)
こちらも説明は不要なほど有名なGoogleのmBaaSです。
今回はOGPとSEO対策のサイトマップ生成に利用しました。
SEOスコア対策の実装はほぼCloud Functionsに依存しています。
Functions内でSpearly CMSのapiから必要なデータを取得することでそれぞれの対策を実現しています。
また、キャッシュやリライト設定の一部にHostingを利用しています。
行った対策
SEOスコア100点を取るにあたって行った対策は以下のとおりです。
- サイトマップ作成
- WebP形式の画像利用
- キャッシュ対策
- RSSフィード作成(※)
- OGP作成(※)
サイトマップ作成
SEO対策にサイトマップは必須なので、Cloud FunctionsからSpearly CMSのapiを叩いてコンテンツを取得します。
サイトマップに関しては、npmのいい感じのパッケージを探しても良かったのですが、今回は自前で実装しました。
import axios from "axios";
import * as functions from "firebase-functions";
import * as admin from "firebase-admin";

admin.initializeApp();

const BASE_URL = "https://column.hhg-exe.jp";
const API_KEY = "Spearly CMSのドキュメントから取得";

type Content = {
  id: string
  title: string
  overview: string
  image: string
  updatedAt: string
}

type ContentResponse = {
  attributes: {
    content_alias: string
  }
  values: {
    title: string
    overview: string
    image: string
    updated_at: string
  }
}

const parseYmd = (stringDate: string): string => {
  return stringDate.replace(/\//g, "-").substring(0, 10);
};

const getContents = async (): Promise<Content[]> => {
  const headers = {
    Authorization: `Bearer ${API_KEY}`,
    Accept: "application/vnd.spearly.v2+json",
  };

  try {
    const res = await axios.get("https://api.spearly.com/content_types/column/contents", {headers});
    return res.data.data.map((data: ContentResponse) => {
      return {
        id: data.attributes.content_alias,
        title: data.values.title,
        overview: data.values.overview,
        image: data.values.image,
        updatedAt: parseYmd(data.values.updated_at),
      };
    });
  } catch (error) {
    console.warn(error);
  }

  return [];
};

exports.sitemap = functions.https.onRequest(async (req, res) => {
  try {
    const lines = [];
    lines.push("<?xml version=\"1.0\" encoding=\"UTF-8\"?>");
    lines.push("<urlset xmlns=\"http://www.sitemaps.org/schemas/sitemap/0.9\">");

    lines.push(`<url><loc>${BASE_URL}</loc></url>`);

    const contents = await getContents();
    contents.forEach((content) => {
      const urlLine = `<url>
  <loc>${BASE_URL}/articles/${content.id}</loc>
  <lastmod>${content.updatedAt}</lastmod>
</url>
`;
      lines.push(urlLine);
    });

    lines.push("</urlset>");

    res.set("Cache-Control", "public, max-age=7200, s-maxage=600");
    res.set("Content-Type", "application/xml");
    res.set("Charset", "UTF-8");
    res.end(lines.join("\n"));
  } catch (error) {
    console.warn(error);
    res.redirect("/");
  }
});
Cloud Functionsに定義しただけでは、サイトマップのURLがCloud Functions由来のものになってしまいます。
そこで、sitemap.xmlにアクセスがあった際には、 sitemap 関数を実行してくれるように firebase.json を編集します。
{
  "hosting": {
    "rewrites": [
      {
        "source": "/sitemap.xml",
        "function": "sitemap"
      },
    ]
  }
}
実際のサイトマップがこちらになります。
WebP形式の画像利用
WebP形式の画像を使うと画像のファイルサイズが軽量になり、ページの表示速度を上げることができます。
SpearlyのImageFluxを使うと自動的にWebP対応された画像のURLを返してくれるので、ブログ執筆時には必ずWebP対応を含めるようにしています。

キャッシュ対策
Firebase Hostingでホスティングしているため、 firebase.json を編集して、コンテンツのキャッシュ期間を変更しました。
デフォルトでは3600秒(1時間)なのですが、もっと伸ばしたかったので、以下のように変更しています。
{
  "hosting": {
    "headers": [
      {
        "source": "**/*.@(dart.js)",
        "headers": [
          {
            "key": "Cache-Control",
            "value": "max-age=3600"
          }
        ]
      },
      {
        "source": "**/*.@(jpg|png|ttf|otf)",
        "headers": [
          {
            "key": "Cache-Control",
            "value": "max-age=86400"
          }
        ]
      },
      {
        "source": "**/*.@(html|js|css)",
        "headers": [
          {
            "key": "Cache-Control",
            "value": "max-age=604800"
          }
        ]
      }
    ],
  }
}
これ以降はSEOに直接関係ないですが、ブログに必要な機能の追加です。
RSSフィード作成
RSSフィードの利用数がどれくらいなのかは不明ですが、せっかくなので作りましょう。
npmの feed パッケージがあるので、そちらを使いました。
import axios from "axios";
import * as functions from "firebase-functions";
import * as admin from "firebase-admin";
import {Feed} from "feed";

admin.initializeApp();

const SITE_TITLE = "メタバースで遊ぶ鹿児島のアプリエンジニア";
const BASE_URL = "https://column.hhg-exe.jp";
const API_KEY = "Spearly CMSのドキュメントから取得";

type Content = {
  id: string
  title: string
  overview: string
  image: string
  updatedAt: string
}

type ContentResponse = {
  attributes: {
    content_alias: string
  }
  values: {
    title: string
    overview: string
    image: string
    updated_at: string
  }
}

const parseYmd = (stringDate: string): string => {
  return stringDate.replace(/\//g, "-").substring(0, 10);
};

const getContents = async (): Promise<Content[]> => {
  const headers = {
    Authorization: `Bearer ${API_KEY}`,
    Accept: "application/vnd.spearly.v2+json",
  };

  try {
    const res = await axios.get("https://api.spearly.com/content_types/column/contents", {headers});
    return res.data.data.map((data: ContentResponse) => {
      return {
        id: data.attributes.content_alias,
        title: data.values.title,
        overview: data.values.overview,
        image: data.values.image,
        updatedAt: parseYmd(data.values.updated_at),
      };
    });
  } catch (error) {
    console.warn(error);
  }

  return [];
};

exports.feed = functions.https.onRequest(async (req, res) => {
  try {
    const feed = new Feed({
      title: SITE_TITLE,
      description: SITE_TITLE,
      id: BASE_URL,
      link: BASE_URL,
      language: "ja",
      image: `${BASE_URL}/ogp.jpg`,
      favicon: `${BASE_URL}/favicon.png`,
      copyright: `All rights reserved 2022, ${SITE_TITLE}`,
      generator: "Feed By Cloud Functions",
    });

    const contents = await getContents();
    contents.forEach((content) => {
      feed.addItem({
        title: content.title,
        id: `${BASE_URL}/articles/${content.id}`,
        link: `${BASE_URL}/articles/${content.id}`,
        description: content.overview,
        date: new Date(Date.parse(content.updatedAt)),
        image: content.image,
      });
    });
    feed.addCategory("Column");

    res.set("Cache-Control", "public, max-age=7200, s-maxage=600");
    res.set("Content-Type", "application/xml");
    res.set("Charset", "UTF-8");
    res.end(feed.rss2());
  } catch (error) {
    console.warn(error);
    res.redirect("/");
  }
});
こちらもそのままでは、RSSのURLがCloud Functions由来のものになってしまいますので、feed 関数を実行してくれるように firebase.json を編集します。
{
  "hosting": {
    "rewrites": [
      {
        "source": "/feed.xml",
        "function": "feed"
      },
    ]
  }
}
実際のRSSフィードがこちらになります。
OGP作成
こちらの記事を参考にダイナミックレンダリングという手法で実現しました。
詳細は割愛しますが、OGPを表示するためのmetaデータをCloud Functions経由で生成しています。
実際にブラウザからアクセスがあった際には正しい記事URLにリダイレクトするような処理を実装しています。
import axios from "axios";
import * as functions from "firebase-functions";
import * as admin from "firebase-admin";

admin.initializeApp();

const BASE_URL = "https://column.hhg-exe.jp";
const API_KEY = "Spearly CMSのドキュメントから取得";

type CreateHtmlProps = {
  title: string
  description: string
  ogpUrl: string
  pageUrl: string
  redirectUrl: string
}

type Content = {
  id: string
  title: string
  overview: string
  image: string
  updatedAt: string
}

type ContentResponse = {
  attributes: {
    content_alias: string
  }
  values: {
    title: string
    overview: string
    image: string
    updated_at: string
  }
}

const createHtml = (props: CreateHtmlProps): string => {
  return `<!DOCTYPE html>
<html lang="ja">
  <head>
    <meta charset="utf-8">
    <meta name="viewport" content="width=device-width,initial-scale=1.0">
    <title>${props.title}</title>
    <meta property="og:title" content="${props.title}">
    <meta property="og:image" content="${props.ogpUrl}">
    <meta property="og:description" content="${props.description}">
    <meta property="og:url" content="${props.pageUrl}">
    <meta property="og:type" content="article">
    <meta property="og:site_name" content="${SITE_TITLE}">
    <meta name="twitter:site" content="${BASE_URL}">
    <meta name="twitter:card" content="summary_large_image">
    <meta name="twitter:title" content="${props.title}">
    <meta name="twitter:image" content="${props.ogpUrl}">
    <meta name="twitter:description" content="${props.description}">
    <meta name="apple-mobile-web-app-capable" content="yes">
    <meta name="apple-mobile-web-app-status-bar-style" content="black">
    <meta name="apple-mobile-web-app-title" content="column">
    <link rel="apple-touch-icon" href="${BASE_URL}/icons/Icon-192.png">
    <link rel="icon" type="image/png" href="${BASE_URL}/favicon.png"/>
  </head>
  <body>
   <script type="text/javascript">
    window.location="${props.redirectUrl}";
   </script>
  </body>
</html>
`;
};

const getContent = async (contentId: string): Promise<Content|null> => {
  const headers = {
    Authorization: `Bearer ${API_KEY}`,
    Accept: "application/vnd.spearly.v2+json",
  };

  try {
    const res = await axios.get(`https://api.spearly.com/contents/${contentId}`, {headers});
    const data = res.data.data as ContentResponse;
    return {
      id: data.attributes.content_alias,
      title: data.values.title,
      overview: data.values.overview,
      image: data.values.image,
      updatedAt: data.values.updated_at,
    };
  } catch (error) {
    console.warn(error);
  }

  return null;
};

exports.articles = functions.https.onRequest(async (req, res) => {
  try {
    const [, , contentId] = req.path.split("/");
    if (!contentId) {
      console.error("contentId is empty");
      res.redirect("/");
      return;
    }

    const content = await getContent(contentId);
    if (!content) {
      console.error("content is empty");
      res.redirect("/");
      return;
    }

    const title = content.title;
    const description = content.overview;
    const ogpUrl = content.image;
    const pageUrl = `${BASE_URL}/articles/${contentId}`;
    const redirectUrl = `/_articles/${contentId}`;

    const html = createHtml({title, description, ogpUrl, pageUrl, redirectUrl});

    res.set("Cache-Control", "public, max-age=86400, s-maxage=86400");
    res.status(200).end(html);
  } catch (error) {
    console.warn(error);
    res.redirect("/");
  }
});
{
  "hosting": {
    "rewrites": [
      {
        "source": "/articles/**",
        "function": "articles"
      },
    ]
  }
}
各OGPが変わっていることは以下のURLをご覧いただければ、一目瞭然です。
記事で利用したコード
そうして書いたコードの一覧が以下のようになります。
実際には、型定義やapiへのリクエストは別ファイルで定義したものをimportしているのでもっと行数は少なくて見やすくなるはずです。
import axios from "axios";
import * as functions from "firebase-functions";
import * as admin from "firebase-admin";
import {Feed} from "feed";

admin.initializeApp();

const SITE_TITLE = "メタバースで遊ぶ鹿児島のアプリエンジニア";
const BASE_URL = "https://column.hhg-exe.jp";
const API_KEY = "Spearly CMSのドキュメントから取得";

type CreateHtmlProps = {
  title: string
  description: string
  ogpUrl: string
  pageUrl: string
  redirectUrl: string
}

type Content = {
  id: string
  title: string
  overview: string
  image: string
  updatedAt: string
}

type ContentResponse = {
  attributes: {
    content_alias: string
  }
  values: {
    title: string
    overview: string
    image: string
    updated_at: string
  }
}

const createHtml = (props: CreateHtmlProps): string => {
  return `<!DOCTYPE html>
<html lang="ja">
  <head>
    <meta charset="utf-8">
    <meta name="viewport" content="width=device-width,initial-scale=1.0">
    <title>${props.title}</title>
    <meta property="og:title" content="${props.title}">
    <meta property="og:image" content="${props.ogpUrl}">
    <meta property="og:description" content="${props.description}">
    <meta property="og:url" content="${props.pageUrl}">
    <meta property="og:type" content="article">
    <meta property="og:site_name" content="${SITE_TITLE}">
    <meta name="twitter:site" content="${BASE_URL}">
    <meta name="twitter:card" content="summary_large_image">
    <meta name="twitter:title" content="${props.title}">
    <meta name="twitter:image" content="${props.ogpUrl}">
    <meta name="twitter:description" content="${props.description}">
    <meta name="apple-mobile-web-app-capable" content="yes">
    <meta name="apple-mobile-web-app-status-bar-style" content="black">
    <meta name="apple-mobile-web-app-title" content="column">
    <link rel="apple-touch-icon" href="https://column.hhg-exe.jp/icons/Icon-192.png">
    <link rel="icon" type="image/png" href="https://column.hhg-exe.jp/favicon.png"/>
  </head>
  <body>
   <script type="text/javascript">
    window.location="${ props.redirectUrl}";
   </script>
  </body>
</html>
`;
};

const getContent = async (contentId: string): Promise<Content|null> => {
  const headers = {
    Authorization: `Bearer ${API_KEY}`,
    Accept: "application/vnd.spearly.v2+json",
  };

  try {
    const res = await axios.get(`https://api.spearly.com/contents/${contentId}`, {headers});
    const data = res.data.data as ContentResponse;
    return {
      id: data.attributes.content_alias,
      title: data.values.title,
      overview: data.values.overview,
      image: data.values.image,
      updatedAt: data.values.updated_at,
    };
  } catch (error) {
    console.warn(error);
  }

  return null;
};

const parseYmd = (stringDate: string): string => {
  return stringDate.replace(/\//g, "-").substring(0, 10);
};

const getContents = async (): Promise<Content[]> => {
  const headers = {
    Authorization: `Bearer ${API_KEY}`,
    Accept: "application/vnd.spearly.v2+json",
  };

  try {
    const res = await axios.get("https://api.spearly.com/content_types/column/contents", {headers});
    return res.data.data.map((data: ContentResponse) => {
      return {
        id: data.attributes.content_alias,
        title: data.values.title,
        overview: data.values.overview,
        image: data.values.image,
        updatedAt: parseYmd(data.values.updated_at),
      };
    });
  } catch (error) {
    console.warn(error);
  }

  return [];
};


exports.articles = functions.https.onRequest(async (req, res) => {
  try {
    const [, , contentId] = req.path.split("/");
    if (!contentId) {
      console.error("contentId is empty");
      res.redirect("/");
      return;
    }

    const content = await getContent(contentId);
    if (!content) {
      console.error("content is empty");
      res.redirect("/");
      return;
    }

    const title = content.title;
    const description = content.overview;
    const ogpUrl = content.image;
    const pageUrl = `${BASE_URL}/articles/${contentId}`;
    const redirectUrl = `/_articles/${contentId}`;

    const html = createHtml({title, description, ogpUrl, pageUrl, redirectUrl});

    res.set("Cache-Control", "public, max-age=86400, s-maxage=86400");
    res.status(200).end(html);
  } catch (error) {
    console.warn(error);
    res.redirect("/");
  }
});


exports.feed = functions.https.onRequest(async (req, res) => {
  try {
    const feed = new Feed({
      title: SITE_TITLE,
      description: SITE_TITLE,
      id: BASE_URL,
      link: BASE_URL,
      language: "ja",
      image: `${BASE_URL}/ogp.jpg`,
      favicon: `${BASE_URL}/favicon.png`,
      copyright: `All rights reserved 2022, ${SITE_TITLE}`,
      generator: "Feed By Cloud Functions",
    });

    const contents = await getContents();
    contents.forEach((content) => {
      feed.addItem({
        title: content.title,
        id: `${BASE_URL}/articles/${content.id}`,
        link: `${BASE_URL}/articles/${content.id}`,
        description: content.overview,
        date: new Date(Date.parse(content.updatedAt)),
        image: content.image,
      });
    });
    feed.addCategory("Column");

    res.set("Cache-Control", "public, max-age=7200, s-maxage=600");
    res.set("Content-Type", "application/xml");
    res.set("Charset", "UTF-8");
    res.end(feed.rss2());
  } catch (error) {
    console.warn(error);
    res.redirect("/");
  }
});

exports.sitemap = functions.https.onRequest(async (req, res) => {
  try {
    const lines = [];
    lines.push("<?xml version=\"1.0\" encoding=\"UTF-8\"?>");
    lines.push("<urlset xmlns=\"http://www.sitemaps.org/schemas/sitemap/0.9\">");

    lines.push(`<url><loc>${BASE_URL}</loc></url>`);

    const contents = await getContents();
    contents.forEach((content) => {
      const urlLine = `<url>
  <loc>${BASE_URL}/articles/${content.id}</loc>
  <lastmod>${content.updatedAt}</lastmod>
</url>
`;
      lines.push(urlLine);
    });

    lines.push("</urlset>");

    res.set("Cache-Control", "public, max-age=7200, s-maxage=600");
    res.set("Content-Type", "application/xml");
    res.set("Charset", "UTF-8");
    res.end(lines.join("\n"));
  } catch (error) {
    console.warn(error);
    res.redirect("/");
  }
});
firebase.json も以下の通りで、今回の記事に関係のない要素は削除しています。
{
  "hosting": {
    "headers": [
      {
        "source": "**/*.@(dart.js)",
        "headers": [
          {
            "key": "Cache-Control",
            "value": "max-age=3600"
          }
        ]
      },
      {
        "source": "**/*.@(jpg|png|ttf|otf)",
        "headers": [
          {
            "key": "Cache-Control",
            "value": "max-age=86400"
          }
        ]
      },
      {
        "source": "**/*.@(html|js|css)",
        "headers": [
          {
            "key": "Cache-Control",
            "value": "max-age=604800"
          }
        ]
      }
    ],
    "rewrites": [
      {
        "source": "/feed.xml",
        "function": "feed"
      },
      {
        "source": "/sitemap.xml",
        "function": "sitemap"
      },
      {
        "source": "/articles/*",
        "function": "articles"
      },
    ]
  }
}
最後に
以上のような方法でSPAなブログでもSEOスコア100点を獲得できました。
Firebase + Spearly の構成ならば言語は選ばずに構築できるので、ぜひお試しください!
言語を選ばないなら普通にSSGするよというツッコミはなしで
なお、速度も意識したSSGなブログは、Next.js + Spearly + Firebaseで作ってます!笑
最後まで読んでいただいてありがとうございました!
よろしければ、いいね!やコメントをしていただけるととっても嬉しいです!!

Discussion