Apollo Odyssey(Apolloのチュートリアル)でApollo Federationをさわってみる
Apollo Oddysey(Apolloのチュートリアル)のうち基礎編的な立ち位置であるLift-offを一通りやったので、Apollo Federationのほうもやっていく
- Voyage I: Federation from Day One <--- これをやる
- Voyage II: Federating the monolith
- Voyage III: Federation in Production
リゾルバの代わりに別のGraphQL APIを子グラフとしてfederationできて、そうやって作ったグラフをsupergraphと呼ぶみたいな感じの雑な認識を持っているが全然違うかもしれない
あとマイクロサービスをGraphQLで作っておけば透過的にイケてるBFF作れちゃうんじゃない?という期待を持っている
作業環境
- macOS Monterey (12.6.2)
node -v
v18.14.0
pnpm -v
7.27.1
メモ
- AppSyncでsubgraphを構築する記事があった
- routerはクエリの実行前にリゾルバの実行順をquery planとして解決する
- 別のsubgraphを参照している場合、参照元のsubgraphはprimary keyのフィールドしか知らないので参照先のsubgraphにリクエストしてスキーマを取得する
まとめ
- Apollo Federationはrouterと複数のsubgraph(Apollo Server)で1つのGraphQL APIを構成するための仕様
- 複数のsubgraphから構築されたグラフをsupergraphと呼ぶ
- Apollo Serverをsubgraphとして動かすためには
- スキーマの先頭でsubgraph間の参照を解決するための
@keyディレクティブを読み込む - Apollo Server起動時に
typeDefとresolversをbuildSubgraphSchema()でラップしてschemaとして渡す - https://zenn.dev/link/comments/e0e7313932b4c6
- スキーマの先頭でsubgraph間の参照を解決するための
- subgraphをApollo Studioにpublishすることでsupergraphのスキーマが自動生成される
- RoverというApolloのCLIでpublishする
- routerはApollo Uplinkという機能をポーリングし、supergraphの最新のスキーマを取得する
- Apollo Studioを使わずにsupergraphのスキーマを生成する方法は未検証
-
rover supergraphでいけるかもしれない - https://www.apollographql.com/docs/rover/commands/supergraphs/
-
- Apollo Studioを使わずにrouterを動かすにはApollo Gatewayを使う
-
https://www.apollographql.com/docs/apollo-server/using-federation/apollo-gateway-setup/
-
ApolloGatewayの初期化でserviceListは非推奨、代わりにIntrospectAndComposeを使う- "We strongly recommend against using IntrospectAndCompose in production"らしい
- production環境を考慮すると
supergraphSdlでsupergraphのスキーマを読み込むのがよい- スキーマはRoverで生成する(
rover spergraph)
- スキーマはRoverで生成する(
-
-
https://www.apollographql.com/docs/apollo-server/using-federation/apollo-gateway-setup/
- 別のsubgraphを参照するには
- 型定義に
@keyディレクティブを追加してprimary keyを指定することでentityとする- 参照元はprimary keyのみフィールドにもつentityの定義を追加する
- 親リゾルバの値をprimary keyとしてで参照先を解決する場合は
__resolveReferenceResolverを実装する - 参照元のsupergraphのオブジェクトをparentとしてResolverを実装する場合は
__resolveReferenceは省略可能
- 型定義に
- routerはRustで書かれたバイナリをダウンロードして使う
Voyage I: Federation from Day One
Intro to Federation
- Apollo Federationは複数のGraphQL APIをモジュールとしてfederateするアーキテクチャ
- このアーキテクチャで構成されたグラフをsupergraphと呼ぶ
- "federated graph"と呼ぶこともあるが同じもの
- Apollo Federationはv1とv2があって、このチュートリアルではv2を使う
- supergraphはrouterと複数のsubgraphで構成される
- subgraphは単独のGraphQLサーバ
- routerはリクエストをsubgraphに振り分ける
- subgraphをリゾルバとして扱うイメージ
- supergraph schemaで定義する
- 感想:BFFそのものっぽい感じ、ただしsubgraphがGraphQLにロックインされるのでAppSyncみたいにはいかなさそう
✍️ Project Setup

- FlyByというサンプルアプリをsupergraphで作る
- 完成イメージ(https://odyssey-flyby.netlify.app/)
- Reviewの一覧とLocationの一覧が並んでいて、それぞれを別のsubgraphとして実装している
- 推奨環境はNode.js 16
- ソースを見たらApollo Serverはv4を使ってたのでそのままやって問題なさそう
- 切り替えるのが面倒なのでこけるまでNode.js 18を使う
リポジトリをclone
git clone https://github.com/apollographql/odyssey-voyage-I
フロントエンドと以下バックエンドの3環境が含まれている(Lernaとかを使うのではなく個別に実装、起動する)
| server | port | 説明 |
|---|---|---|
router |
4000 |
supergraph の router |
subgraph-locations |
4001 |
locationsの subgraph |
subgraph-reviews |
4002 |
reviewsの subgraph |
subgraphから実装していくためsubgraph-locationsとsubgraph-reviewsの各ディレクトリでパッケージをインストールする
pnpm install
開発で使用するため、Apollo Studioのアカウントも作成しておく
スキーマの設計
画面の構成から想定されるクエリを考える
ホーム画面はこんな感じ
https://www.apollographql.com/tutorials/voyage-part1/03-agreeing-on-a-schema


query GetHomePageLocationsAndReviews {
  latestReviews {
    id
    comment
    rating
    location {
      name
    }
  }
  locations {
    id
    name
    overallRating
    photo
    reviewsForLocation {
      id
      comment
      rating
    }
  }
}
詳細画面
https://www.apollographql.com/tutorials/voyage-part1/03-agreeing-on-a-schema

query GetLocationDetails($locationId: ID!) {
  location(id: $locationId) {
    id
    name
    description
    photo
    overallRating
    reviewsForLocation {
      id
      comment
      rating
    }
  }
}
ユーザによるレビューの投稿も行えるようにしたい
mutation SubmitReview($locationReview: LocationReviewInput) {
  submitReview(locationReview: $locationReview) {
    code
    success
    message
    locationReview {
      id
      comment
      rating
    }
  }
}
以上から、スキーマはこんな感じになる
https://www.apollographql.com/tutorials/voyage-part1/03-agreeing-on-a-schema

# schema entry points
type Query {
  latestReviews: [Review!]!
  locations: [Location!]!
  location(id: ID!): Location
}

type Mutation {
  submitReview(locationReview: LocationReviewInput): SubmitReviewResponse
}

# type definitions
type Location {
  id: ID!
  name: String!
  description: String!
  photo: String!
  reviewsForLocation: [Review]!
  overallRating: Float
}

type Review {
  id: ID!
  comment: String
  rating: Int
  location: Location
}

type LocationReviewInput {
  comment: String!
  rating: Int!
  locationId: String!
}

type SubmitReviewResponse {
  code: Int!
  success: Boolean!
  message: String!
  locationReview: Review
}
ここまでは普通にGraphQL APIを作るときと変わらない
reviewsとlocationsにsubgraphを分割して別チームで開発するようなケースを想定していく
https://www.apollographql.com/tutorials/voyage-part1/03-agreeing-on-a-schema

スキーマ上の分担はこんな感じ
Location型のうち、reviewsForLocationとoverallRatingはレビューに関連する属性なのでreviews subgraphが担当する
✍️ subgraphの実装
cloneした時点でsubgraph-reviewsとsubgraph-locationsはそれぞれ普通のGraphQL Serverとして動くようになっている
subgraph-locationsで
pnpm install
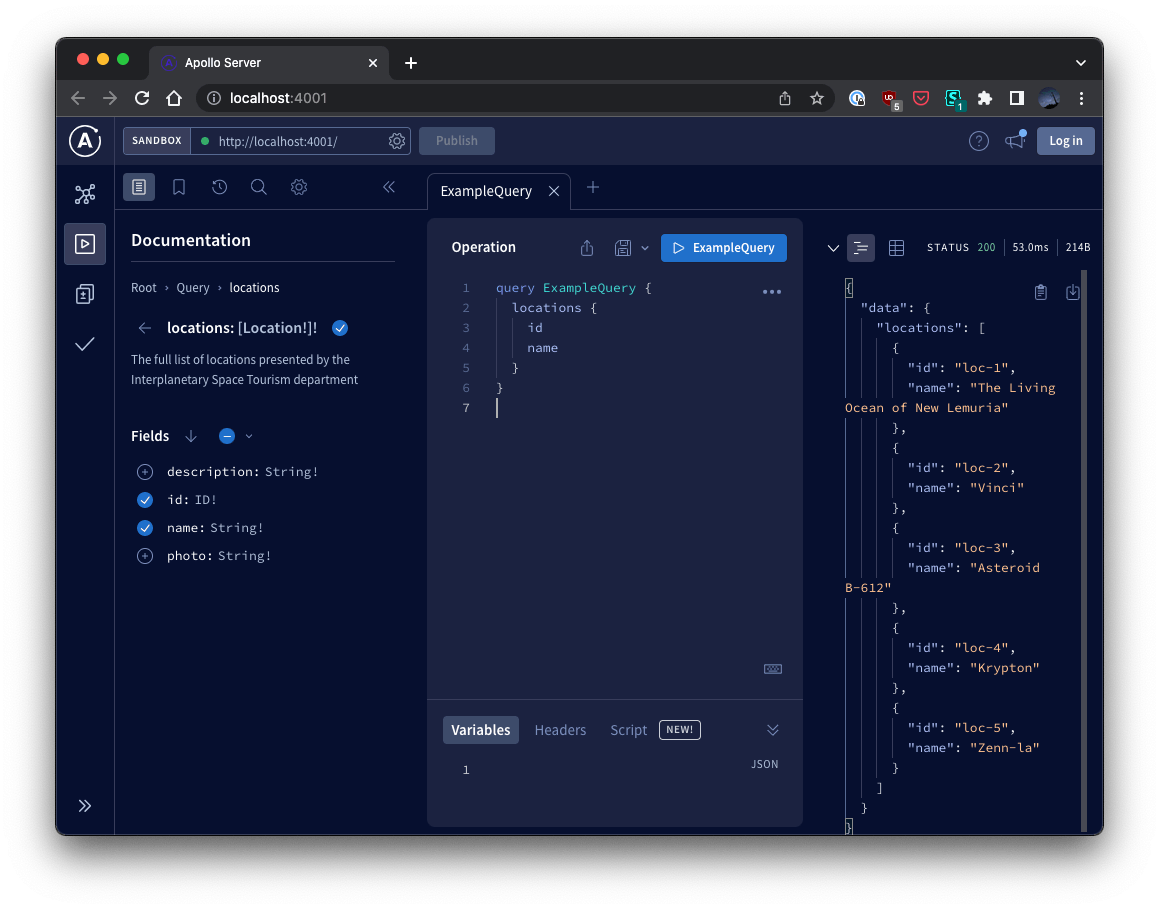
して http://localhost:4001/ にアクセスするとApollo Sandboxでクエリが通ることを確認できる
subgraph-reviewsも同様
subgraphとして振る舞うために、Subgraph Serverに作り変えていく
具体的には、Apollo Federation 2の定義をスキーマの先頭に追加する
+ extend schema
+   @link(url: "https://specs.apollo.dev/federation/v2.0", import: ["@key"])
+
  type Query {
    "The full list of locations presented by the Interplanetary Space Tourism department"
    locations: [Location!]!
    "The details of a specific location"
    location(id: ID!): Location
  }
@apollo/subgraphパッケージを追加する
pnpm add @apollo/subgraph
Apollo Serverの起動時に渡すschemaをbuildSubgraphSchemaでラップする
const { buildSubgraphSchema } = require('@apollo/subgraph');

// ...

async function startApolloServer() {
  const server = new ApolloServer({
    schema: buildSubgraphSchema({ typeDefs, resolvers }),
  });

// ...
起動してみるとApollo Sandboxから普通にGraphQL Serverとして動いているのが確認できる

FieldsにsubgraphのSDLを取得するための_serviceが追加されている
subgraph-reviewsも同様にスキーマとServerのコードを修正する
Managed federation
- スキーマをApollo schema registryで管理する前提
- まずApollo Studioでsupergraphを作る
- subgraphのスキーマをregistryにpublishする
- subgraphのスキーマが更新されるとsupergraphのスキーマが自動更新される
- Apollo Uplinkから利用可能
- Uplink ... 最新のスキーマを配信するサーバとして動く機能
- routerはApollo Uplinkをpollingしてスキーマを最新化

✍️ Publishing the subgraphs with Rover
- Apollo Studioにsubgraphをpublishする
- 現在(2023-02-21時点)のApollo StudioにはSupergraphsタブがあってここからsubgraphを登録するとsupergraphが作成されるUIになっている
- Apollo Odysseyの手順は古いバージョンに対するものなので、再現する場合はApollo Studioを開いたときに小さい字で表示されている
Coming from Apllo Oddysey, ...のリンク(キャプチャ参照)からClassic Graphsタブに遷移してsubgraphを追加する
- Apollo Odysseyの手順は古いバージョンに対するものなので、再現する場合はApollo Studioを開いたときに小さい字で表示されている

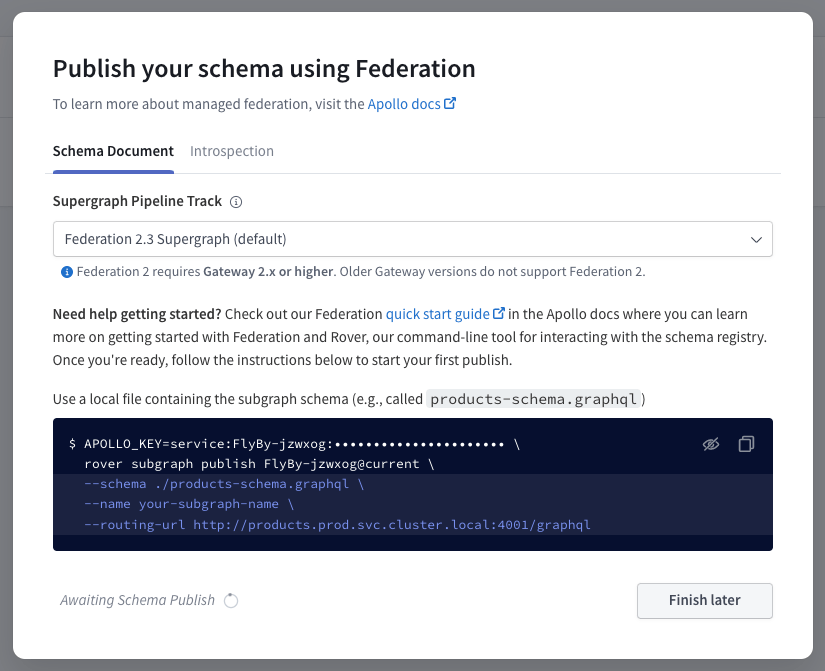
supergraphを作るとAPOLLO_KEYが生成されるのでrouter/.envを作成して追加する
その下のrover ...末尾にあるグラフ名もAPOLLO_GRAPH_REFとして追加
APOLLO_KEY=service:FlyBy-jzwxog:••••••••••••••••••••••
APOLLO_GRAPH_REF=FlyBy-jzwxog@current
✍️ Rover CLIを使ってsubgraphをpublishする
インストール
curl -sSL https://rover.apollo.dev/nix/latest | sh
fishを使っているのでfish_add_pathでPATHに追加
fish_add_path ~/.rover/bin
rover --version
Rover 0.12.1
認証する
API Keyを聞かれるので.envにAPOLLO_KEY=で指定した値をペーストする
rover config auth
Go to https://studio.apollographql.com/user-settings/api-keys and create a new Personal API Key.
Copy the key and paste it into the prompt below.
>
Successfully saved API key.
プロジェクトのルートへ移動して、supergraphの名前(.envにAPOLLO_GRAPH_REFで指定した値)を指定してsubgraphをpublishする
rover subgraph publish FlyBy-jzwxog@current \
      --name locations \
      --schema ./subgraph-locations/locations.graphql \
      --routing-url http://localhost:4001

できた
subgraph-reviewsもやる
rover subgraph publish FlyBy-jzwxog@current \
      --name reviews \
      --schema ./subgraph-reviews/reviews.graphql \
      --routing-url http://localhost:4002
supergraphのスキーマが生成されている

ディレクティブまみれで手書きは無理だなという内容
type Query @join__type(graph: LOCATIONS) @join__type(graph: REVIEWS) {
  """
  The full list of locations presented by the Interplanetary Space Tourism department
  """
  locations: [Location!]! @join__field(graph: LOCATIONS)

  """
  The details of a specific location
  """
  location(id: ID!): Location @join__field(graph: LOCATIONS)

  """
  The three latest reviews submitted for FlyBy's locations
  """
  latestReviews: [Review!]! @join__field(graph: REVIEWS)
}
✍️ routerを動かす
routerはRustで書かれた別のバイナリを使う(パフォーマンスのためっぽい?)
routerディレクトリへ移動してrouterのバイナリをダウンロード
curl -sSL https://router.apollo.dev/download/nix/latest | sh
APOLLO_KEYとAPOLLO_GRAPH_REFを指定してrouterを起動
APOLLO_KEY=service:FlyBy-jzwxog:•••••••••••••••••••••• APOLLO_GRAPH_REF=FlyBy-jzwxog@current ./router
2023-02-21T11:58:35.893452Z  INFO Apollo Router v1.10.3 // (c) Apollo Graph, Inc. // Licensed as ELv2 (https://go.apollo.dev/elv2)
2023-02-21T11:58:35.893627Z  INFO Anonymous usage data is gathered to inform Apollo product development.  See https://go.apollo.dev/o/privacy for details.
2023-02-21T11:58:37.011177Z  INFO Apollo Studio usage reporting is enabled. See https://go.apollo.dev/o/data for details
2023-02-21T11:58:39.155477Z  INFO Health check endpoint exposed at http://127.0.0.1:8088/health
2023-02-21T11:58:39.159479Z  INFO GraphQL endpoint exposed at http://127.0.0.1:4000/ 🚀
✍️ routerをApollo Studioと連携させる
Connection Settings

http://127.0.0.1:4000/を設定してSave

Explorerからクエリを実行したらエラー
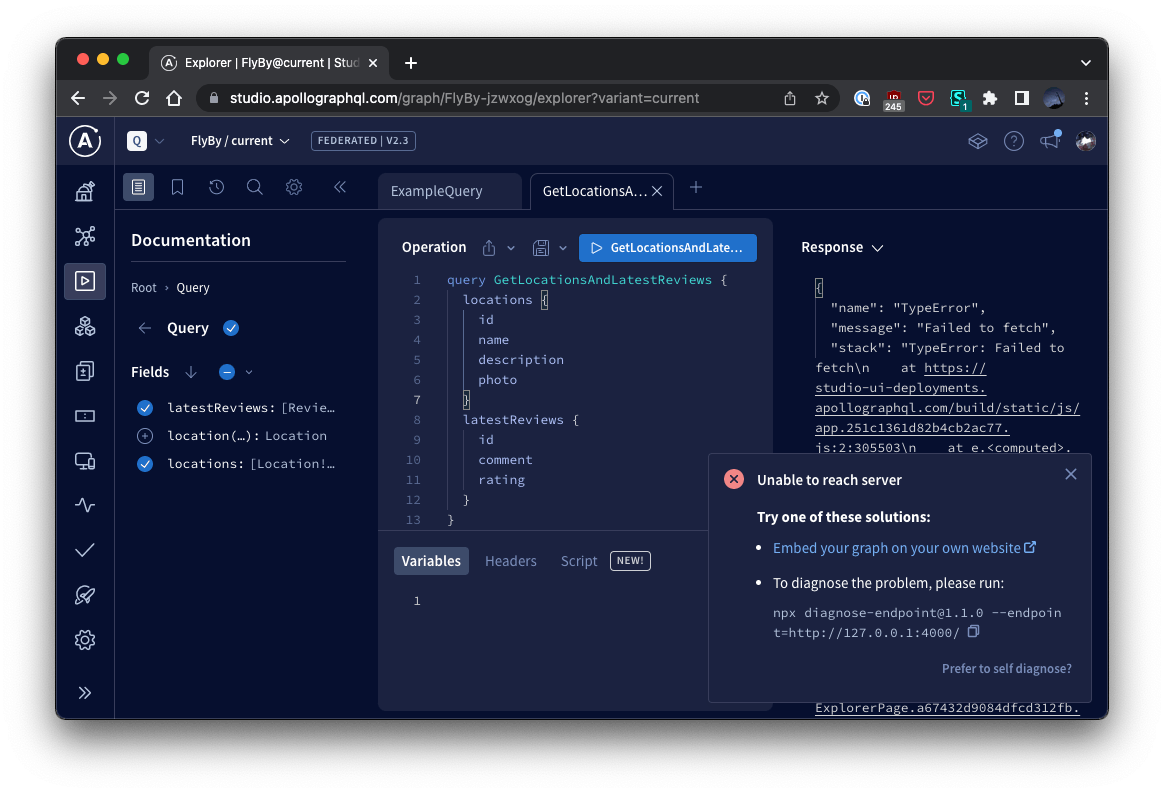
指示に従ってdiagnose-endpointしてみたらIntrospectionが通らないと言われたがここまでの手順でそこの設定はなかったはず...
npx diagnose-endpoint@1.1.0 --endpoint=http://127.0.0.1:4000/
Need to install the following packages:
  diagnose-endpoint@1.1.0
Ok to proceed? (y) y
Diagnosing http://127.0.0.1:4000/
⚠️  Introspection query received a response of {"errors":[{"message":"introspection has been disabled","extensions":{"code":"INTROSPECTION_DISABLED"}}]}. Does introspection need to be turned on?
✍️ entityを使ってフィールド単位でsubgraphを混在させる
この部分、Reviewsからlocationを解決できるようにする
https://www.apollographql.com/tutorials/voyage-part1/09-connecting-data-using-entities

Locationをobjectからentityに変える
entityには以下の定義が必要
- primary key
- reference resolver
Location.idがprimary keyなので(そういう設計である前提)、@keyディレクティブでfields属性にidを指定することでentityを定義する
- type Location {
+ type Location @key(fields: "id") {
    id: ID!
    "The name of the location"
    name: String!
    "A short description about the location"
    description: String!
    "The location's main photo as a URL"
    photo: String!
  }
Apollo Sandboxで見ると_entitiesが生えている

スキーマを変更したのでlocationssubgraphをpublishする
rover subgraph publish FlyBy-jzwxog@current \
      --name locations \
      --schema ./subgraph-locations/locations.graphql \
      --routing-url http://localhost:4001
reviews subgraph側からLocation entityを参照したいので、subgraph-reviews/reviews.graphqlにentityの定義を追加する
+ type Location @key(fields: "id", resolvable: false) {
+   id: ID!
+ }
publishする
rover subgraph publish FlyBy-jzwxog@current \
      --name reviews \
      --schema ./subgraph-reviews/reviews.graphql \
      --routing-url http://localhost:4002
✍️ reviews subgraphからLocationを解決できるようにする
Reviewにlocationを追加する
  type Review {
    id: ID!
    "Written text"
    comment: String
    "A number from 1 - 5 with 1 being lowest and 5 being highest"
    rating: Int
+   "The location the review is about"
+   location: Location
  }
Resolverの実装
  Review: {
    location: ({ locationId }) => {
      return { id: locationId };
    },
  },
publishする
rover subgraph publish FlyBy-jzwxog@current \
      --name reviews \
      --schema ./subgraph-reviews/reviews.graphql \
      --routing-url http://localhost:4002
locations subgraph側に__resolverReference Resolverを実装する
  Location: {
    __resolveReference: ({ id }, { dataSources }) => {
      return dataSources.locationsAPI.getLocation(id);
    },
  },
動いた

✍️ Locationにreviews subgraphを参照するフィールドを追加する
-
overallRating、reviewsForLocationを追加する -
locationssubgraph側ではなく、reviews側でLocationを拡張するような形- routerによってマージされる
https://www.apollographql.com/tutorials/voyage-part1/13-contributing-to-an-entity

これらはreviews subgraph側でLocationのフィールドとしてResolverを実装する必要があるため、resolvable: falseを取り除いてフィールドを追加する
type Location @key(fields: "id") {
  id: ID!
  "The calculated overall rating based on all reviews"
  overallRating: Float
  "All submitted reviews about this location"
  reviewsForLocation: [Review]!
}
Resolverの実装
  Location: {
    overallRating: ({id}, _, {dataSources}) => {
      return dataSources.reviewsAPI.getOverallRatingForLocation(id);
    },
    reviewsForLocation: ({id}, _, {dataSources}) => {
      return dataSources.reviewsAPI.getReviewsForLocation(id);
    },
  },
publishしてrouterからクエリの実行結果を確認する
rover subgraph publish FlyBy-jzwxog@current \
      --name reviews \
      --schema ./subgraph-reviews/reviews.graphql \
      --routing-url http://localhost:4002

動いた
✍️ フロントエンド
clientディレクトリへ移動してパッケージをインストール
npm install
起動
pnpm start
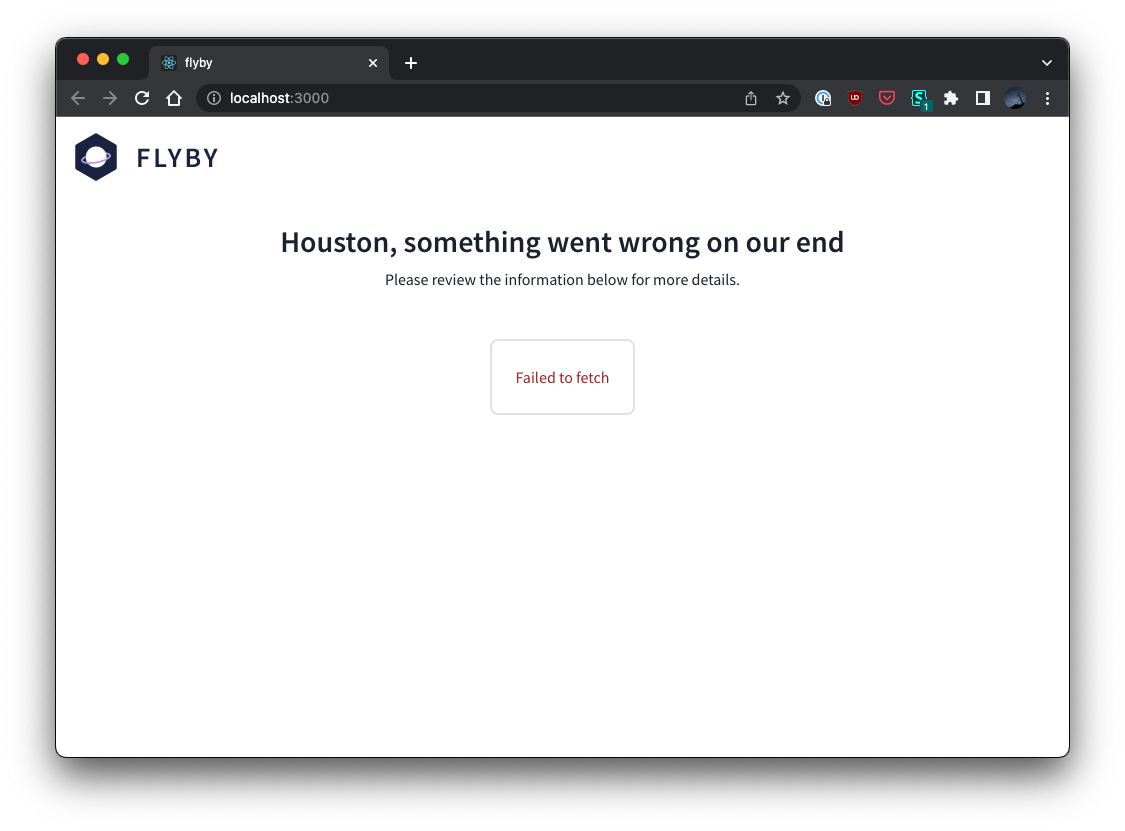
http://localhost:3000 でフロントエンドサーバが起動する
originが異なるのでrouter側でCORSを設定しないといけない
✍️ routerにCORSの設定を追加する
routerディレクトリにconfig.yamlを追加してCORSの設定を行う
cors:
  origins:
    - http://localhost:3000
    - https://studio.apollographql.com
--configオプションを追加してrouterを起動する
APOLLO_KEY=service:FlyBy-jzwxog:•••••••••••••••••••••• \
APOLLO_GRAPH_REF=FlyBy-jzwxog@current \
./router --dev --config config.yaml

動いた めでたしめでたし 🎉