JavaScriptライブラリ・CSSフレームワークを使ったWebアプリを制作する
「JavaScriptライブラリ・CSSフレームワークを使ったWebアプリを制作」する。何を作ろうかな。
とりあえず作る過程と思考を書き込んでいく。
とりあえず講習の中で作りかけていたものを応用していこうかな。
DisneyAPIの情報はとれてるんだよなぁ。
ボタンを押す度にキャラクターが切り替わるようにする。
見た目、レイアウトも変える。
見やすいようにする。
とりあえず11/1 15:30時点のHTMLを残しておく。
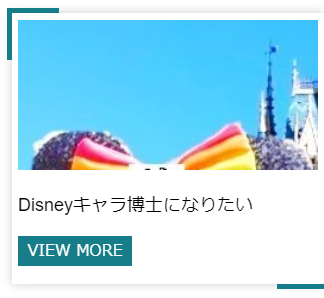
画像は自分のTwitterアイコン
<html>
  <head>
    <meta charset="UTF-8">
    <title>私の自己紹介!</title>
    <script src="https://cdn.jsdelivr.net/npm/axios/dist/axios.min.js"></script>
  </head>
  <body>
    <div class="container">
      <div class="container-card">
        <div class="container-card-img">
          <img id="mypict" src="https://pbs.twimg.com/profile_images/1449922726873894914/KAjEXFI_.jpg" alt="me">
        </div>
        <h1 id="myname">kk_puruzera</h1>
        <p id="bio">Disneyキャラ博士になりたい</p>
        <a href="#">VIEW MORE</a>
        <span></span>
      </div>
    </div>
  </body>
</html>
とりあえず11/1 15:30時点のCSSを残しておく。
.container {
  width: 100%;
  height: 100vh;
  display: flex;
  justify-content: center;
  align-items: center;
    &-card {
      position: relative;
      width: 300px;
      background: white;
      padding: .4em;
      display: flex;
      flex-direction: column;
      align-items: flex-start;
      box-shadow: 0 0 10px rgba(0,0,0,.2);
      &:hover {
        &:before {
          width: 100px;
        }
        &:after {
          height: 100px;
        }
        span {
          background: none;
          &:before {
            height: 100px;
          }
          &:after {
            width: 100px;
          }
        }

      }
      &:before {
        content: '';
        position: absolute;
        top: -5px;
        left: -5px;
        width: 50px;
        height: 5px;
        background: #177E89;
        transition: all .3s ease;
      }
      &:after {
        content: '';
        position: absolute;
        top: -5px;
        left: -5px;
        width: 5px;
        height: 50px;
        background: #177E89;
        transition: all .3s ease;
      }
      &-img {
        width: 100%;
        height: 150px;
        img {
          width: 100%;
          height: 100%;
          object-fit: cover;
        }
      }
      h1 {
        margin: .4em 0;
        font-size: 21px;
        font-family: arial;
      }
      p {
        font-size: 18px;
        margin: .5em 0;
        font-family: arial;
      }
      a {
        background: #177E89;
        color: white;
        text-decoration: none;
        padding: .4em .6em;
        margin: .7em 0;
      }
      span {
        position: absolute;
        width: 100%;
        height: 100%;
        top: 0;
        left: 0;
        &:before {
          content: '';
          position: absolute;
          bottom: -5px;
          right: -5px;
          width: 5px;
          height: 50px;
          background: #177E89;
          transition: all .3s ease;
        }
        &:after {
          content: '';
          position: absolute;
          bottom: -5px;
          right: -5px;
          width: 50px;
          height: 5px;
          background: #177E89;
          transition: all .3s ease;
        }
      }
   }
}
とりあえず11/1 15:30時点のJavaScriptを残しておく。
APIのdataを取得できている。
// HTMLの要素(画像などの外部リソース除く)がすべて読み込まれたら以下の中身が実行される
window.addEventListener('DOMContentLoaded', async function() {
console.log('DOMの構築が完了しました');
let response;
try {
//キャラクターの種類
const chara_count = 7450;
//乱数(0以上1未満の小数)* 種類数 をして小数以下切り捨て
const index = Math.floor(Math.random() * chara_count);
// axiosでAPIを叩く
response = await axios.get('https://api.disneyapi.dev/characters/' + index);
// 取得できたデータをログに表示
console.log(response.data.name);
// 「name」を名前をセット
document.getElementById('myname').innerHTML = '';
ityped.init( `#myname`, {
// 表示させたい文字を配列で用意する
strings: [ `${response.data.name} です`, 'よろしくね!' ],
// アニメーションをループさせる
loop: true
});
;
// 自己紹介文をセット
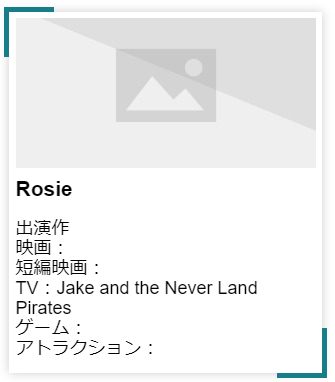
document.getElementById('bio').innerHTML = `
出演作<br>
映画:${response.data.films}<br>
短編映画:${response.data.shortFilms}<br>
TV:${response.data.tvShows}<br>
ゲーム:${response.data.videoGames}<br>
アトラクション:${response.data.parkAttractions}<br>
`;
// 画像
document.getElementById('mypict').src = `${response.data.imageUrl}`;
} catch {
// try内でなんらかのエラーがあったとき
console.error('エラー:', error);
}
})
キャラクー名はタイプライターのように表示されなくていいな。
成果物に関係ないけど。CodePenのレイアウト変更用。
赤丸のところで変更できた。
良い感じにデータが表示できた!
が、画像がでないなぁ。なぜかなぁ。
タイプライター式で表示するのはなくした。
// HTMLの要素(画像などの外部リソース除く)がすべて読み込まれたら以下の中身が実行される
window.addEventListener('DOMContentLoaded', async function() {
  console.log('DOMの構築が完了しました');
  let response;
    //キャラクターの種類
    const chara_count = 7450;
    //乱数(0以上1未満の小数)* 種類数 をして小数以下切り捨て
    const index = Math.floor(Math.random() * chara_count);
    // axiosでAPIを叩く
    response = await axios.get('https://api.disneyapi.dev/characters/' + index);
    // 取得できたデータをログに表示
    console.log(response.data.name);
    // 「name」をセット
    document.getElementById('myname').innerHTML =`
    ${response.data.name}`;
    // 自己紹介文をセット
    document.getElementById('bio').innerHTML = `
      出演作<br>
      映画:${response.data.films}<br>
      短編映画:${response.data.shortFilms}<br>
      TV:${response.data.tvShows}<br>
      ゲーム:${response.data.videoGames}<br>
      アトラクション:${response.data.parkAttractions}<br>
    `;
    // 画像
    document.getElementById('mypict').src = `${response.data.imageUrl}`;
  }
)
「VIEW MORE」いらないので消した。
<span></span>が不要そうに見えたが、削除すると下の緑ラインが消えるので残す。
間に何も記載されていないから削除しても問題なさそうなのにな。
参考 → https://html-coding.co.jp/annex/dictionary/html/span/
<html>
  <head>
    <meta charset="UTF-8">
    <title>私の自己紹介!</title>
    <script src="https://cdn.jsdelivr.net/npm/axios/dist/axios.min.js"></script>
  </head>
  <body>
    <div class="container">
      <div class="container-card">
        <div class="container-card-img">
          <img id="mypict" src="https://pbs.twimg.com/profile_images/1449922726873894914/KAjEXFI_.jpg" alt="me">
        </div>
        <h1 id="myname">kk_puruzera</h1>
        <p id="bio">Disneyキャラ博士になりたい</p>
        <span></span>
      </div>
    </div>
  </body>
</html>
画像がとれぬ。なぜだ。
DisneyAPI
APIから画像のURLは取得できてるんだよな・・・
(誰だよ)
試しに画像URLの後ろに.jpgつけてみたけど意味なかった。
画像が取れない原因がわかったかもしれない。
imageUrl: "https://static.wikia.nocookie.net/disney/images/6/61/Olu_main.png/revision/latest?cb=20200630025227
の.pngから後ろがいらないのかも。
さて、どうしうようかな。
画像取得できた!やはり.pngから後ろの文字列がいらなかったみたい。
取得した画像URL文字列のどこに.pngが含まれているか計算して、文字列の切り取りをする。
で解決。よかった!
// HTMLの要素(画像などの外部リソース除く)がすべて読み込まれたら以下の中身が実行される
window.addEventListener('DOMContentLoaded', async function() {
  console.log('DOMの構築が完了しました')
  //キャラクターの種類
  const chara_count = 7450;
  //乱数(0以上1未満の小数)* 種類数 をして小数以下切り捨て
  const index = Math.floor(Math.random() * chara_count);
  // axiosでAPIを叩く
  let response;
  response = await axios.get('https://api.disneyapi.dev/characters/' + index);
  // 取得できたデータをログに表示
  console.log(response.data.name);

  // 「name」をセット
  document.getElementById('myname').innerHTML =`${response.data.name}`;
  // 自己紹介文をセット
  document.getElementById('bio').innerHTML = `
    出演作<br>
    映画:${response.data.films}<br>
    短編映画:${response.data.shortFilms}<br>
    TV:${response.data.tvShows}<br>
    ゲーム:${response.data.videoGames}<br>
    アトラクション:${response.data.parkAttractions}<br>`;
    // 画像
    var str = response.data.imageUrl;
    var result = str.indexOf('.png') + 4;
    var result1 = str.substr(0, result);
    document.getElementById('mypict').src = `${result1}`;
  }
);
結果。
しかしやりたいことの四分の一も進んでおらん。時間かかりすぎー!!

次はボタンを押したら新しいキャラクーを取得するようにする。
取得した画像が切れるので、CSSの&-imgのサイズ部分をすべて「100%」に変更。
思った通り!この文字列操作でいけそう!
// HTMLの要素(画像などの外部リソース除く)がすべて読み込まれたら以下の中身が実行される
window.addEventListener('DOMContentLoaded', async function() {
  console.log('DOMの構築が完了しました')
  //キャラクターの種類
  const chara_count = 7450;
  //乱数(0以上1未満の小数)* 種類数 をして小数以下切り捨て
  const index = Math.floor(Math.random() * chara_count);
  // axiosでAPIを叩く
  let response;
  response = await axios.get('https://api.disneyapi.dev/characters/' + index);
  // 取得できたデータをログに表示
  console.log(response.data.name);

  // 「name」をセット
  document.getElementById('myname').innerHTML =`${response.data.name}`;
  // 自己紹介文をセット
  document.getElementById('bio').innerHTML = `
    出演作<br>
    映画:${response.data.films}<br>
    短編映画:${response.data.shortFilms}<br>
    TV:${response.data.tvShows}<br>
    ゲーム:${response.data.videoGames}<br>
    アトラクション:${response.data.parkAttractions}<br>`;
    // 画像
    var str = response.data.imageUrl;
    var result = str.length - 34;
    var result1 = str.substr(0, result);
    console.log(result1);
    document.getElementById('mypict').src = `${result1}`;
  }
);
後ろの文字数直書きがいただけないけど、いったんこれでよしとする!
ぐぬぬぬ。うまくいかん。awaitはasyncの直下にいないといけないようだ。
ボタンを押したときに値を再取得、と思ったけど、ページの更新でよいのではないか?
以下を参考に実装してみる。
このやり方ではCodePen上ではエラーになる。なぜなのか。CodePen上だから?
いっそボタンでの再取得は後回しにして見た目整えるのとを先にやろうか。
このままでは特に面白みのないものになってしまう。
本日の最終の状況
HTML
<html>
  <head>
    <meta charset="UTF-8">
    <meta name="viewport" content="width=device-width, initial-scale=1">
    <title>ディズニーキャラクター</title>
    <script src="https://cdn.jsdelivr.net/npm/axios/dist/axios.min.js"></script>
    <script src="https://cdn.jsdelivr.net/npm/vue/dist/vue.js"></script>
    <link rel="stylesheet" href="vue.css">
  </head>
  <body>
    <div id="app">
          <button v-on:click="change">キャラクター取得</button><br>
          </div>
      <div class="container">
        <div class="container-card">
          <div class="container-card-img">
            <img id="mypict" src="https://pbs.twimg.com/profile_images/1449922726873894914/KAjEXFI_.jpg" alt="me">
          </div>
          <h1 id="myname">kk_puruzera</h1>
          <p id="bio">Disneyキャラ博士になりたい</p>
          <span></span>
        </div>
      </div>
  </body>
</html>
CSS
.container {
  width: 100%;
  height: 100vh;
  display: flex;
  justify-content: center;
  align-items: center;
    &-card {
      position: relative;
      width: 300px;
      background: white;
      padding: .4em;
      display: flex;
      flex-direction: column;
      align-items: flex-start;
      box-shadow: 0 0 10px rgba(0,0,0,.2);
      &:hover {
        &:before {
          width: 100px;
        }
        &:after {
          height: 100px;
        }
        span {
          background: none;
          &:before {
            height: 100px;
          }
          &:after {
            width: 100px;
          }
        }

      }
      &:before {
        content: '';
        position: absolute;
        top: -5px;
        left: -5px;
        width: 50px;
        height: 5px;
        background: #177E89;
        transition: all .3s ease;
      }
      &:after {
        content: '';
        position: absolute;
        top: -5px;
        left: -5px;
        width: 5px;
        height: 50px;
        background: #177E89;
        transition: all .3s ease;
      }
      &-img {
        width: 100%;
        height: 100%;
        img {
          width: 100%;
          height: 100%;
          object-fit: cover;
        }
      }
      h1 {
        margin: .4em 0;
        font-size: 21px;
        font-family: arial;
      }
      p {
        font-size: 18px;
        margin: .5em 0;
        font-family: arial;
      }
      a {
        background: #177E89;
        color: white;
        text-decoration: none;
        padding: .4em .6em;
        margin: .7em 0;
      }
      span {
        position: absolute;
        width: 100%;
        height: 100%;
        top: 0;
        left: 0;
        &:before {
          content: '';
          position: absolute;
          bottom: -5px;
          right: -5px;
          width: 5px;
          height: 50px;
          background: #177E89;
          transition: all .3s ease;
        }
        &:after {
          content: '';
          position: absolute;
          bottom: -5px;
          right: -5px;
          width: 50px;
          height: 5px;
          background: #177E89;
          transition: all .3s ease;
        }
      }
   }
}
JavaScript
const app = new Vue({
  el: '#app', // Vueが管理する一番外側のDOM要素
  data: {},
  methods: {
    // 関数はここ
    change: function() {
      console.log('チェンジ');
      // ページをリロード
      location.reload();
      console.log('チェンジ完了');
    },
  },
});

// HTMLの要素(画像などの外部リソース除く)がすべて読み込まれたら以下の中身が実行される
window.addEventListener('DOMContentLoaded', async function() {
  console.log('DOMの構築が完了しました');
  //キャラクターの種類
  const chara_count = 7450;
  //乱数(0以上1未満の小数)* 種類数 をして小数以下切り捨て
  const index = Math.floor(Math.random() * chara_count);
  // axiosでAPIを叩く
  let response;
  response = await axios.get('https://api.disneyapi.dev/characters/' + index);
  // 取得できたデータをログに表示
  console.log(response.data.name);

  // 「name」をセット
  document.getElementById('myname').innerHTML =`${response.data.name}`;
  // 自己紹介文をセット
  document.getElementById('bio').innerHTML = `
    出演作<br>
    映画:${response.data.films}<br>
    短編映画:${response.data.shortFilms}<br>
    TV:${response.data.tvShows}<br>
    ゲーム:${response.data.videoGames}<br>
    アトラクション:${response.data.parkAttractions}<br>`;
    // 画像
    var str = response.data.imageUrl;
    var result = str.length - 34;
    var result1 = str.substr(0, result);
    console.log(result1);
    document.getElementById('mypict').src = `${result1}`;
  }
);
キャラクターをランダムに取得。
ボタンで再取得。
覚えたキャラクターはストック。
ストックはキャラ名のみ。
ストックの画像はURLの記載のみにする。
キャラクター表示画面とストック画面は分けたい。
ストックするキャラクターは選べるようにしたい。
詰め込みすぎかもなので進捗具合によって優先順位かえる。
なお現時点でゴールは不透明。
インスタ風にして取得したものがどんどん下にたまっていくのもありかも
よいpenを見つけた。けど、応用のさせかたがわからない・・・。
このレイアウトもいいなぁ。テキスト見えてたほうがいいような気もする。
解析できなかったのでこちらに変更。
コードがシンプルで読みやすい!
ユーザー名の横に『PRO』ってついてる人のは良いものなのかも。
なぜかできない。もっとシンプルでわかりやすいpenを今から探すか・・・
いちから自分で作るか・・・。
結局このpenを使うことに。
シンプルが一番。
JSはエラーが出ないが、やはり画像が取得できない。
本日時点のコードを残しておく。
HTML
<head>
	<script src="https://cdn.jsdelivr.net/npm/axios/dist/axios.min.js"></script>
</head>
<div style='opacity: 0;' id='imageHover'>
<div class="image-hover-container">
	<div class='container'>
		<div class='middle'>
			<div class='bg-image lake-district'></div>
			<a id="url" href='https://disney.fandom.com/wiki/The_Disney_Wiki'  target="_blank" class='overlay'>
				<h1 id="name">kk_puruzera</h1>
				<p id="bio">Lake District</p>
				<p class='mobile-link'>Read More</p>
			</a>
		</div>
		<div class='bottom-right'>
			<div class='bg-image lake-district'></div>
		</div>
		<div class='bottom-left'>
			<div class='bg-image lake-district'></div>
		</div>

		<div class='top-left'>
			<div class='bg-image lake-district'></div>
		</div>
		<div class='top-right'>
			<div class='bg-image lake-district'></div>
		</div>
	</div>
</div>
</div>


<div class='loading-container' id='loadingScreen'>
	<div id="loading"></div>
</div>
CSS
@import url('https://fonts.googleapis.com/css2?family=Manrope:wght@300&family=Open+Sans&family=Roboto:wght@300&display=swap');


.image-hover-container {
	position: relative;
	height: 100vh;
	width: 100%;
	display: flex;
	.container {
		position: relative;
		height: 430px;
		width: 310px;
		margin: auto;
		display: -webkit-box;
		&:hover {
			> .bottom-right {
				top: 55%;
				left: 80%;
				box-shadow: 0px 37px 29px rgba(0, 0, 0, 0.3);
				width: 350px;
			}
			> .middle {
				height: 100%;
				left: 5%;
				top: 5%;
				width: 100%;
				box-shadow: 0px 23px 33px rgba(0, 0, 0, 0.34);
				.overlay {
					opacity: 1;
					z-index: 2;
					p:nth-child(1) {
						padding-top: 0;
					}
				}
			}
			> .top-left {
				left: -70px;
				top: -90px;
				width: 150px;
				box-shadow: 0px 37px 29px rgba(0, 0, 0, 0.3);
			}
			> .top-right {
				 left: 250px;
				 top: -90px;
				 width: 260px;
				 height: 280px;
				box-shadow: 0px 37px 29px rgba(0, 0, 0, 0.3);
			}
			> .bottom-left {
				left: -89%;
				top: 65%;
				width: 360px;
				box-shadow: 0px 37px 29px rgba(0, 0, 0, 0.3);
			}

		}
		.lancaster {
			background: url(https://static.wikia.nocookie.net/disney/images/b/bf/Mickey_Mouse_Disney_1.png) no-repeat;

		}
		.lake-district {
			background: url(https://static.wikia.nocookie.net/disney/images/b/bf/Mickey_Mouse_Disney_1.png) no-repeat;
		}
		.bg-image {
			background-size: cover;
			background-attachment: fixed;
			background-position: 10% 10%;
		}
		.middle {
			transition: 500ms all;
			 transition-delay: 0.25s;
			transition-timing-function: cubic-bezier(.17,.67,.33,.97);
			position: relative;
			margin: auto;
			height: 100%;
			width: 100%;

			margin: 0px;
			left: 0;
			top: 0;
			box-shadow: 0px 17px 23px rgba(0, 0, 0, 0.34);
			.bg-image {
				height: 100%;
				width: 100%;
			}
			.overlay {
				position: absolute;
				top: 0;
				left: 0;
				height: 100%;
				width: 100%;
				z-index: 9;
				background: rgba(67, 27, 12, 0.75);
				display: flex;
				flex-direction: column;
				transition: 300ms all;
			 transition-delay: 0.37s;
				opacity: 0;
				text-decoration: none;
				z-index: -1;
				h1 {
					position: relative;
					margin: auto;
					color: #fff;
				}
				p {
					position: relative;
					margin: auto;
					color: #fff;
					font-family: 'Roboto', sans-serif;
					font-size: 1.1em;
					opacity: 0.8;
					&:nth-child(1) {
						margin-bottom: 4px !important;
						padding-top: 30px;
						transition: all 400ms;
						transition-delay: 0.3s;
					}
					&:nth-child(2) {
						margin-top: 4px !important;
					}

				}
				.mobile-link {
					display: none;
				}
			}
		}
		.bottom-right {
			transition: 800ms all;
			transition-delay: 0.15s;
			transition-timing-function: cubic-bezier(.17,.67,.33,.97);
			position: absolute;
			left: 0%;
			top: 48%;
			width: 100%;
			box-shadow: 0px 37px 29px rgba(0, 0, 0, 0);
			z-index: 1;
			.bg-image {
				height: 220px;
				width: 100%;
			}
		}
		.bottom-left {
			transition: 800ms all;
			transition-delay: 0.17s;
			transition-timing-function: cubic-bezier(.17,.67,.33,.97);
			position: absolute;
			left: 0%;
			top: 48%;
			width: 100%;
			z-index: 1;
			.bg-image {
				height: 220px;
				width: 100%;
			}
		}

		.top-left {
			transition-timing-function: cubic-bezier(.17,.67,.33,.97);
			transition: 600ms all;
			transition-delay: 0.19s;
			position: absolute;
			left: 0%;
			top: 0%;
			width: 150px;
			z-index: 1;
			.bg-image {
				height: 220px;
				width: 100%;
			}


		}
		.top-right {
			transition: 500ms all;
			transition-delay: 0.08s;
			position: absolute;
			left: 0%;
			top: 0%;
			width: 300px;
			height: 260px;
			z-index: 1;
			transition-timing-function: cubic-bezier(.17,.67,.33,.97);
			.bg-image {
				 float: right;
				 height: 100%;
				 width: 100%;
			}
		}
	}
}

@media (max-width: 100%) {
	.image-hover-container {
		transform: scale(.8) translateX(0px);
		overflow: hidden;
		.overlay {
			p:nth-child(1) {
				 margin-top: 125px;
			}
			p:nth-child(2) {
				margin-bottom: 30px !important;
			}
			.mobile-link {
				display: block !important;
				margin-top: 0px !important;
			}
		}
		.bottom-right, .bottom-left, .top-left, .top-right {
			box-shadow: 0px 0px 0px !important;
		}
	}
}
@media (max-width: 100%) {
	.bottom-right, .bottom-left, .top-left, .top-right {
		display: none !important;
	}
}

// Loading Screen - Taken from Pulsing Balls by Renato Ribeiro
// https://codepen.io/renatorib/pen/JBdkH
.loading-container {
	position: fixed;
	height: 100vh;
	width: 100%;
	left: 0;
	top: 0;
	background: #fff;
	transition: 600ms all;
	#loading {
	  margin: 0 auto;
	  width: 70px;
	  height: 70px;
		background: rgba(67, 27, 12, 0.75);
	  border-radius: 50%;
	  animation: boing .8s linear infinite;
	  position: relative;
	  top: calc(50% - 35px);
	  &:before {
		 content: '';
		 position: absolute;
		 left: calc(50% - 30px);
		 top: calc(50% - 30px);
		 display: block;
		 width: 60px;
		 height: 60px;
		 border-radius: 50%;
		background: rgba(255, 255, 255, 1);
		  animation: boing-inner .8s linear infinite;
	  }
	}
	@keyframes boing {
	  0% { transform: scale(1); }
	  25% { transform: scale(.75); }
	  100% { transform: scale(1); }
	}
	@keyframes boing-inner {
	  0% { transform: scale(1); }
	  25% { transform: scale(.6); }
	  100% { transform: scale(1); }
	}
}

JS

```js
// ロード画面
window.addEventListener("load", async function(){
	const chara_count = 7450;
	const index = Math.floor(Math.random() * chara_count);
	let response;
	response = await axios.get('https://api.disneyapi.dev/characters/' + index);

	document.getElementById('name').innerHTML =`${response.data.name}`;
	document.getElementById('bio').innerHTML = `
		出演作<br>
		映画:${response.data.films}<br>
		短編映画:${response.data.shortFilms}<br>
		TV:${response.data.tvShows}<br>
		ゲーム:${response.data.videoGames}<br>
		アトラクション:${response.data.parkAttractions}<br>`;

	document.getElementById('url').href =`${response.data.sourceUrl}`;

	var str = response.data.imageUrl;
	var result = str.length - 34;
	var result1 = str.substr(0, result);
	document.getElementById('imageHover').src = `${result1}`;

	let hoverImagesContainer = document.getElementById('imageHover');
	let loadingScreen = document.getElementById('loadingScreen');
	loadingScreen.style.opacity = '0';
	loadingScreen.style.zIndex = '-1';
	hoverImagesContainer.style.opacity = '1';
});
CodePen埋め込みできるのか!
お試し投稿
チーム画像取得できない問題を相談した。
以下の回答をもらって試したところ、画像は取得できたが思ったところに反映されない。
これはもうあきらめて画像は固定にしちゃったほうがいいのか。
午前中トライしてダメなら諦める。
JavaScriptの以下の行で画像URLをセットしていると思うのですが
document.getElementById('imageHover').src = ${result1};
imageHoverのIdが付与されたHTML要素がdivなのでsrc属性を持っていません。img要素などでsrc属性に指定してあげれば画像が表示されると思います。
もうわからんのであきらめる。
取得した画像は説明文と一緒に表示することにする。
クイズ感出すだめにバックグラウンドの画像いじる。
作った画像をGoogleドライブに入れて共有用にする。
ファイルなうもあったけど最終ダウンロードから30日~60日で消えてしまうらしいので、Googleでの共有に変更。
と思ったけどこれもうまくいかない。
むむむ。やはりファイルなうでいくか。
この記事読んだらつかめた
CSSのpositionの参考にした
こちらも参考になった。
Disneyフォントはここ。
仲間のCodePenもめっちゃ参考にさせてもらった!
みんなすごいなぁ・・・。
私は時間かけたくせに、なんだこれっていう・・・。
完成したー!
これでよいことにするー!!
一部修正したのでこっちを完成品にする!!
iPhoneでうまく表示されない、動作しないらしい。
なぜなんだろう・・・。