はじめに
この記事では、GitHubのプライベートリポジトリに保管したmarkdownファイルをResourcesとして提供する、リモートMCP(Model Context Protocol)サーバーを作ることを目標にします。
Resourcesについて
MCPでは以下の3つがcore primitivesとして定義されています。
- Tools
- Resources
- Prompts
一般にMCPと言ったとき、多くは「MCPサーバーのTools」を指す場合が多いですが、今回はResourcesに焦点を当てた内容になります。[1]
Resourcesは以下のように説明されています。
Data sources that provide contextual information to AI applications (e.g., file contents, database records, API responses)
本記事ではGitHubリポジトリに置かれたテキストファイルがData sourcesに相当します。
構成図
以下のような構成のリモートMCPサーバー(Resourcesのみ実装)を構築します。

図では認可フローは省いていますが、workers-oauth-providerを用いたGitHub OAuthアプリで行います。
環境
- MacBook Air M3
- macOS 15.5
- Cloudflare Paid
- Claude Code Max
- Claude Desktop Team
背景
なぜリモートMCPサーバーで作るのか、について少しだけ書いておきます。
AIのチーム内活用を進める中で中長期的に重要なのが、Knowledge[2]がチーム内で共有され、資産として積み増し/洗練されていく仕組みです。
具体的には、
- チームのコーディング規則
- 各言語、フレームワークごとのベストプラクティス
- 各組織に固有のドメイン知識
など、チームで共有されるコンテキストをaccessibleに集約し、育てやすくするか。
Knowledgeの置き方について、ユーザー・プロジェクトレベルでは、現下、Claude CodeなどのCLIエージェントに最適化される方向に進んでいるように見えます。つまり特定のプロジェクトに関するノウハウはCLAUDE.mdといった形でソースコードと合わせて管理し、より広いコンテキストは~/.claude/settings.jsonといったuserスコープとして管理する形です。
ここからさらにチーム、ひいては非開発者を含む組織全体にScopeを広げようとする時、知識の共有に関して、考慮すべき課題が出てきます。
- 複数人で編集・アクセスしやすいか(human friendly)
- チームで使われている/使われるであろう様々なエージェントからアクセスしやすいか (AI friendly)
これらに対する一つの選択肢として、GitHubリポジトリのコンテンツをリモートMCPサーバーで提供することにしました。
GitHubは、チームドキュメントの差分管理に最適化され、APIも充実しています。また、リモートMCPサーバーの認証・認可を考えた場合、OAuthプロバイダーであることも長所です。そのほかmarkdownに強いこと、公式でGitHub MCP Serverが提供されていること、などAIとの親和性も加点ポイントです。
提供方法としては、まずMCPに乗っかること。実装の効率化、特定のLLMベンダーへのロックインリスクの軽減が期待できます。MCPクライアントによってはResources用のUIを実装しているケースもあり、そこに乗っかれることも大きなメリットです。ツールやghコマンドでリソースを取得することも考えられるのですが、取得のために1ターン消費するのが不便です。
Claude DesktopではGUIでResourcesが選択/検索できる

Claude Codeでは@メンションでResourcesをファジー検索できる
次にMCPの提供法としてリモートMCPを選択するメリットは、チーム内での導入・アップデート等の保守の容易性です。たとえばClaude TeamではOrganization Connectorsとして管理者が設定するだけでチームへの導入が完了します。ユーザーはOAuthの認可フローを済ませれば使用できるようになります。

Claude TeamではOrganization Connectorsとして設定
ほかの手段として.dxtファイルとして配布できるDesktop Extensionsという仕組みもAnthropicから提唱されていますが、まだ十分には定着しておらず、筆者も実務で導入しましたが、ファイルの配布・更新の手数もそれなりにかかり、導入も意外に手間取る人が多かったです。
ちなみにClaude CodeではMCPのpromptsをカスタムスラッシュコマンドとして用いることもできます。
実装
実装には以下のCloudflareのデモをベースに用います。これでCloudflare Workers上にデプロイできる、GitHub OAuth入りのリモートMCPサーバーを構築できます。
デモのセットアップ
以下でプロジェクトセットアップができます。
$npm create cloudflare@latest -- <mcp server name> --template=cloudflare/ai/demos/remote-mcp-github-oauth
$cd <mcp server name>
$pnpm install
GitHub OAuthアプリの設定
以下のガイドにしたがってGitHub OAuthを構築します。
https://github.com/settings/developers よりOAuthアプリを構成します。
-
Homepage URLには
http://localhost:8788(local) /https://<your-worker-name>.<your-subdomain>.workers.dev(production) - Authorization callback URLにはHomepage URL + /callback

OAuthアプリの構成
これでClient IDとClient secretsが得られます。
シークレット設定
これらの他にCOOKIE_ENCRYPTION_KEYが必要です。これは、openssl rand -hex 32などでランダムに生成します。
本番環境では、Workersをデプロイ後、
$wrangler secret put GITHUB_CLIENT_ID
$wrangler secret put GITHUB_CLIENT_SECRET
$wrangler secret put COOKIE_ENCRYPTION_KEY
でシークレットを設定、ローカルでは.dev.varsをプロジェクトルートに作成します。
GITHUB_CLIENT_ID=<your github client id>
GITHUB_CLIENT_SECRET=<your github client secret>
COOKIE_ENCRYPTION_KEY=<your cookie encryption key>
KVの作成
$wrangler kv namespace create "OAUTH_KV"
作成されたidをwrangler.jsoncに追加。
	"kv_namespaces": [
		{
			"binding": "OAUTH_KV",
			"id": "<Add-KV-ID>"
		}
	],
Streamable HTTP対応
demoはsseのみの対応なので、以下のように変更します。
export default new OAuthProvider({
-	apiHandler: MyMCP.mount("/sse") as any,
-	apiRoute: "/sse",
+	apiHandlers: {
+		"/sse": MyMCP.serveSSE("/sse") as any,
+		"/mcp": MyMCP.serve("/mcp") as any,
+	},
	authorizeEndpoint: "/authorize",
	clientRegistrationEndpoint: "/register",
	defaultHandler: GitHubHandler as any,
	tokenEndpoint: "/token",
});
なお、demoで使用しているagentsのStreamable HTTP対応のPull Requestは下記です。
型の合わせ方がわからず、anyを使ってしまっています。
デモのテスト
これでデモが動作するはずです。ローカルでテストしてみます。
$pnpm run dev
$npx @modelcontextprotocol/inspector
でブラウザにinspectorが開きます。
- Transport Type: Streamable HTTP
- URL: http://localhost:8788/mcp
とし、Open Auth Settingsを開きます。

Quick OAuth Flowをクリックすると同意画面が開きます。

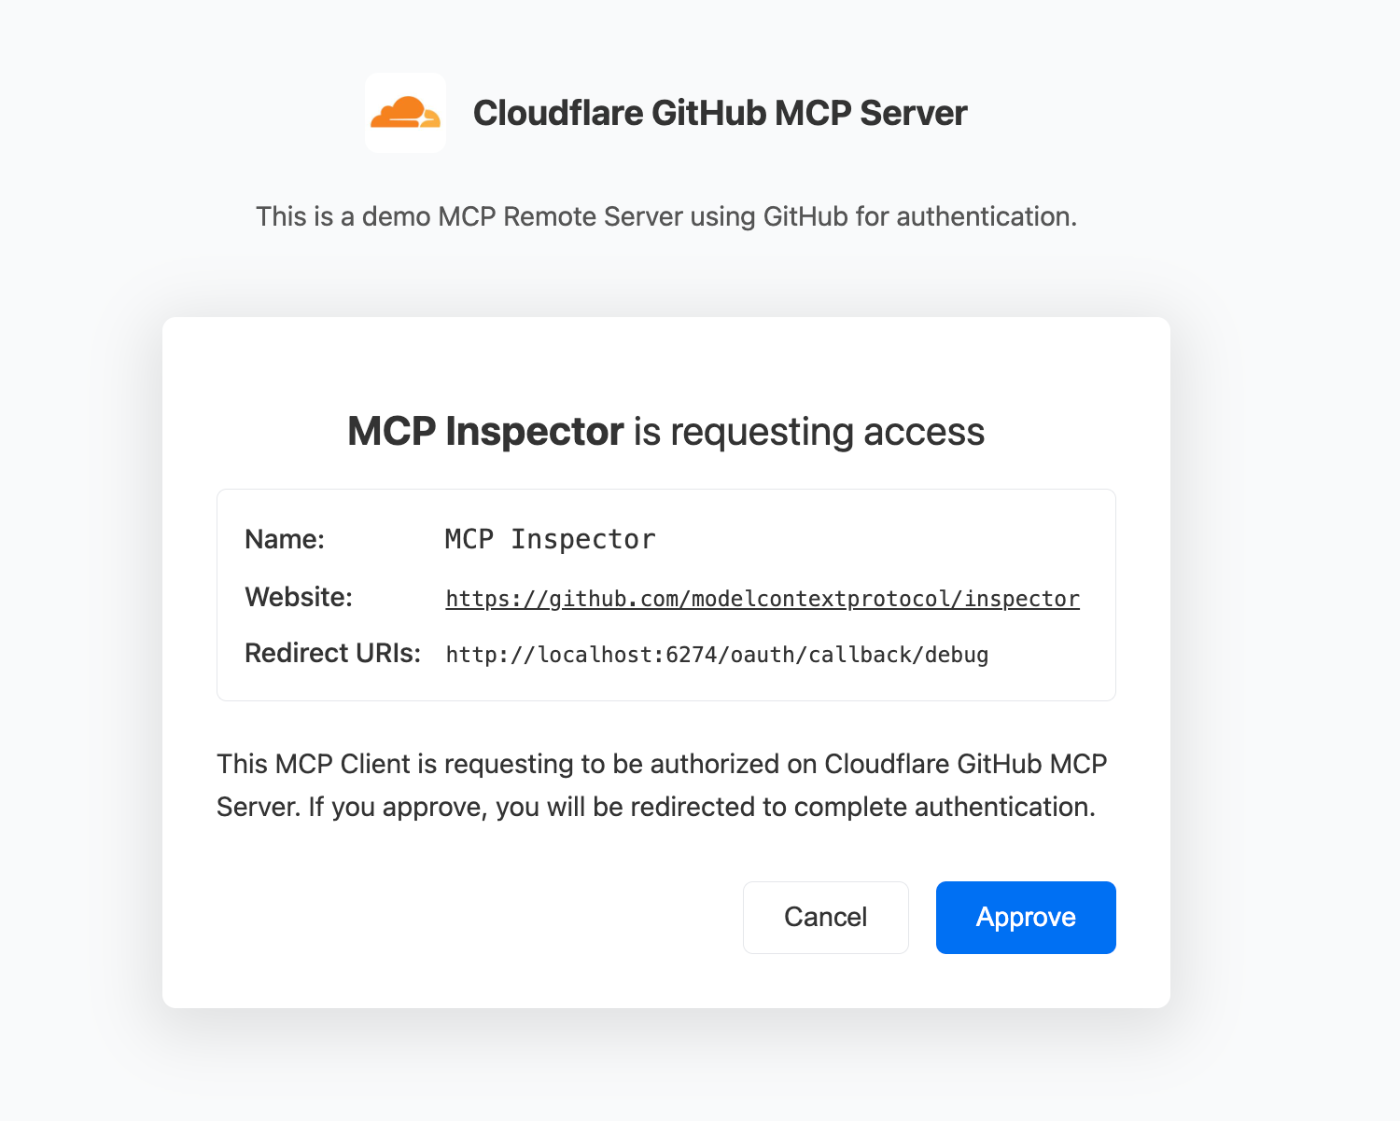
成功するとInspectorに戻ります。Connect>List Toolsと進むと
- add
- userInfoOctokit
の2つのツールが見えるはずです。
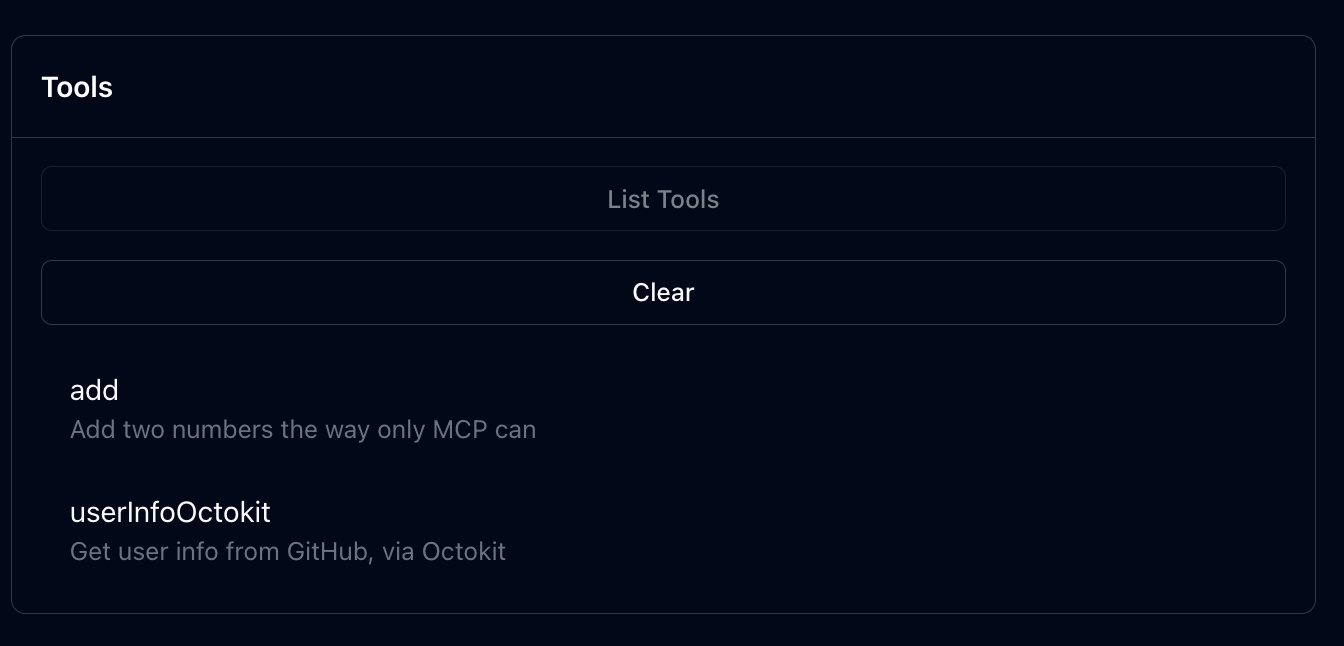
userInfoOctokitを実行して自分の情報が取れるか確認してください。

Resources機能の追加
現状はToolsのみの実装なので、Resourcesを追加していきます。このあたりはAIに仕様書を与えればよしなに作ってくれるので、要所のみに触れます。
src/index.ts
まず、capabilitiesを追加。
	server = new McpServer(
		{
			name: "GitHub OAuth Remote Resource Server",
			version: "0.0.1",
		},
		{
			capabilities: {
				resources: {},
			},
		},
	);
initメソッド内でリソースを登録します。なお、accessTokenはworkers-oauth-providerの実装により、propsから取得可能です。
	async init() {
		const accessToken = this.props.accessToken;
		[...]
		await registerResources(this.server, accessToken, this.env);
	}
}
src/resources
続いてGitHub上のファイルをResourceとして返すように定義します。
Resourceは、テキストの場合
{
  "uri": "file:///example.txt",
  "name": "example.txt",
  "title": "Example Text File",
  "mimeType": "text/plain",
  "text": "Resource content"
}
という形式で返します。
Typescript SDKでは
server.registerResource(
  "config",
  "config://app",
  {
    title: "Application Config",
    description: "Application configuration data",
    mimeType: "text/plain"
  },
  async (uri) => ({
    contents: [{
      uri: uri.href,
      text: "App configuration here"
    }]
  })
);
といったように書けます。実装の仕方は色々あるのですが、筆者は下記の記事および、それを用いたlapras-mcp-serverの実装を参考にしています。
GitHubからのリソース取得
- Tree APIでのファイル一覧取得
-
await octokit.rest.repos.getContentでのファイル情報取得 - Resourcesのinterfaceへの変換
を主に行います。ここはユースケースによって異なってくるので、参考程度の実装を掲示しておきます。
なお、下記実装ではenvでSOURCE_REPOSITORY_NAME(取得元のリポジトリ名)/ BRANCH_NAME(取得元のブランチ名)を指定できるようにしています。また、取得するファイルの取捨選択は実装していませんが、実際はmarkdownファイルのみに限ったり、特定のディレクトリ以下に限定する処理、取得上限数などの制約を追加するべきです。
コード例(src/resources/files.ts)
import { Octokit } from "octokit";

/**
 * Interface for MCP resources
 */
export interface IMCPResource {
  /**
   * Resource name
   */
  readonly name: string;

  /**
   * Resource URI
   */
  readonly uri: string;

  /**
   * Optional human-readable title
   */
  readonly title?: string;

  /**
   * Optional description
   */
  readonly description?: string;

  /**
   * Optional MIME type
   */
  readonly mimeType?: string;

  /**
   * Optional size in bytes
   */
  readonly size?: number;

  /**
   * Resource handler
   */
  handler(uri: URL): Promise<{
    contents: {
      uri: string;
      text: string;
      mimeType?: string;
      title?: string;
      description?: string;
      size?: number;
    }[];
  }>;
}

/**
 * Individual file resource
 */
class FileResource implements IMCPResource {
  readonly name: string;
  readonly uri: string;
  readonly title: string;
  readonly description: string;
  readonly size: number;

  constructor(
    private readonly accessToken: string,
    private readonly owner: string,
    private readonly repo: string,
    private readonly filePath: string,
    private readonly fileName: string,
    private readonly fileSize: number,
  ) {
    // Initialize readonly properties
    this.name = filePath;
    this.uri = `github://file/${filePath}`;
    this.title = fileName;
    this.description = `File: ${filePath} (${fileSize} bytes)`;
    this.size = fileSize;
  }

  get mimeType(): string {
    return this.getMimeType(this.fileName);
  }

  async handler(uri: URL): Promise<{
    contents: {
      uri: string;
      text: string;
      mimeType?: string;
      title?: string;
      description?: string;
      size?: number;
    }[];
  }> {
    try {
      const octokit = new Octokit({ auth: this.accessToken });
      const { data } = await octokit.rest.repos.getContent({
        owner: this.owner,
        repo: this.repo,
        path: this.filePath,
      });

      if (!Array.isArray(data) && data.type === "file") {
        const content = Buffer.from(data.content || "", "base64").toString(
          "utf-8",
        );

        return {
          contents: [
            {
              uri: uri.href,
              title: this.fileName,
              text: content,
              mimeType: this.mimeType,
              size: this.fileSize,
            },
          ],
        };
      } else {
        throw new Error(`Path ${this.filePath} is not a file`);
      }
    } catch (error) {
      throw new Error(`Failed to read file: ${error instanceof Error ? error.message : String(error)}`);
    }
  }

  private getMimeType(filename: string): string {
    const ext = filename.split(".").pop()?.toLowerCase();
    const mimeTypes: Record<string, string> = {
      js: "text/javascript",
      ts: "text/typescript",
      jsx: "text/jsx",
      tsx: "text/tsx",
      json: "application/json",
      md: "text/markdown",
      txt: "text/plain",
      html: "text/html",
      css: "text/css",
      py: "text/x-python",
      java: "text/x-java",
      c: "text/x-c",
      cpp: "text/x-c++",
      rs: "text/x-rust",
      go: "text/x-go",
      rb: "text/x-ruby",
      php: "text/x-php",
      sh: "text/x-shellscript",
      yaml: "text/yaml",
      yml: "text/yaml",
      xml: "text/xml",
      svg: "image/svg+xml",
      png: "image/png",
      jpg: "image/jpeg",
      jpeg: "image/jpeg",
      gif: "image/gif",
      pdf: "application/pdf",
    };

    return mimeTypes[ext || ""] || "application/octet-stream";
  }
}

/**
 * Factory function to create file resources from the source repository
 * @param accessToken GitHub access token
 * @param env Environment variables
 * @returns Array of file resources
 */
export async function createFileResources(
  accessToken: string,
  env: Env,
): Promise<IMCPResource[]> {
  try {
    // Validate SOURCE_REPOSITORY_NAME is set
    if (!env.SOURCE_REPOSITORY_NAME) {
      console.error("SOURCE_REPOSITORY_NAME environment variable is not set");
      return [];
    }

    // Validate repository name format (owner/repo)
    const repoMatch = env.SOURCE_REPOSITORY_NAME.match(/^([^/]+)\/([^/]+)$/);
    if (!repoMatch) {
      console.error(
        `Invalid repository name format: ${env.SOURCE_REPOSITORY_NAME}. Expected format: owner/repo`,
      );
      return [];
    }

    const [, owner, repo] = repoMatch;
    console.error(`Fetching files from repository: ${owner}/${repo}`);
    const octokit = new Octokit({ auth: accessToken });

    // List all files in the repository
    let files = await listFiles(octokit, owner, repo, env.BRANCH_NAME);
    if (files.length === 0) {
      console.error(
        `No files found in repository ${owner}/${repo} with the specified filters`,
      );
      return [];
    }
    console.error(
      `Found ${files.length} files in repository ${owner}/${repo} after filtering`,
    );

    // Create a resource for each file
    return files.map(
      (file) =>
        new FileResource(
          accessToken,
          owner,
          repo,
          file.path,
          file.name,
          file.size,
        ),
    );
  } catch (error) {
    console.error(`Failed to create file resources: ${error instanceof Error ? error.message : String(error)}`);
    return [];
  }
}

/**
 * List all files in a repository using the Git Tree API
 */
async function listFiles(
  octokit: Octokit,
  owner: string,
  repo: string,
  branch?: string,
): Promise<Array<{ path: string; name: string; size: number }>> {
  try {
    let targetBranch = branch;

    // Get repository information to get the default branch if branch is not specified
    if (!targetBranch) {
      const { data: repoInfo } = await octokit.rest.repos.get({
        owner,
        repo,
      });
      targetBranch = repoInfo.default_branch;
    }

    // Get the latest commit of the target branch
    const { data: ref } = await octokit.rest.git.getRef({
      owner,
      repo,
      ref: `heads/${targetBranch}`,
    });

    // Get the commit
    const { data: commit } = await octokit.rest.git.getCommit({
      owner,
      repo,
      commit_sha: ref.object.sha,
    });

    // Get the entire tree recursively
    const { data: tree } = await octokit.rest.git.getTree({
      owner,
      repo,
      tree_sha: commit.tree.sha,
      recursive: "true",
    });

    // Filter only files (blobs)
    return tree.tree
      .filter((item) => item.type === "blob" && item.path)
      .map((item) => ({
        path: item.path,
        name: item.path.split("/")?.pop() ?? "unknown",
        size: item.size || 0,
      }));
  } catch (error) {
    console.error("Error fetching files from tree:", error);
    throw error;
  }
}
Resourcesの登録関数は以下のように書けます。
import type { McpServer } from "@modelcontextprotocol/sdk/server/mcp.js";
import { createFileResources } from "./files.js";

/**
 * Register all resources with the MCP server
 * @param server The MCP server instance
 * @param accessToken GitHub access token
 * @param env Environment variables
 */
export async function registerResources(
  server: McpServer,
  accessToken: string,
  env: Env,
) {
  const fileResources = await createFileResources(accessToken, env);

  for (const resource of fileResources) {
    server.resource(
      resource.name,
      resource.uri,
      resource.handler.bind(resource),
    );
  }
}
scope追加
リポジトリのアクセスのためにscopeも追加が必要です。demoではread:userのみになっています。
async function redirectToGithub(
	request: Request,
	oauthReqInfo: AuthRequest,
	headers: Record<string, string> = {},
) {
	return new Response(null, {
		headers: {
			...headers,
			location: getUpstreamAuthorizeUrl({
				client_id: env.GITHUB_CLIENT_ID,
				redirect_uri: new URL("/callback", request.url).href,
+				scope: "read:user repo",
				state: btoa(JSON.stringify(oauthReqInfo)),
				upstream_url: "https://github.com/login/oauth/authorize",
			}),
		},
		status: 302,
	});
}
Inspectorでのテスト
サーバーを再起動し、再度Inspectorを起動、再認証します。
$pnpm dev
$npx @modelcontextprotocol/inspector
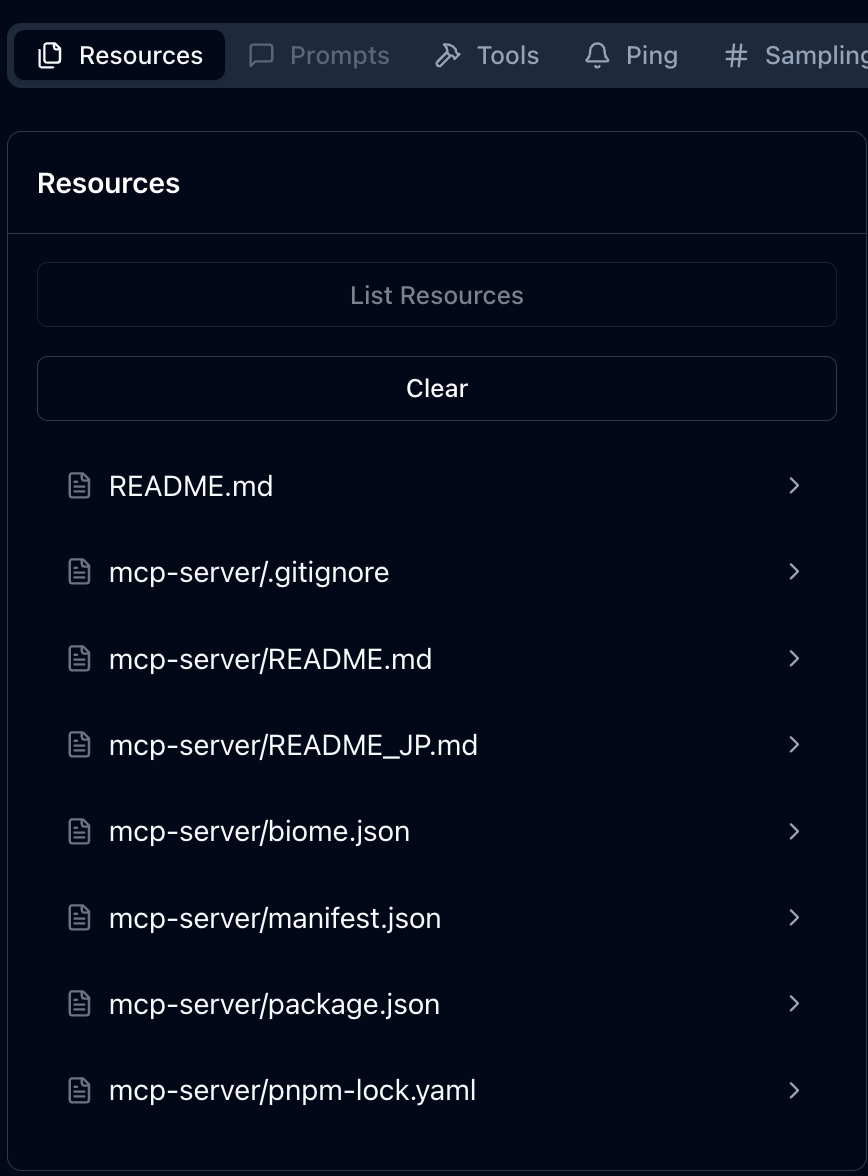
http://localhost:6274/#resourcesにアクセスし、List Resourcesをクリック。

ファイルの一覧が返ります。今回はファイルのfilteringはしていないので、全てのファイルが返っています。
ファイルをクリックすると内容が返ってきます。

pnpm run deploy等でデプロイすればリモートMCPサーバーの完成です。
導入
出来上がったMCPサーバーをMCPクライアントに組み込みます。代表としてClaude CodeとClaude Desktopを取り上げます。
Claude Code
以下を参考に導入できます。
$claude mcp add --transport http <mcp-server-name> https://<your-deployed-workers-url>/mcp (--scope=user)
Claude Codeを開きます。
$claude
$/mcp
ブラウザで認証後、@<mcp-server-name>で関連するResourcesがsuggestされれば成功です。
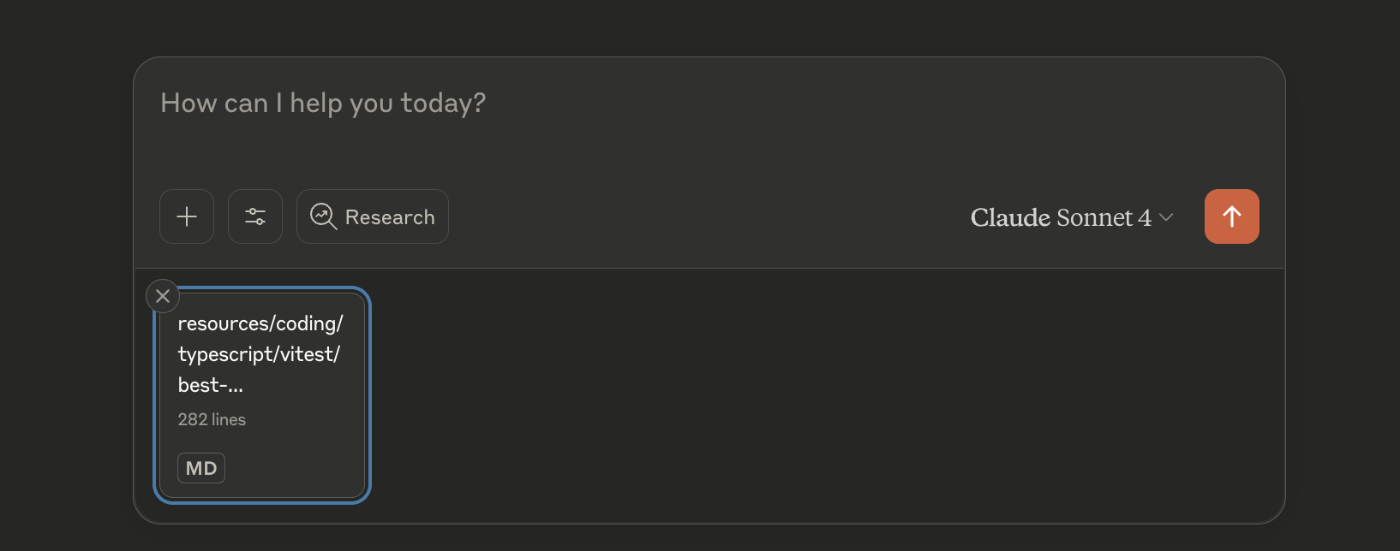
使い方
@<mcp-server-name>とするとファジー検索でドキュメントを選択できます。
たとえば以下はCloudflare WorkersにVitestを導入したい場合にvitestで検索した例です。

候補が表示される
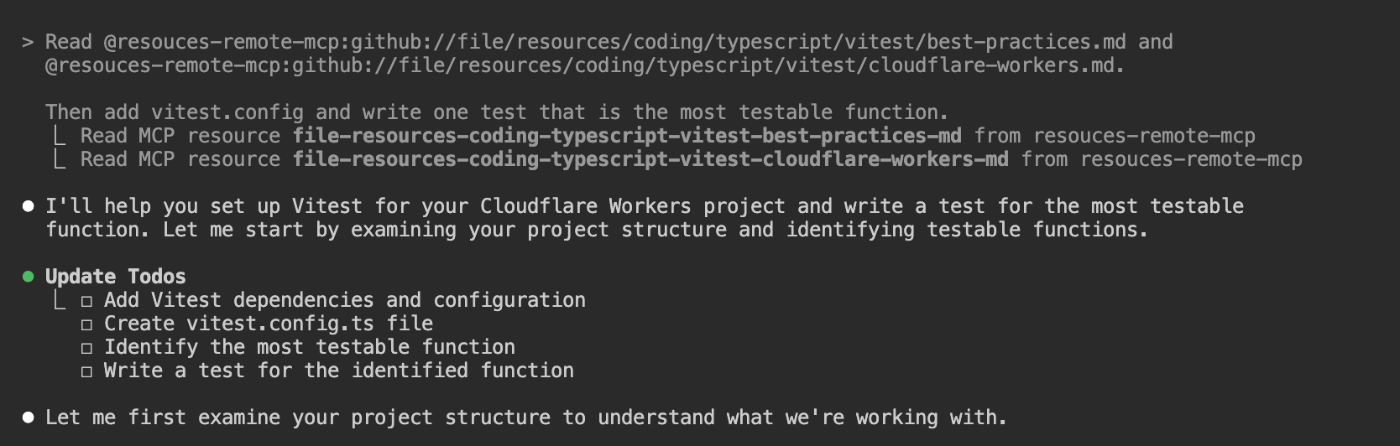
Read @resources-remote-mcp:github://file/resources/coding/typescript/vitest/best-practices.md and
@resources-remote-mcp:github://file/resources/coding/typescript/vitest/cloudflare-workers.md.Then add vitest.config and write one test that is the most testable function.
以下のように、まずドキュメントを読んだ上で、実装が進みます。
Claude Desktop
下記からCustom Connectorとして追加。
URLには~~/mcpまで含みます。
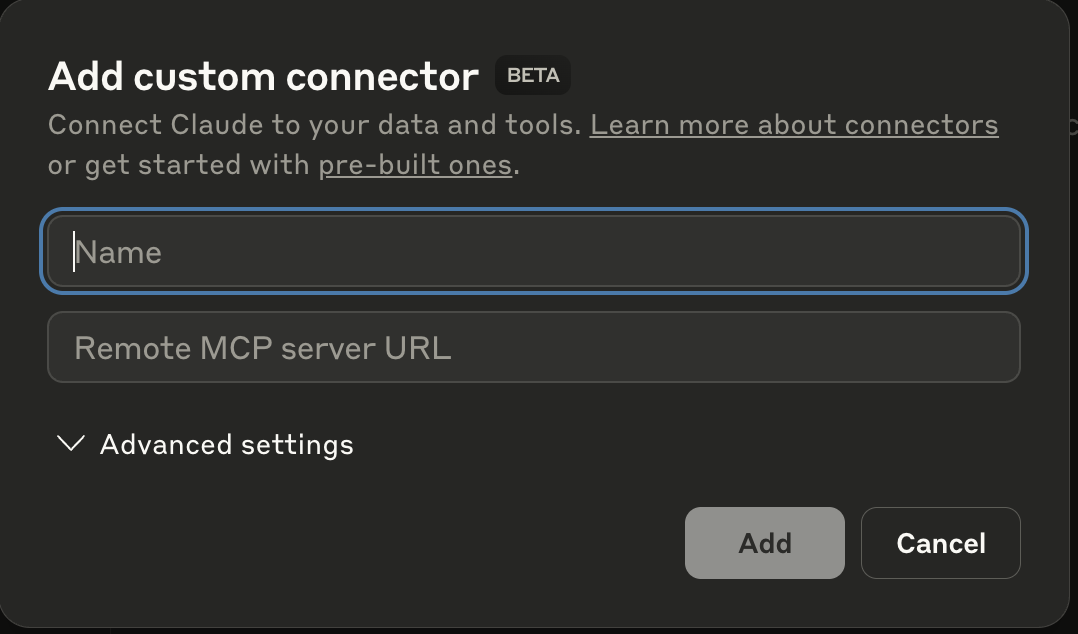
Connectをクリック。
使い方
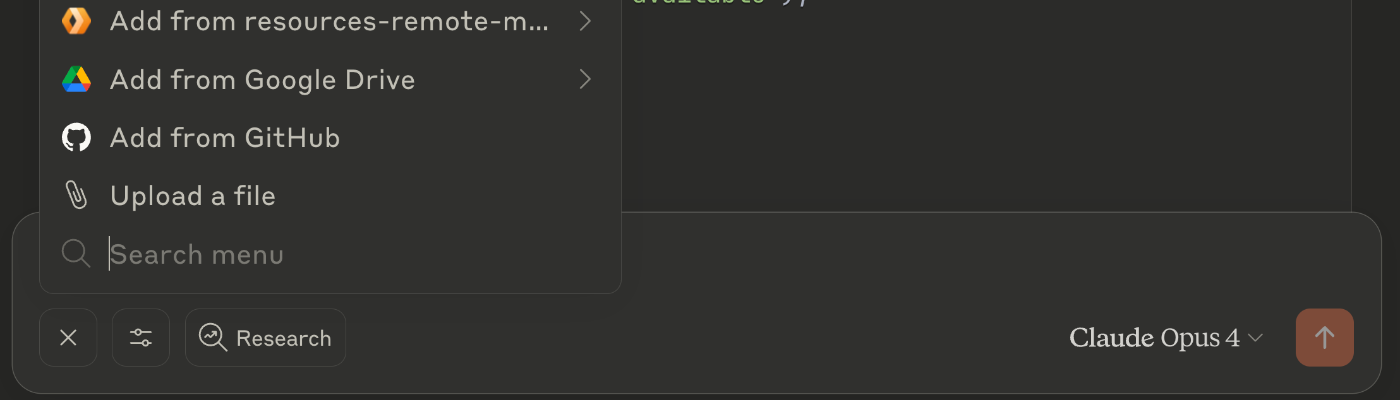
新しいチャットで以下のようにリソースを参照できます。(Add from ~~~のところにはCustom Connectorの登録名が入ります。)


おわりに
これでGitHubリポジトリの内容をリモートMCPサーバーから取得できるようになりました。
ただし、実際に使っていく上では懸念点があります。
- リモートMCPサーバーの歴史が浅いこと
- 実装がCloudflareエコシステムに寄っていること
- 認可の仕様のキャッチアップ
- リポジトリサイズによるパフォーマンス問題
- 大規模なリポジトリでどこまで動作するかは未検証
とはいえ、MCPサーバーの利用者の増加にしたがってリモートMCPサーバーの利点はスケールしていくので、大きな流れとしては今後増えていくと考えています。
参考文献
Resourcesサーバーに関してはあまり実例がないので、広めに挙げておきます。
MCP Specification
Claude Desktopは必ずしも仕様の全てを実装しているわけではなく、たとえば
Resource Templates(resources/templates/list)は未対応。
リモートMCPサーバーのAuthorization
Claude Desktop等の対応状況は以下にありました。
リソースサーバーのミニマル実装
Claude Desktop向けの検証
Prompt, Resource, Toolの概観
Desktop Extensions
-
GitHubリポジトリをTool化するリモートMCPサーバー実装としては、 https://github.com/idosal/git-mcp があります。ただし、publicリポジトリ限定です。 ↩︎
-
Claude TeamやGeminiのGemにおいて参考ドキュメントを指して用いられているワードですが、ここではより抽象的に、「AIをチームのコンテキストに境界づける(defineする)ための自然言語ドキュメント」くらいの意味で使っています。 ↩︎

Discussion