Auth0 + GitHub Pagesでミニマムなログインサンプルを作る
※この記事は2019年12月24日に公開された記事の移植及びリライト記事です。
Auth0のサンプルはダウンロードすると、結構多くのファイルが入っていて、内容を理解するのが難しい印象です。
今回はAuth0のサンプルとチュートリアルを試してみて、 必要最低限に削ぎ落としたサンプルを作ってみたので紹介します。 たったの3ファイルです。もっと削ぎ落としてindex.htmlだけにすることもできますが、あまり我流になると分かりにくいかもしれないのでなるべく公式のサンプル(auth0-samples/auth0-javascript-samples)の構成を変えないようにしています。
また、 サーバーサイドの実装は思い切って無しでGitHub Pagesを使って公開していきます。
静的サイト(Static Site)でのサンプルは思ったより例が無いですね。
完成コードだけを見たい人はこちらをご参照下さい。
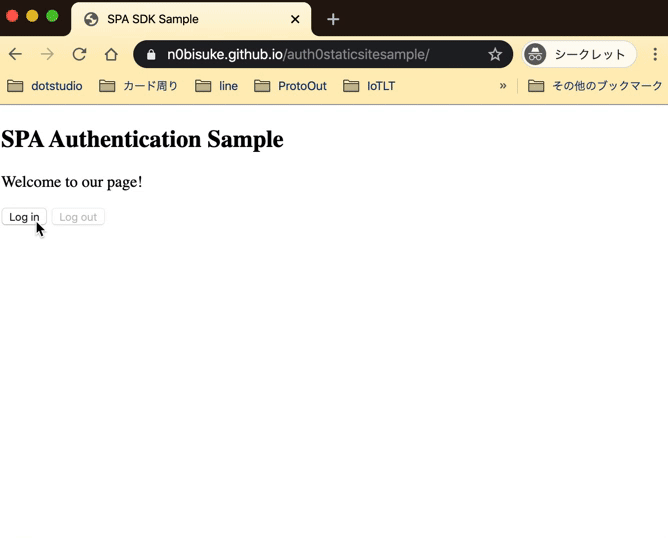
動作イメージ
先に完成の動作イメージです。アクセストークンはマスクしてます。
ちなみに、LINEログイン以外は動作テストはしてません。
1. GitHub Pagesで静的サイトを作成
ここからは簡単に手順を紹介します。
ここは色々な人が記事を書いてるので、各自調べて作ってみましょう。
- GitHub Pages公式
- 過去に僕が書いた記事(古いので新しくググった方が良いかも)
適当にindex.htmlだけを作成してサイトを立ち上げます。
今回はauth0staticsitesampleという名前でリポジトリを作成し、Webサイトを作成しました。
https://GitHubユーザー名.github.io/リポジトリ名という感じになりますね。
- GitHubのリポジトリURL例: https://github.com/n0bisuke/auth0staticsitesample
- GitHub PagesのURL例: https://n0bisuke.github.io/auth0staticsitesample
2. Auth0のアプリケーション作成
Auth0でアプリケーションを作成します。
Settingsのタブに移動し、Allowed Callback URLs、Allowed Web Origins、Allowed Logout URLsの3箇所の設定をしましょう。

- Allowed Callback URLs:
https://GitHubユーザー名.github.io,https://GitHubユーザー名.github.io/リポジトリ名 - Allowed Web Origins:
https://GitHubユーザー名.github.io - Allowed Logout URLs:
https://GitHubユーザー名.github.io,https://GitHubユーザー名.github.io/リポジトリ名
という設定をします。カンマ区切りで複数のURLを設定できるので、ドメイン(僕の場合だとhttps://n0bisuke.github.io)と実際のアプリのURL(https://n0bisuke.github.io/auth0staticsitesample)を指定します。

一箇所だけのキャプチャですが、こんな感じです。
GitHub Pagesじゃなくてもherokuやngrokなどルートパスで利用する場合は、ドメイン名だけを書いてあげれば大丈夫ですね。
3. 実装
フォルダ構成は以下の3ファイルです。
- index.html
- auth_config.json
- script.js
3ファイルをプロジェクトのルートに設置し、以降の内容を記述してGitHubにPushしましょう。

シンプルですね。
auth_config.json
2の手順で、Auth0のアプリケーションを作成すると、こういったJSONデータが生成されます。この情報をもとにauth_config.jsonを作成します。
{
  "domain": "<ユーザー名>.auth0.com",
  "clientId": "XXXXXXXXXXXXXXXXXXXXXX"
}
index.html
CSSも入れ込みました。
<!DOCTYPE html>
<html>
  <head>
    <meta charset="UTF-8" />
    <title>SPA SDK Sample</title>
    <style>
      .hidden {
        display: none;
      }

      label {
        margin-bottom: 10px;
        display: block;
      }
    </style>
  </head>

  <body>
    <h2>SPA Authentication Sample</h2>
    <p>Welcome to our page!</p>
    <button id="btn-login" disabled="true" onclick="login()">Log in</button>
    <button id="btn-logout" disabled="true" onclick="logout()">Log out</button>

    <!--ログイン後に表示-->
    <div class="hidden" id="gated-content">
      <p>
        You're seeing this content because you're currently
        <strong>logged in</strong>.
      </p>
      <label>
        Access token:
        <pre id="ipt-access-token"></pre>
      </label>
      <label>
        User profile:
        <pre id="ipt-user-profile"></pre>
      </label>

      <label>
          User profile Image:
          <img src="" id="ipt-user-profile-image" width="200px">
        </label>
    </div>

    <script src="https://cdn.auth0.com/js/auth0-spa-js/1.2/auth0-spa-js.production.js"></script>
    <script src="script.js"></script>
  </body>
</html>
script.js
以下のscript.jsをコピペして、 1箇所だけ書き換えて下さい。
冒頭のcont APP_PATHの箇所で/auth0staticsitesampleを指定していますが、ここは各自のGitHub Pagesのリポジトリ名にして下さい。ルートパス利用なら/を指定します。
https://xxxx.github.io/<ココ>
'use strict';

const APP_PATH = `/auth0staticsitesample`; // https://ユーザー名.github.io/<ココ> or ルートパス利用なら`/`だけでOK
let auth0 = null;
const fetchAuthConfig = () => fetch("auth_config.json"); // auth_config.json読み込み

const configureClient = async () => {
  const response = await fetchAuthConfig();
  const config = await response.json();

  auth0 = await createAuth0Client({
    domain: config.domain,
    client_id: config.clientId
  });
};

window.onload = async () => {
  await configureClient();

  updateUI();

  const isAuthenticated = await auth0.isAuthenticated();

  if (isAuthenticated) {
    // show the gated content
    return;
  }

  // NEW - check for the code and state parameters
  const query = window.location.search;
  if (query.includes("code=") && query.includes("state=")) {

    // Process the login state
    await auth0.handleRedirectCallback();

    updateUI();

    // Use replaceState to redirect the user away and remove the querystring parameters
    window.history.replaceState({}, document.title, APP_PATH);
  }
};

const updateUI = async () => {
  const isAuthenticated = await auth0.isAuthenticated();

  document.getElementById("btn-logout").disabled = !isAuthenticated;
  document.getElementById("btn-login").disabled = isAuthenticated;

  // NEW - add logic to show/hide gated content after authentication
  if (isAuthenticated) {
    document.getElementById("gated-content").classList.remove("hidden");

    document.getElementById(
      "ipt-access-token"
    ).innerHTML = await auth0.getTokenSilently();

    document.getElementById("ipt-user-profile").innerHTML = JSON.stringify(
      await auth0.getUser()
    );

    //プロフ画像
    const profile = await auth0.getUser();
    document.getElementById("ipt-user-profile-image").src = profile.picture;

  } else {
    document.getElementById("gated-content").classList.add("hidden");
  }
};

const login = async () => {
  await auth0.loginWithRedirect({
    redirect_uri: window.location.origin + APP_PATH
  });
};

const logout = () => {
  auth0.logout({
    returnTo: window.location.origin + APP_PATH
  });
};
4. 完成 & 試す
この3ファイルをGitHubにPushすれば終わりです。
サーバーの用意もないと結構シンプルですね。
では実際に試した様子はこちらです。(冒頭のGIFと同じ)
ログインボタンを押す -> Auth0のフォームが立ち上がる -> ログインする方法を選択(ここではLINEログイン) -> ログイン後のページに遷移する -> ログアウトボタンを押すとログイン前の状態にといった流れのデモになります。
まとめ
Auth0のサンプルを見るとnpm iしてね〜とか、server.jsの記載など、(簡単にだけど)サーバーサイド実装があって、初見の時に「Auth0ってサーバーサイド必須なの?」って感じになってしまいました。
実際は表側の実装だけで作れるのでこんな感じの静的サイトでも組み込むことが出来そうですね。
とりあえず動かすにはオールインワンのサンプルも重要だけど、ここからカスタマイズしていったり構造理解を考えるとミニマムサンプルも大事だなぁと思ったりしました。
それでは!
Discussion