


これってどういう順番になるんだっけ?って毎回なるので図解しました。
describeが2個の場合
たとえば、以下の場合を考えます。
describe('外側のdescribe', () => {
  beforeAll(() => console.log('🐔 beforeAll'));
  afterAll(() => console.log('🐔 afterAll'));
  beforeEach(() => console.log('🐔 beforeEach'));
  afterEach(() => console.log('🐔 afterEach'));

  it('テスト①', () => console.log('🐔 テスト①'));

  describe('内側のdescribe', () => {
    beforeAll(() => console.log('🐤 beforeAll'));
    afterAll(() => console.log('🐤 afterAll'));
    beforeEach(() => console.log('🐤 beforeEach'));
    afterEach(() => console.log('🐤 afterEach'));

    it('テスト②', () => console.log('🐤 テスト②'));
  });
});
これを実行すると以下のような順番になります↓
🐔 beforeAll
🐔 beforeEach
🐔 テスト①
🐔 afterEach
🐤 beforeAll  ←君はなぜここで実行されるのかね?
🐔 beforeEach
🐤 beforeEach
🐤 テスト②
🐤 afterEach
🐔 afterEach ←君はなぜここで実行されるのかね?
🐤 afterAll
🐔 afterAll
私はこれを見るたびに「君はなぜここで実行されるのかね?」と思ってしまいます。
この疑問は、図解すると解決します↓

この図解を見つつ、以下の特徴をおさえると分かりやすい気がします↓
- beforeAll:
- describeブロックがはじまったときに実行される。
- afterAll:
- describeブロックを抜けるときに実行される。
- beforeEach:
- テストの直前に実行される。親があれば親が先。
- afterEach:
- テストの直後に実行される。親があれば親が後。
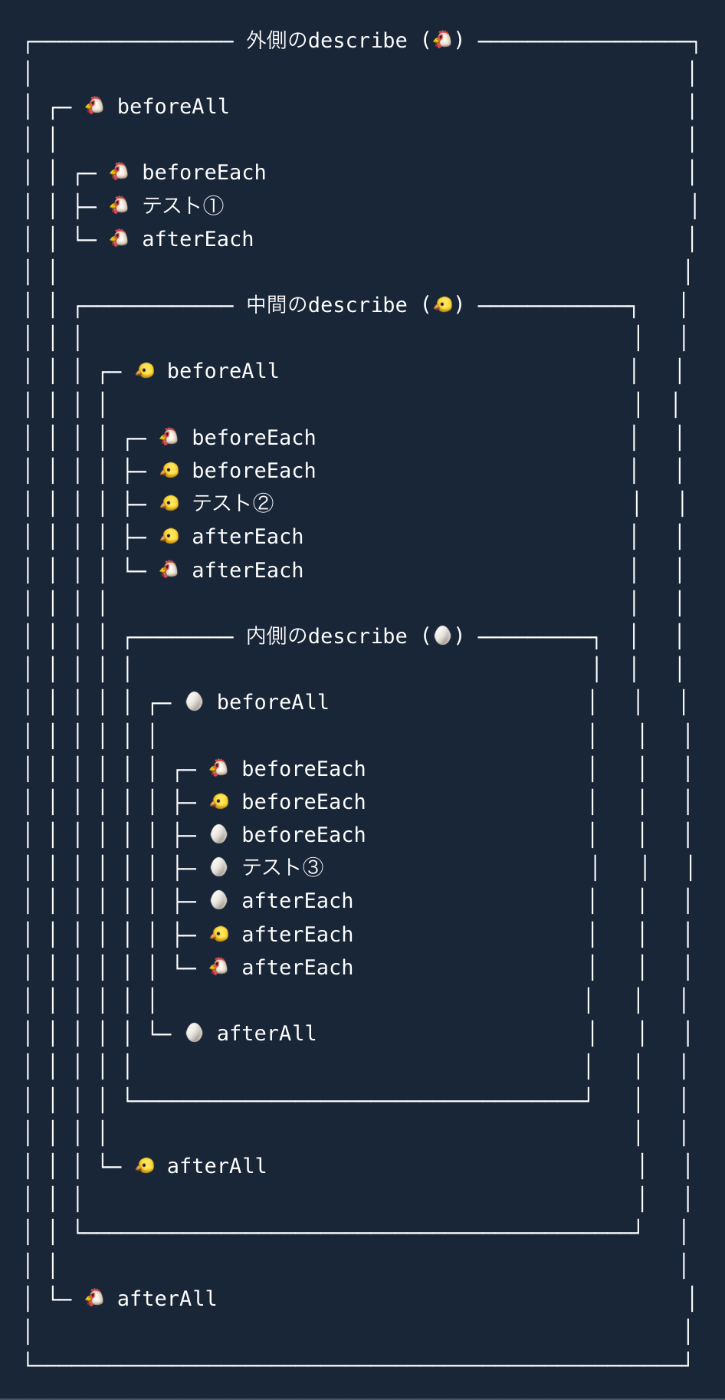
describeが3個の場合
3個ネストした場合の例も貼っておきます↓
describe('外側のdescribe', () => {
  beforeAll(() => console.log('🐔 beforeAll'));
  afterAll(() => console.log('🐔 afterAll'));
  beforeEach(() => console.log('🐔 beforeEach'));
  afterEach(() => console.log('🐔 afterEach'));

  it('テスト①', () => console.log('🐔 テスト①'));

  describe('中間のdescribe', () => {
    beforeAll(() => console.log('🐤 beforeAll'));
    afterAll(() => console.log('🐤 afterAll'));
    beforeEach(() => console.log('🐤 beforeEach'));
    afterEach(() => console.log('🐤 afterEach'));

    it('テスト②', () => console.log('🐤 テスト②'));

    describe('内側のdescribe', () => {
      beforeAll(() => console.log('🥚 beforeAll'));
      afterAll(() => console.log('🥚 afterAll'));
      beforeEach(() => console.log('🥚 beforeEach'));
      afterEach(() => console.log('🥚 afterEach'));

      it('テスト③', () => console.log('🥚 テスト③'));
    });
  });
});
describe内に書かない場合
describeブロック内に書かない場合は、テストファイルのブロックに属する感じになります。
たとえば、以下のように書くと
beforeAll(() => console.log('🐔 beforeAll'));
afterAll(() => console.log('🐔 afterAll'));
beforeEach(() => console.log('🐔 beforeEach'));
afterEach(() => console.log('🐔 afterEach'));

it('テスト①', () => console.log('🐔 テスト①'));

describe('describe', () => {
  beforeAll(() => console.log('🐤 beforeAll'));
  afterAll(() => console.log('🐤 afterAll'));
  beforeEach(() => console.log('🐤 beforeEach'));
  afterEach(() => console.log('🐤 afterEach'));

  it('テスト②', () => console.log('🐤 テスト②'));
});
以下のようにファイルのブロック内として実行されるイメージです。
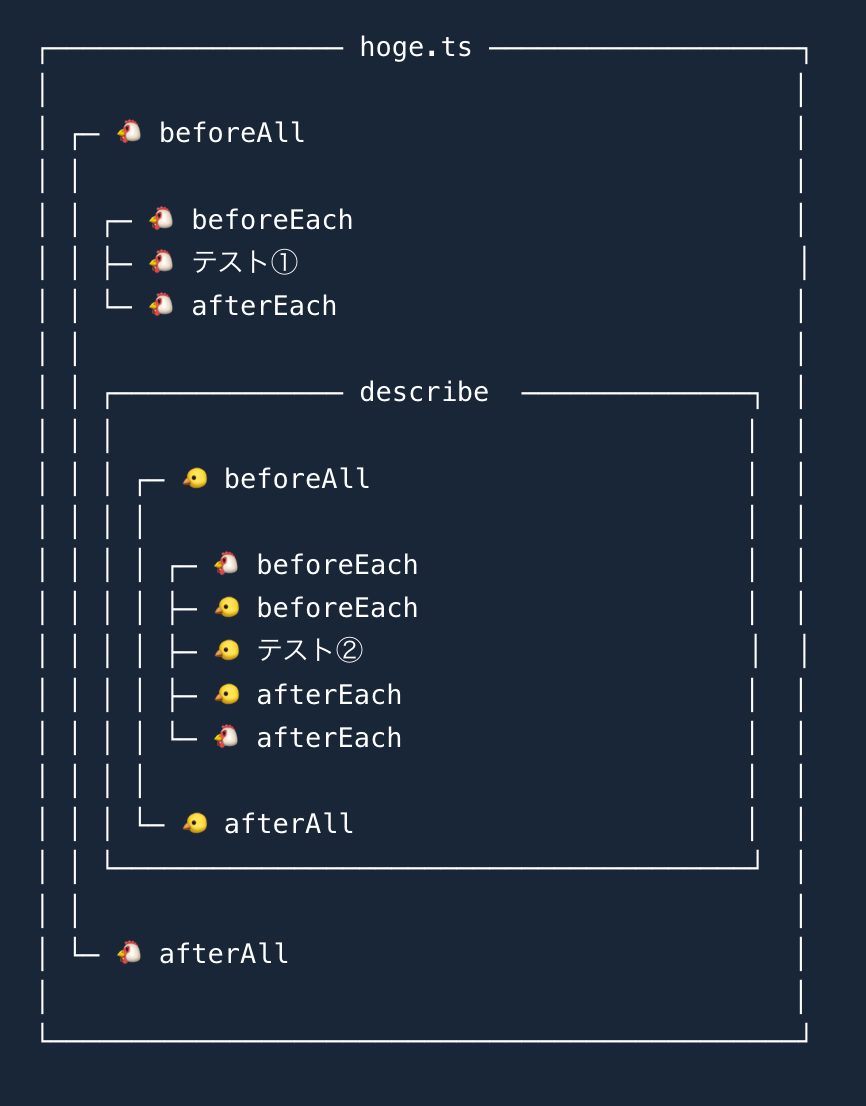
1番最初の例も、ファイル単位のブロックを省略していただけで、本来はこういうイメージです↓

\ PR /
え?テストの書き方がわからない?
いつも雰囲気で書いている?
そんなあなたは今すぐプラハチャレンジ!!!!
→PrAha Challenge | 中級エンジニアを育てるブートキャンプ

Discussion