💭
【shopifyテーマ開発】Liquidを用いて記事の下にシェアボタンを実装
こんばんは。PeiWebです。前回の記事に引き続き、記事のカスタイズに関する備忘録です。
完成形
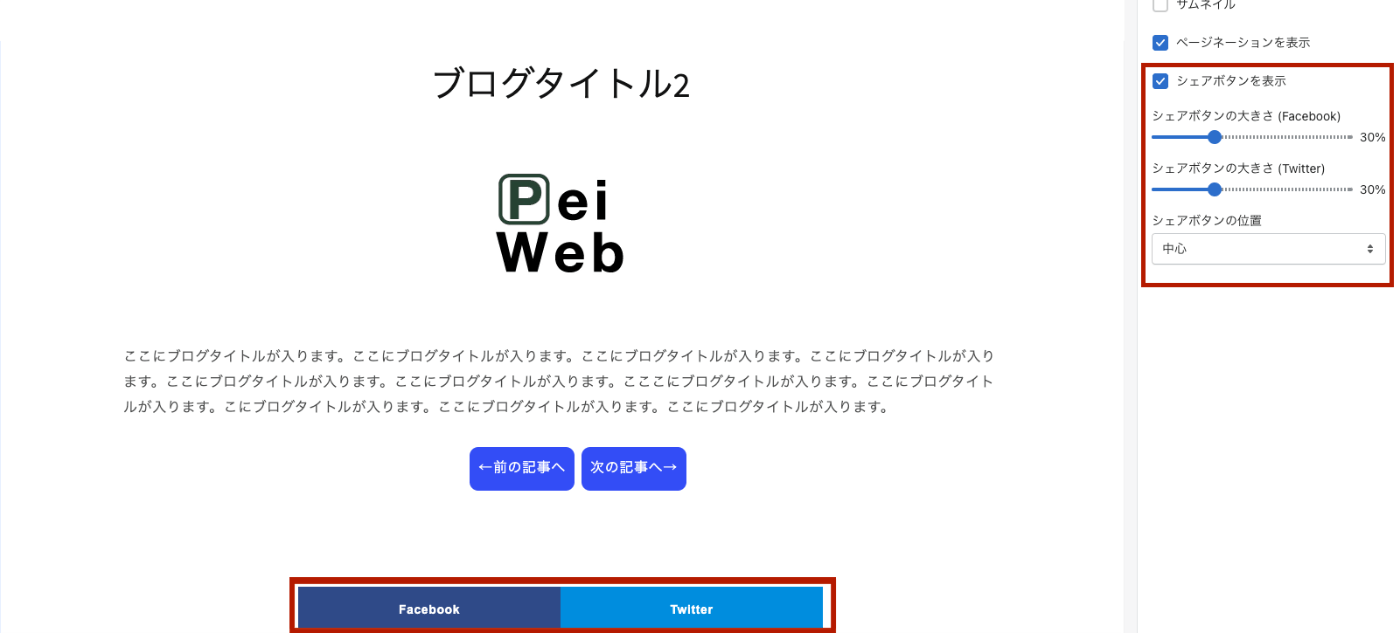
赤色の枠のところを実装していきます。
実装していきます。
JSON
json
{
  "sections": {
    "article": {
      "type": "article"
    }
  },
  "order": ["article"]
}
ここは、前回と変わらず、article.jsonに記載します。
schema
sectionファイル内でSchemaを定義していきます。
{% schema %}
{
  "name": "記事",
  "tag" : "article",
  "settings" : [
  {
  "type": "checkbox",
  "id" : "share-btn",
  "label" : "シェアボタンを表示",
  "default" : true
  },

  {
  "type": "range",
  "id" : "facebook-btn_size",
  "label" : "シェアボタンの大きさ (Facebook)",
  "max": 100,
  "min": 0,
  "step": 5,
  "unit": "%",
  "default" : 100
  },

  {
  "type": "range",
  "id" : "twitter-btn_size",
  "label" : "シェアボタンの大きさ (Twitter)",
  "max": 100,
  "min": 0,
  "step": 5,
  "unit": "%",
  "default" : 100
  },

  {
  "type": "select",
  "id": "share-btn_alignment",
  "label": "シェアボタンの位置",
  "default": "center",
  "options": [
      {
          "label": "中心",
          "value": "center"
      },
      {
          "label": "左",
          "value": "flex-start"
      },
      {
          "label": "右",
          "value": "flex-end"
      }
    ]
  }
  ]
}
{% endschema %}
次は、HTMLを組み込んで行きます✨
HTMLの組み込み
{{ "article.css" | asset_url | stylesheet_tag }}

{% style %}
.facebook-wrap {
  width: {{ section.settings.facebook-btn_size }}%;
}
.twitter-wrap {
  width: {{ section.settings.twitter-btn_size }}%;
}
.article__social {
  justify-content: {{ section.settings.share-btn_alignment }};
}
{% endstyle %}


{% if section.settings.share-btn %}
<div class="article__social">
	<div class="facebook-wrap">
		<a href="http://www.facebook.com/share.php?u={{ shop.domain }}{{ article.url }}" class="facebook">Facebook</a>
	</div>
	<div class="twitter-wrap">
		<a href="https://twiter.com/share?url={{ shop.domain }}{{ article.url }}" class="twitter">Twitter</a>
	</div>
</div>
{% endif %}
詳しく解説していきます。
{% style %} ~ {% endstyle %}
以下のコードはCSSを表しております。
{% style %}
.facebook-wrap {
  width: {{ section.settings.facebook-btn_size }}%;
}
.twitter-wrap {
  width: {{ section.settings.twitter-btn_size }}%;
}
.article__social {
  justify-content: {{ section.settings.share-btn_alignment }};
}
{% endstyle %}
{% if section.settings.share-btn %} ~ {% endif %}
ここでは、シェアボタンがあるかどうかでif文を書いています。チェクボックスが入っていたら、trueなので、実行されます。falseのときはif文以下は実行されないので、なしとなります。
shop.domain
Liquidのオブジェクトで、ショップのプライマリドメインを返します。
入力
{{ shop.domain }}
出力
https://××××××××.myshopify.com/
article.url
articleオブジェクトの一つで、記事の相対URLを返します。
入力
{{ article.url }}
出力
/blogs/カテゴリ/ブログタイトル
最後は、デザインを整えるためにCSSを記述します。
CSSでデザイン
最後に、ボタンのデザインはこんな感じにしました。
CSS
.article__social {
  display: flex;
  flex-wrap: wrap;
  margin: 100px auto;
}

.facebook-wrap {
  background-color: #2e4a88;
  box-shadow: 0 4px 0 #1B3D82;
  text-shadow: 0 -1px -1px #1B3D82;

  /* display: inline; */
  position: relative;
  font-family: Arial;
  font-size: 14px;
  font-weight: bold;
  text-align: center;
  padding: 14px 80px;
}

.facebook{
  text-decoration: none;
  color: white;
  border-radius: 5px;
}

.facebook-wrap:hover {
  background-color: #354F84;
}

.facebook-wrap:active {
  top: 2px;
  box-shadow: 0 2px 0 #1B3D82;
}

.twitter-wrap{
  background-color: #008DDE;
  box-shadow: 0 4px 0 #0078BD;
  /* display: inline; */
  position: relative;
  font-family: Arial;
  font-size: 14px;
  font-weight: bold;
  text-align: center;
  padding: 14px 80px;
}

.twitter-wrap:active {
  top: 2px;
  box-shadow: 0 2px 0 #0078BD;
}

.twitter-wrap:hover {
  background-color: #1397D8;
}

.twitter{
  text-decoration: none;
  color: white;
  border-radius: 5px;
}
色とか、余白とかフォントとか自由にカスタマイズすることができます。個人的には、hoverするときは、背景色と文字の色が入れ替わるのが好きです。
これで実装完了
最後に、、、
少しでも参考になれば記事にイイねしていただけますと嬉しいです。
Webサイト & ECサイト構築のご相談・ご依頼はTwitterのDMまでお願いいたします!
お待ちしております^^
Discussion