Raspberry PiとChatGPTでつくるボイス・アシスタント・ロボット #6

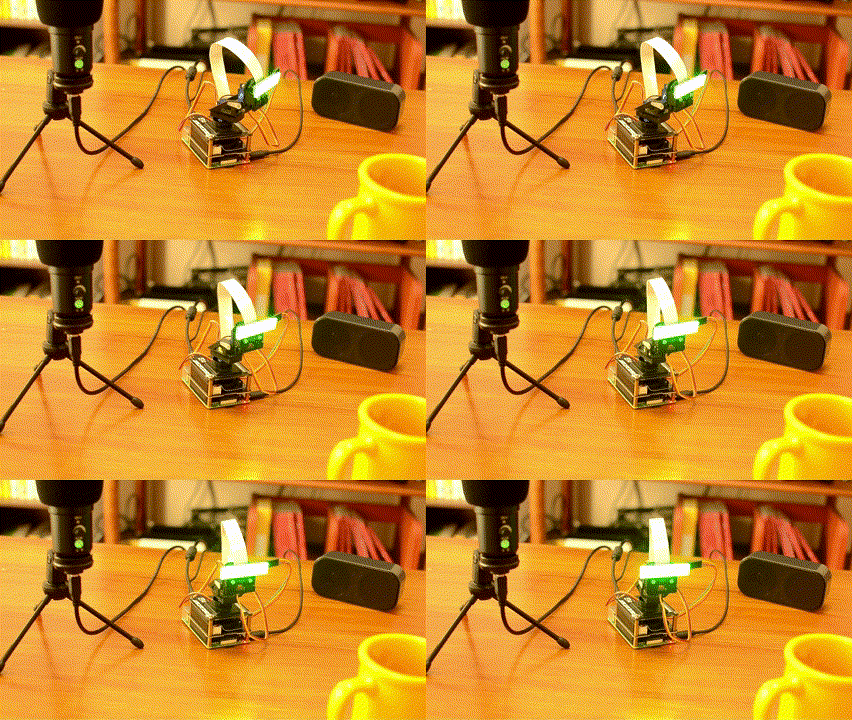
ChatGPT実験ロボット "Voice Assistant Robot_GPT" が物体認識する様子
物体認識
実験ロボットのサンプルプログラムbot_object_detecter.pyファイルで物体認識を行います。内容の説明にあたり、モーターやLED操作の部分を省略したもので解説します。
コンピュータビジョン・ライブラリ OpenCV
前章と同じく、オープンソースのコンピュータビジョン向けライブラリOpenCVを使用します。
仕組み
DNN学習済みモデルは、OpenCVの関数cv2.dnn_DetectionModel()を使って読み込めるため、DNNライブラリを別途インストールすることなく使用できます。また、RaspberryPi OSが64bitに対応したため、以前と比べると推論の速度が大幅に速くなっています。
使用した学習済みDNNモデルは、ssd mobilenet v3です。ダウンロードのリンクは2章にありますのでそちらをご参照ください。データセットcoco.namesに書かれている物体の名称は91種類あるのですが、英語のため、日本語対応JSONファイルcoco_en_ja.json を自作しました。
仕組みづくりには、電子工作用基板の製造メーカーCore Electronics社の公式ブログ[1]を参考にしました。
サンプルプログラム
各ファイルの配置は以下の通りになります。
.
├── dnn_models
│   ├── coco.names
│   ├── coco_en_ja.json
│   ├── frozen_inference_graph.pb
│   └── ssd_mobilenet_v3_large_coco_2020_01_14.pbtxt
└── ex_bot_object_detecter.py
実行ファイルと同じ階層にDNNモデルフォルダを配置します。
import cv2 # ---(※1)
import time
from pathlib import Path

# カメラのクラスを定義 ---(※2)
class Camera():
    def __init__(self):
        self.cap = cv2.VideoCapture(0)
        self.cap.set(3, 640)
        self.cap.set(4, 480)

    def get_frame(self):
        ret, frame = self.cap.read()
        if ret:
            return frame
        return None

    def release_camera(self):
        self.cap.release()

def object_detection(objects=[]): # ---(※3)
    thres = 0.45 # Threshold to detect object
    nms = 0.2

    classNames= []
    classFile = str(Path("dnn_models/coco.names").resolve())
    with open(classFile,"rt") as f:
        classNames = f.read().rstrip("\n").split("\n")

    object_detection_weights = str(Path("dnn_models/frozen_inference_graph.pb").resolve())
    object_detection_config = str(Path("dnn_models/ssd_mobilenet_v3_large_coco_2020_01_14.pbtxt").resolve())

    net = cv2.dnn_DetectionModel(object_detection_weights, object_detection_config)
    net.setInputSize(320,320)
    net.setInputScale(1.0/ 127.5)
    net.setInputMean((127.5, 127.5, 127.5))
    net.setInputSwapRB(True)

    recognized_objects = set()  # ユニークな物体を格納するため、setを使用 ---(※4)

    cam = Camera()  # カメラオブジェクトを作成  ---(※5)

    time_start = time.perf_counter()
    time_end = 0

    while True: # ---(※6)
        frame = cam.get_frame()  # カメラからフレームを取得
        frame = cv2.flip(frame, -1)  # カメラ画像の上下を入れ替える

        classIds, confs, bbox = net.detect(frame,confThreshold=thres,nmsThreshold=nms)

        if len(objects) == 0:
            objects = classNames
        objectInfo =[]

        # 検出した物体のバウンディングボックスを描画する
        frame_output = frame.copy()

        if len(classIds) != 0:
            for classId, confidence,box in zip(classIds.flatten(),confs.flatten(),bbox):
                className = classNames[classId - 1]
                if className in objects:
                    objectInfo.append([box,className])
                    if True:
                        cv2.rectangle(frame_output,box,color=(255,255,255),thickness=1, lineType=cv2.LINE_AA)
                        cv2.putText(frame_output,classNames[classId-1].upper(),(box[0]+10,box[1]+30),
                        cv2.FONT_HERSHEY_SIMPLEX,1,(255,255,255),1)
                        cv2.putText(frame_output,str(round(confidence*100,2)),(box[0]+200,box[1]+30),
                        cv2.FONT_HERSHEY_SIMPLEX,1,(255,255,255),1)

                        print(classNames[classId - 1])
                        recognized_objects.add(classNames[classId - 1])  # ユニークな物体を追加 ---(※7)

        if frame is not None:
            cv2.imshow("Object Detection",frame_output)

        time_end = time.perf_counter() - time_start # ---(※8)

        if time_end > 5:
            break

        key = cv2.waitKey(1)
        if key == ord('q'):
            break

    cam.release_camera()  # カメラを解放  ---(※9)
    cv2.destroyAllWindows()
    return set(recognized_objects) # ---(※10)

if __name__ == '__main__':
    recognized_obj = object_detection()
    print(recognized_obj)
cv2モジュールをインポートし(※1)、OpenCVがカメラモジュールを読み込むクラスを作成します(※2)。
(※3)でプログラム実行関数を定義し、DNNモデルを読み込みます。
実験ロボットはパンチルト機構を活かすため、30秒掛けて水平に180度移動しながら物体認識を行います。認識結果が重複するため、認識結果をset型で保存します。(※4)でecognized_objects変数を用意し、初期化しておきます。
(※5)で初期化したカメラモジュールを読み込みます。
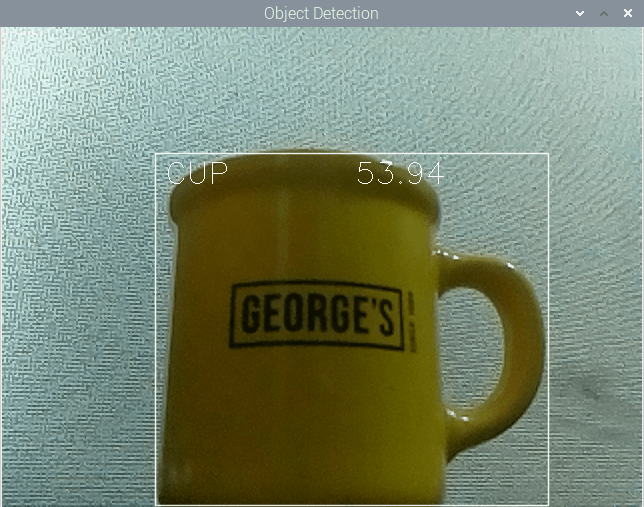
(※6)のループから画像データをストリーミングします。物体認識モデルを利用し、物体が認識されたならば、バウンティボックスと物体名を表示します。

物体を認識した結果
物体認識がされたら初期化した集合に格納し(※7)、ストリーミングループの終了時にset()を使用して重複しない(ユニークな)要素を取り出します(※10)。
5秒間認識を続けたら終了し(※8)、カメラを開放します(※9)。
Discussion