Raspberry PiとChatGPTでつくるボイス・アシスタント・ロボット #5
ChatGPT実験ロボット "Voice Assistant Robot_GPT" が顔識別する様子
顔認識・顔識別
実験ロボットのサンプルプログラム bot_face_data_creator.py ファイルで顔識別のためのデータを作成します。そして、bot_face_track_recognizer.pyファイルで顔識別を行います。内容の説明にあたり、モーターやLED操作の部分を省略したもので解説します。
コンピュータビジョン・ライブラリ OpenCV
OpenCVはインテルが開発・公開したオープンソースのコンピュータビジョン向けライブラリで、画像処理・画像解析および機械学習等で幅広く利用されています。近年のバージョンアップにより、深層学習(DNN)モデルを利用した推論を行うことも可能になっています。
仕組み
@UnaNancyOwen(Tsukasa Sugiura)さんのブログ[1][2]を参考に、顔識別用のデータを作成する仕組みをつくりました。
使用した学習済みDNNモデルのダウンロードのリンクは2章にありますのでそちらをご参照ください。
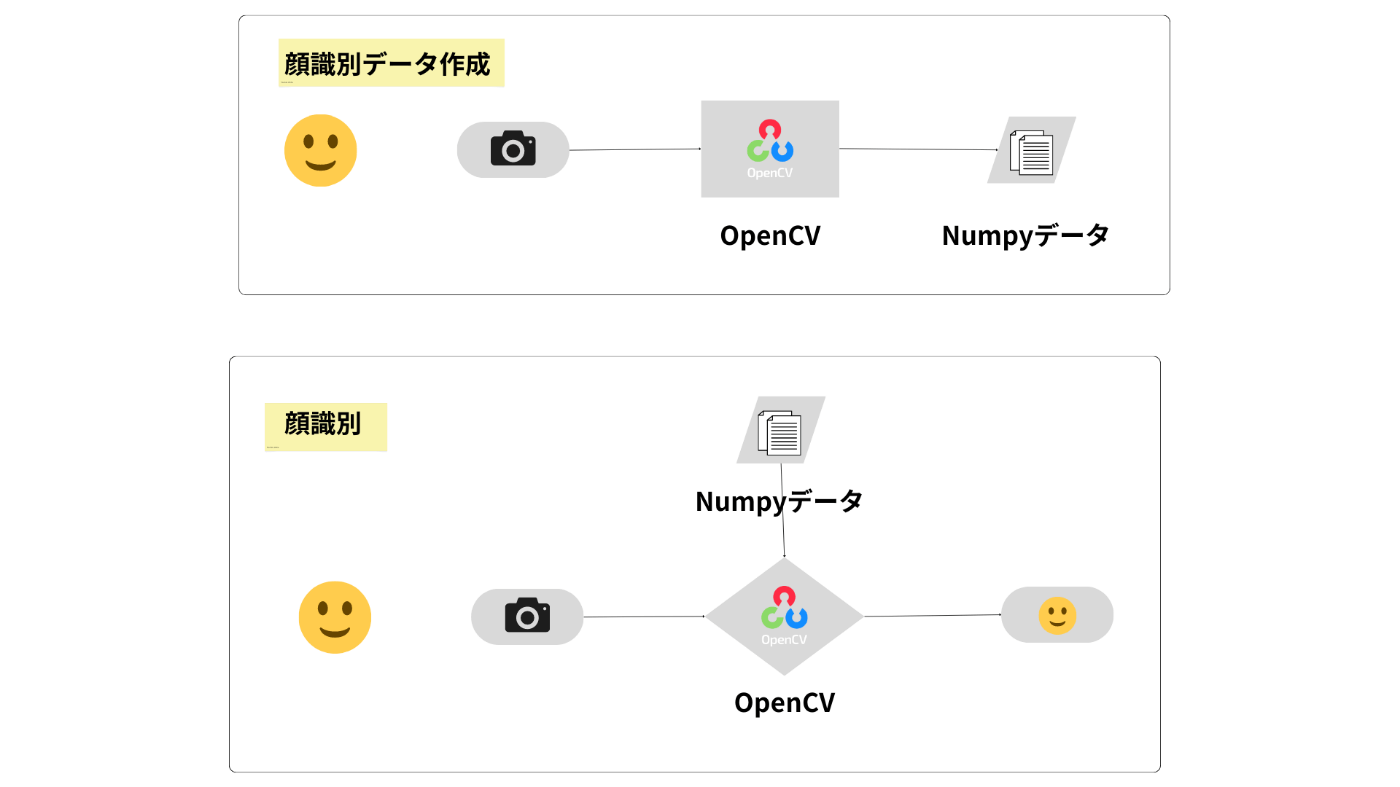
まずは、顔識別用の.npy形式のデータを作成します。ユーザー情報をキーボードを使用して入力し、シャッター用にsキー押下により、顔認識モデルを使い顔画像を切り抜きます。OpenCVは顔識別モデルを使いNunpyデータを作成します。
そして、作成した顔識別モデルを使い、顔の識別を行います。複数の顔画像を使用した学習は必要ありません。
サンプルプログラム
顔識別データ作成
各ファイルの配置は以下の通りになります。
.
├── data
│   └── user_data.json
├── dnn_models
│   ├── age_deploy.prototxt
│   ├── age_net.caffemodel
│   ├── face_recognizer_fast.onnx
│   ├── gender_deploy.prototxt
│   ├── gender_net.caffemodel
│   └── yunet.onnx
├── ex_bot_face_data_creator.py
└── face_dataset
実行ファイルと同じ階層に3つのフォルダを用意します。
-
dnn_modelsフォルダ: 顔認識・顔識別など必要なDNNモデルを格納します。 -
dataフォルダ: ユーザー情報を書き込むJSONファイルを格納します。 -
face_datasetフォルダ: ユーザーの顔画像、顔画像の特徴量を表すNumpyデータを格納します。
import cv2 # ---(※1)
import numpy as np
import json
from pathlib import Path

# カメラのクラスを定義 ---(※2)
class Camera():
    def __init__(self):
        self.cap = cv2.VideoCapture(0)
        self.cap.set(3, 640)
        self.cap.set(4, 480)

    def get_frame(self):
        ret, frame = self.cap.read()
        if ret:
            return frame
        else:
            print("🖥️ SYSTEM: カメラからのフレーム取得に失敗しました。")
            return None


    def release_camera(self):
        self.cap.release()

# jsonファイルを作成する関数 ---(※3)
def save_json(id, name, image, feature, gender, age, category, interested):
    user = {id:{
        "id": id,
        "name": name,
        "image": image,
        "feature": feature,
        "gender": gender,
        "age": age,
        "category": category,
        "interested": interested
    }
    }

    isempty = Path("data/user_data.json").stat().st_size == 0

    if isempty is True:
        with open(Path("data/user_data.json"), "w") as file:
            json.dump(user, file, ensure_ascii=False, indent=4)
    else:
        with open(Path("data/user_data.json")) as file:
            load_user = json.load(file)

        save_user = dict(load_user, **user)

        with open(Path("data/user_data.json"), 'w') as file:
            json.dump(save_user, file, ensure_ascii=False, indent=4)

def face_date_create(): # ---(※4)
    # 顔認識モデルの読み込み
    face_detector_weights = str(Path("dnn_models/yunet.onnx").resolve())
    face_detector = cv2.FaceDetectorYN_create(face_detector_weights, "", (0, 0))

    # 顔識別モデルを読み込む
    face_recognizer_weights = str(Path("dnn_models/face_recognizer_fast.onnx").resolve())
    face_recognizer = cv2.FaceRecognizerSF_create(face_recognizer_weights, "")

    # 年齢識別モデルを読み込む
    ageProto = str(Path("dnn_models/age_deploy.prototxt").resolve())
    ageModel = str(Path("dnn_models/age_net.caffemodel").resolve())

    # 性別識別モデルを読み込む
    genderProto = str(Path("dnn_models/gender_deploy.prototxt").resolve())
    genderModel = str(Path("dnn_models/gender_net.caffemodel").resolve())

    MODEL_MEAN_VALUES = (78.4263377603, 87.7689143744, 114.895847746)
    ageList = ['(0-2)', '(4-6)', '(8-12)', '(15-20)', '(25-32)', '(38-43)', '(48-53)', '(60-100)']
    genderList = ['male', 'female']

    # DNNネットワークに接続
    ageNet = cv2.dnn.readNet(ageModel, ageProto)
    genderNet = cv2.dnn.readNet(genderModel, genderProto)

    # CPU使用を指定
    ageNet.setPreferableBackend(cv2.dnn.DNN_TARGET_CPU)
    genderNet.setPreferableBackend(cv2.dnn.DNN_TARGET_CPU)

    # ユーザーデータの初期化
    user_id = ""
    user_name = ""
    user_image = ""
    user_feature = ""
    user_gender = ""
    user_age = ""
    user_category = ""
    user_interested = ""

    # ユーザー名、ユーザーIDの入力 ---(※5)
    print("🖥️ SYSTEM: ユーザー名をひらがな(またはカタカナ)で入力してEterキーを押してください")
    user_name = input("> ")
    print("🖥️ SYSTEM: ユーザーIDをアルファベット(正規表現)で入力してEnterキーを押してください")
    user_id = input("> ")
    print("🖥️ SYSTEM: 興味のあることをひとつ入力してEnterキーを押してください")
    user_interested = input("> ")
    print("🖥️ SYSTEM: 画像データを 撮影します\n撮影はSキーを押してください\n終了はQキーを押してください")

    cam = Camera()  # カメラオブジェクトを作成 ---(※6)

    while(True): # ---(※7)
        frame = cam.get_frame()  # カメラからフレームを取得
        frame = cv2.flip(frame, -1)  # カメラ画像の上下を入れ替える

        # 入力サイズを指定する
        height, width, _ = frame.shape
        face_detector.setInputSize((width, height))

        # 顔を検出する
        _, faces = face_detector.detect(frame)
        faces = faces if faces is not None else []

        # 検出した顔のバウンディングボックスとランドマークを描画する
        frame_output = frame.copy()

        for face in faces:
            # バウンディングボックス
            x, y, w, h = list(map(int, face[:4]))
            color = (255, 255, 255)
            thickness = 1
            cv2.rectangle(frame_output, (x, y), (x + w, y + h), color, thickness, cv2.LINE_AA)

            # ランドマーク(右目、左目、鼻、右口角、左口角)
            landmarks = list(map(int, face[4:len(face)-1]))
            landmarks = np.array_split(landmarks, len(landmarks) / 2)
            for landmark in landmarks:
                radius = 3
                thickness = -1
                cv2.circle(frame_output, landmark, radius, color, thickness, cv2.LINE_AA)

        # 画像を表示する
        cv2.imshow("face data create", frame_output)
        key = cv2.waitKey(10)

        # sキーでシャッターを切り、DNNモデルを使用しデータを取る ---(※8)
        if key == ord('s'):
            # 検出された顔を切り抜く
            aligned_faces = []
            if faces is not None:
                for face in faces:
                    aligned_face = face_recognizer.alignCrop(frame, face)
                    aligned_faces.append(aligned_face)

            # 画像を保存する
            for i, aligned_face in enumerate(aligned_faces):
                user_image = user_id + ".jpg"
                cv2.imwrite((str(Path("face_dataset/" + user_image))), aligned_face)
                cv2.imshow("aligned_face", aligned_face)

                # 特徴を抽出する
                aligned_face_img = cv2.imread(str(Path("face_dataset/" + user_image)))
                face_feature = face_recognizer.feature(aligned_face_img)

                # 特徴を保存する
                user_feature = user_id + ".npy"
                dictionary = Path("face_dataset/" + user_feature)
                np.save(dictionary , face_feature)

            # 性別を推論する
            blob = cv2.dnn.blobFromImage(frame_output, 1.0, (227, 227), MODEL_MEAN_VALUES, swapRB=False)
            genderNet.setInput(blob)
            genderPreds = genderNet.forward()
            user_gender = genderList[genderPreds[0].argmax()]
            print("🖥️ SYSTEM: 性別 : {}, conf = {:.3f}".format(user_gender, genderPreds[0].max()))

            # 年齢を推論する
            ageNet.setInput(blob)
            agePreds = ageNet.forward()
            user_age = ageList[agePreds[0].argmax()]
            print("🖥️ SYSTEM: 年齢 : {}, conf = {:.3f}".format(user_age, agePreds[0].max()))

            # カテゴリー分類
            if user_age in ageList[:4]:
                if user_gender == "male":
                    user_category = "boy"
                else:
                    user_category = "girl"
            elif user_age in ageList[4: 8]:
                if user_gender == "male":
                    user_category = "man"
                else:
                    user_category = "woman"

            # jsonファイルを保存する  ---(※9)
            save_json(user_id, user_name, user_image, user_feature, user_gender, user_age, user_category, user_interested)
            print("🖥️ SYSTEM: ユーザーデータ\n"
                  f"ID: {user_id} \n"
                  f"名前: {user_name} \n"
                  f"写真: {user_image} \n"
                  f"特徴量: {user_feature} \n"
                  f"性別: {user_gender} \n"
                  f"年齢: {user_age} \n"
                  f"分類: {user_category} \n"
                  f"興味: {user_interested} \n"
                  "を保存しました")

        if key == ord('q'):
            print("🖥️ SYSTEM: 撮影を終了します")
            break

    cam.release_camera()  # カメラを解放   ---(※10)
    cv2.destroyAllWindows()

if __name__ == '__main__':
    face_date_create()
cv2モジュールをインポートし(※1)、OpenCVがカメラモジュールを読み込むクラスを作成します(※2)。
(※3)でユーザー情報を格納するJSONファイルを作成する関数を定義します。
(※4)でプログラム実行関数を定義し、各DNNモデルを読み込みます。
(※5)のinput()関数を使いユーザーが入力した「ユーザーID」・「ユーザーの名前」・「ユーザーの興味」データを取得します。
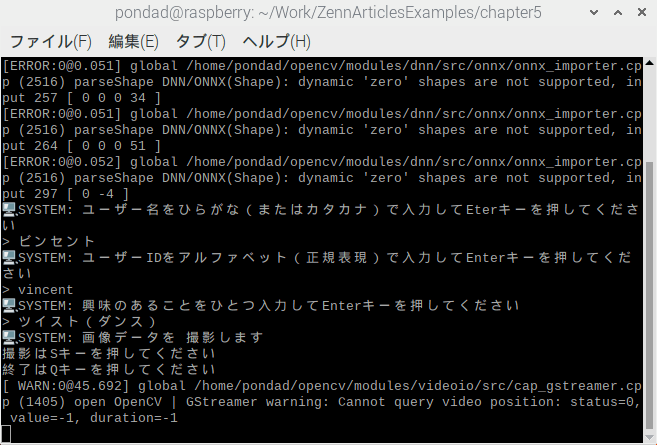
ターミナル確認したユーザー情報を入力
(※6)で初期化したカメラモジュールを読み込みます。
(※7)のループ処理により画像データをストリーミングします。顔認識モデルを使用し、顔が認識されたならば、画像の表示領域にバウンティボックスとランドマークを表示します。
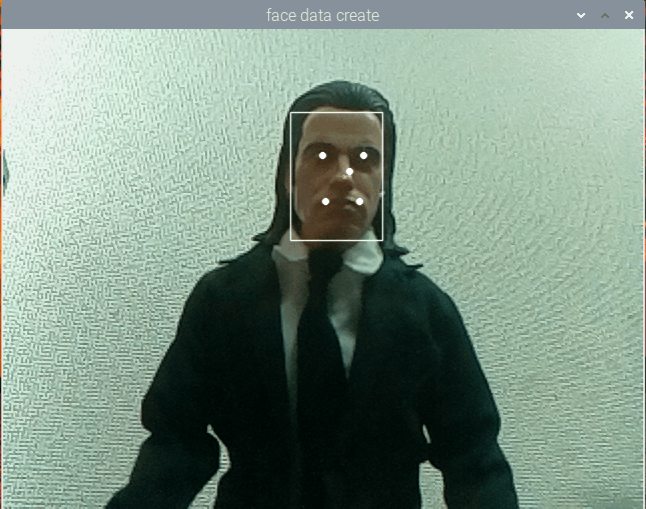
バウンティボックスとランドマーク
(※8)顔画像の切り出しはユーザーがsキー押下により行います。画像取得後brake設定をしていないので何度でも取り直しが可能です。顔画像取得とともにユーザーの年齢性別の推論を行い属性を取得します。
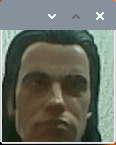
切り抜かれた顔画像
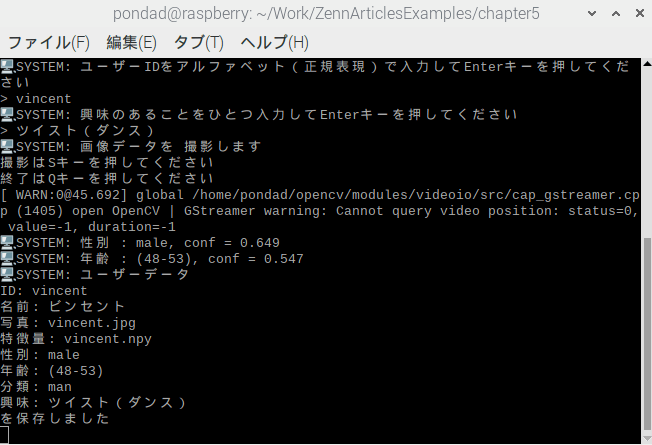
ターミナルで確認した推論結果
(※9)事前に定義した関数を使い、ユーザー情報をJSONファイルに保存します。
{
    "vincent": {
        "id": "vincent",
        "name": "ビンセント",
        "image": "vincent.jpg",
        "feature": "vincent.npy",
        "gender": "male",
        "age": "(38-43)",
        "category": "man",
        "interested": "ツイスト(ダンス)"
    },
}
(※10)プログラムの終了はユーザーのqキー押下により行います。その際、読み込んだカメラモジュールを開放します。
顔識別
各ファイルの配置は以下の通りになります。
.
├── data
│   └── user_data.json
├── dnn_models
│   ├── face_recognizer_fast.onnx
│   └── yunet.onnx
├── ex_bot_face_track_recognizer.py
└── face_dataset
    ├── vincent.jpg
    └── vincent.npy
実行ファイルと同じ階層に3つのフォルダを用意します。face_datasetフォルダに先程作成したユーザーの顔画像.jpgファイル、顔画像の特徴量を表すNumpyデータ.npyファイルが格納されていることをご確認ください。
import cv2 # ---(※1)
import numpy as np
import time
from pathlib import Path
from collections import Counter

# カメラのクラスを定義 ---(※2)
class Camera():
    def __init__(self):
        self.cap = cv2.VideoCapture(0)
        self.cap.set(3, 640)
        self.cap.set(4, 480)

    def get_frame(self):
        ret, frame = self.cap.read()
        if ret:
            return frame
        else:
            print("カメラからのフレーム取得に失敗しました。")
            return None

    def release_camera(self):
        self.cap.release()

def face_recognize(): # ---(※3)
    # モデルの読み込み
    face_detector_weights = str(Path("dnn_models/yunet.onnx").resolve())
    face_detector = cv2.FaceDetectorYN_create(face_detector_weights, "", (0, 0))

    # 顔識別モデルを読み込む
    face_recognizer_weights = str(Path("dnn_models/face_recognizer_fast.onnx").resolve())  # 顔認識用のweights
    face_recognizer = cv2.FaceRecognizerSF_create(face_recognizer_weights, "")

    COSINE_THRESHOLD = 0.363

    # 特徴を読み込み特徴量辞書をつくる ---(※4)
    dictionary = []
    files = Path("face_dataset").glob("*.npy")
    for file in files:
        feature = np.load(file)
        user_id = Path(file).stem
        dictionary.append((user_id, feature))

    # 特徴を辞書と比較してマッチしたユーザーとスコアを返す関数
    def match(recognizer, feature1, data_directory):
        for element in data_directory:
            user_id, feature2 = element
            score = recognizer.match(feature1, feature2, cv2.FaceRecognizerSF_FR_COSINE)
            if score > COSINE_THRESHOLD:
                return True, (user_id, score)
        return False, ("", 0.0)

    recognized_ids =[]

    cam = Camera()  # カメラオブジェクトを作成 ---(※5)

    time_start = time.perf_counter()
    time_end = 0

    while True: # ---(※6)
        frame = cam.get_frame()  # カメラからフレームを取得
        frame = cv2.flip(frame, -1)  # カメラ画像の上下を入れ替える

        # 入力サイズを指定する
        height, width, _ = frame.shape
        face_detector.setInputSize((width, height))

        # 顔を検出する
        _, faces = face_detector.detect(frame)
        faces = faces if faces is not None else []

        # 検出した顔のバウンディングボックスとランドマークを描画する
        frame_output = frame.copy()

        for face in faces:
            # 顔を切り抜き特徴を抽出する
            aligned_face = face_recognizer.alignCrop(frame, face)
            feature = face_recognizer.feature(aligned_face)

            # 辞書とマッチングする ---(※7)
            result, user = match(face_recognizer, feature, dictionary)

            # マッチングしたらボックスとテキストの色を変える
            if result is True:
                color = (0,255,0)
            else:
                color = (255,255,255)

            # バウンディングボックス
            x, y, w, h = list(map(int, face[:4]))
            thickness = 1
            cv2.rectangle(frame_output, (x, y), (x + w, y + h), color, thickness, cv2.LINE_AA)

            # ランドマーク(右目、左目、鼻、右口角、左口角)
            landmarks = list(map(int, face[4:len(face)-1]))
            landmarks = np.array_split(landmarks, len(landmarks) / 2)
            for landmark in landmarks:
                radius = 3
                thickness = -1
                cv2.circle(frame_output, landmark, radius, color, thickness, cv2.LINE_AA)

            # 認識の結果を描画する
            id, score = user if result else ("unknown", 0.0)
            text = "{0} ({1:.2f})".format(id, score)
            position = (x, y - 10)
            font = cv2.FONT_HERSHEY_SIMPLEX
            scale = 0.6
            thickness = 1
            cv2.putText(frame_output, text, position, font, scale, color, thickness, cv2.LINE_AA)

            # マッチングしたらIDを一度だけ追加する ---(※8)
            if result:
                recognized_ids.append(id)

            break

        if frame is not None:
            cv2.imshow("face detection", frame_output)

        time_end = time.perf_counter() - time_start  # ---(※9)
        if time_end > 5:
            break

        key = cv2.waitKey(1)
        if key == ord('q'):
            break

    cam.release_camera()   # カメラを解放   ---(※10)
    cv2.destroyAllWindows()
    return Counter(recognized_ids).most_common()[0][0]   # ---(※11)

if __name__ == '__main__':
    recognized_id = face_recognize()
    print(recognized_id)
cv2モジュールをインポートし(※1)、OpenCVがカメラモジュールを読み込むクラスを作成します(※2)。
(※3)でプログラム実行関数を定義し、各DNNモデルを読み込みます。(※4)で顔画像から抽出した特徴量.npyファイルを読み込みユーザーIDと対にして特徴量辞書をつくります。
(※5)で初期化したカメラモジュールを読み込みます。
(※6)のループから画像データをストリーミングします。顔認証モデルを利用し顔が認識されればバウンティボックスとランドマークを表示します。
顔画像が検出されたならば、特徴量辞書と照会を行います(※7)。
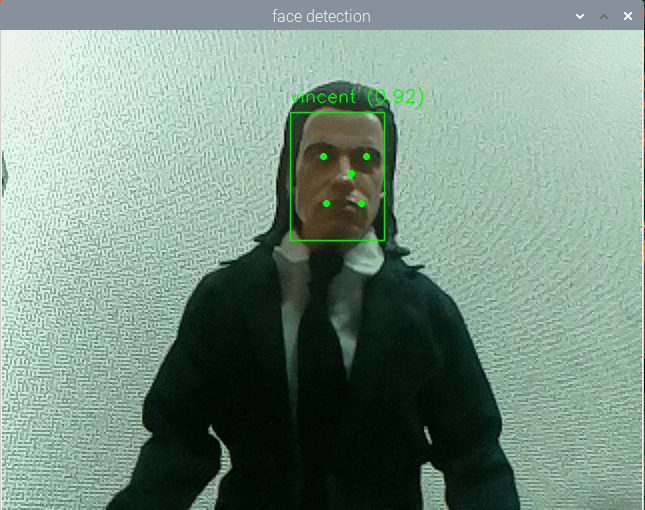
特徴量辞書との照会結果
ユーザーIDがマッチングされたら一度配列の中に格納し(※8)、配列の中で一番多い要素を識別されたIDとして確定します(※11)。これは誤認識が出た際の対策です。
5秒間認識を続けたら終了し(※9)、カメラを開放します(※10)。
Discussion