Notion API × GAS(Google Apps Script)を使って議事録のテンプレを自動作成してみた
はじめに/概要
Notion APIとGAS(Google apps scripts)を使って、週次ミーティングの議事録テンプレートを自動作成する方法を紹介します。
開発メンバーでNotionを利用しているのですが、週次ミーティングで使用するテンプレートを毎週自動で作成できないかと思い、作りました。特にGASで書いている記事が少なかったので参考にされば嬉しいです。
自動作成はしなくても、Notion APIを使用してみたい方でも大丈夫な内容になっています。
対象
Notion APIを使ってみたい方
定期的なミーティングなどで、テンプレを作成することが億劫な方(エンジニアの素質あり!!)
目標
Notion APIをGASで使ってみること。
自動で議事録のテンプレートを作成する実装ができること。
事前準備
NotionのAPIを使用するために、トークンの発行が必要です。
以下のNotion公式ドキュメントのSTEP1・2までを実施してください。
STEP2が終了した私の状態は以下のとおりです。

次に、作成したデータベースのIDをメモしておきます。データベースのIDはこのページのリンクの一部になります。具体的には、下の....notion.so/と?v=zzz...の間に記載のある32文字の数字とアルファベットの組み合わせがデータベースIDとなります。
例)
https://www.notion.so/xxxxxxxxxx0123456789xxxxxxxxxx12?v=zzzzzzzzzzzzzzzzz
↑の例なら以下が、データベースのIDになる。
xxxxxxxxxx0123456789xxxxxxxxxx12
CurlコマンドでNotionにページを新規作成する
まずは、terminalで実行できるcurlコマンドで新規ページを作成します。
Macbookの方はcurlコマンドがデフォルトで使えるため、terminalを開いて以下を実施します。
curl -X POST https://api.notion.com/v1/pages \
  -H "Authorization: Bearer {ここにNotionのToken}" \
  -H "Content-Type: application/json" \
  -H "Notion-Version: 2021-08-16" \
  --data '{
    "parent": { "database_id": "{ここにデータベースのID}" },
    "properties": {
      "名前": {
        "title": [
          {
            "text": {
              "content": "2022/01/10 週次ミーティング"
            }
          }
        ]
      }
    }
  }'
Notion TokenとデータベースIDが以下だとすると、
NotionのToken: 1234567890abcdefghijklmnopqrstuvwsyz
データベースのID: qazwsxedcrfvtgbyhnujmik
terminalで実施するコマンドは以下のとおりです。
curl -X POST https://api.notion.com/v1/pages \
  -H "Authorization: Bearer 1234567890abcdefghijklmnopqrstuvwsyz" \
  -H "Content-Type: application/json" \
  -H "Notion-Version: 2021-08-16" \
  --data '{
    "parent": { "database_id": "qazwsxedcrfvtgbyhnujmik" },
    "properties": {
      "名前": {
        "title": [
          {
            "text": {
              "content": "2022/01/10 週次ミーティング"
            }
          }
        ]
      }
    }
  }'
実行すると、以下のようになります。
{"object":"page","id":"xxxxxxx-xxxxx","created_time":"2022-01-08T09:16:00.000Z","last_edited_time":"2022-01-08T09:16:00.000Z","cover":null,"icon":null,"parent":{"type":"database_id","database_id":"zzzzzzzzzzz"},"archived":false,"properties":{"タグ":{"id":"MAa%7C","type":"multi_select","multi_select":[]},"名前":{"id":"title","type":"title","title":[{"type":"text","text":{"content":"2022/01/10 週次ミーティング","link":null},"annotations":{"bold":false,"italic":false,"strikethrough":false,"underline":false,"code":false,"color":"default"},"plain_text":"2022/01/10 週次ミーティング","href":null}]}},"url":"https://www.notion.so/2022-01-09-c24fddd8c6ff4d90b67b55c28d53bfb6"}
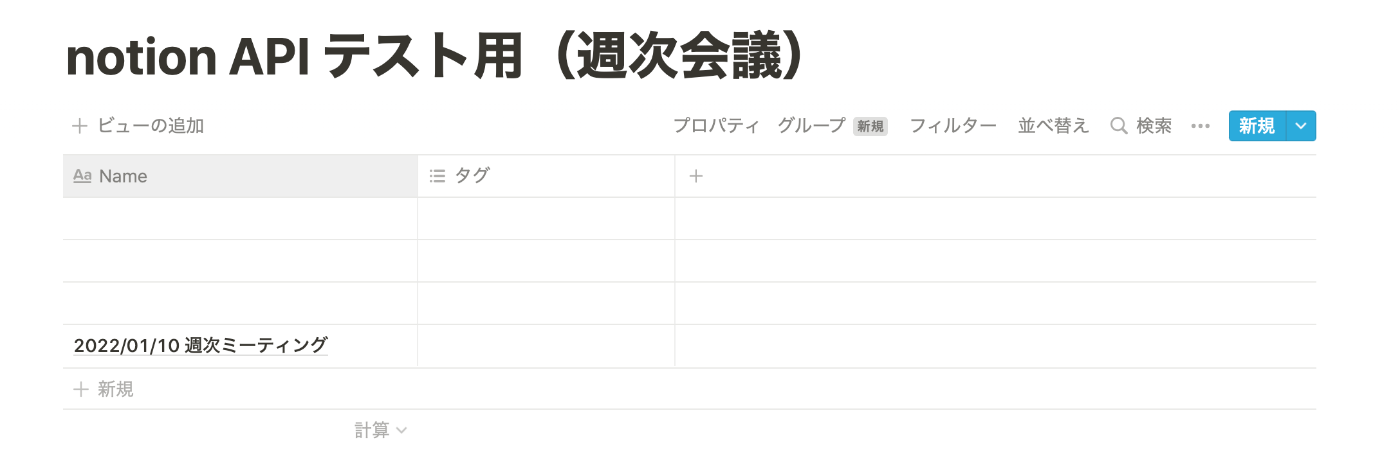
notionでも確認してみると、以下のように一つページが追加されたのがわかります。

ここまで確認できれば、curlコマンドを使ったページの追加はOKです。
ここで、以下のようなエラーが出た場合ですが、
“名前”というプロパティがない、と怒られています。
// エラー例
{"object":"error","status":400,"code":"validation_error","message":"名前 is not a property that exists."}
原因は、propertyに"名前"が存在しないため、起きているエラーです。
対応としては、以下のように、テーブルのpropertyに”名前”があるか、確認をしてください。
GASでNotionにページを新規作成する
続いて、GASでページを新たに作ってみましょう。
Google Apps Scriptを開き、以下のコードをコピペして、createTodayMeetingPageを実行してください。
const notionHeader = token => ({
  'Content-Type': 'application/json',
  'Authorization': 'Bearer ' + token,
  'Notion-Version': '2021-08-16'
})

const createPage = (dbId, token, meetingDate) => {
  const endPoint = `https://api.notion.com/v1/pages`

  const content_data = {
    parent: {
      database_id: dbId,
    },
    properties: {
      Name: {
        title: [{
          text: {
            content: `[定例]${meetingDate}`
          }
        }]
      },
      Tag: {
        multi_select:[
          {
            "name": "mtg"
          }
        ]
      }
    }
  }
  const options = {
    method: 'post',
    headers: notionHeader(token),
    payload: JSON.stringify(content_data)
  }
  const resp = UrlFetchApp.fetch(endPoint, options)
  return JSON.parse(resp.getContentText())
}

// 実行する関数
const createTodayMeetingPage = () => {
  const dbid = "{DBのID}"
  const token = "{notionのトークン}"
  const now = new Date()
  const meetingDate = now.toLocaleDateString("ja-JP", { timeZone: "Asia/Tokyo" })

  const result = createPage(dbid, token, meetingDate)
  console.log(result)
}
エラーが特に出ていなければ、notionを確認してみましょう。
一番上のものが入っていればOKです。(下二つは無視してもらって大丈夫です。また、curlコマンドで作成したページは削除しております。)
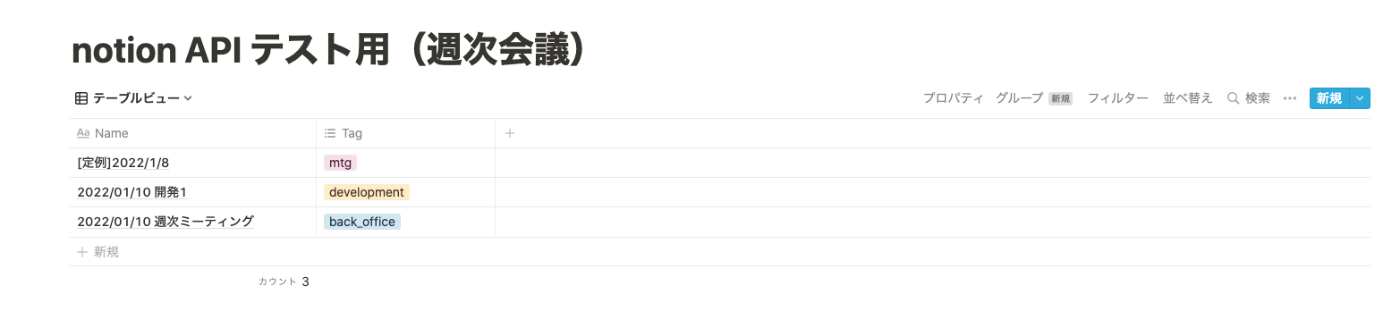
今回は”Tag”のpropertyを”mtg”で一つにしましたが、複数にしたり、存在しないタグを指定しても大丈夫です。上記コードのTagの部分は以下のように変更して、実行してみてください。
Tag: {
        multi_select:[
          {
            "name": "mtg"
          },
	  {
            "name": "strategy"
          },
        ]
      }
実行後、成功したら、notionを確認します。
このように、複数のタグが設定され、かつ新規のタグが作成されました。

ページの中身をGASで書く
これまで、curlコマンドやGASで行ってきた実装は、ページのタイトルとタグをつけるのみで、中身自体には何も記載しておりませんでした。
ですので、中身自体をGASで書く方法を紹介します。
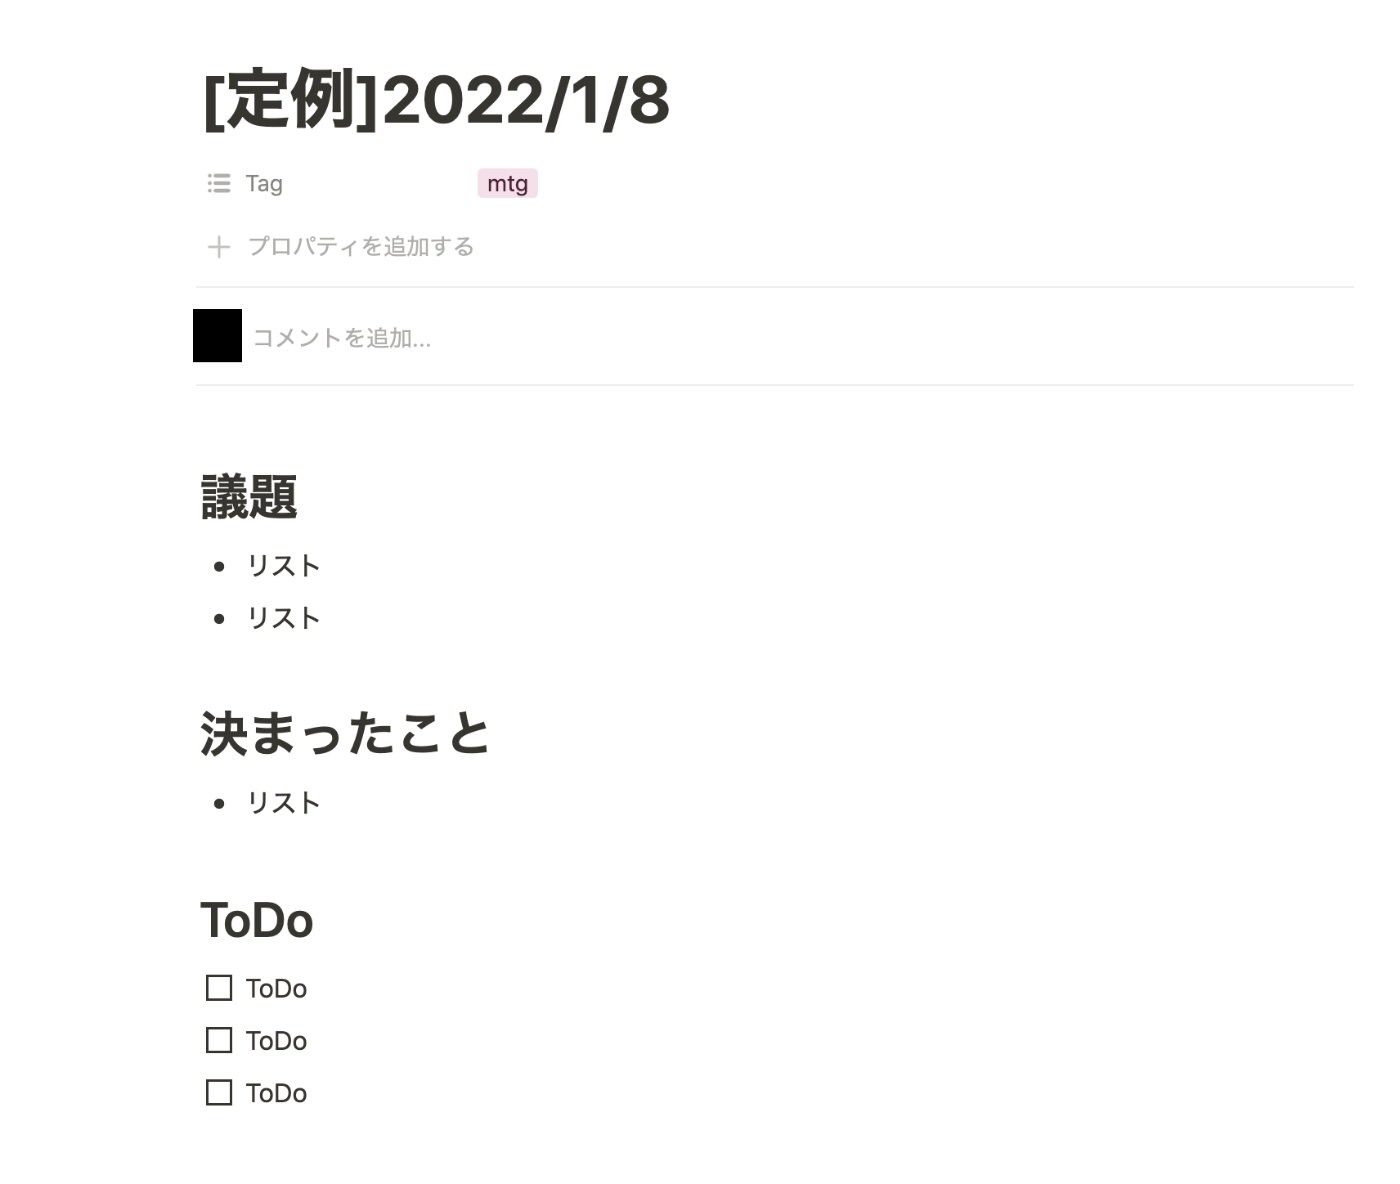
先に目標物を見ていきます。
テーブル:NameとTagをこれまで通りに設定します。

ページの中身:h1タグとListとチェックボックスを入れたものになっています。
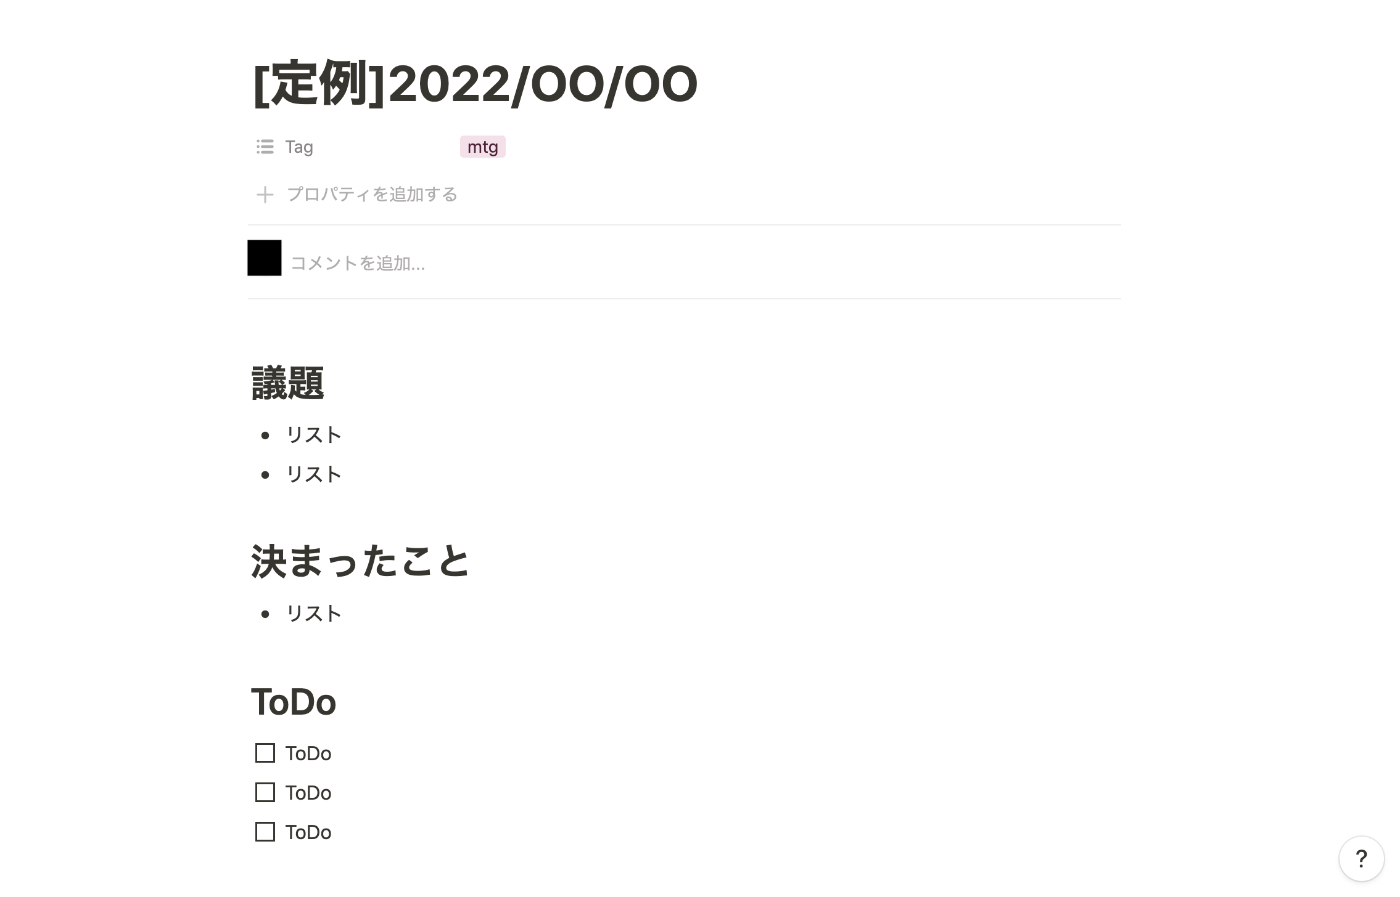
目標物が確認できたため、実際に以下のコードをコピペしてください。
const headerInfo = token => ({
  'Content-Type': 'application/json',
  'Authorization': 'Bearer ' + token,
  'Notion-Version': '2021-08-16'
})

// Create a diary page for the given date
const createPage = (dbId, token, meetingDate) => {
  const endPoint = `https://api.notion.com/v1/pages`

  const content_data = {
    parent: {
      database_id: dbId,
    },
    properties: {
      Name: {
        title: [{
          text: {
            content: `[定例]${meetingDate}`
          }
        }]
      },
      Tag: {
        multi_select:[
          {
            "name": "mtg"
          }
        ]
      }
    },
    // childrenがページ自体の中身に値します。
    "children": [
    // h1タグのブロック
      {
        "object": "block",
        "type": "heading_1",
        "heading_1": {
          "text": [
            {
              "type": "text",
              "text": {
                "content": "議題"
                }
            }
          ]
        }
      },
      // Listのブロック
      {
        "type": "bulleted_list_item",
        //...other keys excluded
        "bulleted_list_item": {
          "text": [{
            "type": "text",
            "text": {
              "content": "",
              "link": null
            }
          }],
        }
      },
      // Listのブロック
      {
        "type": "bulleted_list_item",
        "bulleted_list_item": {
          "text": [{
            "type": "text",
            "text": {
              "content": "",
              "link": null
            }
          }],
        }
      },
      // h1タグのブロック
      {
        "object": "block",
        "type": "heading_1",
        "heading_1": {
          "text": [
            {
              "type": "text",
              "text": {
                "content": "決まったこと"
                }
            }
          ]
        }
      },
      // Listのブロック
      {
        "type": "bulleted_list_item",
        "bulleted_list_item": {
          "text": [{
            "type": "text",
            "text": {
              "content": "",
              "link": null
            }
          }],
        }
      },
      // h1タグのブロック
      {
        "object": "block",
        "type": "heading_1",
        "heading_1": {
          "text": [
            {
              "type": "text",
              "text": {
                "content": "ToDo"
                }
            }
          ]
        }
      },
      // チェックボックスのブロック
      {
        "type": "to_do",
        "to_do": {
          "text": [{
            "type": "text",
            "text": {
              "content": "",
              "link": null
            }
          }],
          "checked": false,
        }
      },
      // チェックボックスのブロック
      {
        "type": "to_do",
        "to_do": {
          "text": [{
            "type": "text",
            "text": {
              "content": "",
              "link": null
            }
          }],
          "checked": false,
        }
      },
      // チェックボックスのブロック
      {
        "type": "to_do",
        "to_do": {
          "text": [{
            "type": "text",
            "text": {
              "content": "",
              "link": null
            }
          }],
          "checked": false,
        }
      }
    ]
  }
  const options = {
    method: 'post',
    headers: headerInfo(token),
    payload: JSON.stringify(content_data)
  }
  const resp = UrlFetchApp.fetch(endPoint, options)
  return JSON.parse(resp.getContentText())
}

const createTodayMeetingPage = () => {
  const dbid = "{DBのID}"
  const token = "{notionのトークン}"
  const now = new Date()
  const meetingDate = now.toLocaleDateString("ja-JP", { timeZone: "Asia/Tokyo" })

  const result = createPage(dbid, token, meetingDate)
  console.log(result)
}
childrenの配列部分にページの中身に入れるブロックを追加していきます。
ブロックには以下のように、たくさんの種類があります。いくつかよく使用するものを例にあげます。
ブロック要素の例
"paragraph":段落
"bulleted_list_item":黒点のリスト
"numbered_list_item":数字のリスト
"to_do":チェックボックス
"header_1":h1タグ
"table":テーブル
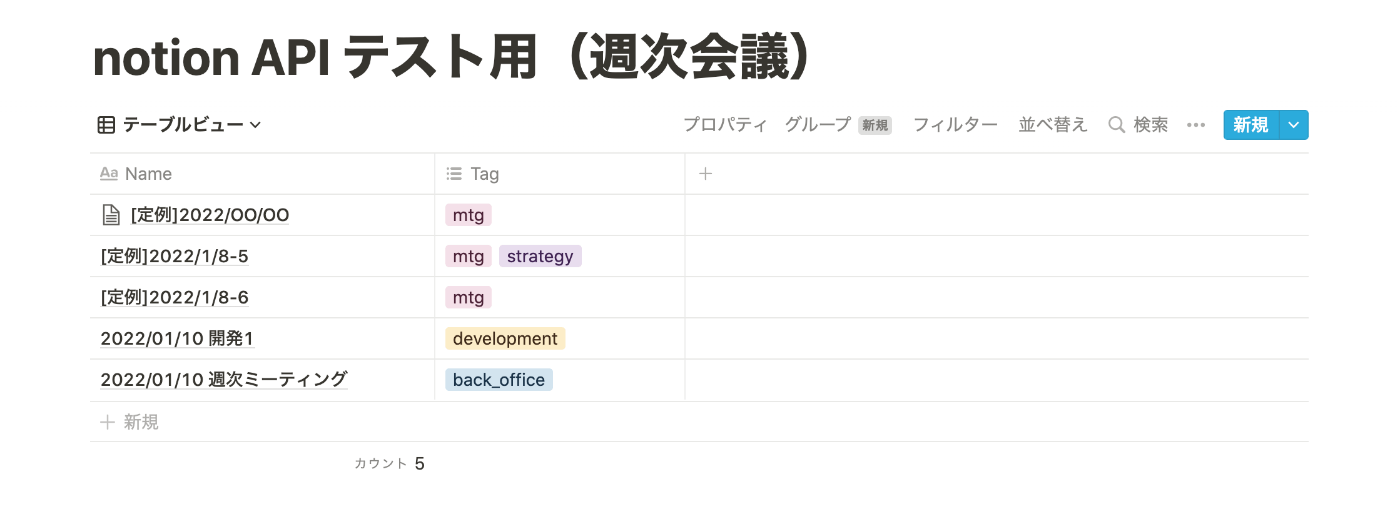
createTodayMeetingPage関数の実行・成功後、notionの方を見ると、以下のように、なっていれば成功です。
テーブル:
中身:
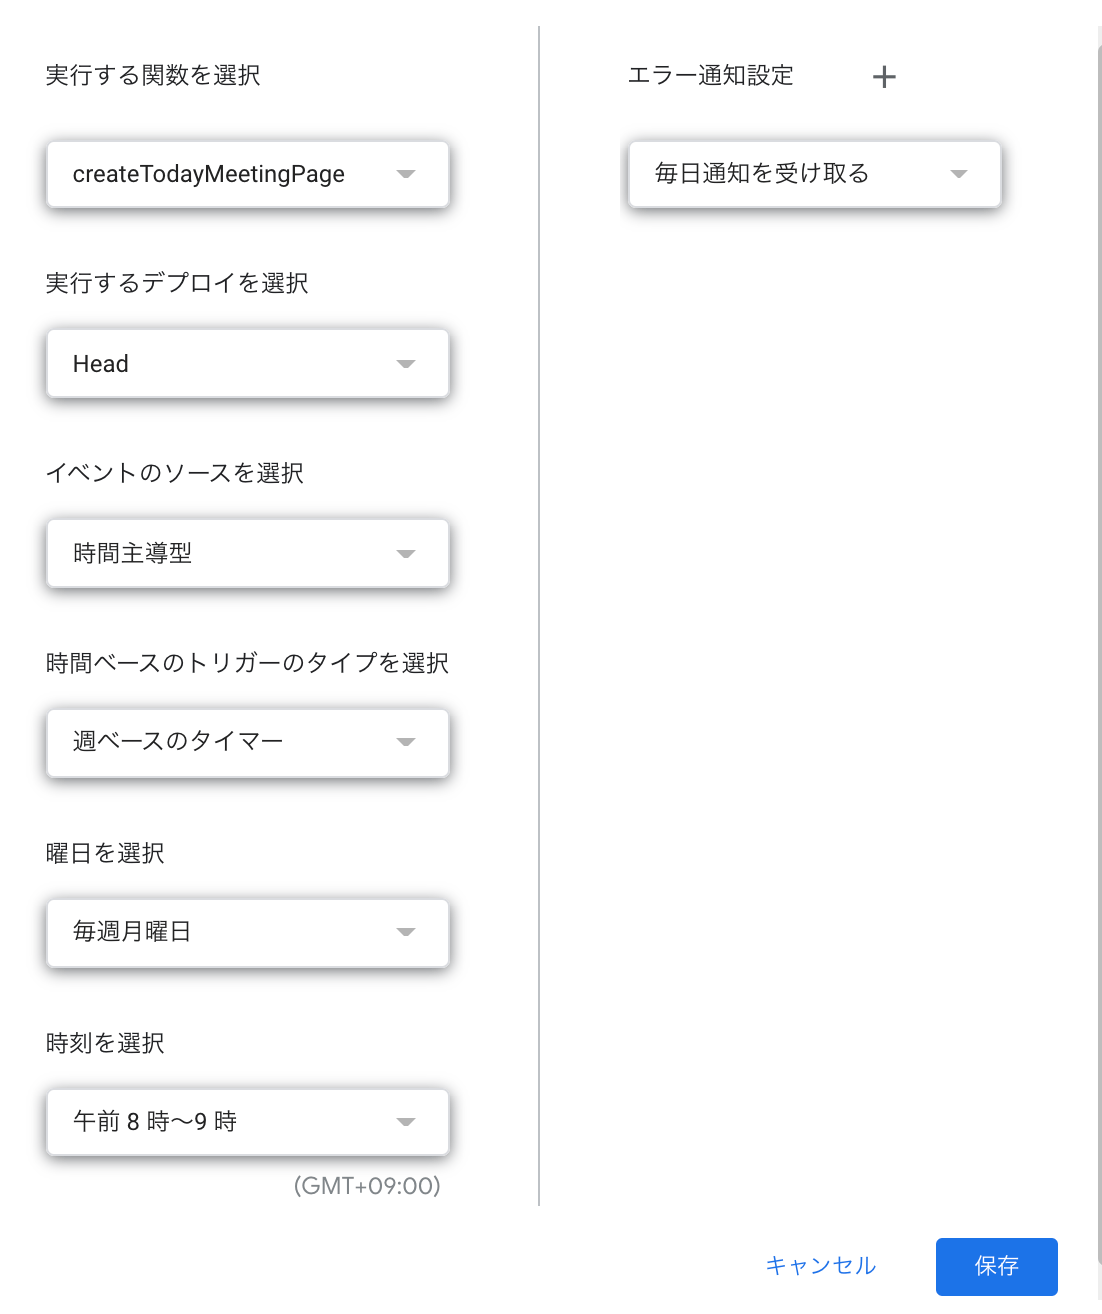
毎週決まった時間に自動作成する
最後に、今回作成したコードを毎週決まった時間に実行するようにします。
GASのメニューから「トリガー」を押して、トリガー一覧画面に進みます。
その後、右下の「トリガーを追加」を選択して、関数を実行するトリガーの設定を行います。

設定はお好みで大丈夫です。今回の場合は、毎週月曜日午前8:00-9:00の間に「createTodayMeetingPage」関数を実行するようにしております。
最後に
まだまだnotion APIの使い方はありそうなので、GASをベースに記事にしたいと思います。
少しでも皆さんの役に立てば嬉しいです。
以上で終了です。お疲れ様でした!
参考になった方は、ぜひ、いいねをいただけると嬉しいです!
Discussion