Viteを使用したkintoneモバイルカスタム開発
はじめに
Reactの開発環境の構築で、Create React Appの代わりにViteを第一の選択とするようにTheo氏が呼びかけました。
viteの影響力はvueからreactに広がっており、フロントエンドのエンジニアリング開発において、ますます人気が出てきています。webpackからviteに切り替える時期が来たと言えるでしょう。
なぜviteを使用するのか
ViteはES Moduleに基づく開発サーバーを採用しています。
ローカルで開発する際には、HMRを使用することで速度が大幅に向上します。webpackと比較して、多くの利点があります:
- より高速なホットアップデートメカニズム
- より高速なパッケージング効率
- よりシンプルな設定
kintoneの開発を行う際には、viteで開発、構築を行う記事について調べてみました。
vite(rollup)を使用してkintoneのカスタムjsをパッケージ化する方法を紹介する記事はありましたが、
viteを使用してkintoneの開発を行う方法についての記事は見つけられませんでした。そこで、この問題を解決するviteプラグインを開発しました。
vite-plugin-kintone-dev
このプラグインの機能:
- viteを使用してkintoneのカスタムjsを作成し、hmrを使用して開発を高速化
- react、vueなどの異なるフロントエンドフレームワークをサポート
- ビルド時にパッケージングと自動アップロードkintoneをサポート
実践:kintoneのモバイル版のカスタマイズ
今回はviteプラグインと組み合わせて、kintoneのモバイル版のカスタム開発を例に解説します。
完成イメージはこちらです:完成イメージ
技術スタック:vite4 + vue3 + vant4
1. viteのスケルトンを使用してvueプロジェクトを初期化
まず、viteのスケルトンツールを使用してvueプロジェクトを作成します。
npm create vue@latest
プロジェクト名を設定します: kintone-mobile-custom(任意のプロジェクト名を設定してください)
vue、TypeScriptを選択し、要件に応じて選択します。そして初期化インストールを行います。
cd kintone-mobile-custom
npm install
2. kintone開発のviteプラグインをインストール
npm install -D vite-plugin-kintone-dev
初回起動時に、自動的にenvファイルの設定テンプレートをチェックします。
設定がない場合は、コマンドラインインタラクションを起動して設定情報を入力させ、自動的にenvファイルを更新します。
(serveモードでは ".env.development" ファイル、buildモードでは ".env.production" ファイル)
プラグインの説明
{
   outputName: "mobile",   //最終的なパッケージの名前
   upload: true
}
viteの設定
import { defineConfig } from "vite";
import vue from "@vitejs/plugin-vue";
import kintoneDev from "vite-plugin-kintone-dev";

// https://vitejs.dev/config/
export default defineConfig({
  plugins: [
    vue(),
    kintoneDev({
      outputName: "mobile",
      upload: true
    }),
  ],
});
3. 他のライブラリのインストール
画像ライブラリ
次に、画像ライブラリを設定します。
非常によく使われるプラグイン画像ライブラリUnplugin Icons
npm install -D unplugin-icons unplugin-vue-components
その具体的な設定は、公式ウェブサイトを参照してください。
すべてのiconリソースを追加しますが、実際のパッケージング時には、必要に応じてロードされます。
npm i -D @iconify/json
モバイルUIライブラリ
次に、vantというライブラリを使用して、モバイル開発のUIライブラリとします。
npm install vant
tsconfig.app.jsonの設定
...
"compilerOptions": {
    "types": ["unplugin-icons/types/vue"],
    ...
}
...
viteの最終設定
import { fileURLToPath, URL } from "node:url";
import { defineConfig } from "vite";
import vue from "@vitejs/plugin-vue";
import Icons from "unplugin-icons/vite";
import IconsResolver from "unplugin-icons/resolver";
import Components from "unplugin-vue-components/vite";
import { FileSystemIconLoader } from "unplugin-icons/loaders";
import kintoneDev from "vite-plugin-kintone-dev";

// https://vitejs.dev/config/
export default defineConfig({
  plugins: [
    kintoneDev({
      platform: "PORTAL",
      type: "MOBILE",
    }),
    vue(),
    Components({
      resolvers: [IconsResolver()],
    }),
    Icons({
      compiler: "vue3",
      customCollections: {
        "my-icons": FileSystemIconLoader("./src/assets/icons"),
      },
    }),
  ],
  resolve: {
    alias: {
      "@": fileURLToPath(new URL("./src", import.meta.url)),
    },
  },
});
プログラム
1. main.tsの修正
Vueを初期化し、そのルートノードをモバイルのポータルの上部の空白部分の要素にマウントします
import 'vant/lib/index.css'
import './assets/main.css'

import { createApp } from 'vue'
import App from './App.vue'
import router from './router'

import { Tabbar, TabbarItem } from 'vant'

kintone.events.on('mobile.portal.show', (event) => {
  const app = createApp(App)
  app.use(router)
  app.use(Tabbar)
  app.use(TabbarItem)
  app.mount(kintone.mobile.portal.getContentSpaceElement()!)
  return event
})
2. 元のモバイル画面を隠す
.gaia-mobile-v2-portal-announcement-container,
.gaia-mobile-v2-portal-appwidget-container,
.gaia-mobile-v2-portal-spacewidget-container {
  display: none;
}
.van-hairline--top-bottom::after,
.van-hairline-unset--top-bottom::after {
  border-width: 0;
}
.gaia-mobile-v2-viewpanel-header {
  background-color: #4b4b4b;
}
.gaia-mobile-v2-viewpanel-contents {
  border-radius: 0;
}
.van-tabbar {
  width: 100vw;
}
.van-tabbar--fixed {
  left: unset;
}
.gaia-mobile-v2-portal-header-container .gaia-mobile-v2-portal-header::after {
  background: none;
}
.group-module-background {
  background-color: rgba(255, 255, 255);
  border-radius: 10px;
  box-shadow: 0 0 5px 0 #ced3d4;
}
3. tabbarの追加
<script setup lang="ts">
import { ref } from "vue"
import type { Ref } from 'vue'

const active: Ref<number> = ref(0)
</script>

<template>
  <router-view v-slot="{ Component }">
    <keep-alive>
      <component :is="Component" />
    </keep-alive>
  </router-view>

  <van-tabbar route v-model="active" active-color="#febf00" inactive-color="#b8b8b5">
    <van-tabbar-item replace to="/">
      <span>Home</span>
      <template #icon="props">
        <i-mdi-home class="tabbar-icon" />
      </template>
    </van-tabbar-item>
    <van-tabbar-item replace to="/contacts">
      <span>Contacts</span>
      <template #icon="props">
        <i-mdi-contacts class="tabbar-icon" />
      </template>
    </van-tabbar-item>
    <van-tabbar-item replace to="/space">
      <span>Space</span>
      <template #icon="props">
        <i-mdi-shape-circle-plus class="tabbar-icon" />
      </template>
    </van-tabbar-item>
    <van-tabbar-item replace to="/star">
      <span>Star</span>
      <template #icon="props">
        <i-mdi-star class="tabbar-icon" />
      </template></van-tabbar-item>
    <van-tabbar-item replace to="/todo">
      <span>Todo</span>
      <template #icon="props">
        <i-mdi-tooltip-edit class="tabbar-icon" />
      </template></van-tabbar-item>
  </van-tabbar>
</template>

<style scoped>
.tabbar-icon {
  font-size: 1em;
}
</style>
4. デモアプリの作成
kintone上でアプリケーションを作成します。そして、以下のフィールドを準備します。
| フィールド名 | フィールドコード | Type |
|---|---|---|
| title | title | 文字列 (1行) |
| num | num | 数値 |
| desc | desc | 文字列 (1行) |
| price | price | 数値 |
| thumb | thumb | 文字列 (1行) |
次に、データを追加してください。そして、【APIトークン】を設定してください。
5. kintone js sdkのインストール
npm install @kintone/rest-api-client
6. kintoneのts宣言の追加
- kintoneのts生成ツールのインストール
npm install -D @kintone/dts-gen
- アプリケーションに基づいてts宣言を生成する
自分の環境に合わせて入力してください
npx @kintone/dts-gen --base-url https://xxxx.cybozu.com -u xxxx -p xxxx --app-id xx
- "tsconfig.app.json"の設定
{
  ...
  "files": ["./node_modules/@kintone/dts-gen/kintone.d.ts"],
  ...
}
- REST API の応答データに対する ts タイプの追加
import { KintoneRecordField } from '@kintone/rest-api-client'

export type GoodListAppRecord = {
  $id: KintoneRecordField.ID
  $revision: KintoneRecordField.Revision
  thumb: KintoneRecordField.SingleLineText
  num: KintoneRecordField.Number
  title: KintoneRecordField.SingleLineText
  price: KintoneRecordField.Number
  desc: KintoneRecordField.SingleLineText
  更新人: KintoneRecordField.Modifier
  创建人: KintoneRecordField.Creator
  更新时间: KintoneRecordField.UpdatedTime
  记录编号: KintoneRecordField.RecordNumber
  创建时间: KintoneRecordField.CreatedTime
}
5.kintone SDK:@kintone/rest-api-client@4.1.0のTSのバグへの対処
@kintone/rest-api-clientの4.1.0にはバグがあり、Viteの新しいバージョンでは、モジュール解析部分にTypeScript 5の新しい設定"Bundler"が使用されています。そのため、ノードの解析に変更しました。
// modify "moduleResolution": "bundler" => "node"
"moduleResolution": "node"
7. kintone apiリクエストのラッピング
import { KintoneRestAPIClient } from '@kintone/rest-api-client'
import type { GoodListAppRecord } from '@/types/restApiRecords'

export class KintoneApi {
  client: KintoneRestAPIClient
  constructor() {
    this.client = new KintoneRestAPIClient({})
  }

  public async getAllRecords(app: string) {
    return await this.client.record.getAllRecords<GoodListAppRecord>({ app })
  }
}
8. envファイルにkintoneの設定を追加する
kintoneアプリのapp idを追加します
VITE_APP_ID=xxx
9. ページの作成
まず、view下の既存のファイルを削除し、以下のファイルを追加します。
view/Home.vue
view/Contacts.vue
view/Space.vue
view/Star.vue
view/Todo.vue
ページにデモデータを用意する
ポータル画面は、kintoneのデータを取得し、デモの注文データとします。
<template>
  <List v-model:loading="loading" :finished="finished" @load="onLoad">
    <Card v-for="(item, index) in list" :key="index" :num="item.num.value" :price="item.price.value"
      :desc="item.desc.value" :title="item.title.value" :thumb="item.thumb.value" />
  </List>
</template>

<script lang="ts" setup>
import { ref } from 'vue'
import type { Ref } from 'vue'
import { Card, List } from 'vant'
import { KintoneApi } from '@/service/kintoneApi'

const list: Ref<kintone.types.Fields[]> = ref([])
const loading = ref(false);
const finished = ref(false);

const onLoad = () => {
  const kintoneClient = new KintoneApi()
  kintoneClient.getAllRecords().then((res) => {
    list.value = res
    loading.value = false;
    finished.value = true;
  })
};
</script>
他のページでも、デモデータを準備します
例えばContacts.vue
<template>
  <div>
    <h1>Contacts</h1>
  </div>
</template>
10. ルーティングの設定
ここでは、createWebHashHistoryの方法を使用してルーティングを作成します。
createWebHistoryの方法では、リフレッシュ時にバックエンドのルーティングに解析されます。
import { createRouter, createWebHashHistory } from "vue-router";

const router = createRouter({
  history: createWebHashHistory(import.meta.env.BASE_URL),
  routes: [
    {
      path: "/",
      name: "home",
      component: () => import("../views/Home.vue"),
    },
    {
      path: "/contacts",
      name: "contacts",
      component: () => import("../views/Contacts.vue"),
    },
    {
      path: "/space",
      name: "space",
      component: () => import("../views/Space.vue"),
    },
    {
      path: "/star",
      name: "star",
      component: () => import("../views/Star.vue"),
    },
    {
      path: "/todo",
      name: "todo",
      component: () => import("../views/Todo.vue"),
    },
  ],
});

export default router;
プロジェクトの起動
npm run dev
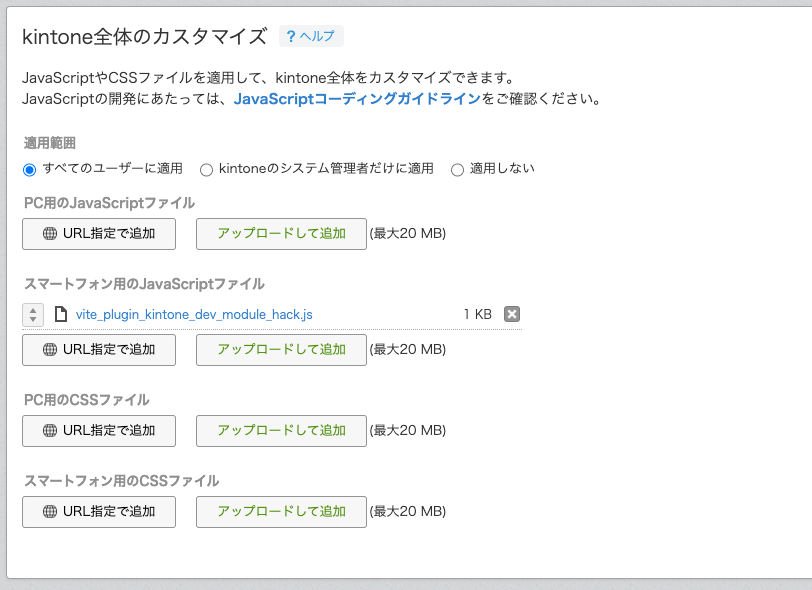
起動後、kintoneのポータル画面のカスタマイズは自動的にvite_plugin_kintone_dev_module_hack.jsファイルをアップロードします。
完成イメージ
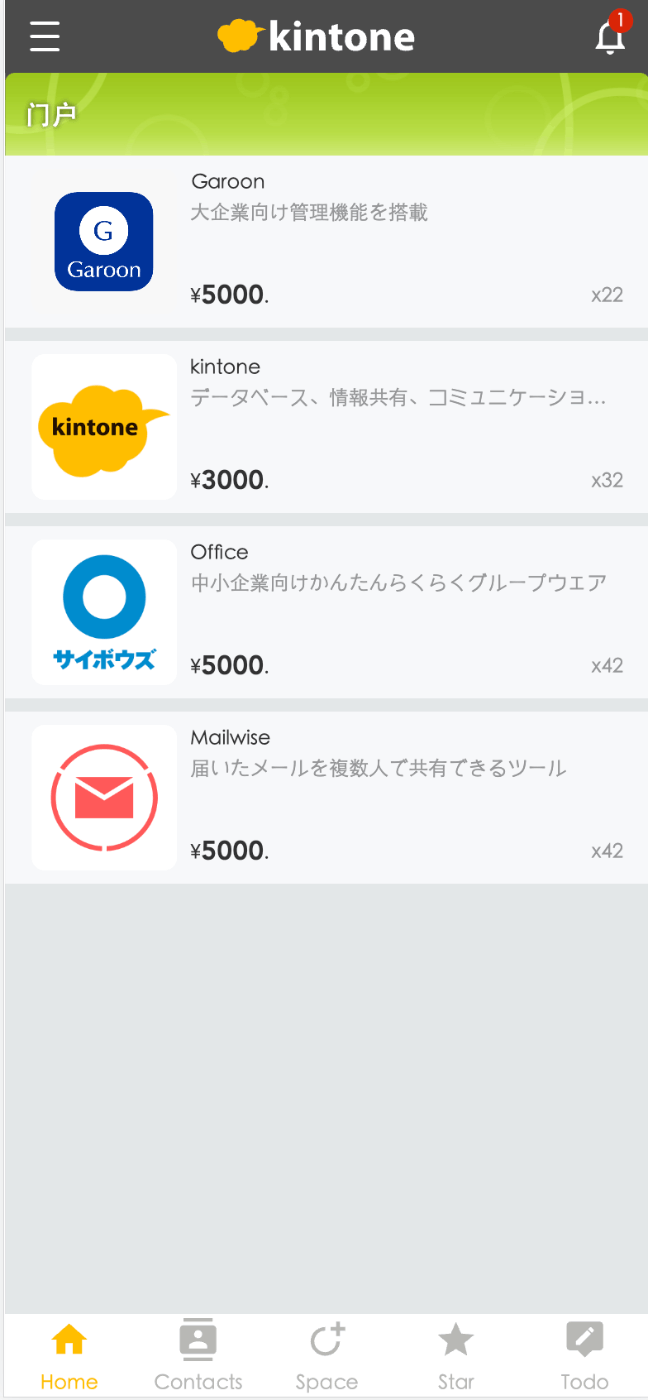
簡単なモバイルカスタマイズの大枠が出来上がりました。
これは最も簡単な例で、実際には、集中型の状態管理、ページライフサイクルのキャッシュ、データのプルダウンリフレッシュなど、考慮すべき点がたくさんあります。
もしモバイル版のカスタマイズに興味があるなら、こちらのプロジェクトもぜひご覧ください。ただし、当時はまだvue2を使用していました。参考にしてみてください。
ビルド段階
npm run build
実行が完了すると、ビルド後のコードが自動的にkintoneにアップロードされます。
サンプルプロジェクト
reactでの使用例
このプラグインは、viteを使用してkintoneでreactアプリケーションを構築するのにも適しています。
reactの使用例は以下を参照してください:
プラグインの原理
プラグインの原理は、JSカスタマイズを通じて、moduleタイプのscriptタグをハックアウトし、main.tsファイルをロードすることです。
ただし、vueとreactの違いもあるため、viteのドキュメントを参考に、コードを調整する必要があります。
カスタマイズの注意点
開発時にイベントハンドラー登録の適切なタイミングについて の適切なタイミングについての問題があった場合、kintoneイベントの使用後にマウントし、以下のコードを使用して問題を解決することができます。
(ビルド時には、esmモードを使用しないので、非同期ロードの問題は存在しないため、削除することができます。)
src/main.tsの例:
import { createApp } from "vue";
import App from "./App.vue";

kintone.events.on("app.record.detail.show", (event) => {
  const app = createApp(App);
  app.mount(kintone.app.record.getHeaderMenuSpaceElement()!);
  return event;
});

//kintoneイベントを手動で実行することで、非同期イベントの実行タイミングの問題を解決します。
const event = new Event("load");
// @ts-ignore
cybozu.eventTarget.dispatchEvent(event);
まとめ
viteを使用すると、HMR技術により、コードを変更した後にすぐに変更がページ上で反映され、非常に迅速な開発体験を実現できます。
もしこのプラグインやこのモバイル例に興味があるなら、ぜひ交流して、スターをつけてください。
Discussion
現在、このプラグインはバージョン2.0.0に更新され、kintoneとViteを完全にサポートするようになりました。以前のイベント登録タイミングの問題を考慮する必要がなくなりました。皆様のご利用をお待ちしております。