[オフライン構築] Flask + uWSGI でアプリケーションを構築する
以前書いた記事(Flaskを理解する)の続きです。
1.uWSGI を採用する理由
Flaskには組み込みサーバ(Werkzeug)があるので、特別な環境構築を行うことなくAPサーバを立ち上げることが出来ますが、組み込みサーバを本番環境で使用することは推奨されていません。
開発用なので効率性・安定性・セキュリティを特別意識して設計されておらず、次のようなデメリットがあるためです。
・パフォーマンスがかなり悪い
・複数リクエストが同時に来たときの挙動が怪しい
・死活監視しないためプロセスが落ちたときに再起動しない
そのためアプリケーションサーバを立てて、その上にアプリケーションを立てるのが一般的です。
uWSGI以外にもGunicornといったAPサーバも有名ですが、より多機能なuWSGIを今回は使用します。
2.uWSGI とは
Flask Documentationの言葉を引用すると、uWSGIとは高速でコンパイルされた、基本サーバ以上の幅広い設定と機能を伴った一そろいのアプリケーションサーバです。
Flask Documentation:
(https://msiz07-flask-docs-ja.readthedocs.io/ja/latest/deploying/uwsgi.html)
またFlask Documentationにあるように Windows ではサポートされていませんので、通常は Linux や Mac で使用されます。
ただし、WSL 上では使用可能ですので、今回は WSL2(Ubnuntu)上で uWSGI の環境構築手順、設定オプションと挙動を説明していきます。
3.uWSGI のオフラインインストール
uWSGIのオンラインインストール手順はいくらでも記事が転がっていて、特にapt-get(yum)やpipを使用した手順が多くあります。これらのコマンドを実行すれば依存パッケージを自動でインストールしてくれるうえ、依存関係まで解決してくれるので非常に効率的で便利です。
しかし、オフラインインストールが必要なシーンに出くわしたとき、pip install <パッケージ名>を実行すれば自動でインストールしてくれるのが当たり前だった筆者は、当時とても苦労をしました。
同じような経験をしている方のために、オフラインにおけるインストール手順を書いていきます。
4.uWSGI オフラインインストール手順
pip はPython向けのパッケージを管理するパッケージマネージャです。
次のコマンドでは、該当するパッケージを pip は Python Package Index(PyPI) というパッケージリポジトリを検索して必要なパッケージを自動でインストールしてくれますが、オフライン環境ではPyPlにアクセスできないため、別な手順が必要になります。
pip install <パッケージ名>
オフライン手順:
(1) PyPl(https://pypi.org/)にアクセスする
(2) リリース履歴から対象バージョンを指定する
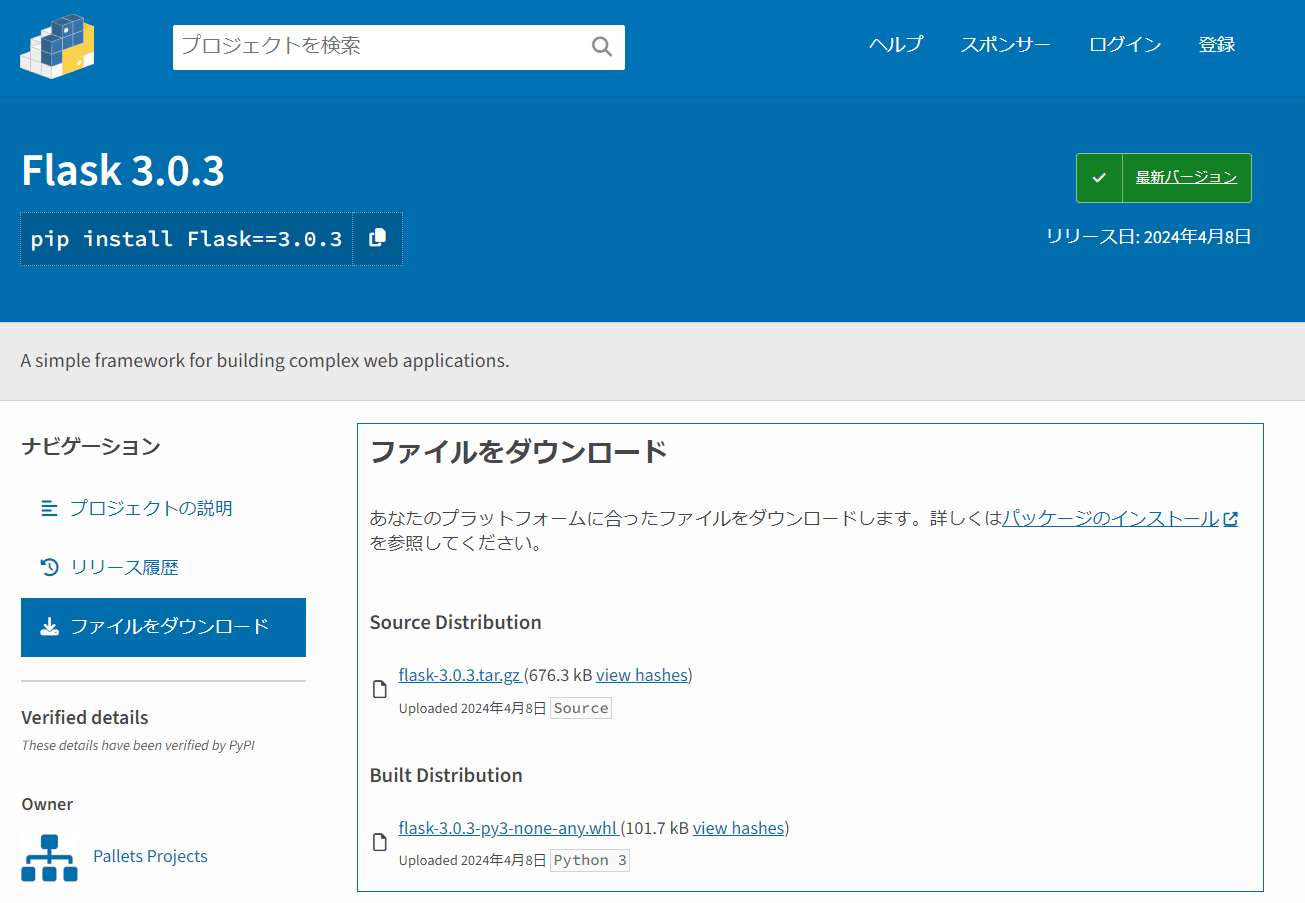
(3) ファイルをダウンロードする(tar、whlなどファイル形式はパッケージにより異なります)
(4) 入手したパッケージを、オフライン端末(例では/tmp)に配置する
(5) tar ball を解凍したら、setup.py を実行してインストールする

(3) PyPlで対象バージョンのソースコードをダウンロード
(5) uwsgiをインストール時のコマンドは次の通り
$ tar xvzf uwsgi-2.0.26.tar.gz
$ cd  uwsgi-2.0.26
$ sudo python setup.py install
インストールされていることを確認します
/tmp/uwsgi-2.0.26$  which uwsgi
/usr/local/bin/uwsgi
5.Flask のオフラインインストール
PyPlからflaskのwheelファイルをダウンロードします。
wheelはPythonのパッケージの形式(フォーマット)を指すファイルで、zip形式のアーカイブです。

ここで、--no-depsオプション(依存関係をインストールしないようにする)を指定してインストールします。このオプションが無いと依存関係のパッケージを、パッケージリポジトリ(PyPl)に探しにいってタイムアウトになるため、インストールに失敗します。
pip install --no-deps [ファイル名].whl
実際にインストールしてみます。
$ pip install --no-deps flask-3.0.3-py3-none-any.whl
Processing ./flask-3.0.3-py3-none-any.whl
Installing collected packages: flask
Successfully installed flask-3.0.3
以前別環境でインストールした時は失敗したはずですが、無事にインストールすることが出来ました。ただし、依存関係はインストールできていないので実行時にエラーになるはずです。
試しに小さなアプリケーションを作成して動かしてみましょう。
from flask import Flask
app = Flask(__name__)

@app.route("/")
def hello_world():
  return "Hello, World!"

if __name__ == '__main__':
  print("flask install success!")
app.pyを実行すると、やはり依存関係のwerkzeugが不足していました。
$ python3 app.py
Traceback (most recent call last):
  File "app.py", line 1, in <module>
    from flask import Flask
  File "/home/user/.local/lib/python3.8/site-packages/flask/__init__.py", line 5, in <module>
    from . import json as json
  File "/home/user/.local/lib/python3.8/site-packages/flask/json/__init__.py", line 6, in <module>
    from ..globals import current_app
  File "/home/user/.local/lib/python3.8/site-packages/flask/globals.py", line 6, in <module>
    from werkzeug.local import LocalProxy
ModuleNotFoundError: No module named 'werkzeug'
では、前回の記事で紹介したflaskの依存パッケージをインストールしていきます。
$ pip install --no-deps MarkupSafe-2.1.5-cp38-cp38-manylinux_2_17_x86_64.manylinux2014_x86_64.whl
$ pip install --no-deps itsdangerous-2.2.0-py3-none-any.whl
$ pip install --no-deps click-8.1.7-py3-none-any.whl
$ pip install --no-deps werkzeug-3.0.3-py3-none-any.whl
$ pip install --no-deps jinja2-3.1.4-py3-none-any.whl
一通り依存パッケージをインストールしたので、実行確認してみると、
正常終了して flask がインストールされたことが確認できました。
$ python3 app.py
flask install success!
6.Flask + uWSGI で起動する
CLIから uwsgi上でflaskアプリケーションを起動してみます。
--httpオプションはHTTPプロセスを127.0.0.1の8000番ポートで起動
--masterオプションで標準のworker managerを起動
--processesオプションでworkerプロセスを4つ起動
$ uwsgi --http 127.0.0.1:8000 --master --processes 4 -w wsgi:app
uwsgi 起動ログ
*** Starting uWSGI 2.0.26 (64bit) on [Sat Jul 20 19:48:55 2024] ***
compiled with version: 9.4.0 on 05 June 2024 11:49:46
os: Linux-5.15.153.1-microsoft-standard-WSL2 #1 SMP Fri Mar 29 23:14:13 UTC 2024
nodename: LAPTOP-F0C74KT3
machine: x86_64
clock source: unix
detected number of CPU cores: 12
current working directory: /home/user/flask_app
detected binary path: /usr/local/bin/uwsgi
!!! no internal routing support, rebuild with pcre support !!!
your processes number limit is 15650
your memory page size is 4096 bytes
detected max file descriptor number: 1048576
lock engine: pthread robust mutexes
thunder lock: disabled (you can enable it with --thunder-lock)
uWSGI http bound on 127.0.0.1:8000 fd 4
uwsgi socket 0 bound to TCP address 127.0.0.1:33987 (port auto-assigned) fd 3
Python version: 3.8.10 (default, Mar 25 2024, 10:42:49)  [GCC 9.4.0]
*** Python threads support is disabled. You can enable it with --enable-threads ***
Python main interpreter initialized at 0x55e59be9ca60
your server socket listen backlog is limited to 100 connections
your mercy for graceful operations on workers is 60 seconds
mapped 364520 bytes (355 KB) for 4 cores
*** Operational MODE: preforking ***
WSGI app 0 (mountpoint='') ready in 0 seconds on interpreter 0x55e59be9ca60 pid: 5494 (default app)
*** uWSGI is running in multiple interpreter mode ***
spawned uWSGI master process (pid: 5494)
spawned uWSGI worker 1 (pid: 5496, cores: 1)
spawned uWSGI worker 2 (pid: 5497, cores: 1)
spawned uWSGI worker 3 (pid: 5498, cores: 1)
spawned uWSGI worker 4 (pid: 5499, cores: 1)
spawned uWSGI http 1 (pid: 5500)
6.1. uWSGI のプロセス構成
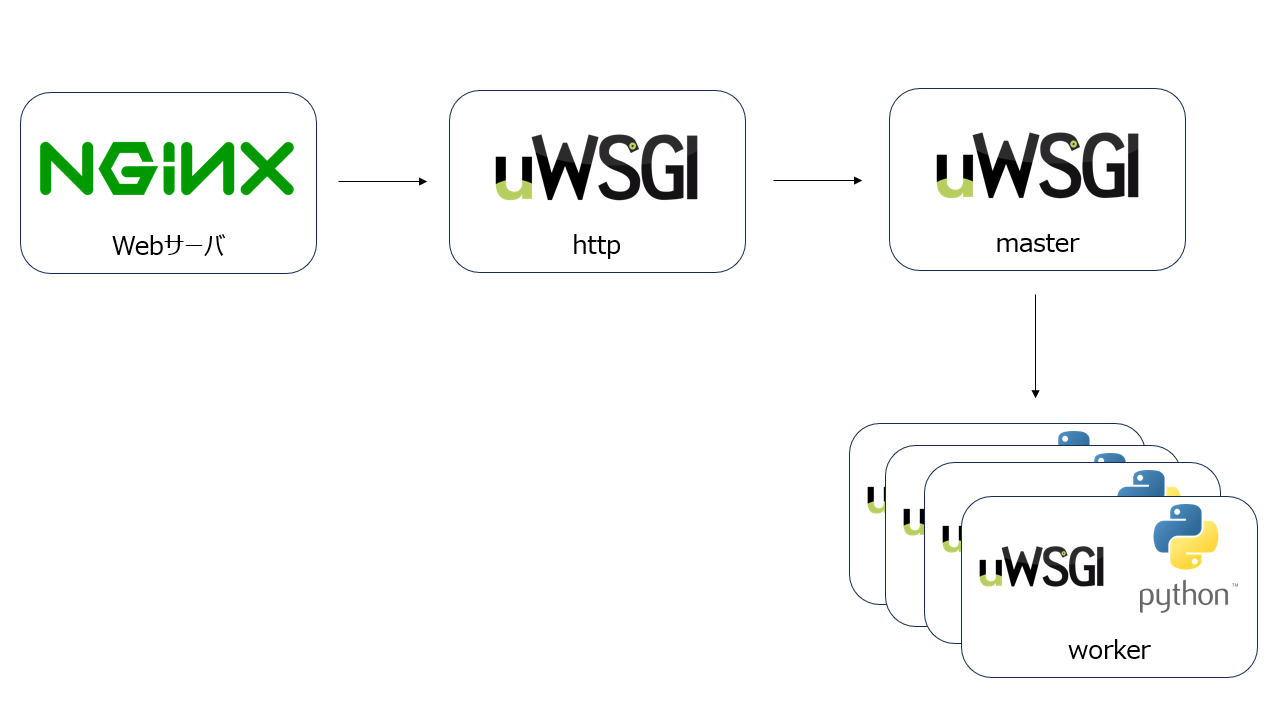
起動ログを見てみると、プロセスは6つ起動しており、
master×1、worker×4、http×1 のプロセス構成になっています。
それぞれ、どういったプロセスなのか調べてみました。
*** uWSGI is running in multiple interpreter mode ***
spawned uWSGI master process (pid: 5494)
spawned uWSGI worker 1 (pid: 5496, cores: 1)
spawned uWSGI worker 2 (pid: 5497, cores: 1)
spawned uWSGI worker 3 (pid: 5498, cores: 1)
spawned uWSGI worker 4 (pid: 5499, cores: 1)
spawned uWSGI http 1 (pid: 5500)
masterプロセス
masterプロセスは、クライアント・WEBサーバからのリクエストを受け付けて適切なWorkerプロセスに渡して処理を行わせるなどのリソース管理を行います。
また、設定を読み込んで workerプロセスの生成・終了を制御する役割も持っており、workerプロセスの親プロセスに相当します。
workerプロセス
workerプロセスは、実際にクライアントから受けたリクエストを処理してレスポンスを生成します。workerプロセスは並列で動作し、複数のリクエストを同時に処理することができます。
httpプロセス
httpプロセスは、HTTPプロトコルを処理するプロセスです。
主にクライアントからのHTTPリクエストを受け取り、masterプロセスやworkerプロセスにルーティングします。
httpプロセスがあることで、masterプロセスやworkerプロセスからHTTPリクエストの処理を分離することができ、パフォーマンスやセキュリティの向上に貢献しているそうです。
リクエスト受信時のプロセス

(図) uWSGI リクエスト受信時のプロセス概要図
6.2. uWSGI のプロセス管理
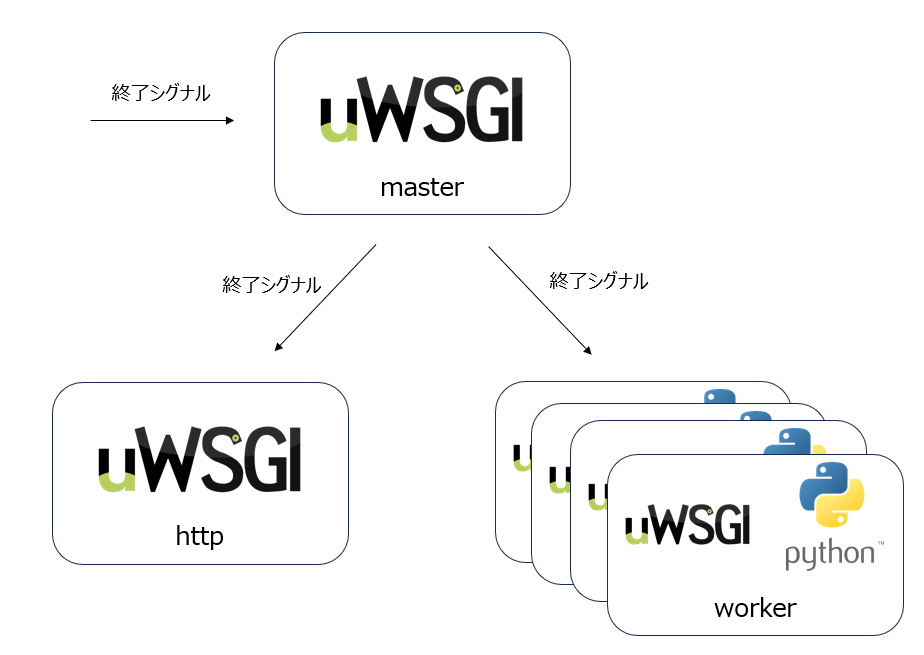
まず終了シグナル(例: SIGINTやSIGTERM)を送信されるとmasterプロセスが受け取り、
masterプロセスは全てのworkerプロセス、httpプロセスに終了シグナルを送信します。
workerプロセスは終了シグナルを受け取ると、現在処理中のリクエストを完了させた後、
自身の終了処理(リソースの解放(メモリやファイルハンドルの解放))を行います。
httpプロセスも同様に終了シグナルを受け取ると、保留中のリクエストを完了させた後、自身の終了処理を行います。
全てのworkerプロセスとhttpプロセスが終了すると、masterプロセスは自身の終了処理(リソースの解放、開いているソケットのクローズ、ログの最終処理など)を行います。
最終的にmasterプロセスも終了し、uWSGIプロセス全体が停止します。
終了シグナル受信時のプロセス

(図) 終了シグナル受信時のプロセス概要図
7.systemd でサービス起動する
自己学習として簡易的な動作確認をする程度であれば、前述のようにターミナルからuWSGIを実行
すれば十分でしょう。しかし、実際の開発現場では複数のサービスを扱うでしょうから、多くの Linux ディストリビューションで標準的な init システムであるsystemdでサービス管理する事が多いはずです。そのため、本記事でもsystemdでサービス化して起動していきます。
uWSGI のconfigファイルを作成する
flaskプロジェクトディレクトリに iniファイル を作成します。
[uwsgi]
module = wsgi:app
master = true
processes = 5
socket = /home/user/flask_app/uwsgi.sock
chmod-socket = 666
vacuum = true
die-on-term = true
wsgi-file = /home/user/flask_app/app.py
logto = /home/user/flask_app/uwsgi.log
uWSGI のserviceユニットファイルを作成する
/etc/systemd/system/ディレクトリにserviceユニットファイルを作成します。
systemctl start uwsgiでExecStartに定義したコマンドが実行されます。
serviceユニットファイルの詳細な内容に関しては、本記事での説明は省略します。
[Unit]
Description = uWSGI
After = syslog.target

[Service]
ExecStart = /usr/local/bin/uwsgi --ini /home/user/flask_app/uwsgi.ini
KillSignal=SIGQUIT
Type=notify
StandardError=syslog
NotifyAccess=all

[Install]
WantedBy=multi-user.target
uWSGI を起動する
systemctl start コマンドでサービスを起動し、systemctl status コマンドで状態を確認します。このとき、Active状態がactive (running)であれば、uwsgiが起動しています。
$ systemctl start uwsgi
$ sudo systemctl status uwsgi
● uwsgi.service - uWSGI
     Loaded: loaded (/etc/systemd/system/uwsgi.service; disabled; vendor preset: enabled)
     Active: active (running) since Sun 2024-07-21 00:50:30 JST; 31s ago
   Main PID: 43938 (uwsgi)
     Status: "uWSGI is ready"
      Tasks: 6 (limit: 4695)
     Memory: 30.5M
     CGroup: /system.slice/uwsgi.service
             ├─43938 /usr/local/bin/uwsgi --ini /home/user/flask_app/uwsgi.ini
             ├─43939 /usr/local/bin/uwsgi --ini /home/user/flask_app/uwsgi.ini
             ├─43940 /usr/local/bin/uwsgi --ini /home/user/flask_app/uwsgi.ini
             ├─43941 /usr/local/bin/uwsgi --ini /home/user/flask_app/uwsgi.ini
             ├─43942 /usr/local/bin/uwsgi --ini /home/user/flask_app/uwsgi.ini
             └─43943 /usr/local/bin/uwsgi --ini /home/user/flask_app/uwsgi.ini

Jul 21 00:50:30 LAPTOP-F0C74KT3 uwsgi[43938]: uWSGI running as root, you can use --uid/--gid/--chroot options
Jul 21 00:50:30 LAPTOP-F0C74KT3 uwsgi[43938]: *** WARNING: you are running uWSGI as root !!! (use the --uid flag) ***
Jul 21 00:50:30 LAPTOP-F0C74KT3 uwsgi[43938]: *** uWSGI is running in multiple interpreter mode ***
Jul 21 00:50:30 LAPTOP-F0C74KT3 uwsgi[43938]: spawned uWSGI master process (pid: 43938)
Jul 21 00:50:30 LAPTOP-F0C74KT3 systemd[1]: Started uWSGI.
Jul 21 00:50:30 LAPTOP-F0C74KT3 uwsgi[43938]: spawned uWSGI worker 1 (pid: 43939, cores: 1)
Jul 21 00:50:30 LAPTOP-F0C74KT3 uwsgi[43938]: spawned uWSGI worker 2 (pid: 43940, cores: 1)
Jul 21 00:50:30 LAPTOP-F0C74KT3 uwsgi[43938]: spawned uWSGI worker 3 (pid: 43941, cores: 1)
Jul 21 00:50:30 LAPTOP-F0C74KT3 uwsgi[43938]: spawned uWSGI worker 4 (pid: 43942, cores: 1)
Jul 21 00:50:30 LAPTOP-F0C74KT3 uwsgi[43938]: spawned uWSGI worker 5 (pid: 43943, cores: 1)
8.まとめ
uwsgiでのflaskアプリケーション起動や、uwsgiプロセス構成の理解への助けになったら幸いです。WEBサーバとの連携や、より細かな uWSGIの設計ができるよう続きの記事も今後書いていく予定です。
[参考]
Discussion