Adding authentication for web service access - シリーズ投稿5/7
Series Top: Dockerで作るおうちLAN遊び場
この投稿はシリーズ第五弾となります。今回は多要素認証サービスを追加し、Nginxリバースプロキシの設定を更新して背後のサービスへのアクセス時にユーザ認証をするようにします。
Authelia and Nginx
認証サービスとして使うのはAutheliaというものです。
ドキュメントを読むと、AutheliaのGitHubレポジトリにコンフィグテンプレートがあることがわかります。リバースプロキシと組み合わせてAutheliaを使っていくので、既存のrp用ディレクトリにAuthelia用のディレクトリを用意してテンプレートをダウンロードしてきます。
https://www.authelia.com/configuration/prologue/introduction/
https://github.com/authelia/authelia/blob/master/config.template.yml
cd $HOME/mylan/rp
mkdir authelia
cd authelia
# download the configuration template
curl https://raw.githubusercontent.com/authelia/authelia/master/internal/configuration/config.template.yml -O
テンプレートの中身を見ると、多岐にわたる設定が含まれていることがわかります。まずはダウンロードしてきたテンプレートファイルのまま、Autheliaのコンフィグチェックにかけてみます。出力は以下のとおりですが、具体的に何がまだ問題かを示してくれます。
$ docker run --rm --mount type=bind,source="$(pwd)"/config.template.yml,target=/config/config.yml authelia/authelia:4.36.9 authelia validate-config --config /config/config.yml

Configuration parsed and loaded with errors:

	 - authentication_backend: you must ensure either the 'file' or 'ldap' authentication backend is configured
	 - access control: 'default_policy' option 'deny' is invalid: when no rules are specified it must be 'two_factor' or 'one_factor'
	 - storage: configuration for a 'local', 'mysql' or 'postgres' database must be provided
	 - storage: option 'encryption_key' is required
	 - notifier: you must ensure either the 'smtp' or 'filesystem' notifier is configured
Authelia config.yml
ではダウンロードしてきたテンプレートのコピーとしてconfig.ymlファイルを用意して、このファイルを更新していきます。更新したファイルにまたAutheliaのコンフィグチェックをかけるともうエラーがないことが確認できます。チェック結果および実際のファイルの中身は以下の通りです。
設定が多岐にわたるので簡単にポイントだけ挙げます:
- Autheliaのサービスポートは9091
- ユーザ認証のプロバイダは
/config/users_database.ymlファイルが指定されている - アクセス制御のセクションで、
jupyter.mylan.localに対して2FAをかけるよう設定している - バイパスポリシーとして
login.mylan.localを設定しており、これはAutheliaの認証ポータルを用意する場所とするため - セッションクッキーのドメインは
mylan.local - ローカルストレージは
/var/lib/authelia/db.sqlite3 - 通知は
/config/notification.txtと設定しており、本番サービスではメールを送るところを、今回のセットアップではメールではなくファイルに通知メッセージを書き込むよう設定
$ cp config.template.yml config.yml

### Edit config.yml file
### and then test the config.yml file again

$ docker run --rm --mount type=bind,source="$(pwd)"/config.yml,target=/config/config.yml authelia/authelia:4.36.9 authelia validate-config --config /config/config.yml
Configuration parsed and loaded successfully without errors.

### Here is the resulting file, omitting comment lines
$ grep -v "[[:space:]]*#" config.yml | sed '/^$/d'
---
theme: light
jwt_secret: a_very_important_secret
default_2fa_method: ""
server:
  host: 0.0.0.0
  port: 9091
  path: ""
  enable_pprof: false
  enable_expvars: false
  disable_healthcheck: false
  tls:
    key: ""
    certificate: ""
    client_certificates: []
  headers:
    csp_template: ""
log:
  level: debug
telemetry:
  metrics:
    enabled: false
    address: tcp://0.0.0.0:9959
totp:
  disable: false
  issuer: authelia.com
  algorithm: sha1
  digits: 6
  period: 30
  skew: 1
  secret_size: 32
webauthn:
  disable: false
  timeout: 60s
  display_name: Authelia
  attestation_conveyance_preference: indirect
  user_verification: preferred
ntp:
  address: "time.cloudflare.com:123"
  version: 4
  max_desync: 3s
  disable_startup_check: false
  disable_failure: false
authentication_backend:
  password_reset:
    disable: false
    custom_url: ""
  refresh_interval: 5m
  file:
    path: /config/users_database.yml
    password:
      algorithm: argon2id
      iterations: 1
      memory: 1024
      parallelism: 8
      key_length: 32
      salt_length: 16
password_policy:
  standard:
    enabled: false
    min_length: 8
    max_length: 0
    require_uppercase: true
    require_lowercase: true
    require_number: true
    require_special: true
  zxcvbn:
    enabled: false
    min_score: 3
access_control:
  default_policy: deny
  rules:
    - domain: login.mylan.local
      policy: bypass
    - domain: jupyter.mylan.local
      policy: two_factor
session:
  name: authelia_session
  domain: mylan.local
  same_site: lax
  secret: insecure_session_secret
  expiration: 1h
  inactivity: 5m
  remember_me_duration: 1M
regulation:
  max_retries: 3
  find_time: 2m
  ban_time: 5m
storage:
  encryption_key: you_must_generate_a_random_string_of_more_than_twenty_chars_and_configure_this
  local:
    path: /var/lib/authelia/db.sqlite3
notifier:
  disable_startup_check: true
  filesystem:
    filename: /config/notification.txt
...
Authelia users_database.yml
コンフィグファイルで見たとおり、ユーザ認証に用いるユーザデータベースをusers_database.ymlファイルとして用意する必要があります。
https://www.authelia.com/reference/guides/passwords/#user--password-file
ドキュメントにある例の通り、ユーザ"john"の分をそのままコピーしてみましょう。また今回私が使うユーザとして"ghost"というユーザ名でユーザデータベースファイルに追記します。
当然ユーザ名、パスワードは構築する人それぞれが自由に決めて用意して頂きたいですが、データベースファイルに記載するパスワード用の文字列の生成方法についてはこのあとすぐ説明に入ります。
$ cat users_database.yml
users:
  john:
    displayname: "John Doe"
    password: "$argon2id$v=19$m=65536,t=3,p=2$BpLnfgDsc2WD8F2q$o/vzA4myCqZZ36bUGsDY//8mKUYNZZaR0t4MFFSs+iM"
    email: john.doe@authelia.com
    disabled: false
  ghost:
    displayname: "ghost"
    password: "$argon2id$v=19$m=1048576,t=1,p=8$bEV6SXZpQ3VMREVzR1NqOQ$TDaho5v+u3AV/ajq93wSgW4RUx5xRqNruYYyou2MpZ4"
    email: ghost@mylan.local
    disabled: false
この記事を書いている時点での問題ですが、先のドキュメントでパスワード用文字列生成に使うと説明されているコマンドauthelia crypto hash generate ...は今回使用しているイメージ4.36.9では使えませんでした。代わりにauthelia hash-passwordコマンドがあるので、これでパスワード用文字列を生成して、上記のようにユーザデータベースファイル内でパスワード文字列に用います。
# command "authelia crypt hash" not available

$ docker run authelia/authelia:4.36.9 authelia crypto hash generate argon2 --password 'ghost'
Error: unknown flag: --password
Usage:
  authelia crypto [command]

Examples:
authelia crypto --help

Available Commands:
  certificate Perform certificate cryptographic operations
  pair        Perform key pair cryptographic operations

Flags:
  -h, --help   help for crypto

Use "authelia crypto [command] --help" for more information about a command.
# run command "authelia hash-password" to generate the password hash
# the password is "ghost"

$ docker run --rm --mount type=bind,source="$(pwd)"/config.yml,target=/config/config.yml authelia/authelia:4.36.9 authelia hash-password -c /config/config.yml -- 'ghost'
Password hash: $argon2id$v=19$m=1048576,t=1,p=8$bEV6SXZpQ3VMREVzR1NqOQ$TDaho5v+u3AV/ajq93wSgW4RUx5xRqNruYYyou2MpZ4
Updating Nginx configuration
ここからはNginxの設定を用意していきます。NginxでAutheliaを利用するセットアップに関して詳細なドキュメントが下のリンクにありますが、この投稿ではずばり使うものだけ用意して紹介していきます。
以下は更新後のconf.d/jupyter.confファイルです。比較的シンプルで、Authelia関連のファイルを読み込む行が3行追加されています。リバースプロキシサーバをSSL/TLS対応させた時のように、別ファイルを用意して読み込ませるだけという形にしています。
$ cat conf.d/jupyter.conf
server {
    listen 443 ssl http2;
    server_name jupyter.mylan.local;

    # docker resolver
    resolver 127.0.0.11 valid=30s;

    # tls
    include /etc/nginx/tls/tls.conf;

    # authelia
    include /etc/nginx/authelia/authelia-portal.conf;

    location / {
        set $upstream 192.168.1.56:8888;
        proxy_pass http://$upstream;
        include /etc/nginx/authelia/auth.conf;
        include /etc/nginx/authelia/authelia-proxy.conf;
        proxy_set_header Upgrade $http_upgrade;
        proxy_set_header Connection "upgrade";
        proxy_set_header Host $host;
    }
}
次にログインポータル用の新しいファイル、conf.d/authelia-ve.confが以下の通りとなります。更新前のjupyter.confファイルと似ており、login.mylan.local宛の通信を扱い、ポート9091でサービス提供しているAutheliaコンテナへ通信を流すよう設定しています。
なおポータル用のDNSレコードlogin.mylan.localはのちほど忘れずに作ります。
$ cat conf.d/authelia-ve.conf
server {
    listen 443 ssl http2;
    server_name login.mylan.local;

    # tls
    include /etc/nginx/tls/tls.conf;

    # authelia
    include /etc/nginx/authelia/authelia-portal.conf;

    # auth portal
    location / {
        resolver 127.0.0.11 ipv6=off;
        set $upstream_authelia http://authelia:9091;
        proxy_pass $upstream_authelia;
        include /etc/nginx/authelia/authelia-proxy.conf;
    }
}
Authelia用に更に別のファイルが必要となるが、専用のディレクトリauthelia_nginxを用意してそこにファイルを追加していくことにします。上のコンフィグファイルで見たとおり、tlsとは更に別のファイルを読み込ませることになります。
1つ目のファイルは/etc/nginx/authelia/authelia-portal.confだ。これはポータルのファイルで、先のjupyter.mylan.localサーバコンフィグファイルでこのファイルを読み込ませることで、https://jupyter.mylan.local/autheliaという場所にサービスを追加していることになっています。
ちなみにもしghostもまだ走らせているとしたら、blog.confファイルでも同様にこのポータルファイルを読み込ませることになります。
# authelia-portal.conf

#Virtual endpoint created by nginx to forward auth requests.
location /authelia {
    internal;
    resolver 127.0.0.11 ipv6=off;
    set $upstream_authelia http://authelia:9091/api/verify;
    proxy_pass_request_body off;
    proxy_pass $upstream_authelia;
    proxy_set_header Content-Length "";

    # Timeout if the real server is dead
    proxy_next_upstream error timeout invalid_header http_500 http_502 http_503;

    # [REQUIRED] Needed by Authelia to check authorizations of the resource.
    # Provide either X-Original-URL and X-Forwarded-Proto or
    # X-Forwarded-Proto, X-Forwarded-Host and X-Forwarded-Uri or both.
    # Those headers will be used by Authelia to deduce the target url of the user.
    # Basic Proxy Config
    client_body_buffer_size 128k;
    proxy_set_header Host $host;
    proxy_set_header X-Original-URL $scheme://$http_host$request_uri;
    proxy_set_header X-Real-IP $remote_addr;
    proxy_set_header X-Forwarded-For $remote_addr;
    proxy_set_header X-Forwarded-Proto $scheme;
    proxy_set_header X-Forwarded-Host $http_host;
    proxy_set_header X-Forwarded-Uri $request_uri;
    proxy_set_header X-Forwarded-Ssl on;
    proxy_redirect  http://  $scheme://;
    proxy_http_version 1.1;
    proxy_set_header Connection "";
    proxy_cache_bypass $cookie_session;
    proxy_no_cache $cookie_session;
    proxy_buffers 4 32k;

    # Advanced Proxy Config
    send_timeout 5m;
    proxy_read_timeout 240;
    proxy_send_timeout 240;
    proxy_connect_timeout 240;
}
jupyter.confに追加しているもう一つのファイルは/etc/nginx/authelia/auth.confです。これはサーバへのリクエスト通信が来た際、まずは認証をするよう仕向けます。このファイル内では、未認証通信についてはhttps://login.mylan.localへ向かせるよう設定しており、この向け先は先に追加したauthelia-ve.confとなっています。
# auth.conf

# Basic Authelia Config
# Send a subsequent request to Authelia to verify if the user is authenticated
# and has the right permissions to access the resource.
auth_request /authelia;
# Set the `target_url` variable based on the request. It will be used to build the portal
# URL with the correct redirection parameter.
auth_request_set $target_url $scheme://$http_host$request_uri;
# Set the X-Forwarded-User and X-Forwarded-Groups with the headers
# returned by Authelia for the backends which can consume them.
# This is not safe, as the backend must make sure that they come from the
# proxy. In the future, it's gonna be safe to just use OAuth.
auth_request_set $user $upstream_http_remote_user;
auth_request_set $groups $upstream_http_remote_groups;
proxy_set_header Remote-User $user;
proxy_set_header Remote-Groups $groups;
# If Authelia returns 401, then nginx redirects the user to the login portal.
# If it returns 200, then the request pass through to the backend.
# For other type of errors, nginx will handle them as usual.
error_page 401 =302 https://login.mylan.local/?rd=$target_url;
最後、3つ目のファイルとして、/etc/nginx/authelia/authelia-proxy.confファイルを用意します。Autheliaの認証サービスが組み込まれるのにあたって、通信を取り回すのに必要な情報を追加したり挙動を設定しています。
# authelia-proxy.conf

client_body_buffer_size 128k;

#Timeout if the real server is dead
proxy_next_upstream error timeout invalid_header http_500 http_502 http_503;

# Advanced Proxy Config
send_timeout 5m;
proxy_read_timeout 360;
proxy_send_timeout 360;
proxy_connect_timeout 360;

# Basic Proxy Config
proxy_set_header Host $host;
proxy_set_header X-Real-IP $remote_addr;
proxy_set_header X-Forwarded-For $proxy_add_x_forwarded_for;
proxy_set_header X-Forwarded-Proto $scheme;
proxy_set_header X-Forwarded-Host $http_host;
proxy_set_header X-Forwarded-Uri $request_uri;
proxy_set_header X-Forwarded-Ssl on;
proxy_redirect  http://  $scheme://;
proxy_http_version 1.1;
proxy_set_header Connection "";
proxy_cache_bypass $cookie_session;
proxy_no_cache $cookie_session;
proxy_buffers 64 256k;

# If behind reverse proxy, forwards the correct IP
set_real_ip_from 10.0.0.0/8;
set_real_ip_from 172.0.0.0/8;
set_real_ip_from 192.168.0.0/16;
set_real_ip_from fc00::/7;
real_ip_header X-Forwarded-For;
real_ip_recursive on;
Add DNS record for Authelia login portal
リバースプロキシサーバの設定は以上で、あとはログインポータル用のDNSレコードを用意しましょう。
# Edit a-records.conf file so that the DNS server can resolve login.mylan.local

$ cat $HOME/mylan/dns/config/a-records.conf
# A Record
     #local-data: "somecomputer.local. A 192.168.1.1"
     local-data: "jupyter.mylan.local. A 192.168.1.56"
     local-data: "login.mylan.local. A 192.168.1.56"

# PTR Record
     #local-data-ptr: "192.168.1.1 somecomputer.local."
     local-data-ptr: "192.168.1.56 jupyter.mylan.local."

# Go to the dns directory and restart docker compose
cd $HOME/mylan/dns
docker compose restart
Starting authelia service
これで準備が全て整います。最後にrpのdocker-compose.ymlファイルを更新していきます。ymlコンフィルファイルの積み込みやデータ保持用のボリューム用意をして、autheliaサービスを追加します。もとからあるrpサービスに関しても新たに用意したAuthelia関連のファイル、ディレクトリが全部積み込まれるようマウント設定追記します。
services:

  rp:
    container_name: rp
    image: nginx:1.23.2
    ports:
      - "443:443"
    volumes:
      - ./conf.d:/etc/nginx/conf.d
      - ./authelia_nginx:/etc/nginx/authelia
      - ./tls:/etc/nginx/tls

  authelia:
    image: authelia/authelia:4.36.9
    expose:
      - 9091
    environment:
      - TZ=UTC
    volumes:
      - authelia_db_volume:/var/lib/authelia
      - type: bind
        source: ./authelia/config.yml
        target: /config/configuration.yml
        read_only: true
      - type: bind
        source: ./authelia/users_database.yml
        target: /config/users_database.yml

volumes:
  authelia_db_volume: {}
これまでの例で見たとおり、docker compose up -dで複数のサービスが実行されています。
$ docker compose up -d
[+] Running 3/3
 ⠿ Network rp_default       Created                                                                                        0.2s
 ⠿ Container rp-authelia-1  Started                                                                                        0.8s
 ⠿ Container rp             Started                                                                                        0.8s

$ docker compose ps
NAME                COMMAND                  SERVICE             STATUS              PORTS
rp                  "/docker-entrypoint.…"   rp                  running             80/tcp, 0.0.0.0:443->443/tcp, :::443->443/tcp
rp-authelia-1       "/app/entrypoint.sh …"   authelia            running (healthy)   9091/tcp
Accessing Authelia
ブラウザでhttps://jupyter.mylan.localにアクセスしてみます。するとJupyter Notebookには接続できず、代わりにhttps://login.mylan.localへ飛ばされ、Autheliaのログインポータルが表示されます。
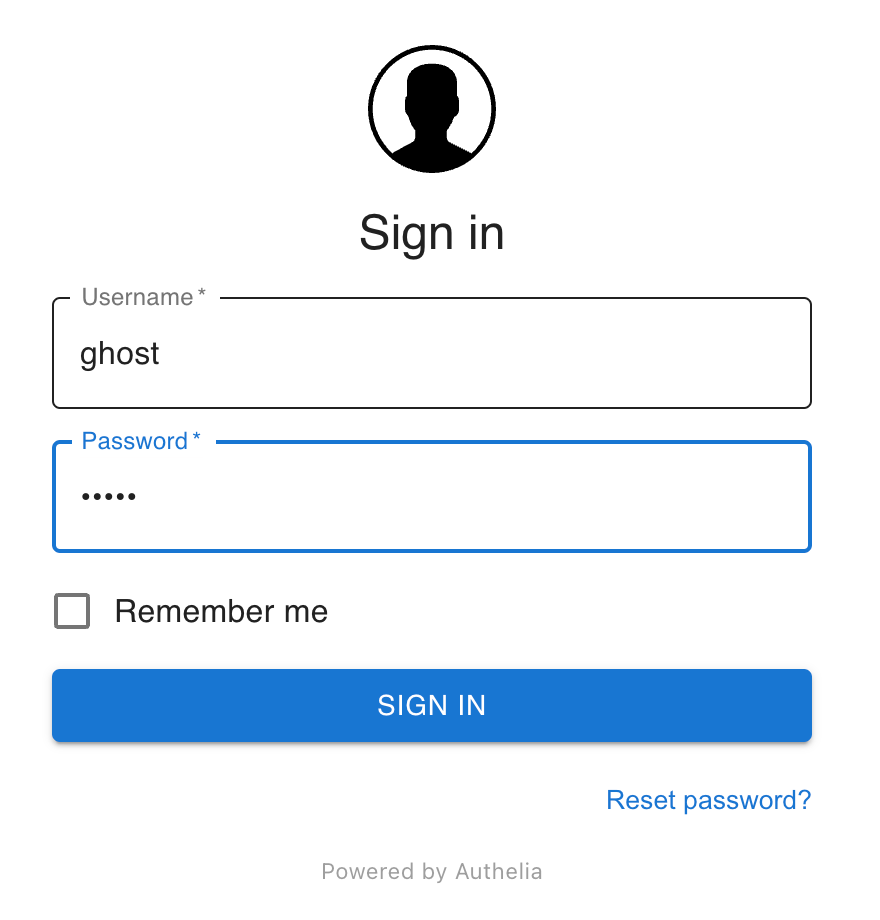
Authelia上で有効なユーザはusers_database.ymlファイルとして用意したとおり"john"と"ghost"です。自分で設定したユーザのユーザ名、パスワードを入力すると、初めてのログインとなるため2FAを設定するよう求められます。
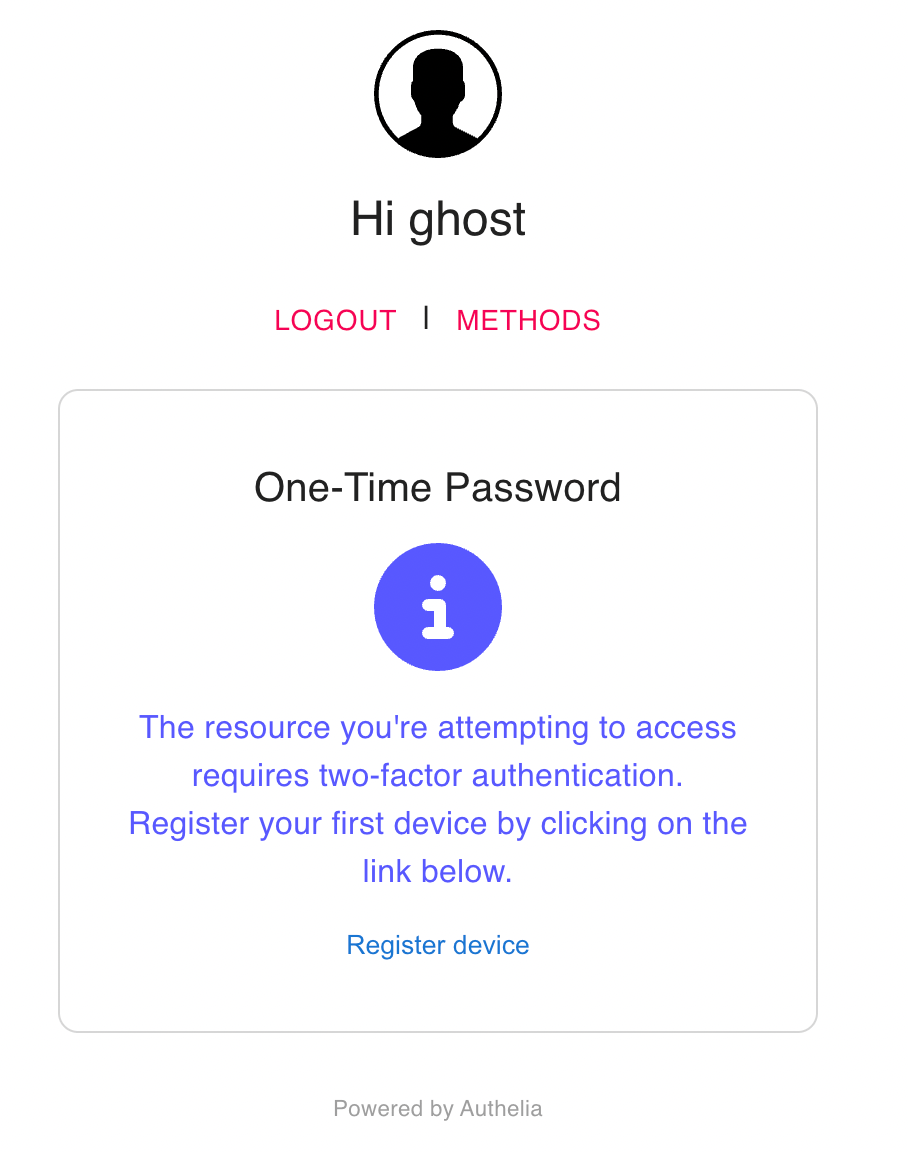
"Register device"を選択するとこのポータルサイトは別途メールで指示を送ったと表示してきます。
今回は通知にメールではなくファイル書き込みするよう設定しているので、Autheliaコンテナ内の当該ファイルを確認しにいきます。
notifier:
  disable_startup_check: true
  filesystem:
    filename: /config/notification.txt
Autheliaのコンテナ名をdocker-compose.ymlファイル内で指定していないので、自動でつけられたコンテナ名を確認し、そのコンテナ内のファイルを見に行きます。
$ docker exec rp-authelia-1 cat /config/notification.txt
Date: 2022-10-23 01:30:03.062953314 +0000 UTC m=+44.509739457
Recipient: { ghost@mylan.local}
Subject: Register your mobile
Body: This email has been sent to you in order to validate your identity.

If you did not initiate the process your credentials might have been compromised and you should reset your password and contact an administrator.

To setup your 2FA please visit the following URL: https://login.mylan.local/one-time-password/register?token=eyJhbGciOiJIUzI1NiIsInR5cCI6IkpXVCJ9.eyJpc3MiOiJBdXRoZWxpYSIsImV4cCI6MTY2NjQ4ODkwMywiaWF0IjoxNjY2NDg4NjAzLCJqdGkiOiI4MjE1ZjUxZi0xNWEyLTRhMTItYTcxZC0yMmZlNWE2ZjczNDIiLCJhY3Rpb24iOiJSZWdpc3RlclRPVFBEZXZpY2UiLCJ1c2VybmFtZSI6Imdob3N0In0.7_gqBza6fO4h24E2xOJeqJ8jPIEeLgVXKUZg3KeYae

This email was generated by a user with the IP 192.168.1.x.

Please contact an administrator if you did not initiate this process.
上が本来メールでユーザに送られる内容となり、提示されているリンクより2FAをセットアップするよう支持されています。ブラウザより改めてこのリンクへアクセスしにいくと、設定へと進めることができます。
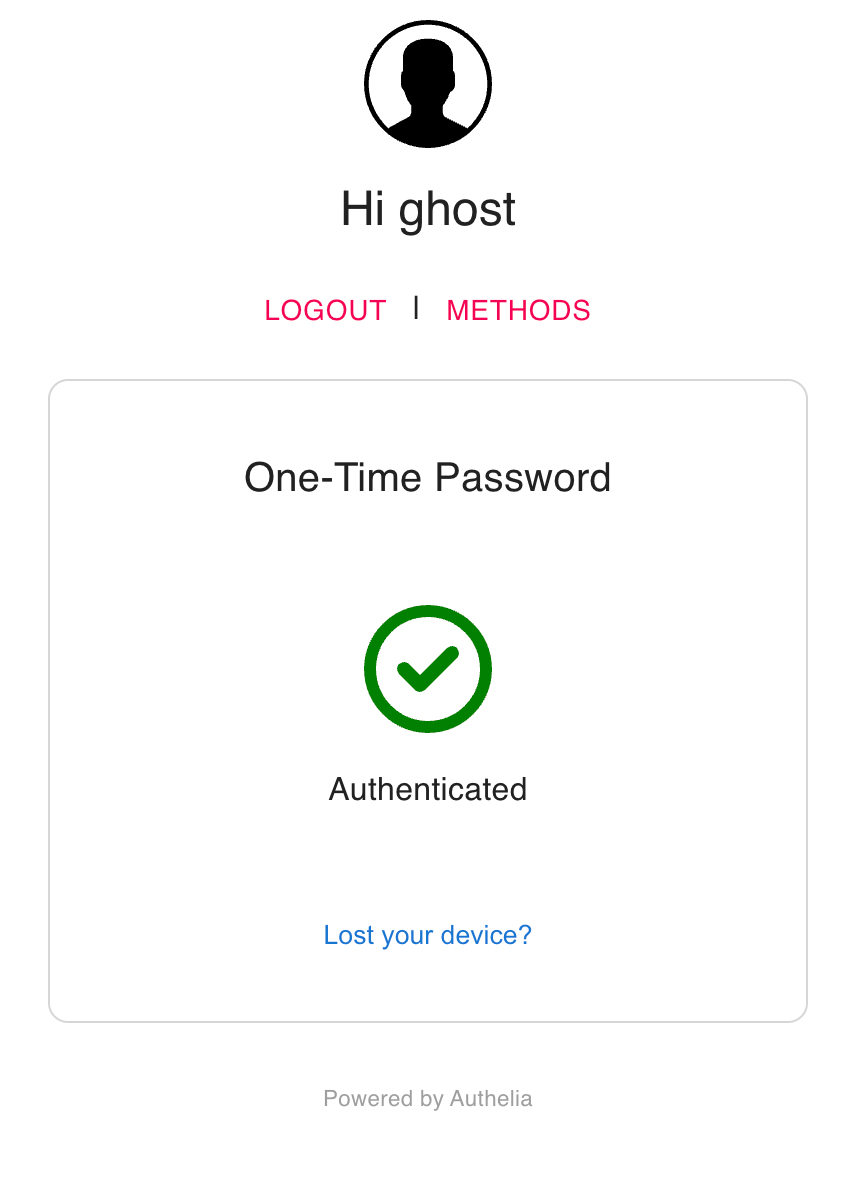
私の場合はスマホにGoogle Authenticatorアプリをインストールし、登録用QRコードを読み込んで2FA設定を完了させました。
IssueをAutheliaコンフィグ内でそのままにしてあったので、アプリではユーザ名"ghost"向けに"authelia.com"が発行している2FAだと表示され、ワンタイムパスワードが表示されています。
今一度https://jupyter.mylan.localへアクセスしようとしてログインポータルに辿り着きます。今回はログインすると2FAのワンタイムパスワード入力を求められます。ここを通ればようやく本来のJupyter Notebookサービスに接続できます。
Files added or updated in this post
以上です!長かったです!
今回登場したファイルについて前回同様、以下リストにまとめています。
 |-rp
 | |-authelia_nginx  # Nginxコンテナ内、/etc/nginx/autheliaとしてマウントされるディレクトリ
 | | |-authelia-portal.conf  # ポータルサービス
 | | |-authelia-proxy.conf  # 通信取り回し用必要設定
 | | |-auth.conf  # Authelia用一般設定
 | |-docker-compose.yml  # Autheliaサービス追加
 | |-authelia  # Authelia用ディレクトリ
 | | |-users_database.yml  # ユーザデータベース
 | | |-config.template.yml  # ダウンロードしてきたテンプレ
 | | |-config.yml  # 実際にAutheliaコンテナに読み込ませる更新済み設定ファイル
 | |-conf.d
 | | |-jupyter.conf  # Authelia関連の必要ファイルをinclude
 | | |-authelia-ve.conf  # 新規追加のlogin.mylan.localサーバ
 | |-tls
 | | |-tls.conf
 | | |-dhparam.pem
 | | |-tls.key
 | | |-tls.crt
 |-dns
 | |-docker-compose.yml
 | |-config
 | | |-a-records.conf  # login.mylan.localレコード追加
Discussion