Private Link構成のDatabricks WorkspaceからSageMakerの推論エンドポイントへのモデルデプロイ
はじめに
Databricksのサーバレス推論エンドポイントは、機械学習モデルをデプロイ、管理、クエリするための統一されたインターフェイスを提供します。 サービングされたモデルは、Webアプリケーションまたはクライアントアプリケーションに統合できるREST APIとして使用できます。
エンドポイントの作成時、機械学習モデルを含んだDocker Imageが作成され、DatabricksのAWSアカウント内のServerless compute planeにコンテナがデプロイされます。現状Databricksのサーバレス推論エンドポイントのデプロイはこの方式のみであり、顧客VPC内でのデプロイに対応していません。
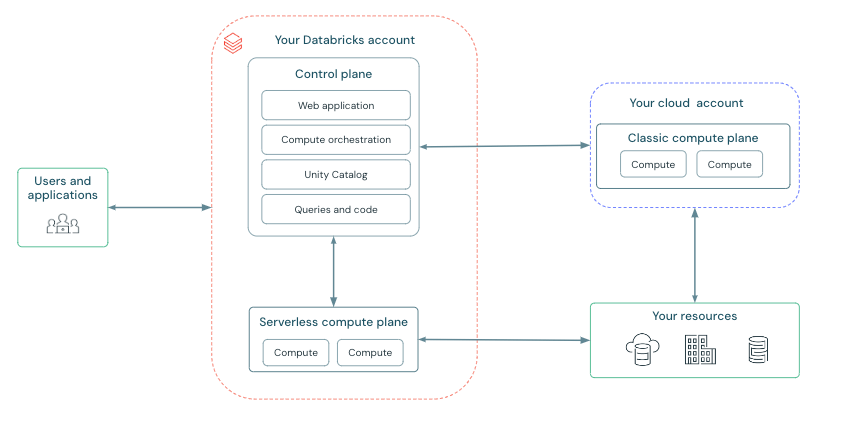
セキュリティーポリシーによってモデルの所在が顧客VPCのみに制限される場合、SageMakerの推論エンドポイントを利用することが1つのワークアラウンドとなります。DatabricksのWorkspaceがBack-endのPrivate Linkを使用しない場合、以下の記事で紹介されている方法で簡単にデプロイ出来ます。 しかし、インターネットと疎通可能なVPCからモデルにアクセスすることが禁止される場合、Back-endのPrivate Link構成のWorkspaceからデプロイを試みますが上記の方法では失敗します。これはmlflowがWorkspaceのVPCからモデルのPythonバージョン、ライブラリのバージョンを解決しようとしてインターネットへのアクセスをトライするためです。本稿では、Back-endのPrivate Link構成の Databricks WorkspaceからSageMakerの推論エンドポイントへモデルをデプロイする方法をウォークスルーします。
課題の特定
「デプロイ時にWorkspaceのVPCからモデルのPythonバージョン、ライブラリのバージョンを解決しようとしてインターネットへのアクセスをトライする」という状況を正しく理解します。mlflow build-and-push-containerでmlflow docker imageを作成した後に、デプロイ時に用いるコードです。
import mlflow.deployments

deployment_name = "my-deployment"

deployment_client = mlflow.deployments.get_deploy_client("sagemaker:/" + region)
deployment_client.create_deployment(
    name=deployment_name,
    model_uri=model_uri,
    config={
      "image_url": image_ecr_url
    }
)
以下のエラーメッセージが返ってきます。
INFO mlflow.models.container: creating and activating custom environment
Collecting package metadata (repodata.json): ...working... failed
Logのエラーメッセージでmlflowのリポジトリを検索すると、該当する処理の関数ではモデルのconda.yamlを読み、conda envを作成しようとしています。
def _install_model_dependencies_to_env(model_path, env_manager) -> List[str]:
    ~~~~~~長いので省略~~~~~~~
    _logger.info("creating and activating custom environment")

    env = _extract_conda_env(env_conf)
    env_path_dst = os.path.join("/opt/mlflow/", env)
    env_path_dst_dir = os.path.dirname(env_path_dst)
    if not os.path.exists(env_path_dst_dir):
        os.makedirs(env_path_dst_dir)
    shutil.copy2(os.path.join(MODEL_PATH, env), env_path_dst)

    if env_manager == em.CONDA:
        conda_create_model_env = f"conda env create -n custom_env -f {env_path_dst}"
        if Popen(["bash", "-c", conda_create_model_env]).wait() != 0:
            raise Exception("Failed to create model environment.")
        activate_cmd = ["source /miniconda/bin/activate custom_env"]
    ~~~~~~長いので省略~~~~~~~
    return activate_cmd
mlflow docker imageはubuntuのベースイメージにmlflowのモデルをデプロイするための様々なstackをインストールしたものであり、Databricksの開発環境とはどうしてもPythonのバージョンやライブラリの過不足が発生します。_install_model_dependencies_to_envがこれを解消しようとしていますが、インターネットと通信ができないので失敗します。
解決策の検討
AWSはPrivateな環境においてSageMakerでPythonの外部ライブラリを利用する方法として、AWS CodeArtifactによるCondaのプライベートリポジトリをホストすることを提案しています。しかし、PythonのインストールイメージはArtifactとして登録できないため、今回のケースでは解決策になりません。
デプロイ時に呼び出されるコードを追っていると、MLFLOW_DISABLE_ENV_CREATIONという先ほどのconda envを作成するか否かを制御する変数を発見しました。
def _serve_pyfunc(model, env_manager):
    ~~~~~~長いので省略~~~~~~~
    disable_env_creation = MLFLOW_DISABLE_ENV_CREATION.get()

    conf = model.flavors[pyfunc.FLAVOR_NAME]
    bash_cmds = []
    if pyfunc.ENV in conf:
        # NB: MLFLOW_DISABLE_ENV_CREATION is False only for SageMaker deployment, where the model
        # files are loaded into the container at runtime rather than build time. In this case,
        # we need to create a virtual environment and install the model dependencies into it when
        # starting the container.
        if not disable_env_creation:
            _install_pyfunc_deps(
                MODEL_PATH,
                install_mlflow=True,
                enable_mlserver=enable_mlserver,
                env_manager=env_manager,
            )
        if env_manager == em.CONDA:
            bash_cmds.append("source /miniconda/bin/activate custom_env")
        elif env_manager == em.VIRTUALENV:
            bash_cmds.append("source /opt/activate")
    ~~~~~~長いので省略~~~~~~~
すなわち、mlflow docker image上であらかじめパッケージの過不足は解消した上で、MLFLOW_DISABLE_ENV_CREATION=trueを指定すればインターネットへの通信は発生しないのでは?と考えました。
構築するアーキテクチャ

- Databricksで機械学習モデルの訓練を行います。同時に同じconda.yamlを持つモデルをExperimentに登録し、Artifactを指定のS3バケットに保存します。
- mlflow docker imageのコンテナでダミーモデルをローカルデプロイし、ライブラリやpythonの依存関係を解消します。ここでは本番モデルにタッチせずに、ダミーモデルのconda.yamlのみを手がかりにコンテナを更新している点がポイントです。SageMaker Notebook Instanceを用いているのは、ネットワークの設定を省略するためで、インターネットアクセスがあるサーバーであれば問題ありません。
- 更新されたコンテナのイメージをECRへコミットします。
- Databricks Workspaceから更新されたイメージを用いて本番モデルをデプロイします。
Workspaceのデプロイ
準備
WorkspaceのデプロイにはTerraformを使用するため、Databricks CLI、AWS CLI、Terraform CLIをセットアップします。クライアントPCではmacOSを使用しています。
Databricks CLIのセットアップ
ドキュメントに従ってDatabricks CLIをインストールします。インストールにはHomebrewが必要です。
$ brew tap databricks/tap
$ brew install databricks
インストールの完了を確認します。Databricks CLI vX.X.Xと返ってくれば成功です
$ databricks -v
Databricks CLI v0.217.0
Databricks CLIを認証するためのprofileを作成します。あらかじめ既存のワークスペースでPersonal Access Tokenを発行しておきます。
$ databricks configure --token --profile myprofile
✔ Databricks host: https://dbc-xxxxxxxxx.cloud.databricks.com/
✔ Personal access token: ***********************
AWS CLIのセットアップ
ドキュメントに従ってAWS CLIをインストールします。
$ curl "https://awscli.amazonaws.com/AWSCLIV2.pkg" -o "AWSCLIV2.pkg"
$ sudo installer -pkg AWSCLIV2.pkg -target /
インストールの完了を確認します。/usr/local/bin/awsと返ってくれば成功です
$ which aws
/usr/local/bin/aws
AWS CLIの認証を行うprofileを作成します。認証に必要なAWSアクセスキーを作成し、Access KeyとSecret Acess Keyを記録しておきます。
$ aws configure --profile myprofile
AWS Access Key ID [None]:***********************
AWS Secret Access Key [None]:***********************
Default region name [None]:
Default output format [None]:
Terraform CLIのセットアップ
ドキュメントに従ってTerraform CLIをインストールします。
$ brew tap hashicorp/tap
$ brew install hashicorp/tap/terraform
インストールの完了を確認します。Terraform vX.X.Xと返ってくれば成功です
$ terraform -v
Terraform v1.7.5
on darwin_arm64
TerraformでWorkspaceをデプロイする
上記のリポジトリからprojectをcloneします。最終更新が2年前でAWS GlueへのVPCE等余計なスタックが残っていたりするのですが、手数が少なくて気に入っているのでこちらを使用します。もちろんTerraform Providerを使用してもらって問題ありません。
$ git clone https://github.com/LeoneGarage/terraform
secrets.tfvarsの以下の値を入力します。これらは、Databricks Account Consoleから取得できる Databricks Account ID、ログ配信S3バケットおよび関連するAWSリソースの名前のプレフィックスとして使用されるDatabricks Account Name、Databricks Account所有者のユーザー名、およびパスワードです。
databricks_account_id = ""
databricks_account_name = ""
databricks_account_username = ""
databricks_account_password = ""
2023年4月以降S3バケットはデフォルトでパブリックアクセスがブロックされ、ACLはデフォルトで無効化されているため、provision/log-delivery/log-delivery.tfの以下の記載を削除します。
resource "aws_s3_bucket_acl" "logdelivery_acl" {
  bucket = aws_s3_bucket.logdelivery.id
  acl    = "private"
}
Workspaceをデプロイします。引数ではCMKの適用範囲、Workspace Name、VPCのリージョン、AWS CLIのprofile、deployment prefixの有無を指定しています。
$ ./configure.sh -nocmk all -w pl-tf-test-workspace -r ap-northeast-1 -ap myprofile -nodp
Account ConsoleでWorkspace pl-tf-test-workspaceのStatusがRunningになっていたら成功です

AWS側の設定
mlflow ExperimentのArtifactを保存するためのS3バケットを作成
DatabricksではExperimentのArtifactの保存場所にDBFSまたはS3をサポートしています。 この後のステップでモデルのパスが必要になります。パスの特定を簡単にするため、mlflow-sagemaker-test-<your_aws_account_id>の名前でS3バケットを作成します。
SageMakerのAPIをコールするためのVPC Endpointの設定
WorkspaceのVPCからはVPC Endpoint経由でSageMakerのAPIや推論エンドポイントにアクセスします。以下のサービス名を持つVPC Endpointを作成し、WorkspaceのVPCにアタッチします。
- com.amazonaws.ap-northeast-1.sagemaker.api
- com.amazonaws.ap-northeast-1.sagemaker.runtime
SageMakerにアクセスするためのIAM Roleを作成
以下の手順を参考にSageMakerにアクセスするためのIAM Role pl-tf-test-sagemaker-roleを作成します。このロールはWorkspaceからのモデルデプロイ時やダミーモデルへのアクセス時にIntance Profileとして使用します。 モデルのArtifactをS3バケットで管理するため、必要に応じてPolicyを追加ください。今回は簡単のためmlflow docker imageの作成、ECRからのimageのpull、ECRへのコミットを全てこのロールで行うため、以下のInline Policyを追加します。
{
      "Version": "2012-10-17",
      "Statement": [
        {
          "Effect": "Allow",
          "Action": [
            "ecr:GetAuthorizationToken",
            "ecr:BatchCheckLayerAvailability",
            "ecr:GetDownloadUrlForLayer",
            "ecr:GetRepositoryPolicy",
            "ecr:DescribeRepositories",
            "ecr:ListImages",
            "ecr:DescribeImages",
            "ecr:BatchGetImage",
            "ecr:InitiateLayerUpload",
            "ecr:UploadLayerPart",
            "ecr:CompleteLayerUpload",
            "ecr:PutImage"
],
          "Resource": "*"
        }
] }
以上の手順が完了したら、Instance ProfileのARNを控えておきます。
デプロイ
Instance Profileの登録とクラスターの用意
WorkspaceのSettignsからSecurityを開き、控えておいたInstance ProfileのARNを入力してWorkspaceにSageMaker、ECR、S3にアクセス可能なInstance Profileを登録します。

ML Runtimeのクラスターに作成したInstance Profileをアタッチして起動します。以降のモデルの準備とデプロイはこのクラスターから行います。

適当なNotebookを開き、クラスターをアタッチします。boto3クライアントはregionを指定していない場合、S3アクセスの時にhttps://s3.amazonaws.com/bucket/ のURLへアクセスするため、環境変数でreigionの設定を行う必要があります。以下の設定をするとboto3クライアントはhttps://*.ap-northeast-1.amazonaws.com/ のURLへアクセスするようになります。
%sh
mkdir ~/.aws
touch ~/.aws/config
cat  > ~/.aws/config <<EOF
[default]
region = ap-northeast-1
sts_regional_endpoints = regional
EOF
ダミーモデルのArtifactを保存する
Databricksでダミーモデルを定義し、mlflow experimentに記録します。モデルにはtorch.nnのチュートリアルから簡単なネットワークを採用します。
import torch
import torch.nn as nn
import torch.nn.functional as F


class MNISTConvNet(nn.Module):

    def __init__(self):
        # this is the place where you instantiate all your modules
        # you can later access them using the same names you've given them in
        # here
        super(MNISTConvNet, self).__init__()
        self.conv1 = nn.Conv2d(1, 10, 5)
        self.pool1 = nn.MaxPool2d(2, 2)
        self.conv2 = nn.Conv2d(10, 20, 5)
        self.pool2 = nn.MaxPool2d(2, 2)
        self.fc1 = nn.Linear(320, 50)
        self.fc2 = nn.Linear(50, 10)

    # it's the forward function that defines the network structure
    # we're accepting only a single input in here, but if you want,
    # feel free to use more
    def forward(self, input):
        x = self.pool1(F.relu(self.conv1(input)))
        x = self.pool2(F.relu(self.conv2(x)))

        # in your model definition you can go full crazy and use arbitrary
        # python code to define your model structure
        # all these are perfectly legal, and will be handled correctly
        # by autograd:
        # if x.gt(0) > x.numel() / 2:
        #      ...
        #
        # you can even do a loop and reuse the same module inside it
        # modules no longer hold ephemeral state, so you can use them
        # multiple times during your forward pass
        # while x.norm(2) < 10:
        #    x = self.conv1(x)

        x = x.view(x.size(0), -1)
        x = F.relu(self.fc1(x))
        x = F.relu(self.fc2(x))
        return x
このMNISTConvNetをpyfuncモデルとしてラップするためのクラスを定義します。
# PyFuncのカスタムモデルとして空のモデルを定義
class MlflowPyfuncModel(mlflow.pyfunc.PythonModel):

    def __init__(self, model):
        self.model = model

    def predict(self, context, model_input):
        import torch
        input_tensor = torch.Tensor(model_input)
        pred = self.model(input_tensor)
        return pred.tolist()
pyfuncモデルの動作確認を行います。
input = torch.randn(1, 1, 28, 28)
net = MNISTConvNet()
model = MlflowPyfuncModel(net)
out = model.predict(None, input)
print(out)
mlflow Experimentにrunを記録します。その際にtorchのversionをadditional_pip_depsに書いておきます。
# mlflow experimentに記録
with mlflow.start_run(run_name='mlflow_model') as run:
  net = MNISTConvNet()
  wrappedModel = MlflowPyfuncModel(net)

  # conda envの定義
  conda_env =  _mlflow_conda_env(
        additional_conda_deps=None,
        additional_pip_deps=["torch==2.0.1", "mlflow==2.9.2"],
        additional_conda_channels=None,
    )

  mlflow.pyfunc.log_model(model_name, python_model=wrappedModel, conda_env=conda_env)
ExperimentsのUIからRun IDを確認して控えておきます。

Docker Imageの作成
別途VPCを用意するのが手間なので、SageMaker Notebookインスタンスを起動します。Notebookインスタンスでなくともインターネットに接続可能なサーバーであれば問題ありません。IAM Roleには先ほど作成したpl-tf-test-sagemaker-roleを指定します。インスタンスが起動したらJupyter Notebookを開いて、 Terminalを起動します。

mlflowをインストールし、mlflow docker imageをローカルでビルドします。
$ pip install mlflow
$ mlflow sagemaker build-and-push-container --no-push
mlflow docker imageのコンテナを指定して、ダミーモデルをローカルでデプロイします。この時にPythonの新しいバージョンや不足しているライブラリがインストールされます。
$ mlflow deployments run-local --target sagemaker \
> --name my-local-deployment \
> --model-uri "s3://mlflow-sagemaker-test-<your_aws_account_id>/model_artifact/<run_id>artifacts/mlflow_model/" \
> --flavor python_function \
> -C port=5000 \
> -C image="mlflow-pyfunc"
Python 3.10.12 をインストールしています。torchもインストールされていますが、ログに現れない仕様となっています。
2024/04/13 09:05:39 INFO mlflow.models.container: creating and activating custom environment
2024/04/13 09:05:39 INFO mlflow.utils.virtualenv: Installing python 3.10.12 if it does not exist
Downloading Python-3.10.12.tar.xz...
-> https://www.python.org/ftp/python/3.10.12/Python-3.10.12.tar.xz
Installing Python-3.10.12...
Installed Python-3.10.12 to /root/.pyenv/versions/3.10.12
gunicornの推論サーバがスタートすればローカルのデプロイは成功です
[2024-04-13 18:57:45 +0000] [12989] [INFO] Starting gunicorn 21.2.0
[2024-04-13 18:57:45 +0000] [12989] [INFO] Listening at: http://127.0.0.1:8000 (12989)
[2024-04-13 18:57:45 +0000] [12989] [INFO] Using worker: gevent
[2024-04-13 18:57:45 +0000] [12993] [INFO] Booting worker with pid: 12993
[2024-04-13 18:57:45 +0000] [12994] [INFO] Booting worker with pid: 12994
別のTerminalを開いて、更新されたコンテナのIDを確認して控えておきます。
$ docker container ps
更新後のコンテナからイメージを作成します。
$ docker commit {対象のコンテナID} mlflow-pyfunc-updated
イメージ作成を確認します
$ docker images
ECRに作成したイメージをコミットします。ECRへのログイン、tag付け、プッシュまで一括でやってくれるmlflowの便利関数を使います。Terminalでpythonのインタプリタを開き
import mlflow.sagemaker
mlflow.sagemaker.push_image_to_ecr("mlflow-pyfunc-updated")
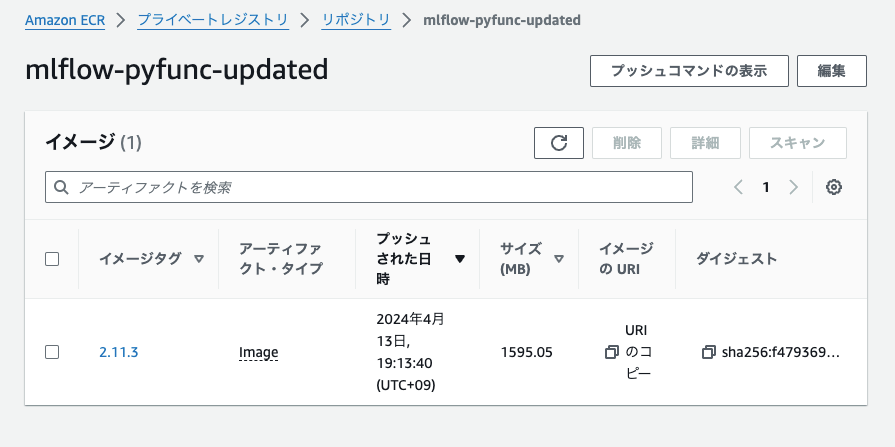
ECRのコンソールにイメージがプッシュされていることを確認します。
推論エンドポイントの作成
DatabricksのNotebookからモデルのデプロイを行います。WorkspaceのSGとサブネットIDを調べてconfigに入力します。モデルはダミーモデルを指定しますが、本番用のモデルでも問題ありません。
%sh

mlflow deployments update --target sagemaker:/ap-northeast-1 \
        --name your-deployment-name \
        --model-uri s3://mlflow-sagemaker-test-<your_aws_account_id>/model_artifact/run_id/artifacts/mlflow_model \
        --flavor python_function\
        -C execution_role_arn=arn:aws:iam::<your_aws_account_id>:role/pl-tf-test-sagemaker-role \
        -C image_url=<your_aws_account_id>.dkr.ecr.ap-northeast-1.amazonaws.com/mlflow-pyfunc-updated:2.11.3 \
        -C bucket=mlflow-sagemaker-test-<your_aws_account_id> \
        -C region_name=ap-northeast-1 \
        -C mode=replace \
        -C archive=False \
        -C instance_type=ml.m5.xlarge \
        -C instance_count=1 \
        -C synchronous=True \
        -C timeout_seconds=300 \
        -C vpc_config='{"SecurityGroupIds": ["sg-xxxxxxxxxxxxxx"], "Subnets": ["subnet-xxxxxxxxxxxxxx", "subnet-xxxxxxxxxxxxxx"]}' \
        -C env='{"MLFLOW_DISABLE_ENV_CREATION": "true"}'
"The SageMaker endpoint was created successfully."のメッセージが出たら成功です。
2024/04/13 10:38:28 INFO mlflow.sagemaker: Waiting for endpoint to reach the "InService" state. Current endpoint status: "Creating"
2024/04/13 10:38:48 INFO mlflow.sagemaker: The deployment operation completed successfully with message: "The SageMaker endpoint was created successfully."
エンドポイントのステータスを確認します。Application status is: InServiceと返ってくれば成功です。
# エンドポイントのステータスを確認するヘルパー関数
import boto3
def check_status(app_name):
  sage_client = boto3.client('sagemaker', region_name=region)
  endpoint_description = sage_client.describe_endpoint(EndpointName=app_name)
  endpoint_status = endpoint_description["EndpointStatus"]
  return endpoint_status

print("Application status is: {}".format(check_status(app_name)))
推論の実行
エンドポイントへクエリしてみます。
import json
import numpy as np
import boto3
import pandas as pd

region = "ap-northeast-1"

# パラメータ指定
input_data = torch.randn(1, 1, 28, 28)
input_data = input_data.tolist()
input_json = json.dumps({"inputs" : input_data})

def query_endpoint(app_name, input_json):
  client = boto3.session.Session().client("sagemaker-runtime", region)

  response = client.invoke_endpoint(
      EndpointName=app_name,
      Body=input_json,
      ContentType='application/json',
  )

  preds = response['Body'].read().decode("ascii")
  preds = json.loads(preds)
  print("Received response: {}".format(preds))
  return preds

print("Sending batch prediction request with input json: {}".format(input_json))

# デプロイされたモデルにポストすることで入力を評価します
response = query_endpoint(app_name=app_name, input_json=input_json)
推論結果を確認します。上手くいっていそうです!

まとめと展望
本稿では、Back-endのPrivate Link構成の Databricks WorkspaceからSageMakerの推論エンドポイントへモデルをデプロイする方法をウォークスルーしました。以下がポイントとなります。
- ダミーモデルのconda.yamlから、mlflow docker imageのPython/ライブラリの過不足を解決した
- 本番モデルのデプロイは閉域(Databricks Workspace)から行った
今回の方式では新しいモデルが作られるたびに、以上のワークフローをもう一度が行う必要があり煩雑です。そのためDatabricks Runtimeごとに必要なライブラリを抽出しベースとなるDocker Imageを用意しておく、CodeBuildでビルドの処理をテンプレート化するといったエンハンスが考えられます。
Discussion