Google Cloudコンソールで作成したリソースをTerraform 形式にエクスポートして効率的にIaC化を行う
この記事の概要
こんにちは。PharmaX でエンジニアをしている諸岡(@hakoten)です。
PharmaX では、クラウド環境として GCP(Google Cloud Platform)を使用しています。
また、各プロジェクトのコードは、Terraformを使って IaC(Infrastructure as Code)化しています。
この記事では、gcloud CLI のコンポーネントである「Config Connector」というツールを使用して、GCP のコンソール画面で作成したリソースを Terraform 形式に出力する方法を紹介します。効率的な IaC 化の参考にしていただければ幸いです。
※ 余談ですが、Kubernetes を使って Google Cloud リソースを管理する Config Connectorというツールもあるようですが、これとは別のものになります。
Terraform の IaC 化での個人的な悩み
PharmaX では、クラウドリソースは Terraform により IaC 化されており、汎用性の高いリソースは Terraform のモジュール機能を使ってモジュール化しています。
モジュール化しておくことで、インフラ側にそこまで詳しくないメンバーでも、新しいリソースを手軽に作成することができるため、開発コストやメンテナンスコストを下げることが目的です。
ただし、当然すべてのリソースがモジュール化されているわけではないため、開発中に新たなモジュールを作らなくてはならない場面もあります。
その場合、PharmaXにはまだインフラは専門のチームや職域がないため、機能開発のエンジニアがモジュールの作成まで行っています。
私の場合、初めて利用するクラウドリソースを作成するときは、まず GCP のコンソール上でドキュメントを読みながら試しに色々作ってみることが多いのですが、この時の小さな悩みとしては、「実際にコンソールで作った構成は、Terraform ではどうやって書くんだっけ?」となることがよくあります。
このような悩みの解決として、「GCP のコンソールで試したものをそのまま Terraform 形式にエクスポートして、構成を理解した上でモジュール化してしまおう」というのがこの記事の目的になります。
Config Connector の基本的な使い方
Config Connector は、Google が公式に提供している gcloud コマンドのコンポーネントで、CLI 経由で使用することができます。
準備として「gcloud CLI をインストールする」を参考に CLI をインストールするか、Cloud Shell環境で作業してください。
gcloud CLIのバージョン
この記事を書いた時点では次のバージョンを使用しています。
Google Cloud SDK 475.0.0
alpha 2024.05.03
beta 2024.05.03
config-connector 1.93.0
インストール
次のコマンドで Config Connector をインストールすることができます。
gcloud components install config-connector
Config Connector を利用するために Cloud Asset API を有効化してください。
gcloud services enable cloudasset.googleapis.com
使い方
Config Connector を有効にすると、gcloud beta resource-config というコマンドが使えるようになります。
resource-config コマンドには現時点で 2 つのサブコマンドがあります。
| サブコマンド | 説明 |
|---|---|
| bulk-export | 指定したプロジェクト、組織、またはフォルダ内の全リソース設定をエクスポートする |
| list-resource-types | bulk-export でサポートされている全リソースタイプを一覧表示する |
プロジェクトのすべてのリソースをエクスポートする
gcloud beta resource-config bulk-export \
 --path=<OUTPUT_DIRECTORY> \
 --project=<PROJECT_ID> \
 --resource-format=terraform
このコマンドにより、指定したディレクトリにリソースの構成ごとに分割された Terraform ファイルがエクスポートされます。
単一ファイルにエクスポートする
gcloud beta resource-config bulk-export \
 --project=<PROJECT_ID> \
 --resource-format=terraform >> terraform_export.tf
path を指定しない場合、エクスポートされたデータは標準出力に送られるため、単一のファイルに出力することができます。
リソース単位でエクスポートする
gcloud beta resource-config bulk-export \
  --resource-types=<Resource Type> \
  --project=<PROJECT_ID> \
  --resource-format=terraform
--resource-types オプションを指定することで、特定のリソースタイプに限定してエクスポートが可能です。
利用可能なリソースタイプは gcloud beta resource-config list-resource-types コマンドで確認できます。
出力例
% gcloud beta resource-config list-resource-types
┌──────────────────────────────────────┬──────────────┬─────────┬──────┐
│               KRM KIND               │ BULK EXPORT? │ EXPORT? │ IAM? │
├──────────────────────────────────────┼──────────────┼─────────┼──────┤
│ AccessContextManagerAccessLevel      │              │         │      │
│ AccessContextManagerAccessPolicy     │              │         │ x    │
│ AccessContextManagerServicePerimeter │              │         │      │
│ ArtifactRegistryRepository           │ x            │ x       │ x    │
│ BigQueryDataset                      │ x            │ x       │      │
│ BigQueryJob                          │              │ x       │      │
│ BigQueryTable                        │ x            │ x       │ x    │
│ BigtableAppProfile                   │ x            │ x       │      │
│ BigtableGCPolicy                     │              │         │      │
│ BigtableInstance                     │ x            │ x       │ x    │
│ BigtableTable                        │ x            │ x       │ x    │
│ CloudBuildTrigger                    │              │         │      │
│ CloudIdentityGroup                   │              │         │      │
│ ComputeAddress                       │ x            │ x       │      │
│ ComputeAddress                       │ x            │ x       │      │
│ ComputeBackendBucket                 │ x            │ x       │ x    │
│ ComputeBackendService                │ x            │ x       │      │
│ ComputeBackendService                │ x            │ x       │      │
│ ComputeDisk                          │ x            │ x       │ x    │
│ ComputeDisk                          │ x            │ x       │ x    │
│ ComputeExternalVPNGateway            │ x            │ x       │      │
│ ComputeFirewall                      │ x            │ x       │      │
│ ComputeForwardingRule                │ x            │ x       │      │
│ ComputeForwardingRule                │ x            │ x       │      │
│ ComputeHTTPHealthCheck               │ x            │ x       │      │
│ ComputeHTTPSHealthCheck              │ x            │ x       │      │
│ ComputeHealthCheck                   │ x            │ x       │      │
│ ComputeHealthCheck                   │ x            │ x       │      │
│ ComputeImage                         │ x            │ x       │ x    │
│ ComputeInstance                      │ x            │ x       │ x    │
│ ComputeInstance                      │ x            │         │ x    │
│ ComputeInstanceGroup                 │ x            │ x       │      │
│ ComputeInstanceTemplate              │ x            │ x       │      │
│ ComputeInterconnectAttachment        │ x            │ x       │      │
│ ComputeNetwork                       │ x            │ x       │      │
│ ComputeNetworkEndpointGroup          │ x            │ x       │      │
│ ComputeNetworkPeering                │              │         │      │
│ ComputeNodeGroup                     │ x            │ x       │      │
│ ComputeNodeTemplate                  │ x            │ x       │      │
│ ComputeProjectMetadata               │              │         │      │
│ ComputeRegionNetworkEndpointGroup    │              │         │      │
│ ComputeReservation                   │ x            │ x       │      │
│ ComputeResourcePolicy                │ x            │ x       │      │
│ ComputeRoute                         │ x            │ x       │      │
│ ComputeRouter                        │ x            │ x       │      │
│ ComputeRouterInterface               │              │         │      │
│ ComputeRouterNAT                     │              │         │      │
│ ComputeRouterPeer                    │              │         │      │
│ ComputeSSLCertificate                │ x            │ x       │      │
│ ComputeSSLCertificate                │ x            │ x       │      │
│ ComputeSSLPolicy                     │ x            │ x       │      │
│ ComputeSecurityPolicy                │ x            │ x       │      │
│ ComputeSharedVPCHostProject          │              │         │      │
│ ComputeSharedVPCServiceProject       │              │         │      │
│ ComputeSnapshot                      │ x            │ x       │ x    │
│ ComputeSubnetwork                    │ x            │ x       │ x    │
│ ComputeTargetGRPCProxy               │              │ x       │      │
│ ComputeTargetHTTPProxy               │ x            │ x       │      │
│ ComputeTargetHTTPProxy               │ x            │ x       │      │
│ ComputeTargetHTTPSProxy              │ x            │ x       │      │
│ ComputeTargetHTTPSProxy              │ x            │ x       │      │
│ ComputeTargetInstance                │ x            │ x       │      │
│ ComputeTargetPool                    │ x            │ x       │      │
│ ComputeTargetSSLProxy                │              │ x       │      │
│ ComputeTargetTCPProxy                │ x            │ x       │      │
│ ComputeTargetVPNGateway              │ x            │ x       │      │
│ ComputeURLMap                        │ x            │ x       │      │
│ ComputeURLMap                        │ x            │ x       │      │
│ ComputeVPNGateway                    │ x            │ x       │      │
│ ComputeVPNTunnel                     │ x            │ x       │      │
│ ContainerCluster                     │ x            │ x       │      │
│ ContainerNodePool                    │ x            │         │      │
│ DataflowFlexTemplateJob              │              │         │      │
│ DataflowJob                          │              │         │      │
│ DNSManagedZone                       │ x            │ x       │      │
│ DNSPolicy                            │ x            │ x       │      │
│ DNSRecordSet                         │              │         │      │
│ FirestoreIndex                       │              │         │      │
│ IAMCustomRole                        │ x            │         │      │
│ IAMServiceAccount                    │ x            │         │ x    │
│ IAMServiceAccountKey                 │              │         │      │
│ KMSCryptoKey                         │ x            │         │ x    │
│ KMSKeyRing                           │ x            │ x       │ x    │
│ LoggingLogSink                       │ x            │         │      │
│ MemcacheInstance                     │ x            │ x       │      │
│ MonitoringAlertPolicy                │ x            │         │      │
│ MonitoringNotificationChannel        │              │         │      │
│ PubSubSchema                         │              │ x       │      │
│ PubSubSubscription                   │ x            │ x       │ x    │
│ PubSubTopic                          │ x            │ x       │ x    │
│ RedisInstance                        │ x            │ x       │      │
│ Folder                               │ x            │ x       │ x    │
│ Project                              │ x            │ x       │ x    │
│ ResourceManagerLien                  │              │         │      │
│ ResourceManagerPolicy                │              │         │      │
│ SecretManagerSecret                  │ x            │ x       │ x    │
│ SecretManagerSecretVersion           │ x            │         │      │
│ ServiceDirectoryEndpoint             │              │ x       │      │
│ ServiceDirectoryNamespace            │ x            │ x       │ x    │
│ ServiceDirectoryService              │              │ x       │ x    │
│ ServiceNetworkingConnection          │              │         │      │
│ Service                              │ x            │ x       │      │
│ SourceRepoRepository                 │ x            │ x       │ x    │
│ SpannerDatabase                      │ x            │ x       │ x    │
│ SpannerInstance                      │ x            │ x       │ x    │
│ SQLDatabase                          │              │ x       │      │
│ SQLInstance                          │ x            │ x       │      │
│ SQLSSLCert                           │              │         │      │
│ SQLUser                              │              │         │      │
│ StorageBucket                        │ x            │         │ x    │
│ StorageBucketAccessControl           │              │         │      │
│ StorageDefaultObjectAccessControl    │              │         │      │
│ StorageNotification                  │              │         │      │
│ StorageTransferJob                   │              │         │      │
└──────────────────────────────────────┴──────────────┴─────────┴──────┘
少しわかりにくいかもしれませんが、BULK EXPORT?にxが付いている項目がエクスポート可能な対象です。
公式ドキュメント
その他、Config Connector の詳細については、公式ドキュメントをご参照ください。
実際にコンソールから作成したリソースを出力してみる
最後に簡単ではありますが、実際に gcloud beta resource-config を使ってリソースの出力を試してみます。
Google Cloud Engine のリソースを作成する

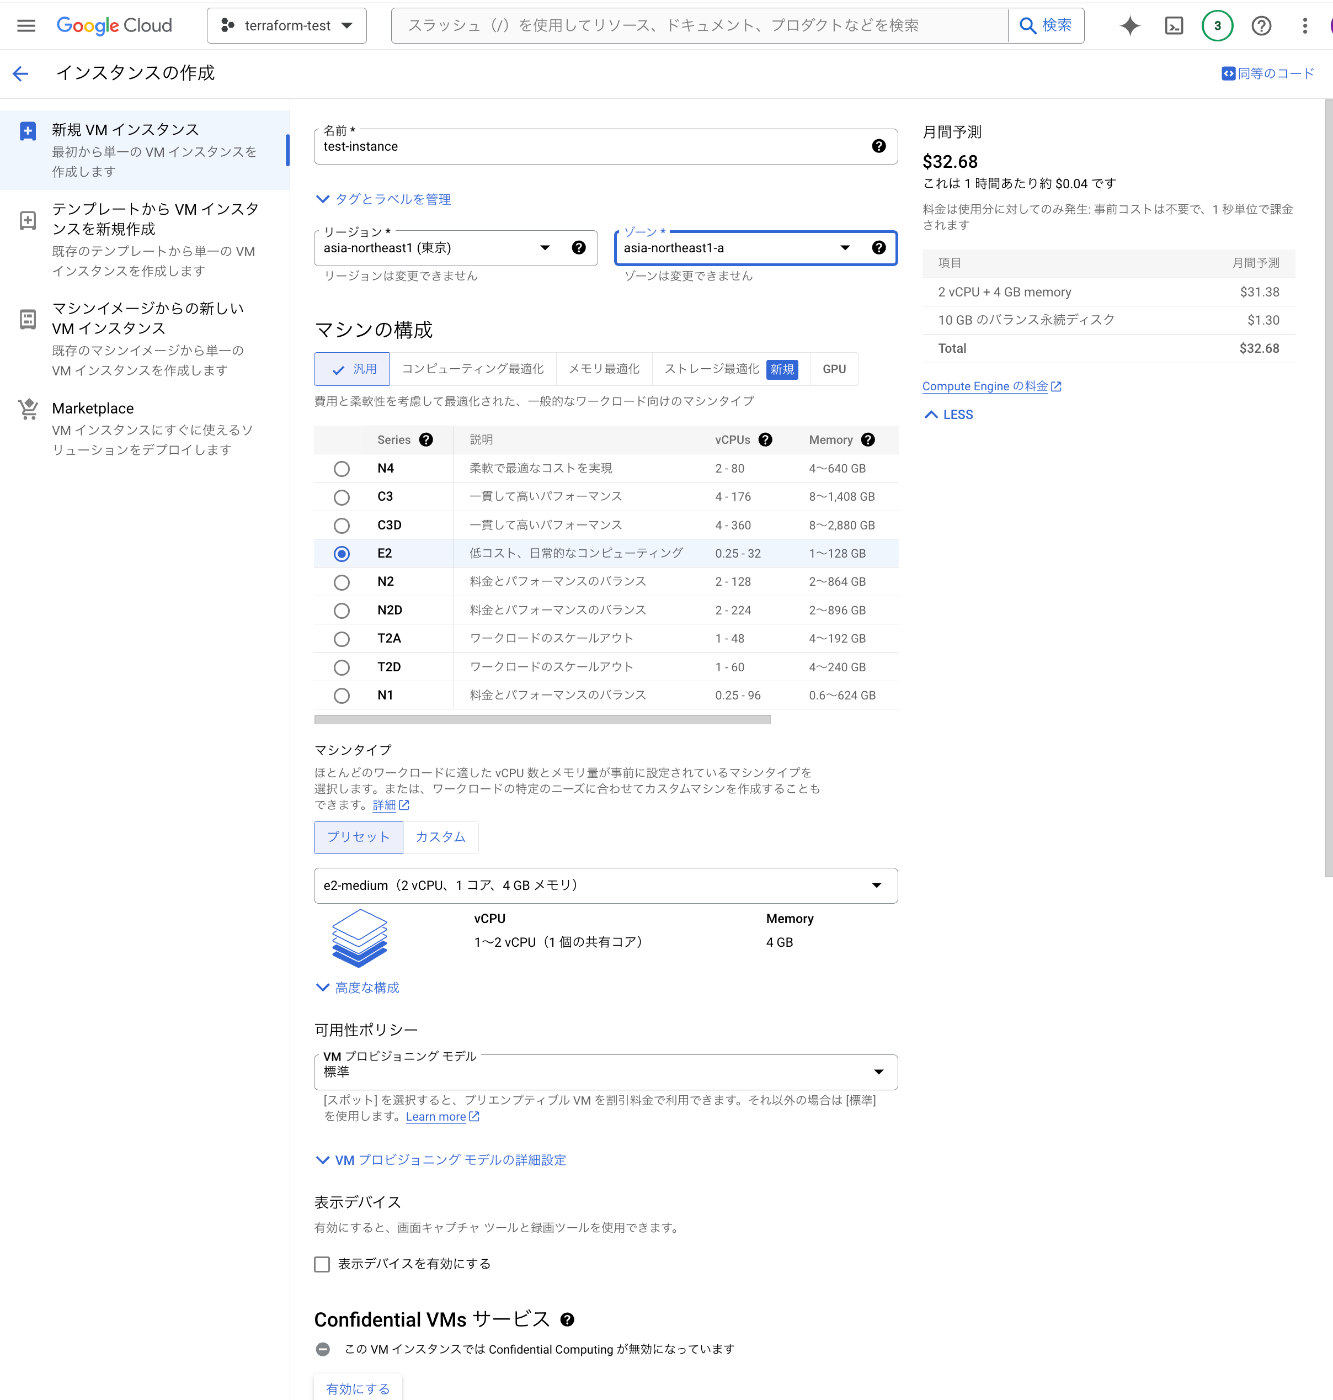
今回は、検証としてGoogle Cloud Engineを使ってみます。
まずは、Google Cloud Engine を GCP のコンソール上で作成します。
Terraform リソースに出力する
作成したインスタンスを gcloud beta resource-config コマンドを使って Terraform の形式に出力します。
% gcloud config set project terraform-test-423004
- 今回は
terraform-test-423004というプロジェクトで動作確認しているため、プロジェクトを切り替えます。
% gcloud components install config-connector
% gcloud services enable cloudasset.googleapis.com
- Config Connector のインストールと Cloud Asset API の有効化を行います。
% gcloud beta resource-config bulk-export \
  --resource-types=ComputeInstance \
  --project=terraform-test-423004 \
  --resource-format=terraform
-
gcloud beta resource-config bulk-exportコマンドを使用して、Terraform フォーマットで出力します。 - ComuteEngineは複数のリソースで作成されますが、今回は検証としてresource-type に
ComputeInstanceを指定しています。
実際の出力結果
Exporting resource configurations to stdout...
resource "google_compute_instance" "test_instance" {
  boot_disk {
    auto_delete = true
    device_name = "test-instance"
    initialize_params {
      image = "https://www.googleapis.com/compute/beta/projects/debian-cloud/global/images/debian-12-bookworm-v20240415"
      size  = 10
      type  = "pd-balanced"
    }
    mode   = "READ_WRITE"
    source = "https://www.googleapis.com/compute/v1/projects/terraform-test-423004/zones/asia-northeast1-a/disks/test-instance"
  }
  confidential_instance_config {
    enable_confidential_compute = false
  }
  machine_type = "e2-medium"
  name         = "test-instance"
  network_interface {
    access_config {
      nat_ip       = "34.146.66.228"
      network_tier = "PREMIUM"
    }
    network            = "https://www.googleapis.com/compute/v1/projects/terraform-test-423004/global/networks/default"
    network_ip         = "10.146.0.2"
    stack_type         = "IPV4_ONLY"
    subnetwork         = "https://www.googleapis.com/compute/v1/projects/terraform-test-423004/regions/asia-northeast1/subnetworks/default"
    subnetwork_project = "terraform-test-423004"
  }
  project = "terraform-test-423004"
  reservation_affinity {
    type = "ANY_RESERVATION"
  }
  scheduling {
    automatic_restart   = true
    on_host_maintenance = "MIGRATE"
    provisioning_model  = "STANDARD"
  }
  service_account {
    email  = "237524808553-compute@developer.gserviceaccount.com"
    scopes = ["https://www.googleapis.com/auth/devstorage.read_only", "https://www.googleapis.com/auth/logging.write", "https://www.googleapis.com/auth/monitoring.write", "https://www.googleapis.com/auth/service.management.readonly", "https://www.googleapis.com/auth/servicecontrol", "https://www.googleapis.com/auth/trace.append"]
  }
  shielded_instance_config {
    enable_integrity_monitoring = true
    enable_vtpm                 = true
  }
  zone = "asia-northeast1-a"
}
# terraform import google_compute_instance.test_instance projects/terraform-test-423004/zones/asia-northeast1-a/instances/test-instance

Export complete.
コマンド一つで無事 Terraform 形式を出力することができました。
私の場合、ここからCompute Instance の Terraform のリファレンスと GCP コンソールを比較しながら、必要なプロパティを把握し、モジュール化を進めるという形をとることが多いです。
[おまけ] AI リソースからモジュールを作成する
ここでは、おまけとして AI を使ったモジュール作成の効率化的な方法を紹介します。
まずは、前述の通り出力された Terraform のフォーマットをファイルに書き込みます。
mor:terraform-export% gcloud beta resource-config bulk-export \
  --resource-types=ComputeInstance \
  --project=terraform-test-423004 \
  --resource-format=terraform > compute_engine.tf
Exporting resource configurations to stdout...

Export complete.
この出力結果を ChatGPT などの任意の AI ツールを使ってモジュール化します。
プロンプトの例は次のようになります。
該当のTerraformリソースを参考にして、google_compute_instance のモジュールを作成してください。

モジュールは以下のファイルに分けてください。

- main.tf : リソース定義ファイル
- variables.tf: プロパティの変数ファイル(日本語で説明を入れてください)
- outputs.tf: リソースのアウトプットファイル

プロパティを渡せるようにしてください。
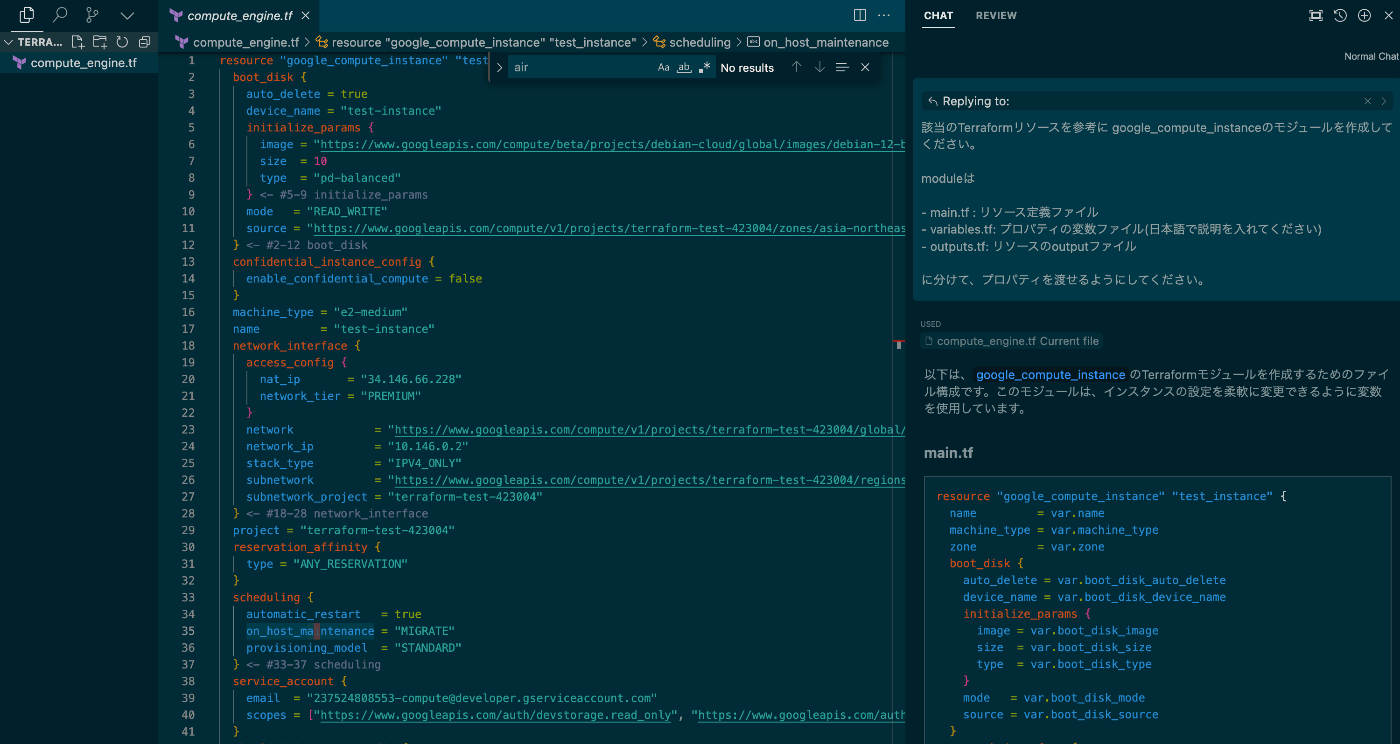
私は、Cursorという AI 組み込みエディタを使用しており、作成したファイルをそのままインプットに渡してプロンプトを実行しています。

CursorエディタでTerraform形式からモジュールを作成する
参考までに、GPT-4 によって作成された結果は次のようになりました。
main.tf
resource "google_compute_instance" "test_instance" {
  name         = var.name
  machine_type = var.machine_type
  zone         = var.zone
  boot_disk {
    auto_delete = var.boot_disk_auto_delete
    device_name = var.boot_disk_device_name
    initialize_params {
      image = var.boot_disk_image
      size  = var.boot_disk_size
      type  = var.boot_disk_type
    }
    mode   = var.boot_disk_mode
    source = var.boot_disk_source
  }
  network_interface {
    network = var.network
    subnetwork = var.subnetwork
    access_config {
      nat_ip       = var.nat_ip
      network_tier = var.network_tier
    }
  }
  scheduling {
    automatic_restart   = var.automatic_restart
    on_host_maintenance = var.on_host_maintenance
    provisioning_model  = var.provisioning_model
  }
  service_account {
    email  = var.service_account_email
    scopes = var.service_account_scopes
  }
  shielded_instance_config {
    enable_integrity_monitoring = var.enable_integrity_monitoring
    enable_vtpm                 = var.enable_vtpm
  }
}
variables.tf
variable "name" {
  description = "インスタンスの名前"
}

variable "machine_type" {
  description = "インスタンスのマシンタイプ"
}

variable "zone" {
  description = "インスタンスが配置されるゾーン"
}

variable "boot_disk_auto_delete" {
  description = "ブートディスクが自動的に削除されるかどうか"
}

variable "boot_disk_device_name" {
  description = "ブートディスクのデバイス名"
}

variable "boot_disk_image" {
  description = "ブートディスクのイメージURL"
}

variable "boot_disk_size" {
  description = "ブートディスクのサイズ(GB)"
}

variable "boot_disk_type" {
  description = "ブートディスクのタイプ"
}

variable "boot_disk_mode" {
  description = "ブートディスクのモード"
}

variable "boot_disk_source" {
  description = "ブートディスクのソースURL"
}

variable "network" {
  description = "ネットワークのURL"
}

variable "subnetwork" {
  description = "サブネットワークのURL"
}

variable "nat_ip" {
  description = "NAT IPアドレス"
}

variable "network_tier" {
  description = "ネットワークティア"
}

variable "automatic_restart" {
  description = "自動再起動が有効かどうか"
}

variable "on_host_maintenance" {
  description = "ホストメンテナンスの際の動作"
}

variable "provisioning_model" {
  description = "プロビジョニングモデル"
}

variable "service_account_email" {
  description = "サービスアカウントのメールアドレス"
}

variable "service_account_scopes" {
  description = "サービスアカウントのスコープ"
  type        = list(string)
}

variable "enable_integrity_monitoring" {
  description = "整合性監視を有効にするかどうか"
}

variable "enable_vtpm" {
  description = "仮想TPMを有効にするかどうか"
}
outputs.tf
output "instance_id" {
  value = google_compute_instance.test_instance.id
  description = "作成されたインスタンスのID"
}

output "instance_self_link" {
  value = google_compute_instance.test_instance.self_link
  description = "作成されたインスタンスの自己リンク"
}
もちろん、この出力をそのまま使用することはありません。ここから必要な変数を精査したり、不要なプロパティを削除するなど修正は必要です。
ですが、ゼロから自分で作成するよりは、かなりの時間短縮になると思います。
AI 時代ですので、積極的に作業の効率化を図っていきたいですね。
終わりに
以上、gcloud コマンドを使って、コンソール上の Google Cloud リソースを Terraform 形式で出力する方法をご紹介しました。
Terraform に精通していないエンジニアや、IaC 化で効率的な方法を探しているエンジニアの方にも少しでも参考になれば幸いです。
PharmaX では、様々なバックグラウンドを持つエンジニアの採用をお待ちしております。
弊社は AI 活用にも力を入れていますので、LLM 関連の開発に興味がある方もぜひ気軽にお声がけください。
もし興味をお持ちの場合は、私の X アカウント(@hakoten)や記事のコメントにお気軽にメッセージいただければと思います。まずはカジュアルにお話できれば嬉しいです!
PharmaXエンジニアチームのテックブログです。エンジニアメンバーが、PharmaXの事業を通じて得た技術的な知見や、チームマネジメントについての知見を共有します。 PharmaXエンジニアチームやメンバーの雰囲気が分かるような記事は、note(note.com/pharmax)もご覧ください。
Discussion