ALBのmTLSを使って内輪向けのクローズドなSNSを構築してみた
はじめに
こちらの記事で断念していた内容です。
mTLS(相互TLS認証)を利用して内輪の人間だけ接続できるTwitterライクなSNSを構築します。
以下要件を満たしたMisskeyのサーバを構築していきます。
- 外部の人間からは投稿を見えないようにする
- スマホからも利用するためIP制限などはかけない
前回は省略した構築部分から説明していこうと思います。
構成図
おおざっぱな構成図は以下になります。
証明書がいっぱい出てきますが、基本はALB + EC2のシンプルな構成です。

インフラ構築作業
基本はCloudformationを利用して構築を進めます。
なお、CFnはRoute53のホストゾーンでドメイン管理していることを前提に作成しています。
-
mTLSで利用するための自己書名サーバ証明書作成
opensslコマンドでの証明書作成コマンドを記載します。
自分はWindowsのWLSで動かしているUbuntuでopensslを実行しています。openssl genrsa -out server.key 4096 openssl req -new -x509 -days 36500 -key server.key -out server.crt #質問には適当に回答 Country Name (2 letter code) [AU]:JP State or Province Name (full name) [Some-State]: Locality Name (eg, city) []: Organization Name (eg, company) [Internet Widgits Pty Ltd]: Organizational Unit Name (eg, section) []: Common Name (e.g. server FQDN or YOUR name) []:server Email Address []: -
クライアント用証明書を作成
上記で作成したサーバ証明書を元にクライアント証明書を作成します。
なお、クライアント証明書はX.509 v3証明書でないとALB接続時にエラーになったためv3で作成します。
参考:https://qiita.com/asw_hoggge/items/cd4852ad1308e988fef9vi v3_req.txt #以下内容で保存 extendedKeyUsage = serverAuth, clientAuth, codeSigning, emailProtection basicConstraints = CA:FALSE keyUsage = nonRepudiation, digitalSignature, keyEnciphermentopenssl genrsa -out client.key 4096 openssl req -new -key client.key -out client.csr #質問には適当に回答 Country Name (2 letter code) [AU]:JP State or Province Name (full name) [Some-State]: Locality Name (eg, city) []: Organization Name (eg, company) [Internet Widgits Pty Ltd]: Organizational Unit Name (eg, section) []: Common Name (e.g. server FQDN or YOUR name) []:client Email Address []: Please enter the following 'extra' attributes to be sent with your certificate request A challenge password []: An optional company name []:openssl x509 -req -days 36500 -in client.csr -CA server.crt -CAkey server.key -CAcreateserial -out client.crt -extfile v3_req.txt openssl pkcs12 -export -out client.pfx -inkey client.key -in client.crt Enter Export Password:【任意のパスワード】 Verifying - Enter Export Password:【任意のパスワード】 #クライアントがiPhoneの場合、-legacy オプションを付与しないと後の証明書インポートに失敗する(ios17.6.1で確認) openssl pkcs12 -export -out mobile-client.pfx -legacy -inkey client.key -in client.crt Enter Export Password:【任意のパスワード】 Verifying - Enter Export Password:【任意のパスワード】最終的に以下ファイルが作成されていれば問題なし
- server.crt:ALB側に配置するサーバ証明書
- client.pfx:クライアント側に配置するクライアント証明書
- mobile-client.pfx:iPhoneを利用する場合のクライアント証明書
-
S3にサーバ証明書を配置する
適当なバケットを作成し、server.crtをアップロードする。
バケットポリシーなどの設定は不要。 -
Cloudformationで構築
デプロイ時に一部パラメータは修正が必要です。
Cloudformation.yml
AWSTemplateFormatVersion: "2010-09-09"
Description:
  Misskey CloudFormation

Metadata:
  "AWS::CloudFormation::Interface":
    ParameterGroups:
      - Label:
          default: "Project Name Prefix"
        Parameters:
          - PJPrefix
      - Label:
          default: "Network Configuration"
        Parameters:
          - VPCCIDR
          - PublicSubnetACIDR
          - PublicSubnetCCIDR
      - Label:
          default: "EC2 Configration"
        Parameters:
          - EC2Name
          - AMIImage
          - InstanceType
          - EC2VolumeType
          - EC2VolumeSize
      - Label:
          default: "Route53 Configration"
        Parameters:
          - HostZoneName
          - HostName
      - Label:
          default: "ALB Configration"
        Parameters:
          - InternetALBName
          - AllowWebAccessIP
          - TrustStoreBucket
          - TrustStoreKey
          - TrustStoreName
      - Label:
          default: "ACM Configration"
        Parameters:
          - HostedZoneId
    ParameterLabels:
      VPCCIDR:
        default: "VPC CIDR"
      PublicSubnetACIDR:
        default: "PublicSubnetA CIDR"
      PublicSubnetCCIDR:
        default: "PublicSubnetC CIDR"
      EC2Name:
        default: "EC2 Instance Name"
      AMIImage:
        default: "Use EC2 AMI Image  Default Ubuntu Server 22.04 LTS"
      InstanceType:
        default: "InstanceType"
      EC2VolumeType:
        default: "EC2 Instance Volume Type"
      EC2VolumeSize:
        default: "EC2 Instance Volume Size GiB"
      HostZoneName:
        default: "Domain HostZone Name"
      HostName:
        default: "HostName"
      InternetALBName:
        default: "Internet ALB Name"
      AllowWebAccessIP:
        default: "Allow Web Access IP with CIDR"
      TrustStoreBucket:
        default: "Trust Store S3 Bucket"
      TrustStoreKey:
        default: "Trust Store Key File"
      TrustStoreName:
        default: "Trust Store Name"
      HostedZoneId:
        default: "Domain HostedZone ID"

Parameters:
  PJPrefix:
    Type: String

  VPCCIDR:
    Type: String
    Default: "192.168.0.0/24"

  PublicSubnetACIDR:
    Type: String
    Default: "192.168.0.0/27"

  PublicSubnetCCIDR:
    Type: String
    Default: "192.168.0.32/27"

  EC2Name:
    Type: String
    Default: misskey

  AMIImage:
    Type: String
    Default: ami-0f415cc2783de6675 #最新のUbuntu Server 22.04 AMIイメージに書き換えてください

  InstanceType:
    Type: String
    Default: t3a.medium

  EC2VolumeType:
    Type: String
    Default: gp3

  EC2VolumeSize:
    Type: Number
    Default: 20

  HostZoneName:
    Type: String
    Default: example.com #自身の環境のホストゾーン名に書き換えてください

  HostName:
    Type: String
    Default: misskey.example.com #任意のホスト名に書き換えてください

  InternetALBName:
    Type: String
    Default: alb

  AllowWebAccessIP:
    Type: String
    Default: 0.0.0.0/0

  TrustStoreBucket:
    Type: String
    Default: "example-truststore-bucket" #自身のS3バケット名に書き換えてください

  TrustStoreKey:
    Type: String
    Default: "server.crt" #自己書名サーバ証明書のファイル名を記載

  TrustStoreName:
    Type: String
    Default: "misskey"

  HostedZoneId:
    Type: String
    Default: XXXXXXXXXXXXXXXXXXXXXX #自身の環境のホストゾーンIDに書き換えてください

Resources:
# VPC
  VPC:
    Type: "AWS::EC2::VPC"
    Properties:
      CidrBlock: !Ref VPCCIDR
      EnableDnsSupport: "true"
      EnableDnsHostnames: "true"
      InstanceTenancy: default
      Tags:
        - Key: Name
          Value: !Sub "${PJPrefix}-vpc"

# InternetGateway
  InternetGateway:
    Type: "AWS::EC2::InternetGateway"
    Properties:
      Tags:
        - Key: Name
          Value: !Sub "${PJPrefix}-igw"

# attach
  InternetGatewayAttachment:
    Type: "AWS::EC2::VPCGatewayAttachment"
    Properties:
      InternetGatewayId: !Ref InternetGateway
      VpcId: !Ref VPC

# Public SubnetA
  PublicSubnetA:
    Type: "AWS::EC2::Subnet"
    Properties:
      AvailabilityZone: "ap-northeast-1a"
      CidrBlock: !Ref PublicSubnetACIDR
      VpcId: !Ref VPC
      Tags:
        - Key: Name
          Value: !Sub "${PJPrefix}-public-subnet-a"

# Public SubnetC
  PublicSubnetC:
    Type: "AWS::EC2::Subnet"
    Properties:
      AvailabilityZone: "ap-northeast-1c"
      CidrBlock: !Ref PublicSubnetCCIDR
      VpcId: !Ref VPC
      Tags:
        - Key: Name
          Value: !Sub "${PJPrefix}-public-subnet-c"

# Public RouteTableA
  PublicRouteTableA:
    Type: "AWS::EC2::RouteTable"
    Properties:
      VpcId: !Ref VPC
      Tags:
        - Key: Name
          Value: !Sub "${PJPrefix}-public-route-a"

# Public RouteTableC
  PublicRouteTableC:
    Type: "AWS::EC2::RouteTable"
    Properties:
      VpcId: !Ref VPC
      Tags:
        - Key: Name
          Value: !Sub "${PJPrefix}-public-route-c"

# PublicRouteA
  PublicRouteA:
    Type: "AWS::EC2::Route"
    Properties:
      RouteTableId: !Ref PublicRouteTableA
      DestinationCidrBlock: "0.0.0.0/0"
      GatewayId: !Ref InternetGateway

# PublicRouteC
  PublicRouteC:
    Type: "AWS::EC2::Route"
    Properties:
      RouteTableId: !Ref PublicRouteTableC
      DestinationCidrBlock: "0.0.0.0/0"
      GatewayId: !Ref InternetGateway

  PublicSubnetARouteTableAssociation:
    Type: "AWS::EC2::SubnetRouteTableAssociation"
    Properties:
      SubnetId: !Ref PublicSubnetA
      RouteTableId: !Ref PublicRouteTableA

  PublicSubnetCRouteTableAssociation:
    Type: "AWS::EC2::SubnetRouteTableAssociation"
    Properties:
      SubnetId: !Ref PublicSubnetC
      RouteTableId: !Ref PublicRouteTableC

# EC2
  EC2:
    Type: AWS::EC2::Instance
    Properties:
      ImageId: !Ref AMIImage
      InstanceType: !Ref InstanceType
      IamInstanceProfile: !Ref EC2InstanceProfile
      BlockDeviceMappings:
        - DeviceName: /dev/sda1
          Ebs:
            VolumeType: !Ref EC2VolumeType
            DeleteOnTermination: true
            VolumeSize: !Ref EC2VolumeSize
      NetworkInterfaces:
        - DeleteOnTermination: True
          DeviceIndex: "0"
          SubnetId: !Ref PublicSubnetA
          AssociatePublicIpAddress : True
          GroupSet:
            - !Ref EC2SG
      Tags:
          - Key: Name
            Value: !Sub "${PJPrefix}-${EC2Name}"

# IAM Role
  EC2IAMRole:
    Type: AWS::IAM::Role
    Properties:
      RoleName: !Sub ${PJPrefix}-SSM-role
      AssumeRolePolicyDocument:
        Version: 2012-10-17
        Statement:
          - Effect: Allow
            Principal:
              Service:
                - ec2.amazonaws.com
            Action:
              - sts:AssumeRole
      Path: /
      ManagedPolicyArns:
        - arn:aws:iam::aws:policy/AmazonSSMManagedInstanceCore
  EC2InstanceProfile:
    Type: AWS::IAM::InstanceProfile
    Properties:
      Path: /
      Roles:
        - Ref: EC2IAMRole
      InstanceProfileName: !Sub ${PJPrefix}-EC2InstanceProfile

  #SG
  EC2SG:
    Type: AWS::EC2::SecurityGroup
    Properties:
      GroupName:  !Sub "${PJPrefix}-EC2-SG"
      GroupDescription: Allow ALB access
      VpcId: !Ref VPC
        #ALB
  EC2SGIngress:
    Type: "AWS::EC2::SecurityGroupIngress"
    Properties:
      IpProtocol: tcp
      FromPort: 80
      ToPort: 80
      SourceSecurityGroupId: !GetAtt [ ALBSG, GroupId ]
      GroupId: !GetAtt [ EC2SG, GroupId ]

  ALBSG:
    Type: "AWS::EC2::SecurityGroup"
    Properties:
      VpcId: !Ref VPC
      GroupName: !Sub "${PJPrefix}-alb-sg"
      GroupDescription: "-"
      Tags:
        - Key: "Name"
          Value: !Sub "${PJPrefix}-alb-sg"
      SecurityGroupIngress:
        - IpProtocol: tcp
          FromPort: 443
          ToPort: 443
          CidrIp: !Ref AllowWebAccessIP

# A Record Alias
  DNSRecordSet:
    Type: AWS::Route53::RecordSet
    Properties:
      HostedZoneName: !Sub "${HostZoneName}."
      Name: !Sub "${HostName}."
      Type: A
      AliasTarget:
        DNSName: !GetAtt InternetALB.DNSName
        HostedZoneId: !GetAtt InternetALB.CanonicalHostedZoneID

#  Target Group
  TargetGroup:
    Type: "AWS::ElasticLoadBalancingV2::TargetGroup"
    Properties:
      VpcId: !Ref VPC
      Name: !Sub "${PJPrefix}-${InternetALBName}-tg"
      Protocol: HTTP
      Port: 80
      HealthCheckProtocol: HTTP
      HealthCheckPath: "/"
      HealthCheckPort: "traffic-port"
      HealthyThresholdCount: 5
      UnhealthyThresholdCount: 2
      HealthCheckTimeoutSeconds: 5
      HealthCheckIntervalSeconds: 30
      Matcher:
        HttpCode: 200
      Tags:
        - Key: Name
          Value: !Sub "${PJPrefix}-${InternetALBName}-tg"
      TargetGroupAttributes:
        - Key: "deregistration_delay.timeout_seconds"
          Value: 300
        - Key: "stickiness.enabled"
          Value: false
        - Key: "stickiness.type"
          Value: lb_cookie
        - Key: "stickiness.lb_cookie.duration_seconds"
          Value: 86400
      Targets:
        - Id: !Ref EC2
          Port: 80

#  Internet ALB
  InternetALB:
    Type: "AWS::ElasticLoadBalancingV2::LoadBalancer"
    Properties:
      Name: !Sub "${PJPrefix}-${InternetALBName}-alb"
      Tags:
        - Key: Name
          Value: !Sub "${PJPrefix}-${InternetALBName}-alb"
      Scheme: "internet-facing"
      LoadBalancerAttributes:
        - Key: "deletion_protection.enabled"
          Value: false
        - Key: "idle_timeout.timeout_seconds"
          Value: 300
      SecurityGroups:
        - !Ref ALBSG
      Subnets:
        - !Sub "${PublicSubnetA}"
        - !Sub "${PublicSubnetC}"

  ALBListener:
    Type: "AWS::ElasticLoadBalancingV2::Listener"
    Properties:
      DefaultActions:
        - TargetGroupArn: !Ref TargetGroup
          Type: forward
      LoadBalancerArn: !Ref InternetALB
      Port: 443
      Protocol: HTTPS
      MutualAuthentication:
        TrustStoreArn: !GetAtt TrustStore.TrustStoreArn
        Mode: "verify"
      Certificates:
        - CertificateArn: !Ref ACM

#  Trust Store
  TrustStore:
    Type: AWS::ElasticLoadBalancingV2::TrustStore
    Properties:
      CaCertificatesBundleS3Bucket: !Ref TrustStoreBucket
      CaCertificatesBundleS3Key: !Ref TrustStoreKey
      Name: !Ref TrustStoreName

#  ACM
  ACM:
    Type: AWS::CertificateManager::Certificate
    Properties:
      DomainName: !Sub "${HostName}"
      DomainValidationOptions:
        - DomainName: !Sub "${HostName}"
          HostedZoneId: !Ref HostedZoneId
      ValidationMethod: DNS
作成が完了したALBのリスナーを確認すると、mTLSが正常に有効になっています。

Misskeyの構築
SSM接続ができるよう設定しているため、そちらから作業を行います。

Misskeyのセットアップには、公式から提供されているシェルスクリプトを利用するのが簡単です。
sudo apt update
sudo apt full-upgrade -y
sudo reboot
sudo wget https://raw.githubusercontent.com/joinmisskey/bash-install/main/ubuntu.sh -O ubuntu.sh

sudo bash ubuntu.sh
シェルスクリプトの実行内容
#dockerで構築したところ画像アップロードがうまくいかなかったためsystemdでセットアップ
Install Method
Do you use systemd to run Misskey?:
Y = To use systemd / n = To use docker
[Y/n] > y

Misskey setting
Repository url where you want to install:
> https://github.com/misskey-dev/misskey.git
The name of a new directory to clone:
> misskey
Branch or Tag
> master

Enter the name of user with which you want to execute Misskey:
> misskey

#利用するホスト名
Enter host where you want to install Misskey:
> misskey.example.com
OK, let's install misskey.example.com!

#Nginxのセットアップ
Nginx setting
Do you want to setup nginx?:
[Y/n] > y
Nginx will be installed on this computer.
Port 80 and 443 will be opened by modifying iptables.

Do you want it to open ports, to setup ufw or iptables?:
u = To setup ufw / i = To setup iptables / N = Not to open ports
[u/i/N] > n
OK, you should open ports manually.

#ALBでHTTPS化するためCertbot設定は不要
Certbot setting
Do you want it to setup certbot to connect with https?:
[Y/n] > n
OK, you don't setup certbot.

Cloudflare setting
Do you use Cloudflare?:
[Y/n] > n
OK, you don't use Cloudflare.
Let's encrypt certificate will be installed using the method without Cloudflare.

Make sure that your DNS is configured to this machine.
Tell me which port Misskey will watch:
Misskey port:
> 3000

#PostgreSQLのセットアップ
Database (PostgreSQL) setting
Do you want to install postgres locally?:
(If you have run this script before in this computer, choose n and enter values you have set.)
[Y/n] > y
PostgreSQL will be installed on this computer at localhost:5432.
Database user name:
> misskey
Database user password:
> 【任意のパスワード】
Database name:
> mk1

#Redisのセットアップ
Redis setting
Do you want to install redis locally?:
(If you have run this script before in this computer, choose n and enter values you have set.)
[Y/n] > y
Redis will be installed on this computer at localhost:6379.
Redis password:
> 【任意のパスワード】
接続確認
curlコマンド
特にオプションを指定しなかった場合、接続に失敗します。
curl https://misskey.example.com
    curl: (35) OpenSSL SSL_connect: Connection reset by peer in connection to misskey.example.com:443
次に、オプションで先ほど作成したクライアントキーと証明書を指定すると問題なく接続が可能です。
curl --key client.key --cert client.crt https://misskey.example.com
    <!DOCTYPE html><!---
      _____ _         _
     |     |_|___ ___| |_ ___ _ _
     | | | | |_ -|_ -| '_| -_| | |
     |_|_|_|_|___|___|_,_|___|_  |
                             |___|
     Thank you for using Misskey!
     If you are reading this message... how about joining the development?
     https://github.com/misskey-dev/misskey
    -->
ちなみに、Misskeyではapiを叩くことで、アカウントを持っていなくてもポストを見ることができてしまいます。
これに関しても、証明書をオプションで指定しなかった場合にはちゃんと失敗するようになっています。
curl --key client.key --cert client.crt -s https://misskey.example.com/api/notes -H 'content-type: application/json' --data-raw "{\"limit\":10}" | jq -r .[].text
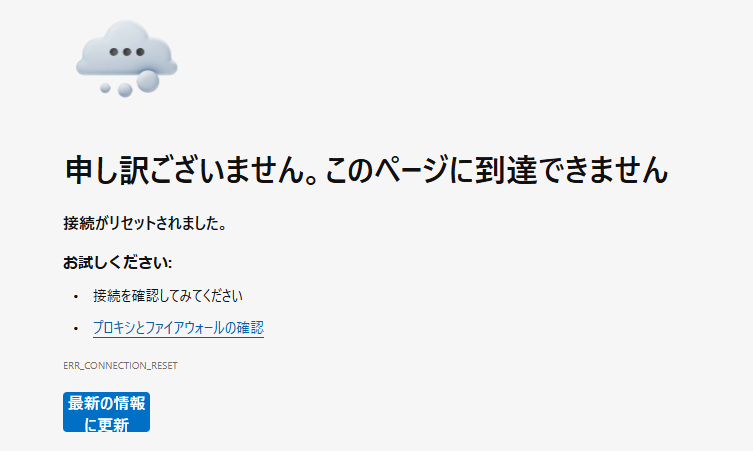
Microsoft Edgeの場合
証明書を登録しないで接続するとエラーになります。
https://ホスト名
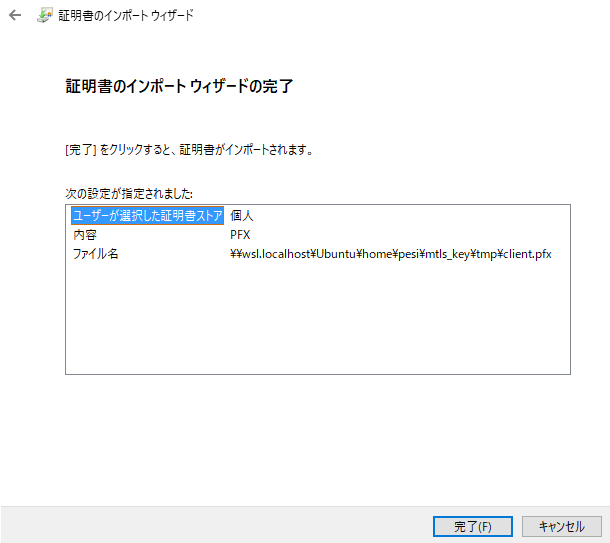
ブラウザに証明書を登録します。
「設定」-「プライバシー、検索、サービス」-「セキュリティ」-「証明書の管理」を開いて、インポートをクリック。
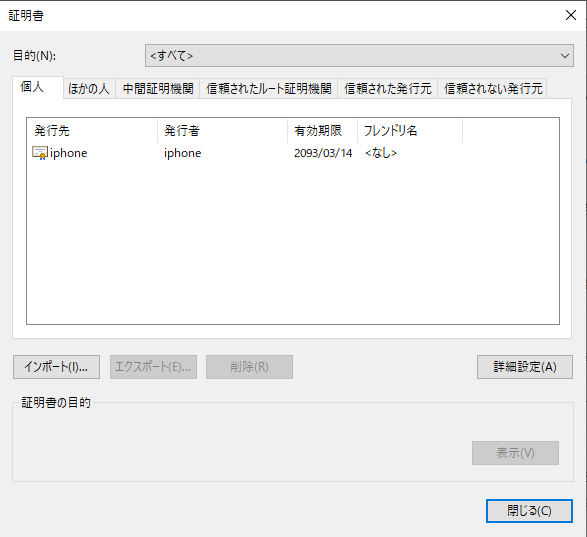
最初に作成した「client.pfx」を選択してインポートを行う。
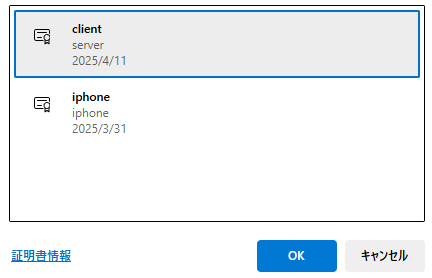
改めてEdgeから接続し、インポートした証明書を選択するとMisskeyのページが表示されます。
ユーザ、パスワードを設定し、初期設定を終えればMisskeyが利用可能です。

iPhone + Safariの場合
こちらも証明書を登録しないで接続するとエラーになります。

iPhoneに証明書を登録します。
PCからメール等で最初に作成した「mobile-client.pfx」をiPhoneに送ります。
pfxファイルをタップするとダウンロードされます。
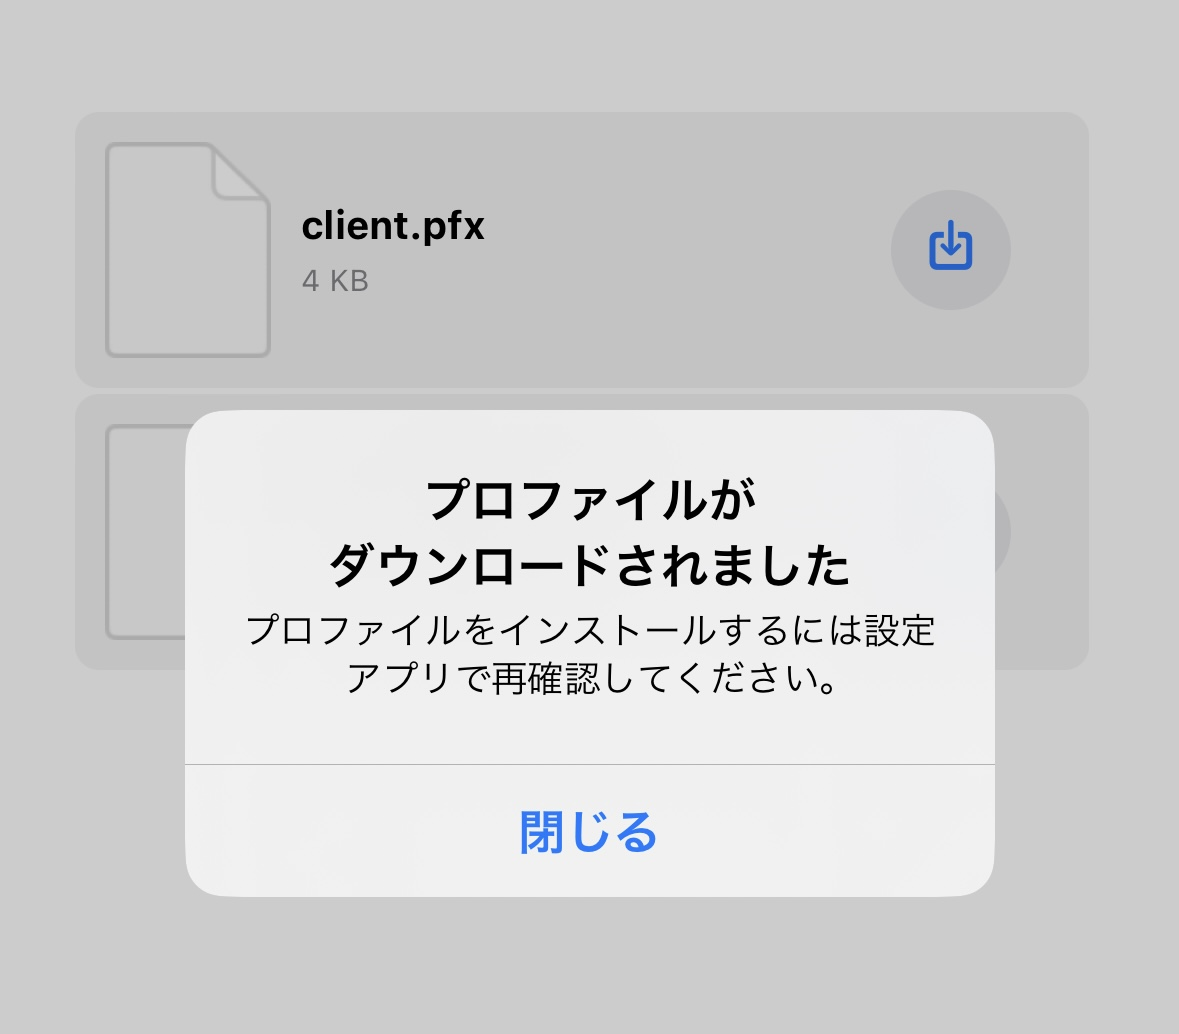
設定の「一般」-「VPNとデバイス管理」から「ダウンロード済みプロファイル」を開き、インストールを行う。
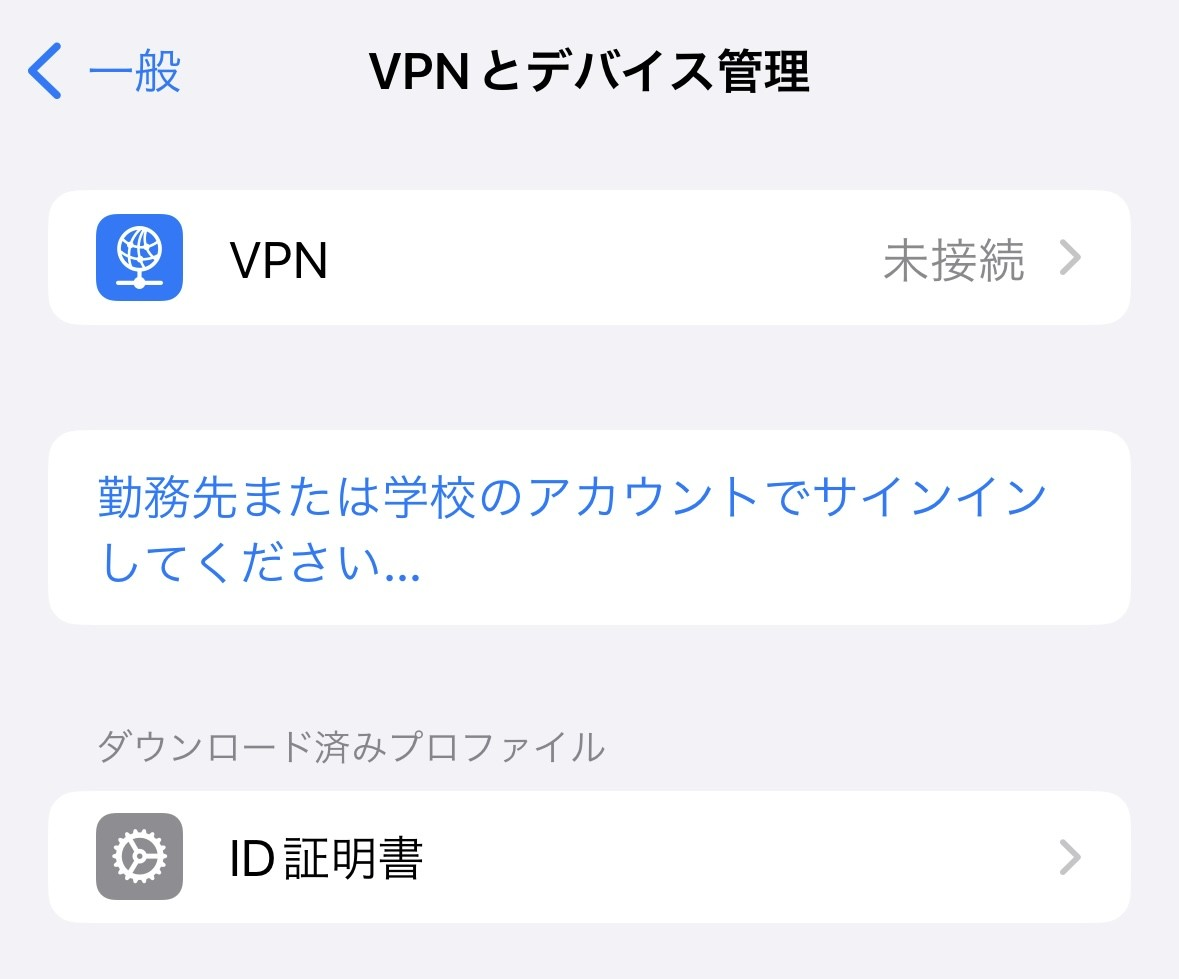
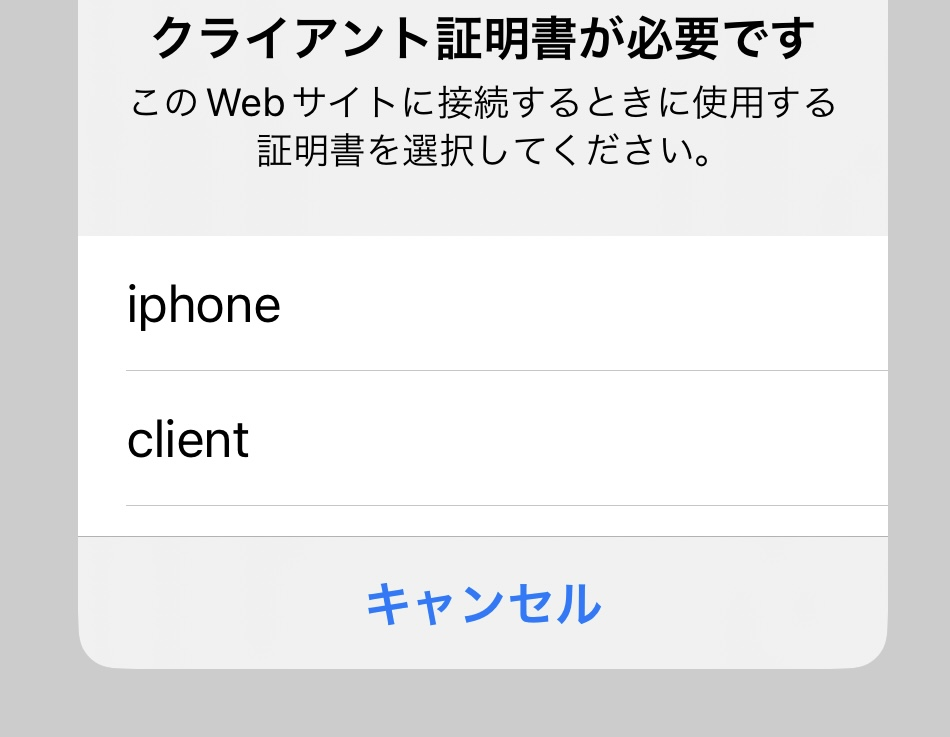
証明書をインストールした状態で再度接続を行うと、クライアント証明書を選択させられるので、先ほどインストールしたものを選択すると無事Misskeyに接続ができます。

証明書の運用について
現状、クライアント用証明書は「client.crt」から作成したpfxファイルを使用していますが、もしこの証明書をすべてのクライアントで使いまわすと、漏洩などした場合にすべてのクライアントに証明書を払い出しなおさないといけなくなります。
それを避けるためにも、1ユーザにつき1クライアント証明書を作成したほうが後々の管理が楽になるかと思います。
以下のようなシェルスクリプトを用意しておくとクライアント証明書作成が簡単です。
vi cert-gen.sh

#以下内容で保存
#!/bin/bash
echo "cert name : $1"
openssl genrsa -out $1.key 4096
openssl req -new -key $1.key -out $1.csr -subj "/C=JP/CN=$1"
openssl x509 -req -days 36500 -in $1.csr -CA server.crt -CAkey server.key -CAcreateserial -out $1.crt -extfile v3_req.txt
openssl pkcs12 -export -out $1.pfx -inkey $1.key -in $1.crt -password pass:$2
openssl pkcs12 -export -out mobile-$1.pfx -legacy -inkey $1.key -in $1.crt -password pass:$2
sh cert-gen.sh 【証明書名】 【パスワード】
証明書の失効
証明書が漏洩などした場合に備えて、mTLSには特定の証明書を失効させる「失効リスト」という機能があります。
参考:https://blog.serverworks.co.jp/alb-mtls-trust_store_crl
試しに最初に作成した「client.crt」を失効させて、Misskeyに接続できないようにします。
touch index.txt

vi crl.cnf

#以下内容で保存
[ ca ]
default_ca = CA_default
[ CA_default ]
dir = ./
database = $dir/index.txt
private_key = ./server.key
certificate = ./server.crt
default_crl_days = 30
crl_extensions = crl_ext
default_md = sha256
[ crl_ext ]
authorityKeyIdentifier = keyid:always
client.crtを失効
openssl ca -revoke client.crt -config crl.cnf
openssl ca -gencrl -out crl.pem -config crl.cnf
作成された「crl.pem」ファイルをS3にアップロード。
トラストストアを開き、「証明書失効リスト」へ上記S3にアップロードしたファイルを追加。

この状態で改めて新規でMisskeyに接続しに行くと、エラーで接続ができなくなる。
もし証明書が漏洩したり、特定のクライアントの接続を拒否したくなった場合、この方法で失効できます。
最後に
SSLクライアント証明書認証を利用することで、内輪向けのサイトを構築することができました。
なんとなく存在は知っていましたが、いざやってみると証明書周りの知識がほとんどなく苦労しました。
また、ALBのmTLSではX.509 v3証明書でないとエラーになったり、iPhoneにpfxファイルをインストールするためにはlegacyオプションが必要だったりというところで躓くことも多かったです。
ちなみに、本記事のCloudformationを更新したり削除したりすると、TrustStoreにて高確率でエラーが発生します。
基本的にトラストストアはCloudformationで管理しない方がよいかもしれません。
(Terraform, OpenTofuに移行してからCFnの不便さが目立つ、、、)
Discussion