Vite + Vue3 + Router + TailWind + GitHub Pages の実装
Vite + Vue3 + Router + TailWind + GitHub Pages の実装
レポジトリ名: vite-vue-router-tailwind-test
GitHubレポジトリ: https://github.com/reiya0104/vite-vue-router-tailwind-test
GitHub Pages: https://reiya0104.com/vite-vue-router-tailwind-test/
目標
Vite というビルドツールを使って,Vue (Vue3) + Router (Router4) のアプリを作ります.
その後,TailWind というCSSフレームワークを導入して,GitHub Pages で公開できるようにします.
作成方法
Step.0 Node.js・npm・yarn のインストール
私はVoltaというバージョン管理ツールでインストールしました.
Voltaでのインストールは,こちらを参考にしました.
使用環境
- OS: Windows 10 Home
- Volta: v1.0.5
- Node: v16.13.0
- npm: v8.1.4
- Yarn: v1.22.17
Step.1 プロジェクト作成
yarn で vite のプロジェクトを作成し,
ルートディレクトリをそのプロジェクトに変えます.
その後,yarn install で yarn をインストールします.
まとめると,
yarn create @vitejs/app [プロジェクト名]
(質問は vue → vue-ts と答えます.)
cd [プロジェクト名]
yarn install
となります.今回は,
yarn create @vitejs/app vite-vue-router-tailwind-test
(質問は vue → vue-ts と答えます.)
cd vite-vue-router-tailwind-test
yarn install
です.
プロジェクト名が長いので,今後は
[プロジェクト名] = vite-vue-router-tailwind-test
とします.適宜読み替えてください!
ここで,
yarn dev
を入力し,localhost:3000 でViteプロジェクトができたことを確認するといいと思います.
(確認できたらコマンドラインで Ctrl + C を押しましょう.)
Step.2 必要パッケージのインストール
yarn add vue-router@4 vuex axios
yarn add -D sass scss scss-loader
を入力してパッケージをインストールします.
(vuex と axios に関して,今回必要であるのかどうかはわかりませんでした.)
Step.3 ディレクトリ構成
src ディレクトリに
router.ts-
viewsディレクトリ
を追加します.
そして,views ディレクトリに
About.vueHome.vue
を追加します.
すると,次のようなディレクトリ構造になると思います.
root
|   .gitignore
|   index.html
|   package.json
|   README.md
|   tsconfig.json
|   vite.config.ts
|   yarn.lock
|
+---node_modules
|       # 略
|
+---public
|       favicon.ico
|
\---src
    |   App.vue
    |   env.d.ts
    |   main.ts
    |   router.ts       # 追加
    |
    +---assets
    |       logo.png
    |
    +---components
    |       HelloWorld.vue
    |
    \---views           # 追加
            About.vue   # 追加
            Home.vue    # 追加
Step.4 Routerの導入
src ディレクトリ下の
src/main.tssrc/App.vuesrc/router.tssrc/views/Home.vuesrc/views/About.vue
の5つのファイルをそれぞれ次のように変更します.
./src/main.ts
import { createApp } from 'vue'
+ import router from './router'
import App from './App.vue'

- createApp(App).mount('#app')
+ createApp(App).use(router).mount('#app')
すなわち
import { createApp } from 'vue'
import router from './router'
import App from './App.vue'

createApp(App).use(router).mount('#app')
./src/App.vue
- <script setup lang="ts">
- // This starter template is using Vue 3 <script setup> SFCs
- // Check out https://v3.vuejs.org/api/sfc-script-setup.html#sfc-script-setup
- import HelloWorld from './components/HelloWorld.vue'
- </script>

<template>
-   <img alt="Vue logo" src="./assets/logo.png" />
-   <HelloWorld msg="Hello Vue 3 + TypeScript + Vite" />
+ <div id="nav">
+   <router-link to="/">Home</router-link> |
+   <router-link to="/about">About</router-link>
+ </div>
+ <router-view/>
</template>


<style>
#app {
  font-family: Avenir, Helvetica, Arial, sans-serif;
  -webkit-font-smoothing: antialiased;
  -moz-osx-font-smoothing: grayscale;
  text-align: center;
  color: #2c3e50;
  margin-top: 60px;
}

+  #nav {
+    padding: 30px;
+  }
+
+  #nav a {
+    font-weight: bold;
+    color: #2c3e50;
+  }
+
+  #nav a.router-link-exact-active {
+    color: #42b983;
+  }

</style>
すなわち
<template>
  <div id="nav">
    <router-link to="/">Home</router-link> |
    <router-link to="/about">About</router-link>
  </div>
  <router-view/>
</template>

<style>
#app {
  font-family: Avenir, Helvetica, Arial, sans-serif;
  -webkit-font-smoothing: antialiased;
  -moz-osx-font-smoothing: grayscale;
  text-align: center;
  color: #2c3e50;
  margin-top: 60px;
}

#nav {
  padding: 30px;
}

#nav a {
  font-weight: bold;
  color: #2c3e50;
}

#nav a.router-link-exact-active {
  color: #42b983;
}
</style>
./src/router.ts
import Vue from 'vue';
import * as VueRouter from 'vue-router';
import { createRouter, createWebHistory } from 'vue-router'
// HomeビューとAboutビューのインポート
import Home from './views/Home.vue';
import About from './views/About.vue';

const routes = [
  {
    path: '/',
    component: Home  // Homeビュールーティング
  },
  {
    path: '/about',
    component: About  // Aboutビュールーティング
  },
]

const router = createRouter({
  history: createWebHistory(import.meta.env.BASE_URL),
  routes,
});

export default router;
./src/views/Home.vue
<template>
  <div class="home">
    <img alt="Vue logo" src="../assets/logo.png" />
    <HelloWorld msg="Hello Vue 3 + TypeScript + Vite" />
  </div>
</template>

<script lang="ts">
// @ is an alias to /src
import HelloWorld from "../components/HelloWorld.vue";

export default {
  name: "Home",
  components: {
    HelloWorld,
  },
};
</script>
./src/views/About.vue
<template>
  <div class="about">
    <h1>This is About page</h1>
  </div>
</template>
ここまでを変更すれば,Routerの追加ができたと思います.
Step.4.5 GitHub Pages で公開する
一度ここで,GitHub Pages で投稿してみましょう.
まず,./vite.config.ts を次のように変更します.
./vite.config.ts
import { defineConfig } from 'vite'
import vue from '@vitejs/plugin-vue'

// https://vitejs.dev/config/
export default defineConfig({
  // 本番時はgithubリポジトリをルートパスにする
+ base: (process.env.NODE_ENV === 'poduction')
+    ? '/[プロジェクト名]/' : './',
+ build: {
+   outDir: 'docs'
+ },
  plugins: [vue()]
})
すなわち
import { defineConfig } from 'vite'
import vue from '@vitejs/plugin-vue'

// https://vitejs.dev/config/
export default defineConfig({
  // 本番時はgithubリポジトリをルートパスにする
  base: (process.env.NODE_ENV === 'production')
    ? '/[プロジェクト名]/' : './',
  build: {
    outDir: 'docs'
  },
  plugins: [vue()]
})
とします.
そのあと,コマンドラインで次を実行します.
yarn build
すると,docs フォルダができ,index.html 等が作成されたかと思います.
次に,GitHub の設定をします.
GitHubにPushしていない人はこのタイミングでしておきましょう.
次の手順でGitHub Pages を有効にします.
- GitHub のレポジトリページの
Settingに移ります. - 左側のタブから
Pagesを選択します. - 下の写真(一枚目) の
Noneをmasterに,その後出てくる📁/(root)をdocsに変更して保存します(写真二枚目).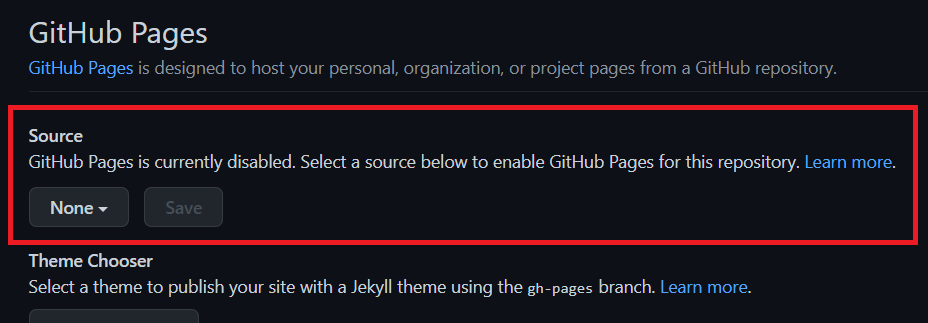
Saveを押して保存します.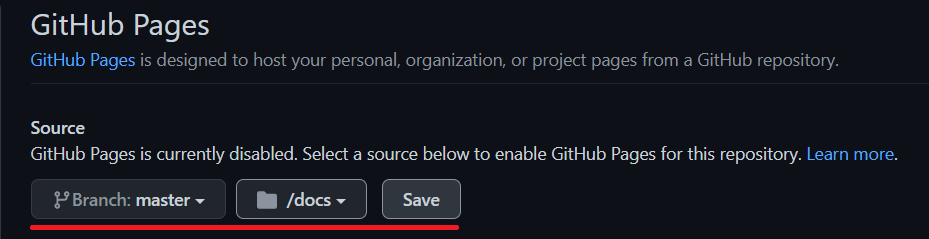
- 下の方にある
Enforce HTTPSにチェックが付いていなければチェック☑します.
これでしばらく待つと,指定されたURLで今回のページを見ることができます.
Step.5 TailWind の導入
TailWind を導入していきます.
まず,次の2つのコマンドを入力します.
tailwind ではなく tailwindcss であることに注意してください!
yarn add -D tailwindcss@latest postcss@latest autoprefixer@latest
yarn -s run tailwindcss init -p
すると,postcss.config.js と tailwind.config.js ができます.
tailwind.config.js の方を次のように変更します.
./tailwind.config.js
module.exports = {
- purge: [],
+ purge: ['./index.html', './src/**/*.{vue,js,ts,jsx,tsx}'],
  darkMode: false, // or 'media' or 'class'
  theme: {
    extend: {},
  },
  variants: {
    extend: {},
  },
  plugins: [],
}
すなわち
module.exports = {
  purge: ['./index.html', './src/**/*.{vue,js,ts,jsx,tsx}'],
  darkMode: false, // or 'media' or 'class'
  theme: {
    extend: {},
  },
  variants: {
    extend: {},
  },
  plugins: [],
}
次に,src ディレクトリ下に index.scss を作成し,次のようにします.
./src/index.scss
@tailwind base;
@tailwind components;
@tailwind utilities;
また,このファイルを有効にするために,src/main.ts を次のように変更します.
./src/main.ts
import { createApp } from 'vue'
import router from './router'
import App from './App.vue'
+ import './index.scss'

createApp(App).use(router).mount('#app')
すなわち
import { createApp } from 'vue'
import router from './router'
import App from './App.vue'
import './index.scss'

createApp(App).use(router).mount('#app')
これで,TailWind が有効になったと思います.
しかし,プレビューを見るとレイアウトが先ほどと異なってしまっています.
最後に, TailWind のコマンドを使ってページを整えます.
Step.6 TailWind によるページ調整
完全にもとに戻すのはTailWind の標準的な設定では難しいので,できるだけ近づけたものを書いていきます.
まず,src/index.scss を次のように調整します.
./src/index.scss
@tailwind base;
@tailwind components;
@tailwind utilities;

+ h1 {
+   @apply text-3xl;
+   @apply font-bold;
+   @apply my-6;
+ }
+
+ p {
+   @apply leading-4;
+   @apply my-4;
+ }
+
+ button {
+   @apply bg-gray-100;
+   @apply hover:bg-gray-200;
+   @apply border-gray-500;
+   @apply border;
+   @apply px-2;
+   @apply py-0.5;
+   @apply rounded;
+ }
すなわち
@tailwind base;
@tailwind components;
@tailwind utilities;

h1 {
  @apply text-3xl;
  @apply font-bold;
  @apply my-6;
}

p {
  @apply leading-4;
  @apply my-4;
}

button {
  @apply bg-gray-100;
  @apply hover:bg-gray-200;
  @apply border-gray-500;
  @apply border;
  @apply px-2;
  @apply py-0.5;
  @apply rounded;
}
次に,src/views/Home.vue の img にクラスを追加します.
<template>
  <div class="home">
-   <img alt="Vue logo" src="../assets/logo.png" />
+   <img alt="Vue logo" class="mx-auto" src="../assets/logo.png" />
    <HelloWorld msg="Hello Vue 3 + TypeScript + Vite" />
  </div>
</template>

<script lang="ts">
// @ is an alias to /src
import HelloWorld from "../components/HelloWorld.vue";

export default {
  name: "Home",
  components: {
    HelloWorld,
  },
};
</script>
すなわち
<template>
  <div class="home">
    <img alt="Vue logo" class="mx-auto" src="../assets/logo.png" />
    <HelloWorld msg="Hello Vue 3 + TypeScript + Vite" />
  </div>
</template>

<script lang="ts">
// @ is an alias to /src
import HelloWorld from "../components/HelloWorld.vue";

export default {
  name: "Home",
  components: {
    HelloWorld,
  },
};
</script>
これでほぼ元通りになりました!
完全に戻したい方は,検証ツールを見て復元してくださいませ.
Step.7 GitHub Page を作成する
最後のお仕事です.
Step.4.5 GitHub Pages で公開する
が終わってない方は戻って vite.config.ts と GitHub の設定をしてください.
これが終わってる方は,
yarn build
を実行してください.
そして,GitHub にプッシュすれば完成です!
ここまでおつかれさまでした!
おわりに
はじめは Vue + Router に TailwWind を導入したかったのですが,マニュアルには Vite というものを使っていて混同しました.
時間はかかりましたが,ここまでこれたのでよかったです.
読んでくださりありがとうございました.
Discussion