Cloudflare R2 バケットの接続オプションを整理


はじめに
Devdoc を見ると、R2 バケット接続オプションには 3 つ方式があると書いてます。

R2 についてはすでに多くの記事が書かれていますので詳細はそちらに任せ、本記事では 3 つそれぞれについて
① 接続
② 認証
③ キャッシュ
という観点で整理をしてみます。
なお、Enterprise プラン環境で試しており、プランによっては上位が必要な場合があります。
1. Workers Runtime API
Workers から R2 API を呼ぶ方式です(= in-Worker R2 API)。
| R2 の接続 | Eyeball 接続ホスト | Eyeball の認証 | R2 オブジェクトの CDN キャッシュ | R2 Public Buckets |
|---|---|---|---|---|
| in-Worker R2 API (Workers Bindings) |
<worker>.<subdomain>.workers.dev | ◯ Workerで実装 |
✗ | ✗ |
| in-Worker R2 API (Workers Bindings) |
Workers Custom Domains または Routes |
◯ Worker に加え、Access や WAF Custom Rules も使える |
◯ Worker で Cache API (注)Cache API は Tiered Cache 未対応 |
✗ |
1-1. 接続イメージ
Eyeball は以下のどちらかで接続します。
1-2. R2 bucket の利用
Worker で R2 API を使うには、Workers Bindings で R2 bucket と接続しておきます。
The in-Worker R2 API is accessed by binding an R2 bucket to a Worker. The Worker you write can expose external access to buckets via a route or manipulate R2 objects internally.
The R2 API includes some extensions and semantic differences from the S3 API. If you need S3 compatibility, consider using the S3-compatible API.
https://developers.cloudflare.com/r2/api/workers/workers-api-reference/
具体的には wrangler.toml に r2_buckets を追加します。
[[r2_buckets]]
binding = 'MY_BUCKET' # <~ valid JavaScript variable name
bucket_name = '<YOUR_BUCKET_NAME>'
R2 bucket を操作するメソッドが定義されています。
// 例(データとメタデータの書き込み)
await env.MY_BUCKET.put(key, request.body);
1-3. Eyeball の認証
Eyeball からのリクエストを R2 に通す前に認証を実施することができます。
workers.dev の場合
Workers 内で実装します。
You must now define authorization logic to determine who can perform what actions to your bucket. This logic lives within your Worker’s code, as it is your application’s job to determine user privileges.
https://developers.cloudflare.com/r2/api/workers/workers-api-usage/#5-bucket-access-and-privacy
HTTP ヘッダーによる認証や Signed URL など、色々な方法が考えられます。
# ヘッダー認証の例(アップロード)
# Worker example
# https://developers.cloudflare.com/workers/examples/auth-with-headers/

$ curl "https://<worker>.<subdomein>.workers.dev/test.png" \
  -H "x-custom-auth-key: SECRET" \
  --form "file=@test.png;type=image/png"

# Signed URLの例(ダウンロード)
# Worker example
# https://developers.cloudflare.com/workers/examples/signing-requests/
# ⌛ 時限で接続が拒否される

$ while true; do curl "https://<worker>.<subdomein>.workers.dev/hoge.json?mac=***&expiry=1702744117218"; sleep 10; done

{"hoge":"moge"}
{"hoge":"moge"}
URL expired at Sat Dec 16 2023 16:28:37 GMT+0000 (Coordinated Universal Time)
Workers Custom Domains の場合
Workers のほか、Access や WAF Custom Rules による認証も可能になります。
WAF Custom Rules によるトークン認証
Access の様々な認証方法
組み合わせのデモを作成してみます。
画像ファイルにアクセス
→ Email の One Time Pin 認証(Access)
→ Signed URL(Workers)を得る
→ 画像ファイルを入手
→ Signed URL の時限が過ぎると、接続できなくなる

1−4. R2 オブジェクトのキャッシュ
workers.dev の場合
キャッシュしません( *.workers.dev では Cache API が効きません)。
However, any Cache API operations in the Cloudflare Workers dashboard editor, Playground previews, and any *.workers.dev deployments will have no impact. For Workers fronted by Cloudflare Access, the Cache API is not currently available. Only Workers deployed to custom domains have access to functional cache operations.
https://developers.cloudflare.com/workers/runtime-apis/cache/
Workers Custom Domains の場合
キャッシュは Workers 内の Cache API で制御可能です。
You will need to connect a custom domain or route to your Worker in order to use the Cache API. Cache API operations in the Cloudflare Workers dashboard editor, Playground previews, and any *.workers.dev deployments will have no impact.
https://developers.cloudflare.com/r2/examples/cache-api/
// リクエストをキャッシュに照合
let cache = caches.default;
await cache.match(request);
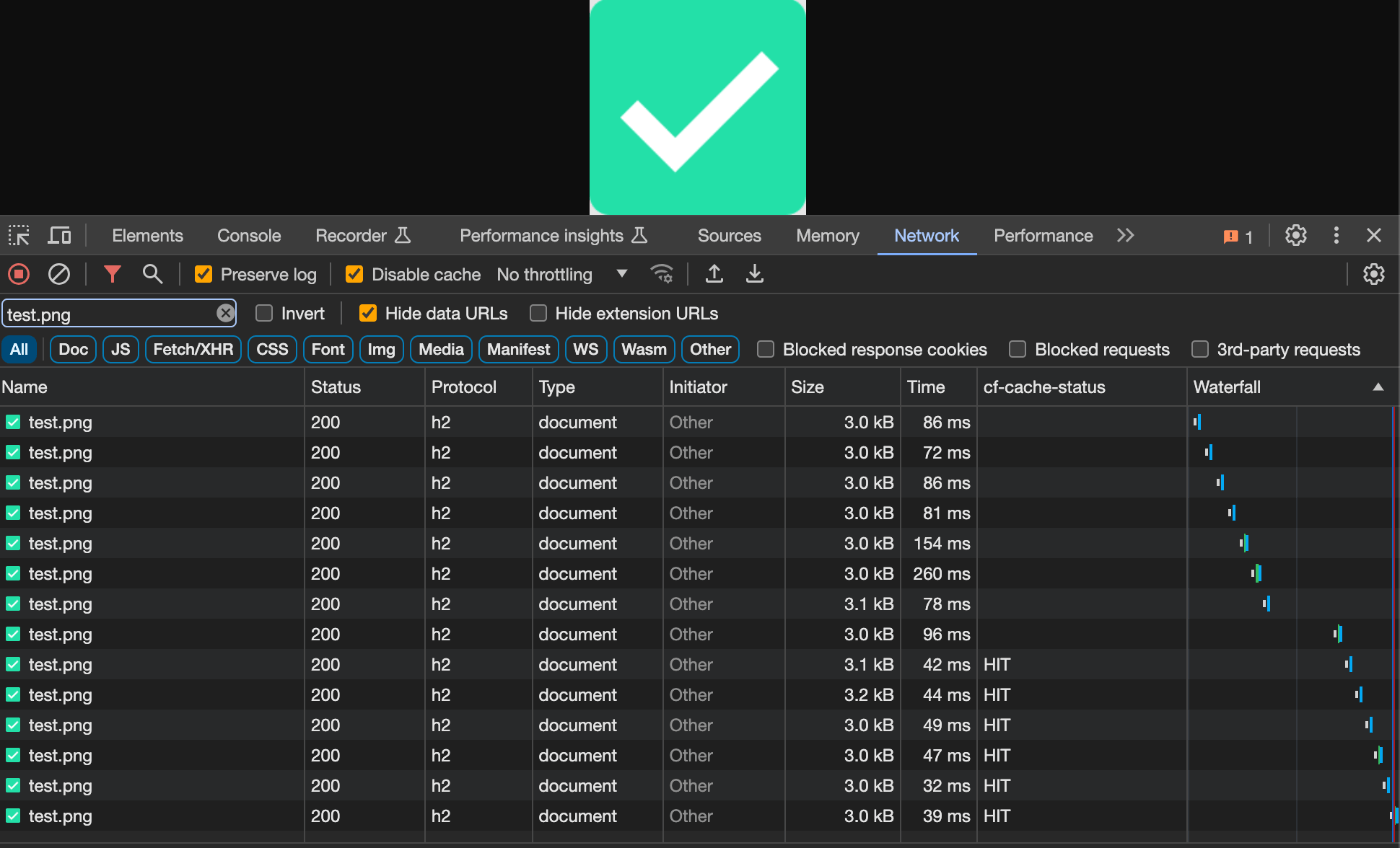
上記の認証デモの Worker に Cache API を追記してみます。
画像が cf-cache-status: HIT となりました。

なお、Cache API は今のところ Tiered cache には未対応 [1] です。
The cache.put method is not compatible with tiered caching. Refer to Cache API for more information. To perform tiered caching, use the fetch API.
https://developers.cloudflare.com/workers/runtime-apis/cache/#background
比較
前半が workers.dev、後半が Workers Custom Domains です。
キャッシュのありなしの違いが確認できます。
余談
R2 でなく Workers KV と Cache API の似たようなサンプルが Kinsta の例 Blog にありました。
ストレージオプション(R2 と KV、Durable Objects)の比較はこちらです。
2. S3 API
R2 がサポートしている範囲の S3 API を利用できます。
Devdoc には S3 API とありますが、この記事では AWS の S3 API と区別するため S3 互換 API と書きます。
| R2 の接続 | Eyeball 接続ホスト | Eyeball の認証 | R2 オブジェクトの CDN キャッシュ | R2 Public Buckets |
|---|---|---|---|---|
| S3 互換 API | <accout_id>.r2.cloudflarestorage.com | ◯ R2のアクセストークンを知っている |
✗ | ✗ |
| S3 互換 API | <bucket_name>.<account_id>.r2.cloudflarestorage.com | ◯ Presigned URL を知っている |
✗ | ✗ |
上記の通り接続ホストに Cloudflare の Account ID 入ります(Presigned URL の場合は Bucket 名も)。そのため、直接エンドユーザに共有することは少なく、内部アプリケーションでより用いられる、との解説があります。
It is useful to note that presigned URLs will expose your account ID and bucket name to whoever gets a copy of the URL. Public bucket URLs do not contain the account ID or bucket name. Typically, you will not share presigned URLs directly with end users or browsers, as presigned URLs are used more for internal applications.
https://developers.cloudflare.com/r2/api/s3/presigned-urls/#differences-between-presigned-urls-and-public-buckets
2-1. 接続イメージ
2-2. R2 bucket の利用
S3 互換 API では接続には認証ありきの設計になっていますので、最初に R2 API トークン作成が必要になります。
トークンにはいずれかの権限を与えます。
- Admin 読み書き
- Admin 読み
- Object 読み書き
- Object 読み
2-3. Eyeball の認証
S3 互換 API を利用するには認証情報を知っている必要があります。
R2 API トークンそのもの、あるいは、そこから生成された Presigned URL です。
R2 API トークンの場合
トークンをセットします。
# R2 API トークンの指定例
$ cat ~/.aws/credentials
[cf-R2]
aws_access_key_id = *
aws_secret_access_key = *
S3 互換 API に接続します。
以下は AWS CLI(s3api) で R2 API トークンを参照し、R2 bucket にアクセスしています。
$ aws s3api list-buckets --endpoint-url https://$ACCOUNT.r2.cloudflarestorage.com --profile $PROFILE| jq '.Buckets[]|select(.Name=="signed-1")'

{
  "Name": "signed-1",
  "CreationDate": "2022-09-23T09:06:38.702000+00:00"
}
Presigned URL の場合
Presigned URL を生成し、接続させます。
R2 API トークン自体を知らなくても、URL を知っていれば S3 互換 API に接続することができます。
その URL は指定した期間で使えなくすることができます。
認証情報はクエリーパラメータで渡します。
# GetObject の例
X-Amz-Algorithm=AWS4-HMAC-SHA256
X-Amz-Content-Sha256=UNSIGNED-PAYLOAD
X-Amz-Credential=*%2Fauto%2Fs3%2Faws4_request
X-Amz-Date=20231214T131340Z
X-Amz-Expires=3600
X-Amz-Signature=*
X-Amz-SignedHeaders=host
x-id=GetObject
各パラメータの詳細は本家 AWS の説明があります。
→ Authenticating Requests: Using Query Parameters (AWS Signature Version 4)
Presigned URL の作り方
Presigned URL の生成は色々な AWS ツールが使えます。
Workers でaws4fetch を呼んで生成する例もあります。(Binding との比較にも触れてあります)
// aws-sdk-js-v3 の例
// https://developers.cloudflare.com/r2/examples/aws/aws-sdk-js-v3/
:
console.log(
  await getSignedUrl(S3, new GetObjectCommand({Bucket: `${bucketName}`, Key: `${objectName}`}), { expiresIn: 3600 })
);
:
# aws-sdk-js-v3 実行と Presigind URL のアウトプット
$ node ./getsignedurl.js
https://$BUCKET.$ACCOUNT.r2.cloudflarestorage.com/test.png?X-Amz-Algorithm=AWS4-HMAC-SHA256&....&x-id=PutObject
https://$BUCKET.$ACCOUNT.r2.cloudflarestorage.com/test.png?X-Amz-Algorithm=AWS4-HMAC-SHA256&....&x-id=GetObject
2-4. R2 オブジェクトのキャッシュ
S3 互換 API ではキャッシュしません。
試しに Workers Custom Domains を被せて Cache API を呼ぶと、キャッシュはできました。
Devdoc にユースケースが見当たらず、あまり使われてないのかもしれません。
Eyeball は Presigned URL の Host 部分を Workers Custom Domains に差し替えてリクエストします。
Worker は $BUCKET.$ACCOUNT.r2.cloudflarestorage.com にプロキシーします。
# Eyeball のリクエスト URL(Presigned URL の Host 部を差し替え)
https://<Workers Custom Doman>/test.png?X-Amz-Algorithm=AWS4-HMAC-SHA256&....&x-id=GetObject
cf-cache-status: HIT でレスポンスされています。

Worker の例です。
fetch でキャッシュされると思いましたが、S3 互換 API をオリジンにした場合はキャッシュされなかったので Cache API で代替しています。
// 差し替え例
    const r2url = new URL(request.url);
    r2url.hostname = env.R2_BKT;
    const response = await fetch(r2url);
    // Cache
    const headers = new Headers(response.headers);
    headers.set('cache-tag', 'r2obj');
    // tag で PURGE
    headers.set('cache-control', 's-maxage=120');
    // Dashboard で "Browser Cache TTL" は "respect existing headers" に
    const newResponse = new Response(response.body, {headers});
    ctx.waitUntil(cache.put(cacheKey, newResponse.clone()));
    newResponse.headers.delete('cache-tag', 'r2obj');
    return newResponse;
  },
比較
前半が S3 互換 API、後半が Workers Custom Domains です。
HTTP のバージョンとキャッシュが違うことが見えます。S3 互換 API だと HTTP/1.1 でした。

余談
上記 Worker の fetch 先を AWS の S3 API エンドポイントに変え AWS の Presigined URL にアクセスしたところ、R2 同様に接続可能で Cache もしていました。
Cache API を外し fetch でもキャッシュしてました。

なお、ヘッダーの書き換えのみであれば Worker 使わず、ダッシュボードから Rules で設定する方法もあります。
3. R2 Public Buckets
その名の通り R2 bucket をインターネットに公開します。
R2 オブジェクトを読むだけで(GET)、書いたり消したりはできません。
| R2 の接続 | Eyeball 接続ホスト | Eyeball の認証 | R2 オブジェクトの CDN キャッシュ | R2 Public Buckets |
|---|---|---|---|---|
| Public Bucket | pub-*.r2.dev | ✗ | ✗ | ◯ |
| Public Bucket | R2 Custom Domains | ◯ Access や WAF Custom Rules 、Workersで実装 |
◯ 標準の Cache (注)R2 オリジンは Tiered Cache 未対応 |
◯ |
3-1. 接続イメージ
3-2. R2 bucket の利用
R2 bucket は Managed Public Access(r2.dev)あるいは R2 Custom Domains 経由でインターネットに公開されます。
3-3. Eyeball の認証
デフォルトでは認証がないので、追加したくなるケースが多いと思います。
Managed Public Access の場合
r2.dev で公開することを Managed Public Access と呼びますが、認証を有効にできません。
また、レート制限もあり、セキュリティやパフォーマンス(キャッシュ)が効かないため、開発目的のみとし、本番利用には推奨されていません。
Public access through r2.dev subdomains are rate limited and should only be used for development purposes.
To enable access management, Cache and bot management features, you must set up a custom domain when enabling public access to your bucket.
R2 Custom Domains の場合
R2 Custom Domains では 1 の Workers Custom Domains と同じような認証が可能です。
To restrict access to your custom domain’s bucket, use Cloudflare’s existing security products.
-Cloudflare Zero Trust Access: Protects buckets that should only be accessible by your teammates.
-Cloudflare WAF Token Authentication: Restricts access to documents, files, and media to selected users by providing them with an access token.
https://developers.cloudflare.com/r2/buckets/public-buckets/#access-control
CORS の指定も可能です
注意点として、Custom Domains で認証を付けた場合は、r2.dev は無効にし、保護のバイパスを防ぎます。
Disable public access to your r2.dev subdomain when using products like WAF or Cloudflare Access. If you do not disable public access, your bucket will remain publicly available through your r2.dev subdomain.
3-4. R2 オブジェクトのキャッシュ
r2.dev ではキャッシュしません。
R2 Custom Domains では Cloudflare CDN のキャッシュが働きます。
Domain access through a custom domain allows you to use Cloudflare Cache to accelerate access to your R2 bucket.
https://developers.cloudflare.com/r2/buckets/public-buckets/#caching
R2 Custom Domains で公開した静的サイトを見ると、画像などがキャッシュされます。
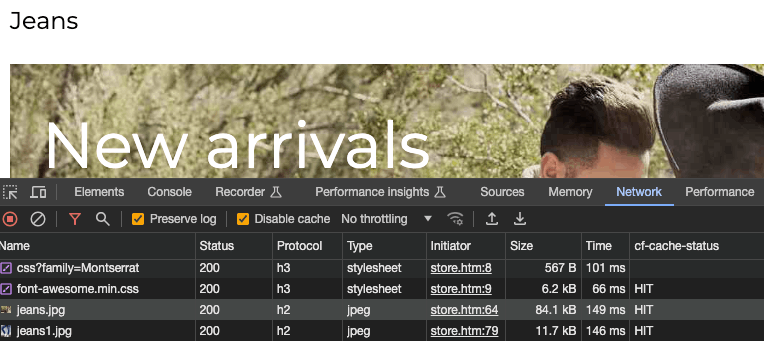
$ curl https://r2static.oyama.cf/w3images/jeans.jpg -svo /dev/null 2>&1| grep -i hit
< cf-cache-status: HIT
オリジンが R2 の場合、現時点では Tiered Cache は未対応 [1:1] です。
Tiered Cache currently is not compatible with responses from R2. These responses will act as if Tiered Cache is not configured.
https://developers.cloudflare.com/cache/how-to/tiered-cache/#custom-tiered-
Currently Cloudflare’s Tiered Cache feature is not compatible with responses from R2. These responses will act as if Tiered Cache is not configured.
https://developers.cloudflare.com/r2/reference/limits/#caching
比較
前半が r2.dev、後半が R2 Custom Domains です。
HTTP のバージョンとキャッシュが違うことが見えます。r2.dev だと HTTP/1.1 でした。

まとめ
| R2 の接続 | Eyeball 接続ホスト | Eyeball の認証 | R2 オブジェクトの CDN キャッシュ | R2 Public Buckets |
|---|---|---|---|---|
| in-Worker R2 API (Workers Bindings) |
<worker>.<subdomain>.workers.dev | ◯ Workerで実装 |
✗ | ✗ |
| in-Worker R2 API (Workers Bindings) |
Workers Custom Domains | ◯ Worker に加え、Access や WAF Custom Rules も使える |
◯ Worker で Cache API (注)Cache API は Tiered Cache 未対応 |
✗ |
| S3 互換 API | <accout_id>.r2.cloudflarestorage.com | ◯ R2のアクセストークンを知っている |
✗ | ✗ |
| S3 互換 API | <bucket_name>.<account_id>.r2.cloudflarestorage.com | ◯ Presigned URL を知っている |
✗ | ✗ |
| Public Bucket | *.r2.dev | ✗ | ✗ | ◯ |
| Public Bucket | R2 Custom Domains | ◯ Access や WAF Custom Rules 、Workersで実装 |
◯ 標準の Cache (注)R2 オリジンは Tiered Cache 未対応 |
◯ |
制限など
R2 の制限
Worker の制限
Request Limits
https://developers.cloudflare.com/workers/platform/limits#request-limits
You cannot upload more than 100 MiB (200 MiB for Business customers) to a Worker.
Enterprise customers can upload 500 MiB by default and can ask their account team to raise this limit.
Detecting precondition failures is currently easier with presigned URLs as compared with R2 bindings.
https://developers.cloudflare.com/r2/api/s3/presigned-urls/#limitations
その他
Presigined URL と Public bucket の違い
-
Tiered Cacheに対応してないとは、リクエストを受けたエッジのデータセンター(Lower Tier)のみでキャッシュし、Upper Tier がないことを指します。
 ↩︎ ↩︎
↩︎ ↩︎
Discussion