【GoNB】Jupyter Notebooks で Go を動かしてみる
はじめに
私が所属するチームでは E2E テストに Jupyter (Python) を活用しています。なかなかに便利なのでふと Go でも触れないのかなと調べていたところ GoNB というライブラリを使えば Jupyter で Go を動かせることを知りました。この記事は半日くらい試して触ってみた所感の共有となります。詳しく網羅しているわけではないので導入の際の参考にしていただければと思います。
Jupyterとは
Python などをWebブラウザ上で記述・実行できる統合開発環境です。(大学生のときに授業で使ったような気がします。)記事を執筆している私はお察しかと思いますが、あまり Jupyter のことはよくわかっていません。 Jupyter に関する情報は別途調べていただければ幸いです。
ライブラリ
以下のページに Jupyter にて Go を動かすためのライブラリが記載されています。
| ライブラリ名 | ライセンス | URL |
|---|---|---|
| GoNB | MIT | https://github.com/janpfeifer/gonb |
| Gophernotes | MIT | https://github.com/gopherdata/gophernotes |
| lgo | BSD-3-Clause | https://github.com/yunabe/lgo |
| igo | MIT | https://github.com/takluyver/igo |
| gopherlab (Public archive) | MIT | https://github.com/fabian-z/gopherlab |
記事執筆時点(2023/09/01)では Gophernotes がスター数がもっとも多かったのですが、 GoNB の方が開発が活発そうだったので GoNB を触ってみることにしました。
GoNB セットアップ
GoNB に説明が記載されているのでそちらをご参考ください。
ここでは、私が GoNB を触るまで行った手順を記載しておきます。
検証環境
uname -a
Darwin MacBook-Pro-7.local 22.5.0 Darwin Kernel Version 22.5.0: Thu Jun 8 22:22:19 PDT 2023; root:xnu-8796.121.3~7/RELEASE_ARM64_T8103 arm64
docker version
Client:
 Cloud integration: v1.0.35-desktop+001
 Version:           24.0.5
 API version:       1.43
 Go version:        go1.20.6
 Git commit:        ced0996
 Built:             Fri Jul 21 20:32:30 2023
 OS/Arch:           darwin/arm64
 Context:           default

Server: Docker Desktop 4.22.1 (118664)
 Engine:
  Version:          24.0.5
  API version:      1.43 (minimum version 1.12)
  Go version:       go1.20.6
  Git commit:       a61e2b4
  Built:            Fri Jul 21 20:35:38 2023
  OS/Arch:          linux/arm64
  Experimental:     false
 containerd:
  Version:          1.6.21
  GitCommit:        3dce8eb055cbb6872793272b4f20ed16117344f8
 runc:
  Version:          1.1.7
  GitCommit:        v1.1.7-0-g860f061
 docker-init:
  Version:          0.19.0
  GitCommit:        de40ad0
go version
go version go1.21.0 darwin/arm64
インストール & 起動
以下のコマンドを実行することにより docker にて Jupyter 環境を起動することができます。
docker run -it --rm -p 8888:8888 -v "${PWD}":/home/jovyan/work janpfeifer/gonb_jupyterlab:latest
VSCodeから接続
そのままWebブラウザでも実行可能ですが、 VSCode でも実行可能なので設定してみます。
- 拡張機能をインストール
- docker にて起動
接続するための URL がログにて出力されます。
[I 20xx-xx-xx xx:xx:xx.xxx ServerApp] jupyterlab | extension was successfully loaded.

  _   _          _      _
 | | | |_ __  __| |__ _| |_ ___
 | |_| | '_ \/ _` / _` |  _/ -_)
  \___/| .__/\__,_\__,_|\__\___|
       |_|

Read the migration plan to Notebook 7 to learn about the new features and the actions to take if you are using extensions.

https://jupyter-notebook.readthedocs.io/en/latest/migrate_to_notebook7.html

Please note that updating to Notebook 7 might break some of your extensions.

[I 20xx-xx-xx xx:xx:xx.xxx ServerApp] nbclassic | extension was successfully loaded.
[I 20xx-xx-xx xx:xx:xx.xxx ServerApp] notebook | extension was successfully loaded.
[I 20xx-xx-xx xx:xx:xx.xxx ServerApp] Serving notebooks from local directory: /home/jovyan
[I 20xx-xx-xx xx:xx:xx.xxx ServerApp] Jupyter Server 2.7.1 is running at:
[I 20xx-xx-xx xx:xx:xx.xxx ServerApp] http://f7213a3b2cf1:8888/lab?token=a030f4d0fb30f3a7944626a0be8b332891749c657bb6dfe2
[I 20xx-xx-xx xx:xx:xx.xxx ServerApp]     http://127.0.0.1:8888/lab?token=a030f4d0fb30f3a7944626a0be8b332891749c657bb6dfe2
[I 20xx-xx-xx xx:xx:xx.xxx ServerApp] Use Control-C to stop this server and shut down all kernels (twice to skip confirmation).
[C 20xx-xx-xx xx:xx:xx.xxx ServerApp]

    To access the server, open this file in a browser:
        file:///home/jovyan/.local/share/jupyter/runtime/jpserver-8-open.html
    Or copy and paste one of these URLs:
        http://f7213a3b2cf1:8888/lab?token=a030f4d0fb30f3a7944626a0be8b332891749c657bb6dfe2
        http://127.0.0.1:8888/lab?token=a030f4d0fb30f3a7944626a0be8b332891749c657bb6dfe2 # <- これ
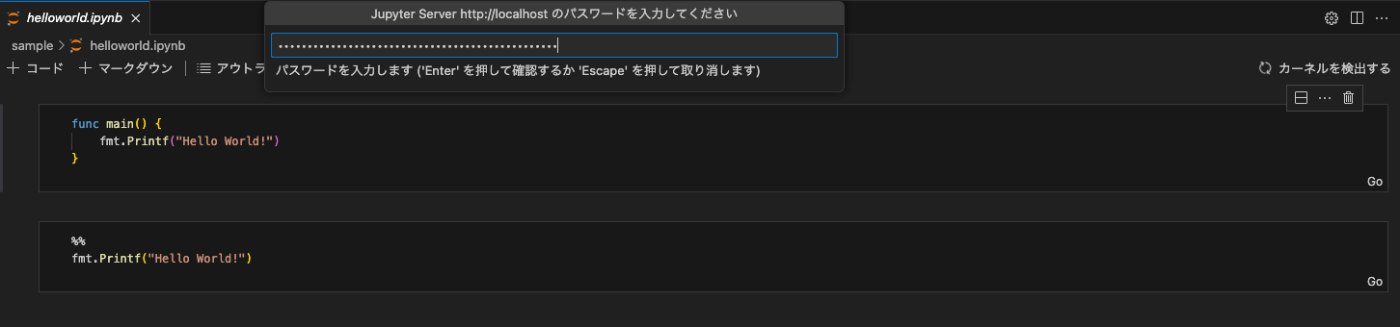
のちに token が必要となるのでコピーします。
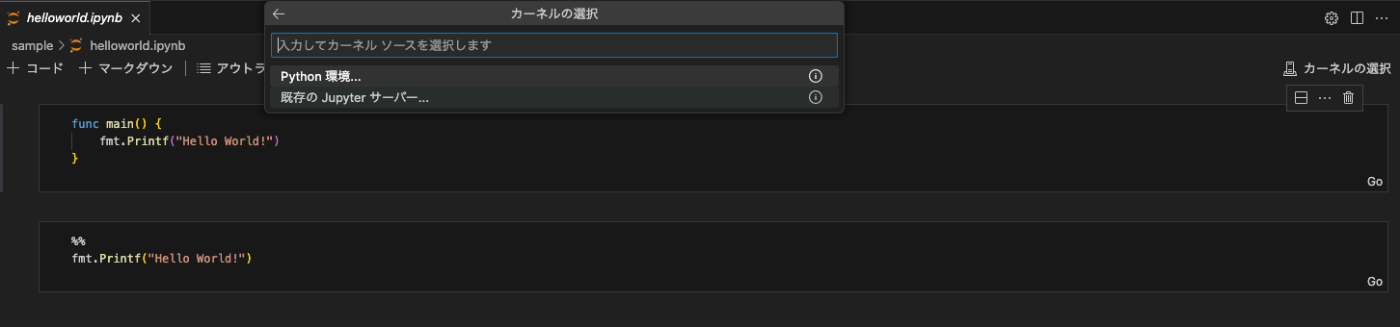
- .ipynb ファイルを VSCode で開き、
カーネルの選択を選択
-
既存の Jupyter サーバーを選択
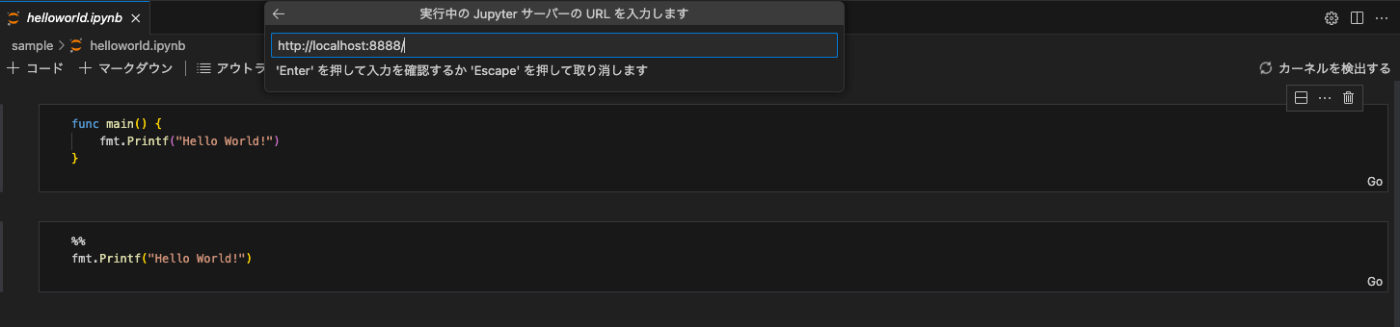
-
実行中の Jupyter サーバーの URL を入力しますを選択 -
http://localhost:8888/を入力
- 2 でコピーしていたトークンをパスワードとして入力
-
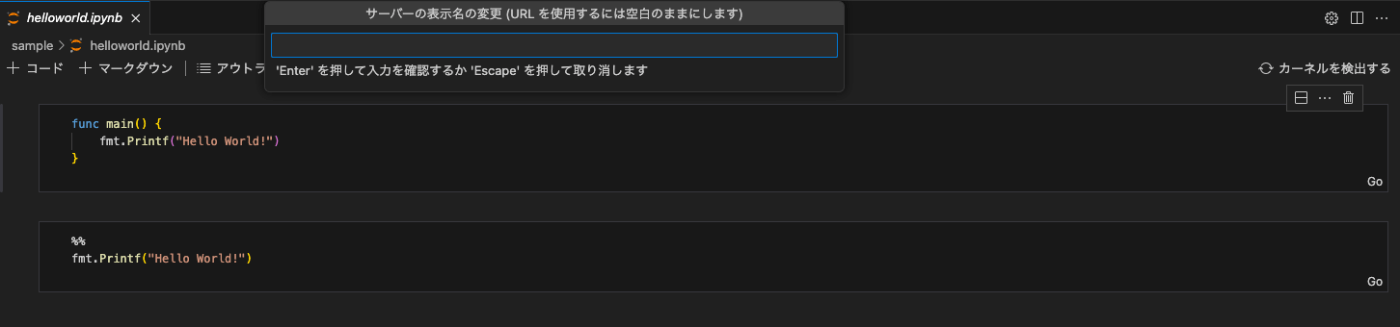
サーバーの表示名の変更を空欄のままエンター
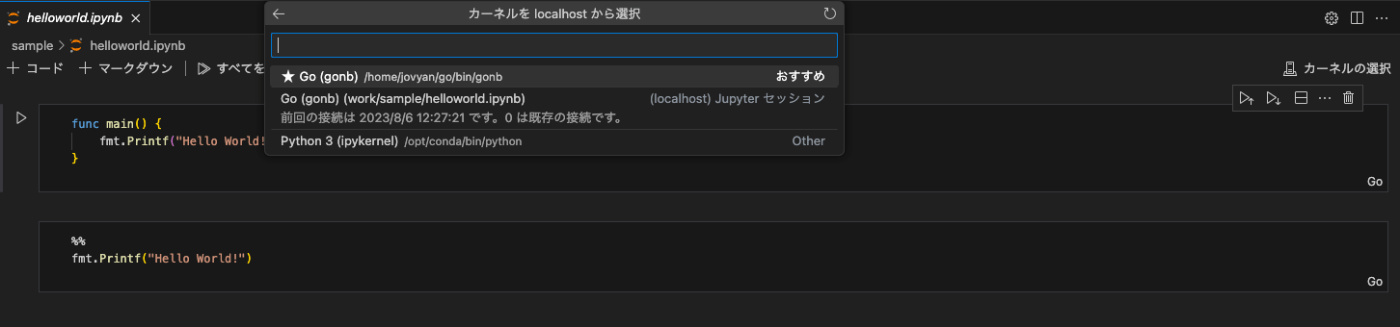
- おすすめ表示される
Go (gonb) /home/jovyan/go/bin/gonbを選択
-
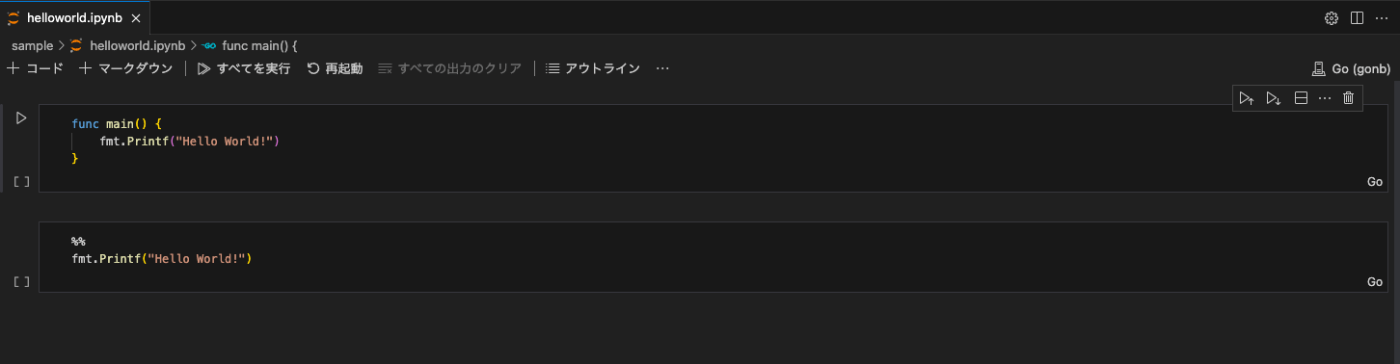
すべてを実行を選択
いろいろ試す
GoNB を触るにあたり以下のようなディレクトリを用意しました。
.
├── cmd
│   └── main.go // 接続テスト用のサーバーコード
├── go.mod
├── pkg // 共通化したい自作パッケージ置き場
│   └── client
│       └── client.go
└── sample
    ├── helloworld.ipynb
    ├── http.ipynb
    ├── testing.ipynb
    └── var.ipynb
docker にて Jupyter を起動するときは上記ディレクトリの root にいることを想定しています。
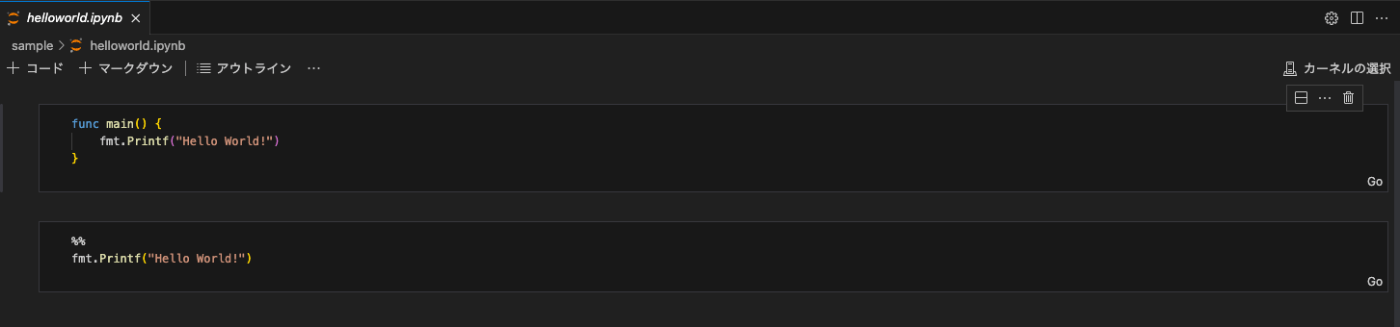
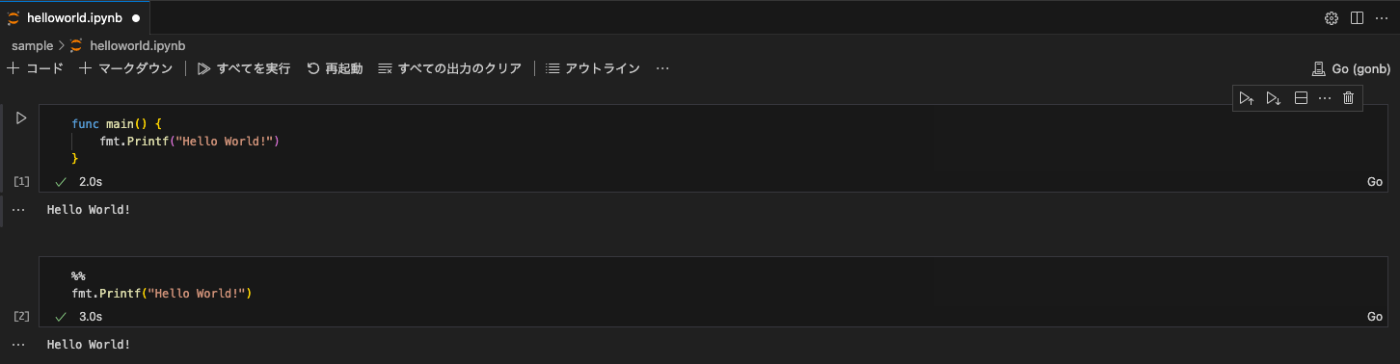
Hello World
-
func main() {}か%%のおまじないでコードが記述できる
変数の共有
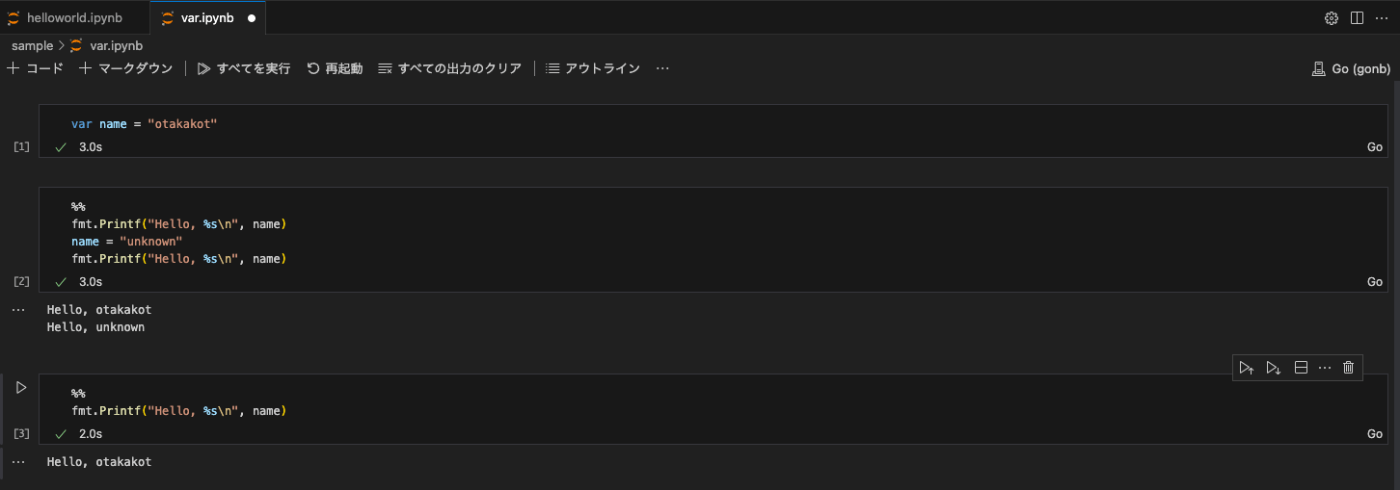
- グローバルで変数宣言する
-
func main() {}内でグローバル宣言した変数を書き換えても別のセル実行時には反映されない
サーバーにアクセス
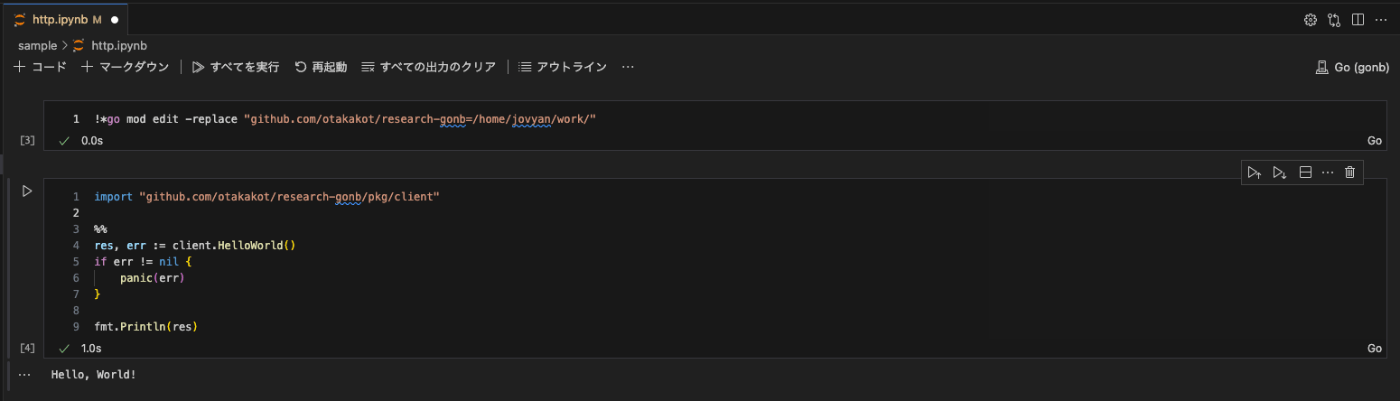
-
Hello, Worldを返す簡易サーバーを用意
package main

import (
	"fmt"
	"log"
	"net/http"
)

func main() {
	http.HandleFunc("/", func(w http.ResponseWriter, r *http.Request) {
		log.Printf("%s", r.UserAgent())
		fmt.Fprintf(w, "Hello, World!")
	})

	log.Println("http://localhost:8080/")

	http.ListenAndServe(":8080", nil)
}
- サーバーにアクセスするためのクライアントを自作モジュールとして用意
package client

import (
	"io"
	"net/http"
)

func HelloWorld() (string, error) {
	resp, err := http.Get("http://host.docker.internal:8080") // docker to host machine
	if err != nil {
		return "", err
	}
	defer resp.Body.Close()

	body, err := io.ReadAll(resp.Body)
	if err != nil {
		return "", err

	}

	return string(body), nil
}
-
go.modがカーネルごと(?)に作成されるため自作モジュールにアクセスするために以下のおまじないを記述
!*go mod edit -replace "${module_name}=/home/jovyan/work/"
testing.T
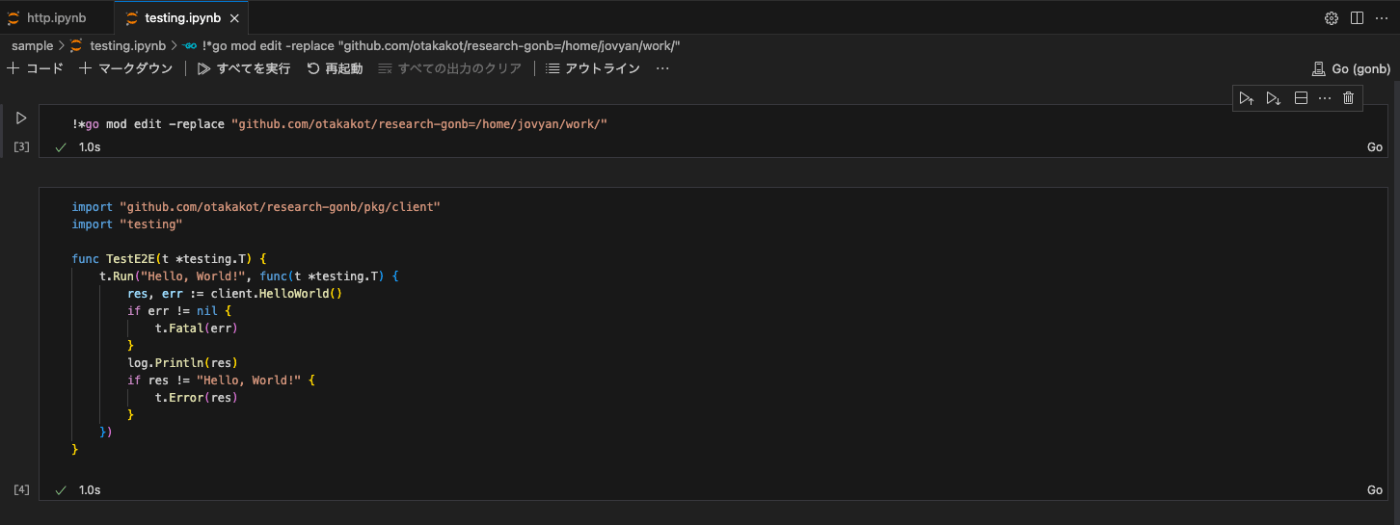
- セルの実行はできるがテストの実行はできない
- (
go testってどうやって動いているのだろう...)
Diff Check
比較に成功
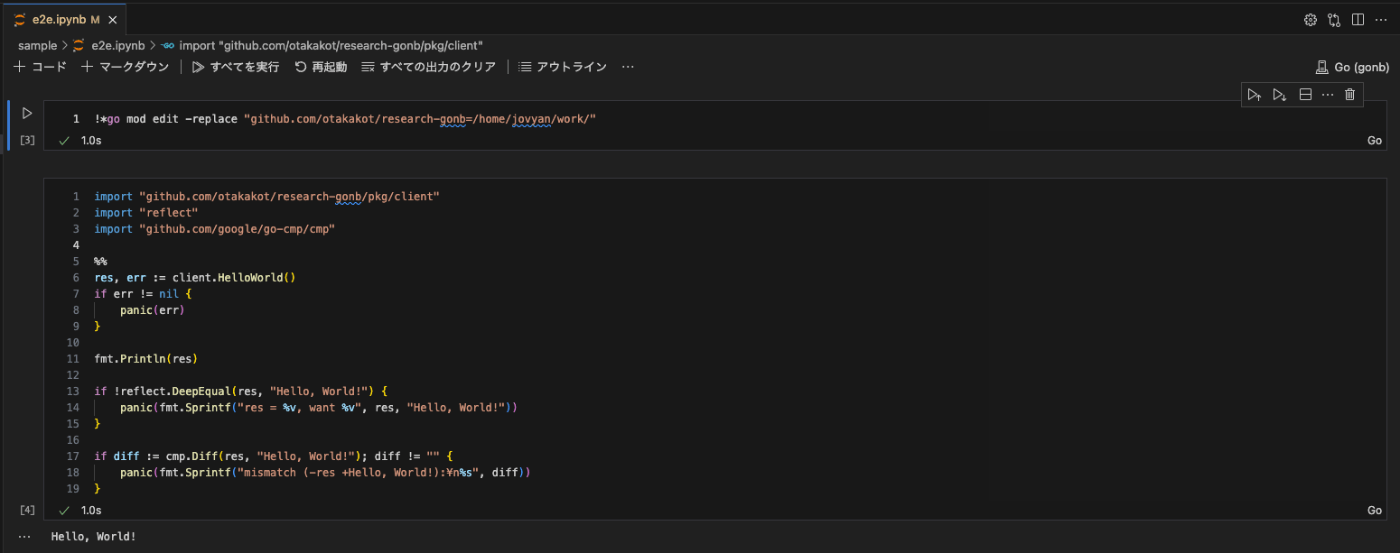
比較に失敗(サーバーのレスポンスを変更)
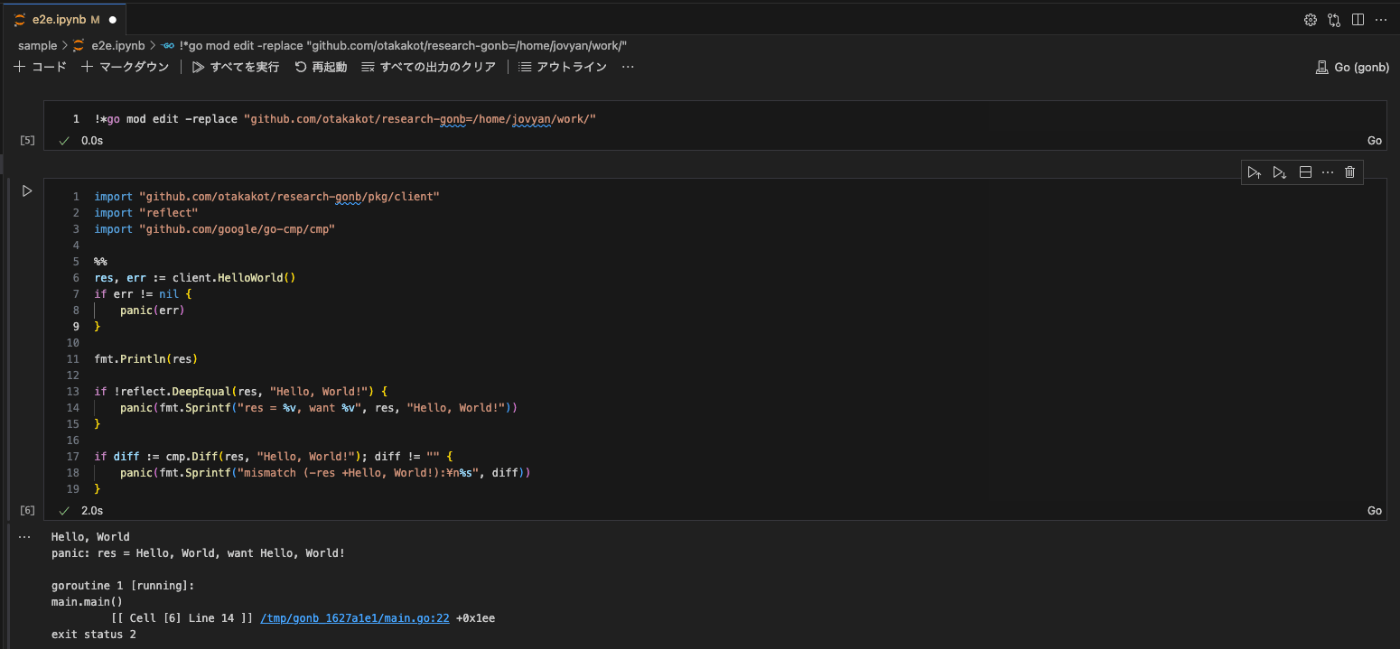
-
refrectとdiffを使って比較が可能 -
panicを使ってみたがセルが失敗扱いにならなかった
所感
- VSCode でコーディングしたけど Jupyter 扱いなので Go の補完は効かない
- 補完が効かないのでカーネルを実際に実行してみないと動くかどうかわからない
- 別セルで利用するためにグローバルで宣言した変数は Go の制約によりそのセル内で参照しておかないとビルドエラーが発生する
- VSCode で
再起動を実行すると接続が途切れてしまう
おわりに
半日触ってみた程度ですが、もう少し活用するためにはいろいろ調査や工夫が必要だなと感じました。ただ、マークダウン形式とコードを併用していろいろ実装したいときには活用できそうです。(コメントを丁寧に書けばいいのでは...)
あくまで半日程度触ってみての感想です。この記事を読んで気になった方がいましたら、ぜひ活用してみてください。
Discussion