FastAPIから出力されるOpenAPIをyamlにしたい
はじめに
FastAPI は python の Web フレームワークです。そして API のインターフェイスを python のコードで記述すれば、API の仕様書を OpenAPI 形式で出力できるという、とても便利な機能を持っています。
しかし標準機能では json 形式の出力のみで、yaml 形式の出力は備わっていません。yaml の方が読みやすくて好きなのでこれは困ります。
この記事では、そんな方向けに yaml で出力する方法を紹介します。また、それ以外にもクライアント側のコード生成を行うにあたって微妙に困ることがあるので、その解決方法も紹介します。
サンプルコードは以下のリポジトリに公開しています。
yaml 形式での出力
以下のようなコードを追加すると、/openapi.yaml に GET すれば yaml 形式で出力されるようになります。
from fastapi import FastAPI, Response
from functools import lru_cache
import yaml
from yamlcore import CoreDumper


def set_openapi_yaml(app: FastAPI) -> None:

    @lru_cache()
    def read_openapi_yaml() -> Response:
        openapi_json = app.openapi()
        yaml_s = yaml.dump(openapi_json, Dumper=CoreDumper)
        return Response(yaml_s, media_type="text/yaml")

    app.add_api_route(
        "/openapi.yaml",
        read_openapi_yaml,
        methods=["GET"],
        include_in_schema=False,
    )
include_in_schema を False にしているため、このルートは openapi の仕様書に出力されません。FastAPI オブジェクトを set_openapi_yaml に渡すとこの機能がセットされます。
app = FastAPI()
set_openapi_yaml(app)
Query パラメータのスキーマが出力されない
Query パラメーターは pydantic の Model (以下の例だと SampleQuery) として定義して以下のように書くことができます。
from pydantic import BaseModel

class SampleQuery(BaseModel):
    q_str: str
    q_int: int
from typing import Annotated
from fastapi import Query

@router.get("/")
async def get_sample(query: Annotated[SampleQuery, Query()]):
    pass

しかしこのままでは OpenAPI のスキーマには SampleQuery が出力されません。これはコード生成するときに不便です。
そんな時は以下のようにして解決できます。
def query_schema(query_cls: type[BaseModel]) -> tuple[str, dict[str, Any]]:
    schema = query_cls.model_json_schema(
        ref_template="#/components/schemas/{model}"
    )
    # 余計なので削除
    del schema["$defs"]
    # default null なのに key があると optional にならないのでここで削除
    for value in schema["properties"].values():
        if "default" in value.keys() and value["default"] is None:
            del value["default"]

    return query_cls.__name__, schema
def set_custom_openapi(app: FastAPI) -> None:
    def custom_openapi():
        if app.openapi_schema:
            return app.openapi_schema
        openapi_schema = get_openapi(
            title=app.title,
            version=app.version,
            openapi_version=app.openapi_version,
            summary=app.summary,
            description=app.description,
            terms_of_service=app.terms_of_service,
            contact=app.contact,
            license_info=app.license_info,
            routes=app.routes,
            webhooks=app.webhooks.routes,
            tags=app.openapi_tags,
            servers=app.servers,
            separate_input_output_schemas=app.separate_input_output_schemas,
        )
    # query parameter は schema に追加されないのでここで追加
    queires: list[type[BaseModel]] = [SampleQuery]
    for query in queires:
        q_name, q_schema = query_schema(query)

        openapi_schema["components"]["schemas"][q_name] = q_schema

    return openapi_schema
app = FastAPI()
set_custom_openapi(app)
すると無事 OpenAPI のスキーマに追加されます。

Enum のスキーマのカスタマイズ
enum の定義に x-enum-varnames を加えるとクライアントのコード生成時に enum で生成してくれます。
PetType:
  type: string
  enum:
    - 猫
    - 犬
  x-enum-varnames:
    - Cat
    - Dog
以下のように CustomSchemaEnum を定義して、それを継承すると x-enum-varnames が出力されます。
from pydantic_core import core_schema as cs
from pydantic import GetJsonSchemaHandler
from pydantic.json_schema import JsonSchemaValue
from enum import Enum

class CustomSchemaEnum(Enum):
    @classmethod
    def get_names(cls):
        return [e.name for e in cls]

    @classmethod
    def __get_pydantic_json_schema__(
        cls, core_schema: cs.CoreSchema, handler: GetJsonSchemaHandler
    ) -> JsonSchemaValue:
        json_schema = handler(core_schema)
        json_schema = handler.resolve_ref_schema(json_schema)
        json_schema["x-enum-varnames"] = cls.get_names()
        return json_schema

class PetType(str, CustomSchemaEnum):
    Cat = "猫"
    Dog = "犬"
Redoc のカスタマイズ
ReDoc (デモサイト) は、OpenAPI の仕様書をベースに整った API ドキュメントを生成するドキュメントジェネレーターです。
FastAPI に標準機能として備わっており、サーバーを起動して /redoc にアクセスすれば利用できます。
基本的なカスタマイズ
カスタマイズするには、以下の FastAPI の redoc の html を生成する関数をコピーして中身を変更します。
ReDoc は <redoc> タグの属性に色々指定して設定を変更できるようです。
<redoc> タグの部分だけ抜粋して、たとえば以下のように変更します。面倒なのでハードコーディングしていますが、それで十分でしょう。
def get_redoc_html(
    openapi_url: str = "/openapi.json",
    theme: dict = None,
) -> HTMLResponse:

    ...省略...
    """"
    <redoc
        spec-url="{openapi_url}"
        disable-search="true"
        hide-download-button="true"
    """
    if theme is not None:
        html += f"""
            theme='{json.dumps(theme)}'
        """
    html += """
    ></redoc>
    """
    ...省略...
指定できるパラメーターは以下のリンクから確認できます。
そして以下のような関数を用意し設定します。
def set_custom_redoc(app: FastAPI) -> None:
    def redoc_html():
        return get_redoc_html(
            openapi_url=app.openapi_url,
            title=app.title,
            theme={"sidebar": {"backgroundColor": "lightblue"}},
        )

    app.add_api_route(
        "/redoc",
        redoc_html,
        methods=["GET"],
        include_in_schema=False,
    )
redoc_url=None とすることで標準の Redoc が無効になり、カスタマイズした redoc を設定できます。
app = FastAPI(redoc_url=None)
set_custom_redoc(app)
Redoc のロゴ
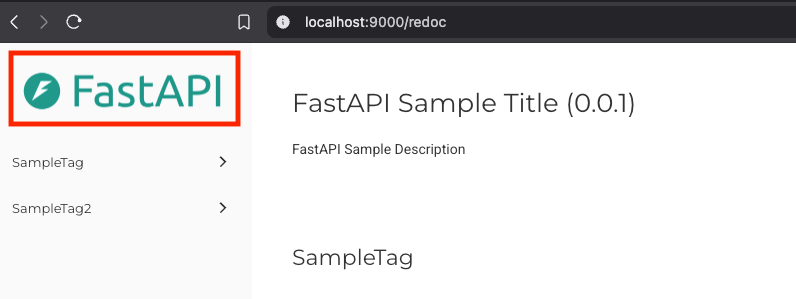
Redoc のロゴは openapi.yaml の info.x-logo.url にロゴの URL 指定することで変更できます。
info:
  x-logo:
    url: https://fastapi.tiangolo.com/img/logo-margin/logo-teal.png
そのためには FastAPI オブジェクトの openapi メソッドをオーバーライドすれば良いです。
def set_custom_openapi(app: FastAPI) -> None:
    def custom_openapi():
        if app.openapi_schema:
            return app.openapi_schema
        openapi_schema = get_openapi(
            title=app.title,
            version=app.version,
            openapi_version=app.openapi_version,
            summary=app.summary,
            description=app.description,
            terms_of_service=app.terms_of_service,
            contact=app.contact,
            license_info=app.license_info,
            routes=app.routes,
            webhooks=app.webhooks.routes,
            tags=app.openapi_tags,
            servers=app.servers,
            separate_input_output_schemas=app.separate_input_output_schemas,
        )
        openapi_schema["info"]["x-logo"] = {
            "url": "https://fastapi.tiangolo.com/img/logo-margin/logo-teal.png"
        }

    app.openapi = custom_openapi
Swagger UI のカスタマイズ
Swagger UI (デモサイト) は OpenAPI の仕様書をもとに REST API の仕様を可視化し、インタラクティブに操作できるウェブベースのユーザーインターフェースです。
FastAPI の標準機能として備わっており、サーバーを起動して /docs にアクセスすれば利用できます。仕様の確認だけでなく API のテストもできるのでとても便利です。
カスタマイズしたことない (必要性を感じない) のでわかりませんが、ReDoc と同様に以下の関数をコピーして変更すれば良いと思われます。
Discussion