はじめに
nest.jsをバックエンドとして開発したが、api docは人間の目で確認しながら、作成しました。悲しいと感じながら、人間ミスも多発でした。その現象を解決ために、コードからapi docを生成し、api docからフロントエンド用のschemaを生成するまでに自動化するのは本記事の目的です。
nest.jsとは
Nest.jsは、Node.jsのための強力なフレームワークで、効率的なサーバーサイドアプリケーションを構築することを目的としています。TypeScriptをベースになっています。DIコンテナもサポートしております。
環境構築
nest.jsとvite.jsで環境構築してください。
サンプルコードはこちらもダウンロードできます。
ファイル構成
.
├── README.md
├── client // viteで作られたfrontend service
│   ├── src
│   │   ├── App.tsx
│   │   ├── Users.tsx
│   │   ├── apiClient // 自動生成されたAPIClient
│   │   │   ├── APIClient.ts
│   │   │   ├── core
│   │   │   ├── index.ts
│   │   │   ├── models
│   │   │   │   ├── Config.ts
│   │   │   │   └── CreateUserDto.ts
│   │   │   └── services
│   │   │       └── DefaultService.ts
├── openApi
│   └── swagger-spec.yaml // 自動生成されたAPI doc
└── server // nest.jsで作られたbackend service
nest.js -> openAPIを生成する
通常パータン
公式はもっと詳しく記載してあるので、興味ある方は確認してください。demoには抜粋したものを記載しました。
demo
まずはnest.js専用のopenAPIを生成するライブラリを入れましょう。
$ npm install --save @nestjs/swagger
main.tsにopenAPIのconfigを設定しましょう。
import { NestFactory } from '@nestjs/core';
import { AppModule } from './app.module';
import { ValidationPipe } from '@nestjs/common';
import { SwaggerModule, DocumentBuilder } from '@nestjs/swagger';

async function bootstrap() {
  const app = await NestFactory.create(AppModule);
  app.useGlobalPipes(new ValidationPipe());
  const config = new DocumentBuilder()
    .setTitle('Users example')
    .setDescription('The users API description')
    .setVersion('1.0')
    .addTag('user')
    .build();
  const document = SwaggerModule.createDocument(app, config);
  SwaggerModule.setup('api', app, document);

  await app.listen(3000);
}
bootstrap();
これで、http://localhost:3000/api にアクセスすると、openAPIのページが表示されます。

プロパティごとの詳細を入れてみましょう。(一部プロパティ略)
import { ApiProperty } from '@nestjs/swagger';
import {
  IsInt,
  IsString,
  IsIn,
  Min,
  Max,
  IsDefined,
  IsOptional,
} from 'class-validator';

export class CreateUserDto {
  @ApiProperty({
    description: 'The id of the user',
    type: 'number',
    example: 11111111,
    required: true,
    minLength: 8,
  })
  @IsDefined()
  @IsInt()
  @Min(8)
  id: number;

  @ApiProperty({
    description: 'The name of the user',
    type: 'string',
    example: 'John Doe',
    required: true,
  })
  @IsDefined()
  @IsString()
  name: string;

  @ApiProperty({
    description: 'The name of the user',
    enum: ['F', 'M'],
    example: 'F',
    required: true,
  })
  @IsDefined()
  @IsIn(['F', 'M'])
  gender: 'F' | 'M';

  @ApiProperty({
    description: 'The age of the user',
    type: 'number',
    example: 30,
    required: false,
  })
  @IsOptional()
  @IsInt()
  @Min(0)
  @Max(120)
  age?: number;
}
これで、API docが生成されました。
ここまでは通常で、簡易的にopenapiが生成してくれるので、かなり便利だと思います。
ただ、いくつか問題があります。
問題1: DTOクラスが100個あると、どうすれば良いですか?
以前API非公開だったが、いきなり公開とのことになっていて、全てのDTO(Inputdata)クラスにApiPropertyを追加することが必要になります。何かいい方法があるかを調べてみました。
@nestjs/swaggerをpluginに設定すると、自動的に全てのDTO properties(@ApiHidePropertyが付いているプロパティ以外)に@ApiPropertyを注入します。
nest-cli.jsonに以下のpluginを追加すれば良いです。
{
  "$schema": "https://json.schemastore.org/nest-cli",
  "collection": "@nestjs/schematics",
  "sourceRoot": "src",
  "compilerOptions": {
    "deleteOutDir": true,
    "plugins": ["@nestjs/swagger"]
  }
}
これでdtoにある@ApiPropertyは不要になりました。
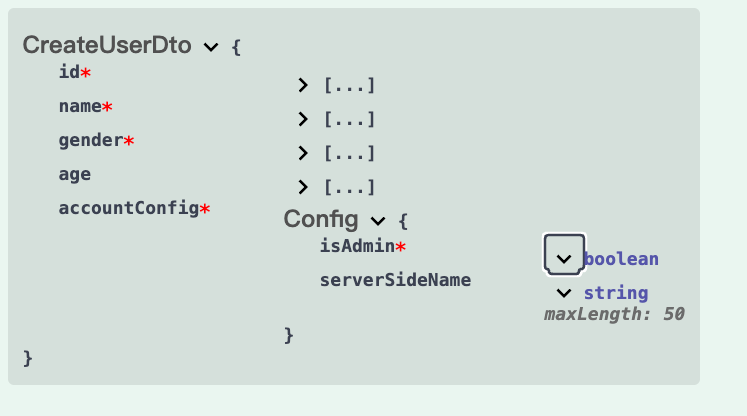
ちなみに、class-validatorのtypeも対応してくれるので、使い勝手が良さそうです。
export class Config {
  @IsDefined()
  isAdmin: boolean;

  @IsOptional()
  @MaxLength(50)
  serverSideName?: string;
}

export class CreateUserDto {
  @Type(() => Config)
  accountConfig: Config;
}
問題2: 別ドメインにopenAPIを置きたい場合、どうすれば良いなのか?
現在openAPIの表示はhttp://localhost:3000/apiに表示されています。
jsonの場合
http://localhost:3000/api-jsonにアクセスすれば、jsonファイルをそのままダウンロードやコピーすることは可能です。
yamlの場合
http://localhost:3000/api-yamlにアクセスすれば、yamlファイルをそのままダウンロードやコピーすることは可能です。
schemaを生成するにはopenapi-typescriptを使うので、remoteでもファイルでもどちらでも良いです。一応、yamlファイルを生成するコードも貼ります。
yamlファイルを作成したい場合
以下のように追加すれば、指定したフォルダに出力できます。watchモードにしているので、dtoクラスに変更は即yamlファイルに反映するので、目視の確認が不要になって、確実に実装とAPIが一致になります。
import { NestFactory } from '@nestjs/core';
import { AppModule } from './app.module';
import { ValidationPipe } from '@nestjs/common';
import { SwaggerModule, DocumentBuilder } from '@nestjs/swagger';
+ import { dump } from 'js-yaml';
+ import * as fs from 'fs';

async function bootstrap() {
  const app = await NestFactory.create(AppModule);
  app.useGlobalPipes(new ValidationPipe());
  const config = new DocumentBuilder()
    .setTitle('Users example')
    .setDescription('The users API description')
    .setVersion('1.0')
    .addTag('user')
    .build();
  const document = SwaggerModule.createDocument(app, config);

+  fs.writeFileSync('../openApi/swagger-spec.yaml', dump(document, {}));

  SwaggerModule.setup('api', app, document);

  await app.listen(3000);
}
bootstrap();
これで、ようやくnest.jsからopenAPIに自動生成ができるようなりました。次は、openAPIからschemaを生成して、clientに利用できるようにします。
openAPI -> schemaを生成する
今回使うライブラリはopenapi-typescript-codegenです。
openapi-typescript-codegen は、OpenAPI(Swagger)仕様を基にして TypeScript のクライアントコードを自動生成するツールです。
-
OpenAPI(Swagger)互換性: OpenAPI 3.x 仕様に準拠しており、Swagger Editor や他の OpenAPI ツールで作成した仕様ファイル(YAML や JSON)を入力として利用します。
-
TypeScript への変換: OpenAPI の定義から TypeScript の型定義やAPIクライアントコードを生成します。これにより、型安全性が高く、開発効率が向上します。
-
カスタマイズ可能: 生成されるコードのスタイルや構造をカスタマイズするためのオプションが豊富に用意されています。例えば、関数の命名規則や使用する HTTP ライブラリの指定などが可能です。
-
オプションオブジェクトのサポート: --useOptions オプションを使用することで、関数の引数をオプションオブジェクトとしてまとめて扱うことができます。これにより、関数呼び出しの柔軟性が向上します。
-
クライアント側のバリデーション: 生成されたコードには、OpenAPI のスキーマに基づいたクライアント側のバリデーションが組み込まれます。これにより、不正なデータを送信する前にエラーをキャッチできます。
-
モジュール化された出力: 生成されたコードは、モジュールや名前空間に整理されているため、大規模なアプリケーションでの利用にも適しています。
インストール
$ cd openApi
$ npm init -y
$ npm install openapi-typescript-codegen --save-dev
基本運用
マジックのようなコマンドを叩くと、client/src/apiClientにapiClientが生成できます!
$ npx openapi-typescript-codegen --input swagger-spec.yaml --output ../client/src/apiClient --useUnionTypes --useOptions --name APIClient --client fetch
では、このコマンドは何をやってくれるのは説明させていただきます。
--input
基礎になるopenAPIのファイルを指定できます。ファイルパスでも、URLでも、文字列でもいけます。
--output
出力のディレクトリです。
--useUnionTypes
enumsをunion typesに変換すること。
具体例を挙げると:
変換前
enum Color {
  Red,
  Green,
  Blue
}
変換後
type Color = 'Red' | 'Green' | 'Blue';
--useOptions
関数の呼び出しパラメータをオプションオブジェクトとして扱う設定すること。
具体例を挙げると:
変換前
// API関数の定義
function getUser(userId: string, includeDetails: boolean): Promise<User> {
  // APIリクエストの実行
}

// 関数の使用
getUser('12345', true);
変換後
// API関数の定義
function getUser(options: { userId: string; includeDetails: boolean }): Promise<User> {
  // APIリクエストの実行
}

// 関数の使用
getUser({
  userId: '12345',
  includeDetails: true
});
--name
生成したapiClientのクラスネームです。
これでopenAPI -> schemaの生成もできました。
さて、次はclientからschemaを使って呼びだすことだけです。
schema -> clientで呼び出す
ここからは自由に非同期状態管理ライブラリを選択しても構いません。こちらはreact-queryを使います。
インストール
$ cd client
$ npm install @tanstack/react-query
初期設定
App.tsx
const queryClient = new QueryClient();

function App() {
  return (
    <QueryClientProvider client={queryClient}>
      <Users />
    </QueryClientProvider>
  );
}
apiClientを用いて、react-queryを実装する
User.tsx
import './App.css';
import { useQuery, useMutation, useQueryClient } from '@tanstack/react-query';
import { APIClient, CreateUserDto } from './apiClient';

// 生成されたAPIClientを用いて、apiClientを生成する
const apiClient = async () => {
  return new APIClient({ BASE: 'http://localhost:3000' }).default;
};
const userAPI = await apiClient();

export const Users: React.FC = () => {
  const queryClient = useQueryClient();
  // Queries

  // GET /users はそのままで使える
  const query = useQuery({
    queryKey: ['users'],
    queryFn: () => userAPI.appControllerGetUsers(),
  });

  // Mutations
  // POST /user もそのままで使える
  // Dtoのタイプもそのまま使えるので、type safeはより一層
  const mutation = useMutation({
    mutationFn: (user: CreateUserDto) =>
      userAPI.appControllerCreateUser({
        requestBody: user,
      }),
    onSuccess: () => {
      // Invalidate and refetch
      queryClient.invalidateQueries({ queryKey: ['users'] });
    },
  });

  return (
    <div>
      <ul>
        {query.data?.map((todo) => (
          <li key={todo.id}>{todo.name}</li>
        ))}
      </ul>
      <button
        onClick={() => {
          mutation.mutate({
            id: generateRandomTenDigitNumber(),
            name: generateRandomFourCharacterString(),
            gender: 'M',
            accountConfig: {
              isAdmin: true,
            },
          });
        }}
      >
        Add Todo
      </button>
    </div>
  );
};
終わりに
server -> openAPI -> schema -> clientの生成が終わりました。複雑な作業が続ける日々に、少しでも楽になっていたら何よりです。

世界のラストワンマイルを最適化する、OPTIMINDのテックブログです。「どの車両が、どの訪問先を、どの順に、どういうルートで回ると最適か」というラストワンマイルの配車最適化サービス、Loogiaを展開しています。recruit.optimind.tech/
Discussion