Azure (Azure AD B2C) + AWS (ALB) でOIDC認証を設定
概要
Azure AD B2C(以下、B2C) と AWS ALB(以下、ALB)組み合わせでOIDC認証を設定しました。
B2CとALBの連携に苦労したため、B2CとALBの接続部分の設定に焦点を当てて説明します。
B2CとALBの基本設定は、既に設定済みと仮定しています。
B2CとALBの接続仕様
それぞれの接続仕様に注意する必要があります。
以下、注意事項です。
ALB
- ALBはUserinfoエンドポイントが必要です。
- OIDC規格に厳密であり、Userinfoエンドポイントのレスポンスにsubフィールドが含まれている必要があります。
B2C
- Userinfoエンドポイントの設定にはカスタムポリシーが必要です。
- UserinfoエンドポイントへのアクセスにはB2Cで設定したアプリケーションのスコープが必要です。
- カスタムポリシーのサンプルコードでは、subではなくobjectIdというフィールド名で出力されます。
つまり、Userinfoエンドポイントのレスポンスに、subフィールドが含まれるようにすれば問題ありません。
参考ドキュメント
Userinfoエンドポイントの設定
Userinfoエンドポイントを設定する手順については、公式ドキュメントを参考にして設定します。
Userinfoエンドポイントが用意できましたら、
Userinfoエンドポイントのレスポンスで、objectIdをsubとして出力するようにカスタムポリシーを修正します。
技術プロファイル <TechnicalProfile Id="UserInfoIssuer"> のobjectIdのInputClaimを以下のように修正します。
<InputClaim ClaimTypeReferenceId="objectId" PartnerClaimType="sub"/>
また、OIDC公式ドキュメントにおいてメールアドレスはemailとなっていますので、emailAddressをemailとして出力するように修正しておきます。
<InputClaim ClaimTypeReferenceId="signInNames.emailAddress" PartnerClaimType="email"/>
修正済みのカスタムポリシーのコード(UserInfoIssuer部分のみ)
<!--
<ClaimsProviders> -->
  <ClaimsProvider>
    <DisplayName>Token Issuer</DisplayName>
    <TechnicalProfiles>
      <TechnicalProfile Id="UserInfoIssuer">
        <DisplayName>JSON Issuer</DisplayName>
        <Protocol Name="None" />
        <OutputTokenFormat>JSON</OutputTokenFormat>
        <CryptographicKeys>
          <Key Id="issuer_secret" StorageReferenceId="B2C_1A_TokenSigningKeyContainer" />
        </CryptographicKeys>
        <!-- The Below claims are what will be returned on the UserInfo Endpoint if in the Claims Bag-->
        <InputClaims>
	  <!-- OIDC規格ではsubは必須フィールド https://openid.net/specs/openid-connect-core-1_0.html#UserInfoResponse -->
          <InputClaim ClaimTypeReferenceId="objectId" PartnerClaimType="sub"/>
          <InputClaim ClaimTypeReferenceId="givenName"/>
          <InputClaim ClaimTypeReferenceId="surname"/>
          <InputClaim ClaimTypeReferenceId="displayName"/>
          <!-- emailにフィールド名変更 -->
          <InputClaim ClaimTypeReferenceId="signInNames.emailAddress" PartnerClaimType="email"/>
        </InputClaims>
      </TechnicalProfile>
      <TechnicalProfile Id="UserInfoAuthorization">
        <DisplayName>UserInfo authorization</DisplayName>
        <Protocol Name="None" />
        <InputTokenFormat>JWT</InputTokenFormat>
        <Metadata>
          <!-- Update the Issuer and Audience below -->
          <!-- Audience is optional, Issuer is required-->
          <Item Key="issuer">https://yourtenant.b2clogin.com/11111111-1111-1111-1111-111111111111/v2.0/</Item>
          <Item Key="audience">[ "22222222-2222-2222-2222-222222222222", "33333333-3333-3333-3333-333333333333" ]</Item>
          <Item Key="client_assertion_type">urn:ietf:params:oauth:client-assertion-type:jwt-bearer</Item>
        </Metadata>
        <CryptographicKeys>
          <Key Id="issuer_secret" StorageReferenceId="B2C_1A_TokenSigningKeyContainer" />
        </CryptographicKeys>
        <OutputClaims>
          <OutputClaim ClaimTypeReferenceId="objectId" PartnerClaimType="sub"/>
          <OutputClaim ClaimTypeReferenceId="signInNames.emailAddress" PartnerClaimType="email"/>
          <!-- Optional claims to read from the access token. -->
          <!-- <OutputClaim ClaimTypeReferenceId="givenName" PartnerClaimType="given_name"/>
             <OutputClaim ClaimTypeReferenceId="surname" PartnerClaimType="family_name"/>
             <OutputClaim ClaimTypeReferenceId="displayName" PartnerClaimType="name"/> -->
        </OutputClaims>
      </TechnicalProfile>
    </TechnicalProfiles>
  </ClaimsProvider>
<!--
</ClaimsProviders> -->
ALBのOIDC設定
Userinfoエンドポイントの準備が整いましたら、ALBの設定を行います。
詳細な手順については、以下のAWSの公式ドキュメントを参照
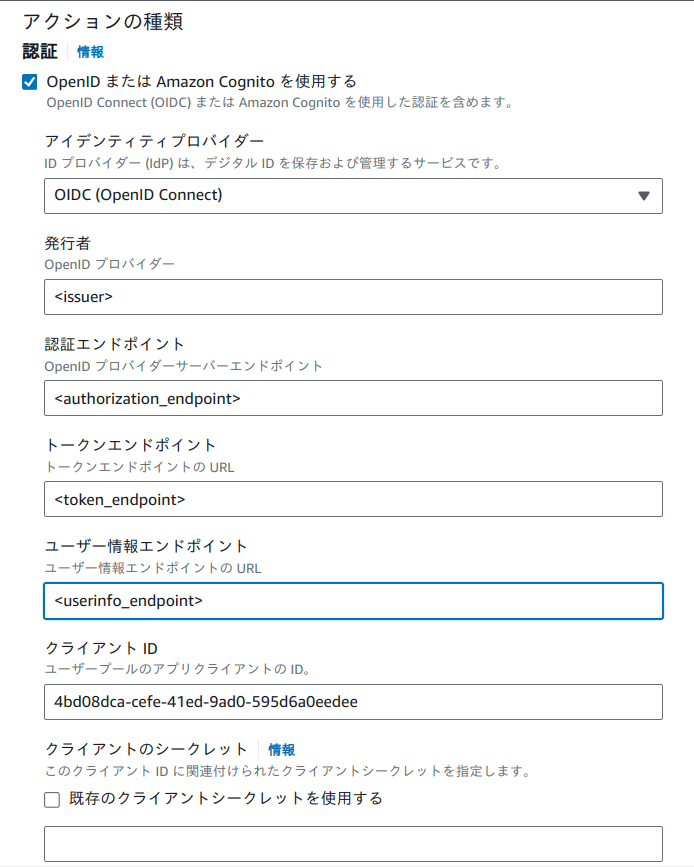
B2Cで用意したOpenID Configurationエンドポイントを確認し、ALBにOIDC認証を設定します。
OpenID Configurationエンドポイント

ALBの設定画面で、issuerなどの情報を入力します。設定画面の例は以下の通りです。
さらに、「高度な認証設定」でスコープの設定が必要です。
openidとB2Cで設定したアプリケーションのアプリケーションIDを以下のように設定します。
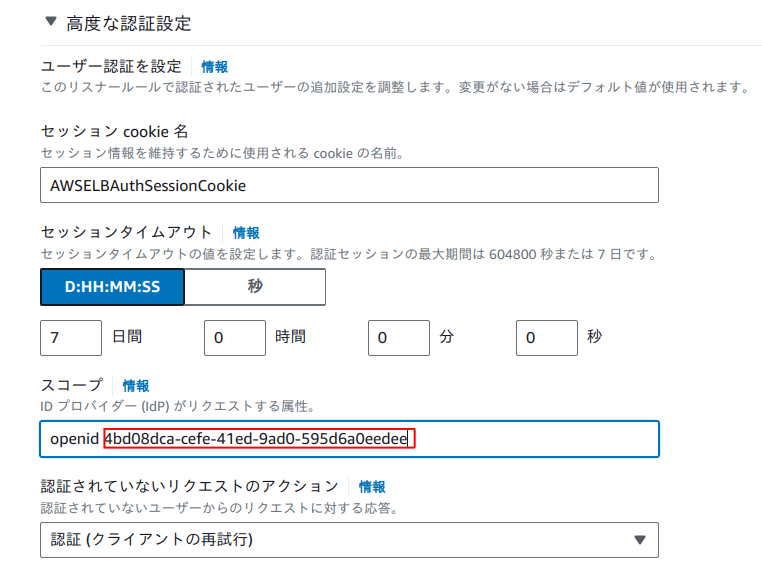
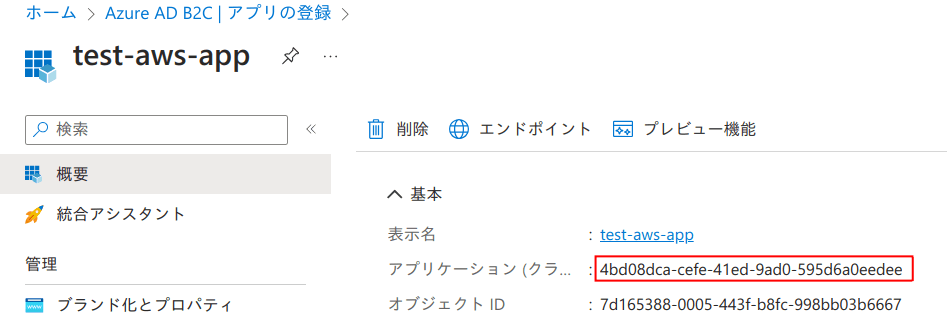
アプリケーションIDは、B2Cのアプリケーション設定画面で以下の部分にあります。
ログアウトの設定
OIDC認証の設定が完了しました。
最後にログアウトの設定を行います。
OIDC認証が完了すると、<AWSELBAuthSessionCookie-0> のCookie名が発行されていることが分かります。ログアウトするためには、B2Cのログアウトだけでなく、ALBのセッションも破棄する必要があります。
PHPでログアウトのエンドポイントを用意する場合
$logoutEndpoint = "https://opqrshunidp.b2clogin.com/opqrshunidp.onmicrosoft.com/b2c_1_susi/oauth2/v2.0/logout?post_logout_redirect_uri=<>";
// AWSELBAuthSessionCookie-0の有効期限を現在のタイムスタンプに設定して削除
setcookie('AWSELBAuthSessionCookie-0', '', time(), '/', '', false, true);

// ログアウトエンドポイントにリダイレクト
header('Location: ' . $logoutEndpoint);
exit();
ログアウトURLは、OpenID Configurationエンドポイント end_session_endpoint を指定します。
post_logout_redirect_uriへのパラメーターには、ログアウト正常終了後にユーザーをリダイレクトするURLを指定します。
参考ドキュメント
終わりに
AWSでOIDC認証を設定する場合、AWS Cognitoは設定が容易です。
一方、Azure AD B2Cはカスタムポリシーが必要で難易度が高いものの、ユーザー体験を柔軟にカスタマイズできるCIAM(Customer Identity and Access Management)です。AWS Cognitoで要件を満たせない場合、B2Cは有用な選択肢だと思います。
また、Azureからは新しいCIAMであるMicrosoft Entra IDのプレビュー版もリリースされていますので、こちらにも期待です。
Discussion