追記
2022/12/30
記事内で EventCallback<T> のプロパティを JavaScript から設定することができないと書いていましたが出来たので内容を変えています。
本文
前に .NET 7 で追加された Blazor の新機能に関する記事を書きました。
この時にカスタム エレメントについて全く触れていませんでした。ということで触れようと思います!
参考にしたのは以下のドキュメントです。(日本語のほうがちょっと情報が古かったので英語で)
カスタム エレメント
HTML 内で普通にタグとして Blazor のコンポーネントを使えるようになる素敵な機能です。Blazor Server, Blazor WebAssembly のどちらでも使えます。
使い方
Blazor のプロジェクトに Microsoft.AspNetCore.Components.CustomElements パッケージを NuGet から導入することで使えるようになります。Blazor Server と Blazor WebAssembly でカスタム エレメントとしてコンポーネントを登録する際の書き方がチョット違います。
Blazor Server
builder.Services.AddServerSideBlazor(options =>
{
    // RegisterCustomElement メソッドでコンポーネントをカスタム エレメントとして登録
    // この場合は Counter コンポーネントを my-counter という名前で登録
    options.RootComponents.RegisterCustomElement<Counter>("my-counter");
});
Blazor WebAssembly
// RegisterCustomElement メソッドでコンポーネントをカスタム エレメントとして登録
// この場合は Counter コンポーネントを my-counter という名前で登録
builder.RootComponents.RegisterCustomElement<Counter>("my-counter");
この時、注意すべき点としてはカスタム エレメントの名前はケバブケースじゃないとダメというところです。(はまった…)
my-counter は OK だけど MyCounter や mycounter はダメです。全部小文字でなおかつ - が途中に無いとダメです。罠…!
パラメーターもプリミティブ型や JSON にシリアライズ可能なオブジェクトなら渡すことが可能みたいです。ということは、
やってみよう
ということでやってみます。今回は Blazor WebAssembly でやってみようと思ったので Blazor WebAssembly のプロジェクトテンプレートで始めます。プロジェクトを作成したら Microsoft.AspNetCore.Components.CustomElements を NuGet で追加します。
そして Program.cs を以下のように書き換えて Counter コンポーネントを my-counter というカスタム エレメントとして登録しました。普通のルート コンポーネントの登録は今回は削除しました。
using CustomTagApp;
using CustomTagApp.Pages;
using Microsoft.AspNetCore.Components.Web;
using Microsoft.AspNetCore.Components.WebAssembly.Hosting;

var builder = WebAssemblyHostBuilder.CreateDefault(args);
// ここに追加!普通のルートコンポーネントの登録処理は削除!
builder.RootComponents.RegisterCustomElement<Counter>("my-counter");

builder.Services.AddScoped(sp => new HttpClient { BaseAddress = new Uri(builder.HostEnvironment.BaseAddress) });

await builder.Build().RunAsync();
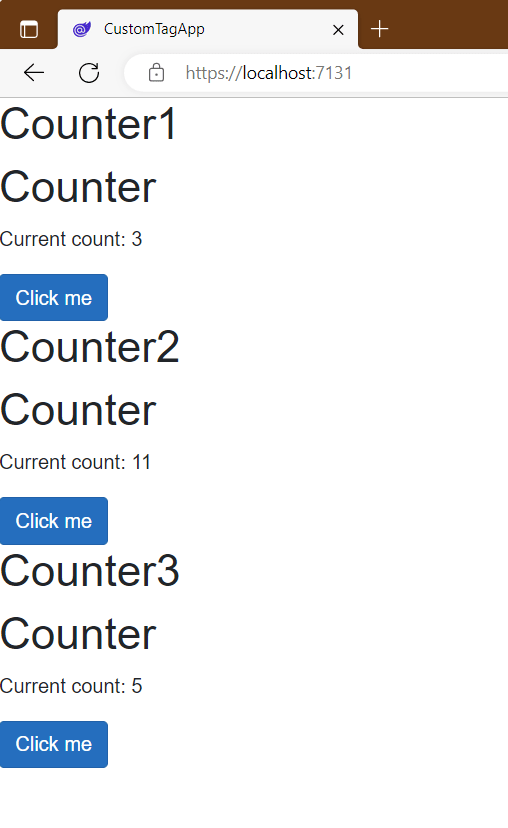
これでカスタム エレメントが使えるようになりました!!カスタム エレメントを使う側は Blazor をホストしているのと同じ所から配信されていないといけないみたいなので、デプロイの時のやりかたは結構めんどくさいことにはなりそうですね…。とりあえず今回はプロジェクトに含まれている wwwroot/index.html でカスタム エレメントを使っていこうと思います。
<!DOCTYPE html>
<html lang="en">

<head>
    <meta charset="utf-8" />
    <meta name="viewport" content="width=device-width, initial-scale=1.0, maximum-scale=1.0, user-scalable=no" />
    <title>CustomTagApp</title>
    <base href="/" />
    <link href="css/bootstrap/bootstrap.min.css" rel="stylesheet" />
    <link href="css/app.css" rel="stylesheet" />
    <link rel="icon" type="image/png" href="favicon.png" />
    <link href="CustomTagApp.styles.css" rel="stylesheet" />
</head>

<body>

    <h1>Counter1</h1>
    <my-counter></my-counter>
    <h1>Counter2</h1>
    <my-counter></my-counter>
    <h1>Counter3</h1>
    <my-counter></my-counter>

    <script src="_framework/blazor.webassembly.js"></script>
</body>

</html>
これを実行すると以下のような結果になります。因みに Blazor WebAssembly の初期化が終わるまでカスタム エレメントの内容は表示されません。まぁ、これは普通の Blazor WebAssembly のプロジェクトを実行した時と同じですね。
Counter.razor を以下のように変更することで CurrentCount パラメーターに対して HTML や JavaScript から値を設定できるようになります。私が確認した限りでは設定が出来るだけで取得は出来ませんでした。残念。
@page "/counter"

<PageTitle>Counter</PageTitle>

<h1>Counter</h1>

<p role="status">Current count: @CurrentCount</p>

<button class="btn btn-primary" @onclick="IncrementCount">Click me</button>

@code {

    [Parameter]
    public int CurrentCount { get; set; }

    private void IncrementCount()
    {
        CurrentCount++;
    }
}
wwwroot/index.html を以下のように変更して CurrentCount を設定するようにしてみましょう。HTML のカスタム エレメントとしてパラメーターを設定する場合はケバブケースの current-count になります。JavaScript からの場合は currentCount になります。
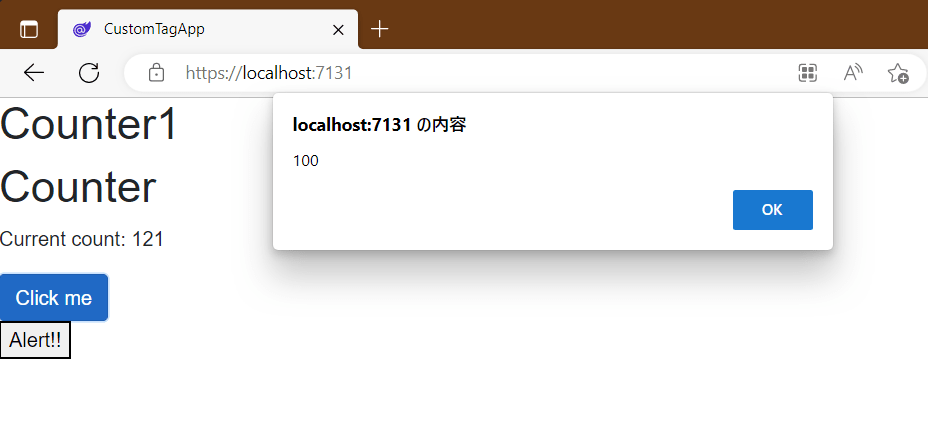
期待通りに動かないのですが、一応 HTML の世界でボタンをクリックしたときに currentCount の値をアラートで出してみています。
<!DOCTYPE html>
<html lang="en">

<head>
    <meta charset="utf-8" />
    <meta name="viewport" content="width=device-width, initial-scale=1.0, maximum-scale=1.0, user-scalable=no" />
    <title>CustomTagApp</title>
    <base href="/" />
    <link href="css/bootstrap/bootstrap.min.css" rel="stylesheet" />
    <link href="css/app.css" rel="stylesheet" />
    <link rel="icon" type="image/png" href="favicon.png" />
    <link href="CustomTagApp.styles.css" rel="stylesheet" />
</head>

<body>
    <h1>Counter1</h1>
    <my-counter id="my-counter1" current-count="100"></my-counter>
    <div>
        <button id="alert-button">Alert!!</button>
    </div>

    <script src="_framework/blazor.webassembly.js" autostart="false"></script>
    <script>
        Blazor.start().then(function() {
            const counter = document.getElementById("my-counter1");
            document.getElementById("alert-button").addEventListener("click", function() {
                // ここで currentCount の値を取得しているが、必ずタグで設定した 100 になってしまう…
                alert(counter.currentCount);
            });
        });
    </script>
</body>

</html>
実行すると以下のようになります。カウンターの値を 121 にした状態で Alert!! のボタンを押しているのに初期値の 100 が出ていることが確認できます。
EventCallback 対応
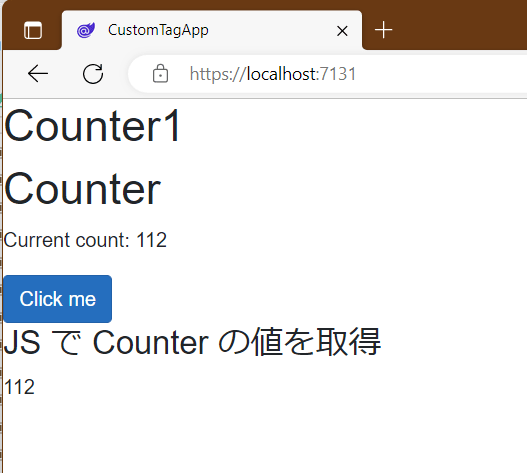
一応 JavaScript から EventCallback<T> 型のプロパティに関数を設定することでイベントに対するコールバックを指定することが出来ます。ただ、この設定のタイミングが Blazor の初期化が終わってカスタム エレメントが完全に動き出した後じゃないと動かないみたいです。Blazor の初期化が終わったタイミングでよければ Blazor.start().then(() => { ... }); で良いのですが、そのタイミングだとまだ早すぎるようです…。
my-counter が、ちゃんと使える状態になった後に呼ばれるイベントがあればよいのですが…。ということで以下のように Blazor.start() の後に 1 秒待つというイケてない実装になりました。
<!DOCTYPE html>
<html lang="en">

<head>
    <meta charset="utf-8" />
    <meta name="viewport" content="width=device-width, initial-scale=1.0, maximum-scale=1.0, user-scalable=no" />
    <title>CustomTagApp</title>
    <base href="/" />
    <link href="css/bootstrap/bootstrap.min.css" rel="stylesheet" />
    <link href="css/app.css" rel="stylesheet" />
    <link rel="icon" type="image/png" href="favicon.png" />
    <link href="CustomTagApp.styles.css" rel="stylesheet" />
</head>

<body>
    <h1>Counter1</h1>
    <my-counter id="my-counter1" current-count="100"></my-counter>
    <div>
        <h3>JS で Counter の値を取得</h3>
        <span id="placeholder"></span>
    </div>

    <script src="_framework/blazor.webassembly.js" autostart="false"></script>
    <script>
        Blazor.start().then(() => {
            // とりあえず Blazor 初期化完了から 1 秒程度たったらうまくいく…
            setTimeout(() => {
                // どうも my-counter が完全に初期化が終わったあとじゃないと countChanged には値は設定できないみたい…
                document.getElementById("my-counter1").countChanged = currentCount => {
                    document.getElementById("placeholder").innerText = currentCount + "";
                };
            }, 1000);
        });
    </script>
</body>

</html>
Counter コンポーネントは CountChanged を以下のように足しています。
@page "/counter"

<PageTitle>Counter</PageTitle>

<h1>Counter</h1>

<p role="status">Current count: @CurrentCount</p>

<button class="btn btn-primary" @onclick="IncrementCount">Click me</button>

@code {

    [Parameter]
    public int CurrentCount { get; set; }
    [Parameter]
    public EventCallback<int> CountChanged { get; set; }

    private async Task IncrementCount()
    {
        CurrentCount++;
        await CountChanged.InvokeAsync(CurrentCount);
    }
}
実行して何回かカウンターの値を増やした後の画面は以下のようになります。ちゃんと CountChanged に設定したコールバックが呼ばれていることが確認できます。
まとめ
ということでカスタム エレメントを少し試してみました。現時点だと HTML の世界から Blazor の世界への値の設定を行う一方通行のみサポートされているみたいです。なので、Blazor の表示系のコンポーネントを使いたいときにはカスタム エレメントの機能が使えるかもしれません。EventCallback<T> を設定する適切なタイミングがわかればもうちょっと使えるところがひろがりそうですが…。
今後に期待…!!

Discussion