GCPでSelf-Hosted Sentryを構築する
GCP(Google Cloud Platform)でSelf-Hosted Sentryを立てることがあったのでメモとして残します。
構成

- Cloud Load Balancing(GCLB)
- マネージド SSL 証明書を使いために設定
- Let's Encrypt などで運用するなら不要
- Cloud Armor
- DDOSやSQL Injectionなどの攻撃から守る
- Compute Engine
- Sentry を立てている
- Docker Compose で複数の Docker コンテナが起動している
- リバプロ用の Nginx も常駐
- Cloud SQL for PostgreSQL
- Sentry のデータなどを保存
- Docker Compose でも作成できるがデータを永続化したかったため外出しした
前提
- VPC ネットワーク、Firewall 作成済
- Cloud NAT およびルーティング設定済
- 東京リージョンで構築
サービスアカウントを作成
使わなくてもサービスアカウントを作ったほうが良いので作ります(参考記事)。Cloud Shell で実行します。
$ gcloud config set project [PROJECT_ID]
$ SERVICE_ACCOUNT_NAME=sentry
$ gcloud iam service-accounts create \
    $SERVICE_ACCOUNT_NAME \
    --display-name $SERVICE_ACCOUNT_NAME
GCE インスタンスの作成
マシンスペックとして 2.4GB のメモリが必要なので、余裕をもって E2 Medium(2 vCPU、4 GB)を選択します。OS は Ubuntu 20.04 LTS にしました。
$ gcloud beta compute instances create sentry \
  --project=[PROJECT_ID] \
  --zone=asia-northeast1-a \
  --machine-type=e2-medium \
  --subnet=[SUBNET] \
  --no-address \
  --maintenance-policy=MIGRATE \
  --service-account=sentry@[PROJECT_ID].iam.gserviceaccount.com \
  --scopes=https://www.googleapis.com/auth/cloud-platform \
  --tags=web \
  --image=ubuntu-2004-focal-v20200917 \
  --image-project=ubuntu-os-cloud \
  --boot-disk-size=10GB \
  --boot-disk-type=pd-standard \
  --boot-disk-device-name=sentry \
  --no-shielded-secure-boot \
  --shielded-vtpm \
  --shielded-integrity-monitoring \
  --reservation-affinity=any
セキュアにするため、パブリック IP アドレスをつけません。踏み台サーバ経由か、Cloud IAP で SSH ログインします(参考記事)。
Docker、Docker Compose のインストール
ここからは GCE インスタンスで行います。ドキュメント通りに Docker などをインストールします。
$ sudo apt-get update && sudo apt-get install \
  apt-transport-https \
  ca-certificates \
  curl \
  gnupg-agent \
  software-properties-common
$ curl -fsSL https://download.docker.com/linux/ubuntu/gpg | sudo apt-key add -
$ sudo apt-key fingerprint 0EBFCD88
$ sudo add-apt-repository \
  "deb [arch=amd64] https://download.docker.com/linux/ubuntu \
  $(lsb_release -cs) \
  stable"
$ sudo apt-get update && sudo apt-get install docker-ce docker-ce-cli containerd.io
$ sudo docker version --format '{{.Server.Version}}'
19.03.13

$ sudo curl -L "https://github.com/docker/compose/releases/download/1.27.4/docker-compose-$(uname -s)-$(uname -m)" -o /usr/local/bin/docker-compose
$ sudo chmod +x /usr/local/bin/docker-compose
$ docker-compose --version | sed 's/docker-compose version \(.\{1,\}\),.*/\1/'
1.27.4
Cloud SQL for PostgreSQL の設定
Sentry で用いる Cloud SQL インスタンスを作成します。Self-Hosted 版では PostgreSQL 9.6 が使用されていたので、それに合わせました。
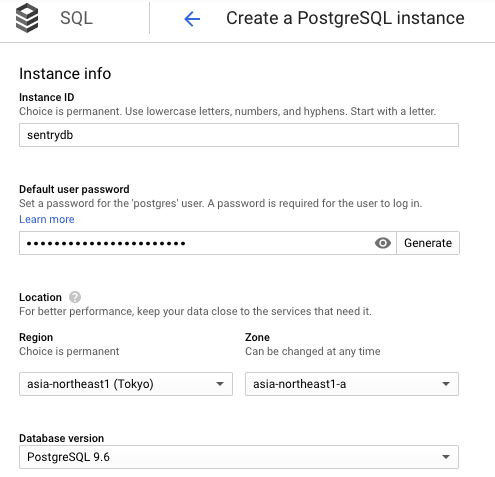
また、プライベート IP アドレスで接続するため、GCE インスタンス同様パブリック IP アドレスを付与しません。
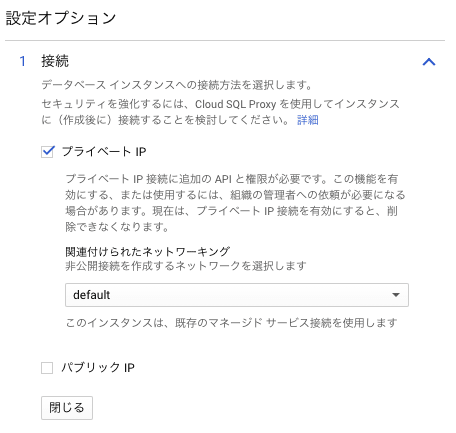
アクティブになるまで少々時間がかかります。プライベートIPアドレスが表示されるようになったら、GCE インスタンスから接続して初期設定を行います。
$ sudo apt-get install postgresql-client
$ psql -d template1 -U postgres -h <Cloud SQLのIPアドレス> -p 5432
=> CREATE EXTENSION citext;
=> CREATE USER sentry;
=> SELECT usename FROM pg_user;
       usename
----------------------
 cloudsqladmin
 cloudsqlsuperuser
 cloudsqlagent
 cloudsqlimportexport
 cloudsqlreplica
 postgres
 sentry
(7 rows)

=> GRANT sentry TO cloudsqlsuperuser;
=> \du
                                                List of roles
         Role name         |                         Attributes                         |      Member of
---------------------------+------------------------------------------------------------+---------------------
 cloudsqladmin             | Superuser, Create role, Create DB, Replication, Bypass RLS | {}
 cloudsqlagent             | Create role, Create DB                                     | {cloudsqlsuperuser}
 cloudsqliamserviceaccount | Cannot login                                               | {}
 cloudsqliamuser           | Cannot login                                               | {}
 cloudsqlimportexport      | Create role, Create DB                                     | {cloudsqlsuperuser}
 cloudsqlreplica           | Replication                                                | {}
 cloudsqlsuperuser         | Create role, Create DB                                     | {pg_monitor,sentry}
 postgres                  | Create role, Create DB                                     | {cloudsqlsuperuser}
 sentry                    |                                                            | {}

=> CREATE DATABASE sentry
  OWNER sentry
  TEMPLATE template1
  ENCODING UTF8;

=> GRANT ALL PRIVILEGES ON DATABASE sentry to sentry;
=> \l
                                                List of databases
     Name      |       Owner       | Encoding |  Collate   |   Ctype    |            Access privileges
---------------+-------------------+----------+------------+------------+-----------------------------------------
 cloudsqladmin | cloudsqladmin     | UTF8     | en_US.UTF8 | en_US.UTF8 |
 postgres      | cloudsqlsuperuser | UTF8     | en_US.UTF8 | en_US.UTF8 |
 sentry        | sentry            | UTF8     | en_US.UTF8 | en_US.UTF8 | =Tc/sentry                             +
               |                   |          |            |            | sentry=CTc/sentry
 template0     | cloudsqladmin     | UTF8     | en_US.UTF8 | en_US.UTF8 | =c/cloudsqladmin                       +
               |                   |          |            |            | cloudsqladmin=CTc/cloudsqladmin
 template1     | cloudsqlsuperuser | UTF8     | en_US.UTF8 | en_US.UTF8 | =c/cloudsqlsuperuser                   +
               |                   |          |            |            | cloudsqlsuperuser=CTc/cloudsqlsuperuser
(5 rows)

=> \q
Sentry の構築
Self-Hosting 版(getsentry/onpremise)を持ってきます。
$ git clone https://github.com/getsentry/onpremise.git
$ cd onpremise
PostgreSQL のコンテナを起動しないように install.sh、docker-compose.yml を修正します。
$ git diff
diff --git a/docker-compose.yml b/docker-compose.yml
index d0d5ce3..7870eef 100644
--- a/docker-compose.yml
+++ b/docker-compose.yml
@@ -10,7 +10,6 @@ x-sentry-defaults: &sentry_defaults
   image: sentry-onpremise-local
   depends_on:
     - redis
-    - postgres
     - memcached
     - smtp
     - snuba-api
@@ -61,13 +60,6 @@ services:
         soft: 10032
         hard: 10032

-  postgres:
-    << : *restart_policy
-    image: 'postgres:9.6'
-    environment:
-      POSTGRES_HOST_AUTH_METHOD: 'trust'
-    volumes:
-      - 'sentry-postgres:/var/lib/postgresql/data'
   zookeeper:
     << : *restart_policy
     image: 'confluentinc/cp-zookeeper:5.5.0'
@@ -221,8 +213,6 @@ services:
 volumes:
   sentry-data:
     external: true
-  sentry-postgres:
-    external: true
   sentry-redis:
     external: true
   sentry-zookeeper:
diff --git a/install.sh b/install.sh
index 88e069a..e579e47 100755
--- a/install.sh
+++ b/install.sh
@@ -130,7 +130,6 @@ fi
 echo ""
 echo "Creating volumes for persistent storage..."
 echo "Created $(docker volume create --name=sentry-data)."
-echo "Created $(docker volume create --name=sentry-postgres)."
 echo "Created $(docker volume create --name=sentry-redis)."
 echo "Created $(docker volume create --name=sentry-zookeeper)."
 echo "Created $(docker volume create --name=sentry-kafka)."
コンフィグファイルを修正し、Cloud SQL の接続情報に変更します。
$ cp sentry/{sentry.conf.example.py,sentry.conf.py}
$ sudo vim sentry/sentry.conf.py
DATABASES = {
    "default": {
        "ENGINE": "sentry.db.postgres",
        "NAME": "postgres",
        "USER": "postgres",
        "PASSWORD": "<パスワード>",
        "HOST": "<Cloud SQLのプライベートIPアドレス>",
        "PORT": "",
    }
}
以下のコマンドで Sentry 構築に必要な初期設定を行います。
$ sudo ./install.sh

# Sentryアカウントの作成(ログイン時に使用する)
Would you like to create a user account now? [Y/n]: Y
Email: <メールアドレスを入力>
Password: <パスワードを入力>
Repeat for confirmation: <パスワードを再度入力>
User created: <メールアドレス>
Added to organization: sentry
Creating missing DSNs
Correcting Group.num_comments counter
Docker Compose でコンテナ起動します。
$ sudo docker-compose up -d
$ sudo docker-compose ps
                     Name                                   Command               State              Ports
----------------------------------------------------------------------------------------------------------------------
sentry_onpremise_clickhouse_1                    /entrypoint.sh                   Up      8123/tcp, 9000/tcp, 9009/tcp
sentry_onpremise_cron_1                          /bin/sh -c exec /docker-en ...   Up      9000/tcp
sentry_onpremise_ingest-consumer_1               /bin/sh -c exec /docker-en ...   Up      9000/tcp
sentry_onpremise_kafka_1                         /etc/confluent/docker/run        Up      9092/tcp
sentry_onpremise_memcached_1                     docker-entrypoint.sh memcached   Up      11211/tcp
sentry_onpremise_nginx_1                         nginx -g daemon off;             Up      0.0.0.0:9000->80/tcp
sentry_onpremise_post-process-forwarder_1        /bin/sh -c exec /docker-en ...   Up      9000/tcp
sentry_onpremise_redis_1                         docker-entrypoint.sh redis ...   Up      6379/tcp
sentry_onpremise_relay_1                         /bin/bash /docker-entrypoi ...   Up      3000/tcp
sentry_onpremise_sentry-cleanup_1                /entrypoint.sh 0 0 * * * g ...   Up      9000/tcp
sentry_onpremise_smtp_1                          docker-entrypoint.sh exim  ...   Up      25/tcp
sentry_onpremise_snuba-api_1                     ./docker_entrypoint.sh api       Up      1218/tcp
sentry_onpremise_snuba-cleanup_1                 /entrypoint.sh */5 * * * * ...   Up      1218/tcp
sentry_onpremise_snuba-consumer_1                ./docker_entrypoint.sh con ...   Up      1218/tcp
sentry_onpremise_snuba-outcomes-consumer_1       ./docker_entrypoint.sh con ...   Up      1218/tcp
sentry_onpremise_snuba-replacer_1                ./docker_entrypoint.sh rep ...   Up      1218/tcp
sentry_onpremise_snuba-sessions-consumer_1       ./docker_entrypoint.sh con ...   Up      1218/tcp
sentry_onpremise_snuba-transactions-consumer_1   ./docker_entrypoint.sh con ...   Up      1218/tcp
sentry_onpremise_symbolicator-cleanup_1          /entrypoint.sh 55 23 * * * ...   Up      3021/tcp
sentry_onpremise_symbolicator_1                  /bin/bash /docker-entrypoi ...   Up      3021/tcp
sentry_onpremise_web_1                           /bin/sh -c exec /docker-en ...   Up      9000/tcp
sentry_onpremise_worker_1                        /bin/sh -c exec /docker-en ...   Up      9000/tcp
sentry_onpremise_zookeeper_1                     /etc/confluent/docker/run        Up      2181/tcp, 2888/tcp, 3888/tcp
リバプロ用 nginx のインストール
HTTP 80 ポートで受け付けるようにするために、nginx をインストールします。
$ sudo apt-get install nginx-full
$ cat << EOF > /etc/nginx/sites-available/default
upstream sentry {
    server localhost:9000;
    server localhost:9000;
    server localhost:9000;
}

server {
    listen 80;

    location / {
        proxy_pass        http://sentry;

        add_header Strict-Transport-Security "max-age=31536000";
    }
}
EOF

$ sudo nginx -t
$ sudo systemctl enable nginx
$ sudo systemctl restart nginx
ロードバランサの作成
HTTPS Load Balancing を作成していきます。作成方法についてはこちらの記事をご覧ください。
インスタンスグループが必要ですが、今回はすでに GCE インスタンスを作っているため、非マネージドインスタンスグループとして作成します。SSL証明書はマネージドサービスのものを使用します。ELB作成後、グローバルIPアドレスとドメインとの名前解決をする必要があります(参考記事)。
ヘルスチェックを設定する際に、URL パスが / だと 302 で返してしまいヘルスチェックが通らないため、HTMLソースコードから静的ファイルのパスを取得してヘルスチェックに利用します。今回は /_static/1601273008/sentry/images/favicon.png としました。
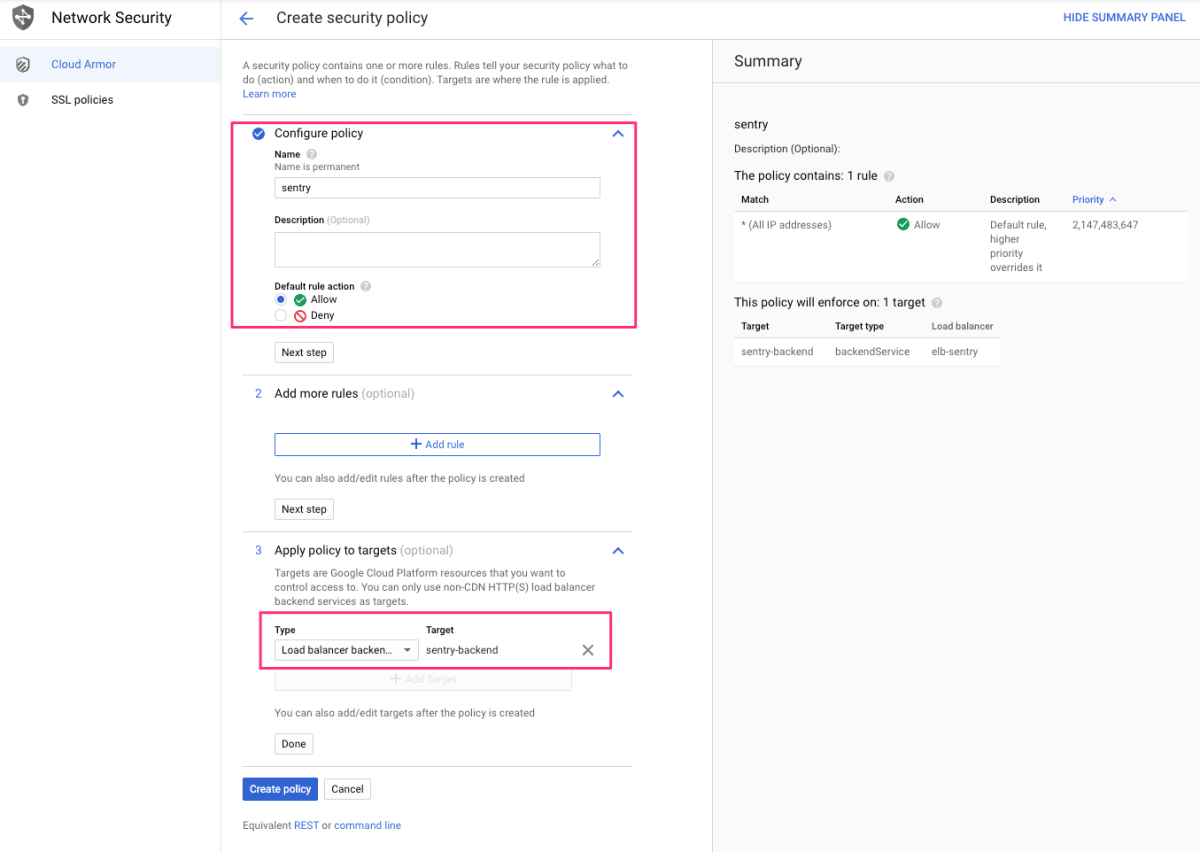
Cloud Armor の設定
デフォルトルールアクションを Allow にしてセキュリティポリシーを作成します。SQL Injection などの設定もここでできますが後回しにしておきます。
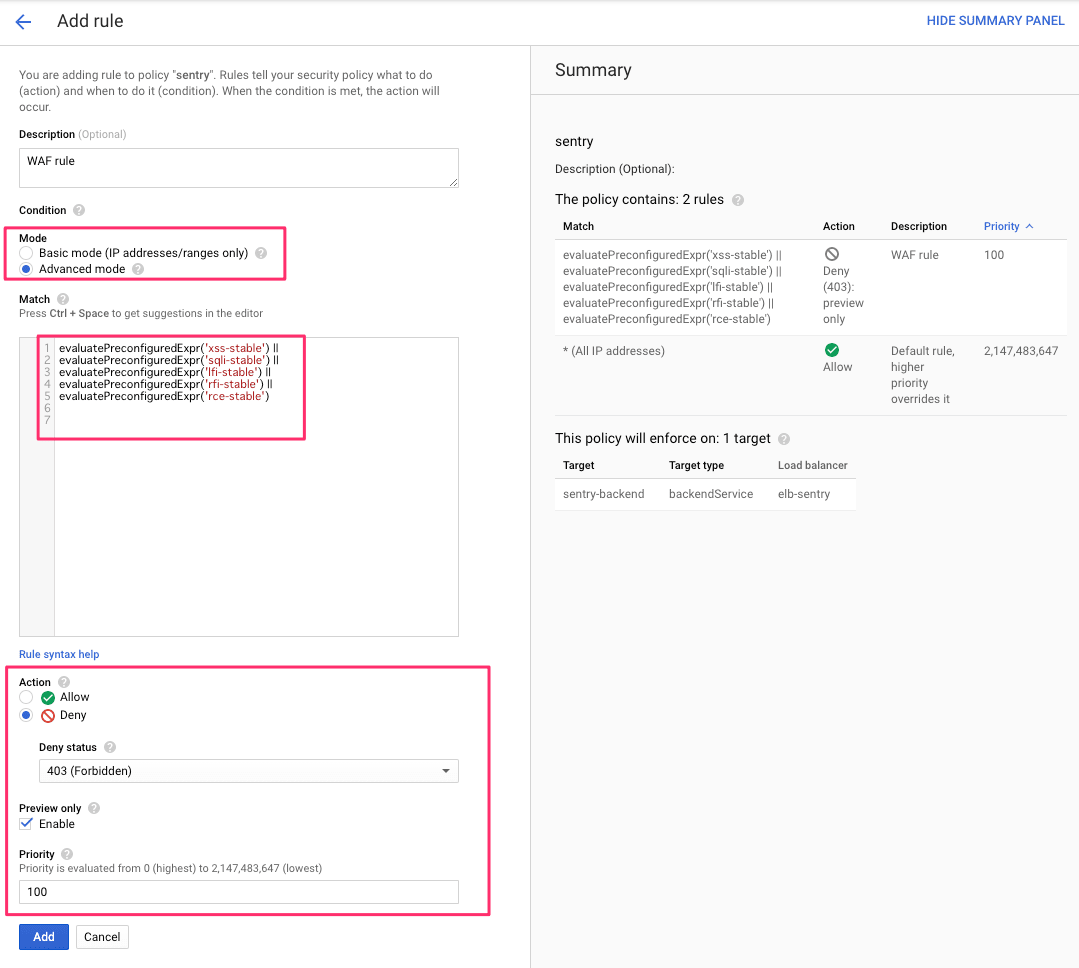
作成後、「Add Rule」で SQL Injection などから攻撃を防ぐルールを追加します。「Mode」を Advanced にして、Match に以下のルールを記載します。この構文についてはドキュメントを参照してください。ここでは XSS や SQL Injection など Cloud Armor が事前に定義しているルールをすべて盛り込みました。
evaluatePreconfiguredExpr('xss-stable') ||
evaluatePreconfiguredExpr('sqli-stable') ||
evaluatePreconfiguredExpr('lfi-stable') ||
evaluatePreconfiguredExpr('rfi-stable') ||
evaluatePreconfiguredExpr('rce-stable')
Action を Deny にし、Priority を小さい数字にすることで優先度を高くします。意図しない誤検知によるブロックを防ぐため「Preview only」にチェックをいれておきます。
しばらく運用してモニタニングダッシュボードで、問題がなければプレビューを外します。
初期設定
構築が終わったらブラウザから Sentry 画面を開き、先ほど設定したアカウントでログインし初期設定を行います。
Google Auth の設定
Google コンソールから OAuth の設定とクライアントID、シークレットキーを取得しておきます(参考記事)。
Authorized redirect URIs は https://<ドメイン>/auth/sso/ にします。
getsentry/onpremise にはすでに Google Auth のプラグインとして getsentry/sentry-auth-google が含まれていますが、しばらく更新されていないせいか Google の認証に失敗するため、フォークされた siemens/sentry-auth-oidc をインストールします。
$ sudo vim sentry/requirements.txt
# 追記
sentry-auth-oidc
$ sudo vim sentry/sentry.conf.py
# 追記
OIDC_CLIENT_ID = "<クライアントID>"
OIDC_CLIENT_SECRET = "<シークレットキー>"
OIDC_SCOPE = "openid profile email"
OIDC_AUTHORIZATION_ENDPOINT = "https://accounts.google.com/o/oauth2/v2/auth"
OIDC_TOKEN_ENDPOINT = "https://www.googleapis.com/oauth2/v4/token"
OIDC_USERINFO_ENDPOINT = "https://www.googleapis.com/oauth2/v3/userinfo"
OIDC_ISSUER = "Google"
# 再作成
$ sudo docker-compose stop && sudo docker-compose rm
$ sudo ./install.sh
$ sudo docker-compose up -d

# Server error になる場合は nginx も再起動しておく
$ sudo systemctl restart nginx
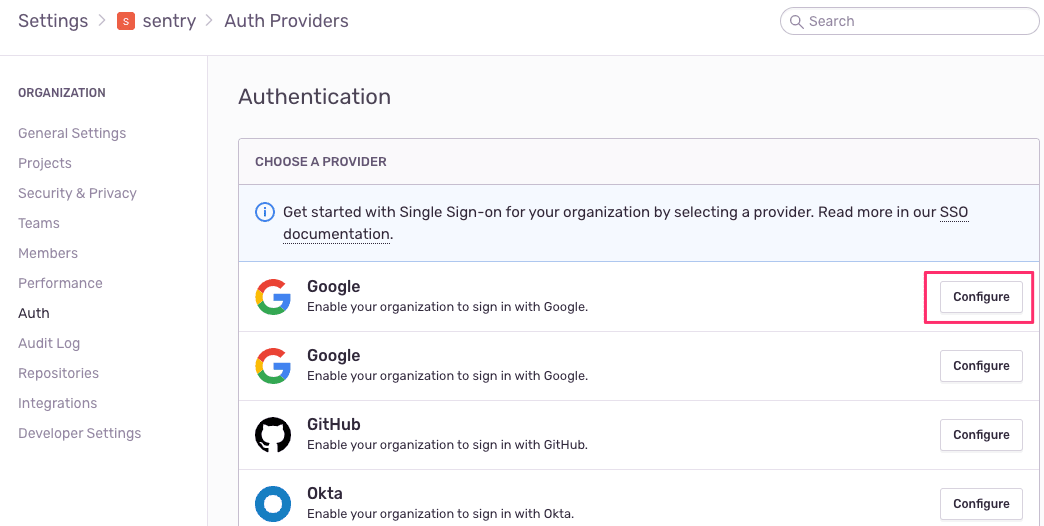
https://<ドメイン>/settings/sentry/auth/ に行き、一番上にある Google の Configure をクリックします。
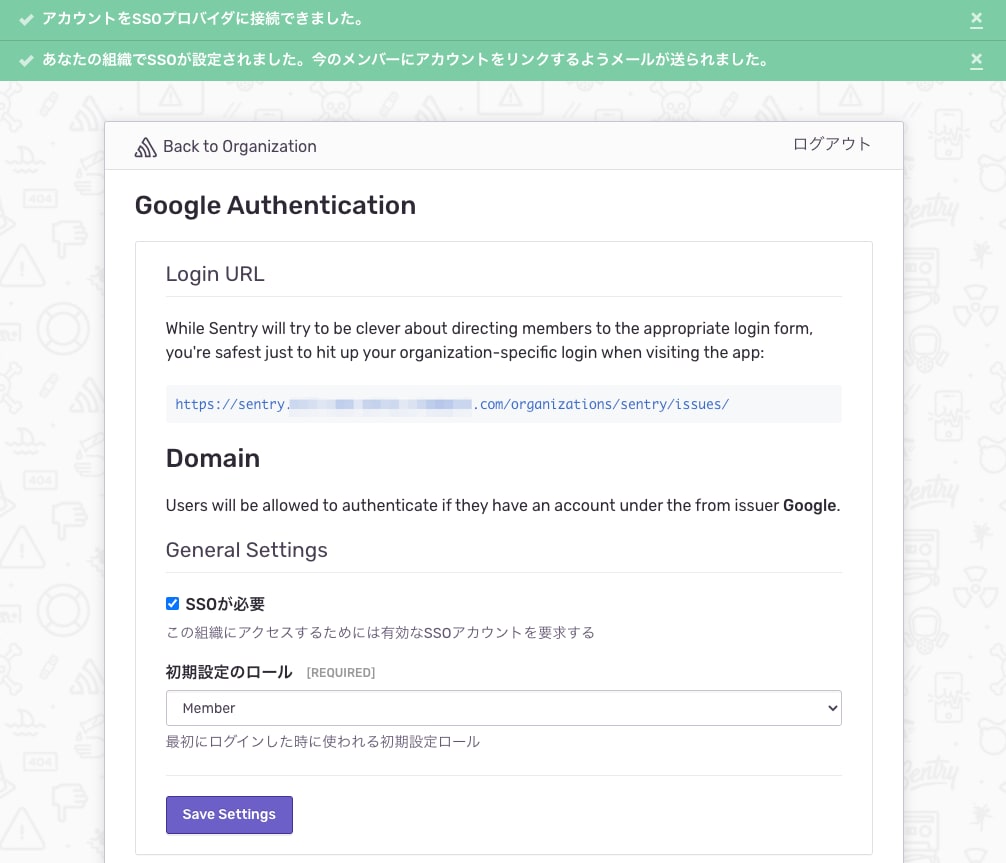
Google アカウントでログインし、以下の画面が出れば設定できています。「Back to Organization」をクリックして戻ってください。
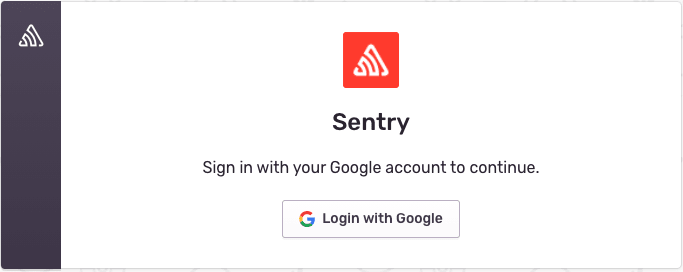
次のログインからは「Login with Google」を選択しログインします。
Slack 連携
Sentry で受け取ったエラーを Slack に通知させます。
Slack App の作成
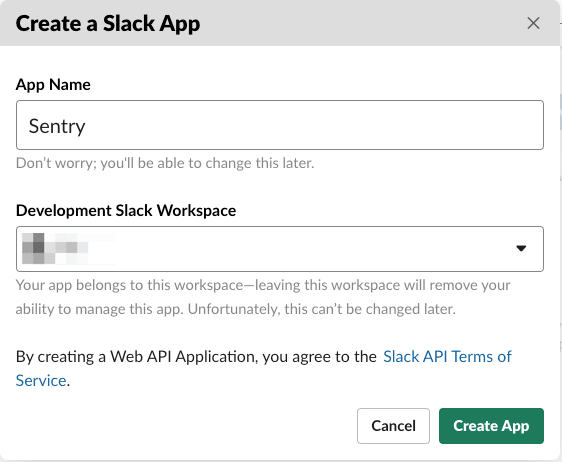
https://api.slack.com/apps/new で Slack App を作成します。
作成後、「App Credentials」から Client ID、Client Secret、Signing Secret を控えます。
Sentry サーバ側の設定
Sentry を立てているサーバにログインし sentry/config.yml を編集して先ほど控えた Client ID などを追記します。
$ sudo su -
% cd ~/onpremise
% vim sentry/config.yml
slack.client-id: <client id>
slack.client-secret: <client secret>
slack.signing-secret: <signing secret>
slack.legacy-app: False
以下のコマンドで再起動します。
$ sudo docker-compose restart web worker cron sentry-cleanup
Slack 側の設定
Slack の設定画面に戻ります。
Interactivity & Shortcuts
「Futures」→「Interactivity & Shortcuts」を選択します。右上のトグルをOnにして、Request URL に https://<ドメイン>/extensions/slack/action/ を入力します。
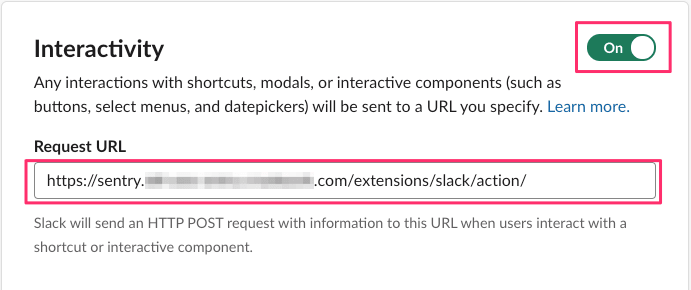
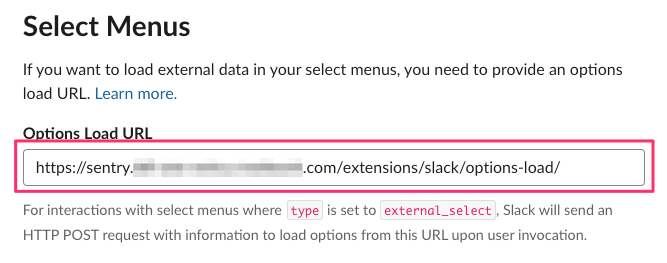
画面下部にある「Options Load URL」に https://<ドメイン>/extensions/slack/options-load/ を入力します。
右下にある「Save Changes」をクリックします。
OAuth & Permissions
「Futures」→「OAuth & Permissions」を選択します。「Redirect URLs」に https://<ドメイン>/extensions/slack/setup/ を入力し「Save URLs」をクリックします。
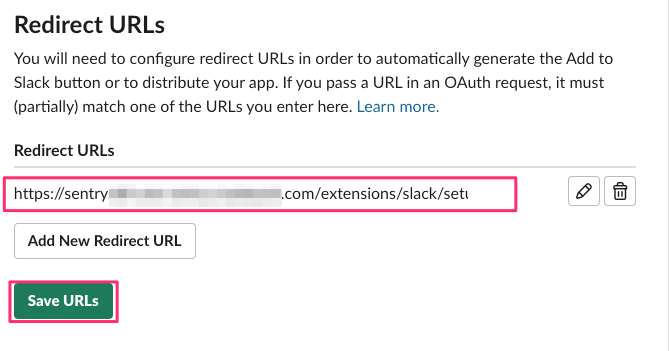
その下部にある「Scopes」で links:read のスコープを追加します。

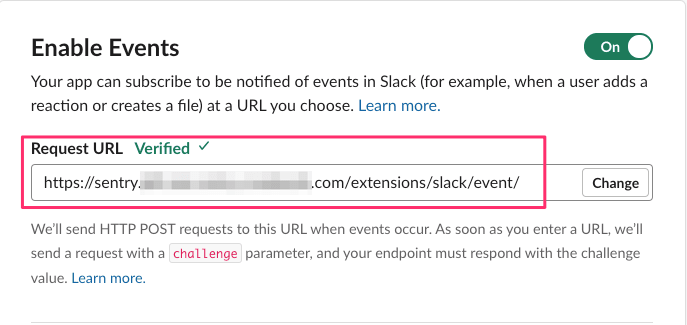
Event Subscriptions
「Futures」→「Event Subscriptions」を選択します。「Request URL」に https://<ドメイン>/extensions/slack/event/ を入力します。下図のように Verified となっていることを確認します。
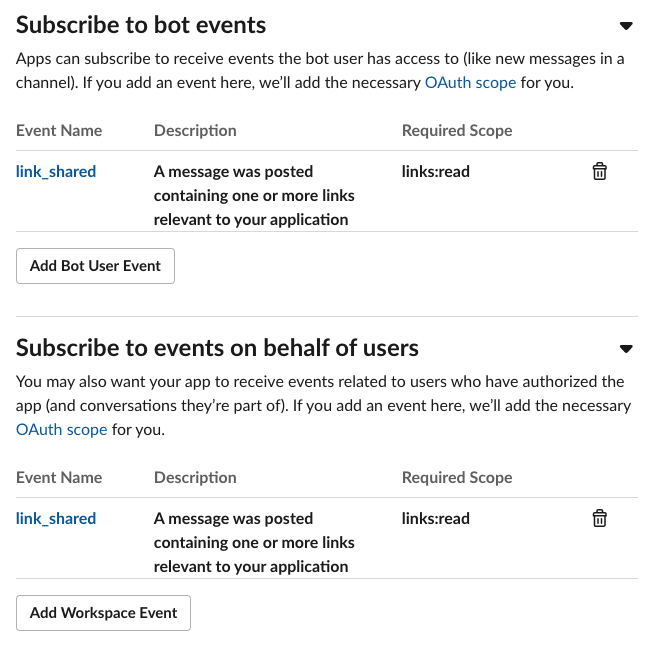
下部にある「Subscribe to bot events」と「Subscribe to events on behalf of users」では下図のように links_shared を追加します。
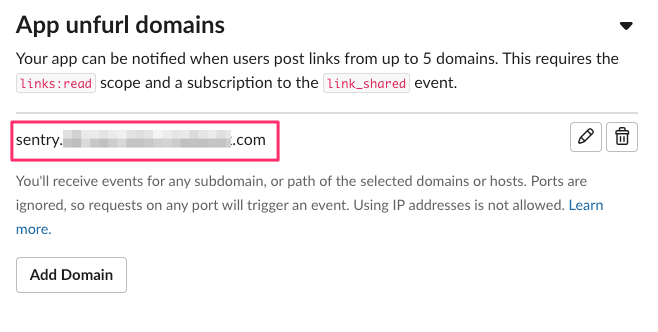
「App unfurl domains」で Sentry のドメインを入力します。
右下にある「Save Changes」をクリックする。
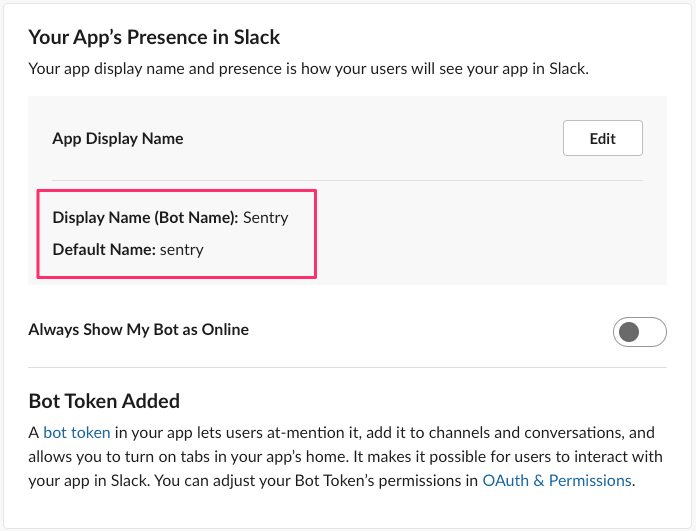
Bot User
「Futures」→「App Home」を選択し、Bot 名などをお好みで設定します。
Sentry Integrations の設定
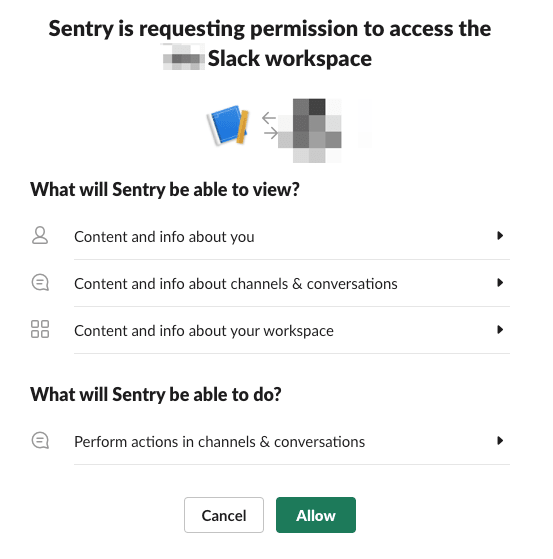
Sentry の画面ふたたび戻ります。「Settings」→「Integrations」から Slack を選択し、「Add ワークスペース」をクリックします。

「Allow」をクリックすると連携が完了します。
Slack 通知設定
Alert で Slack 通知する設定を行います。「Add an action...」で「Send a Slack notification」を選択し、通知先の Workspace とチャンネルを設定します。
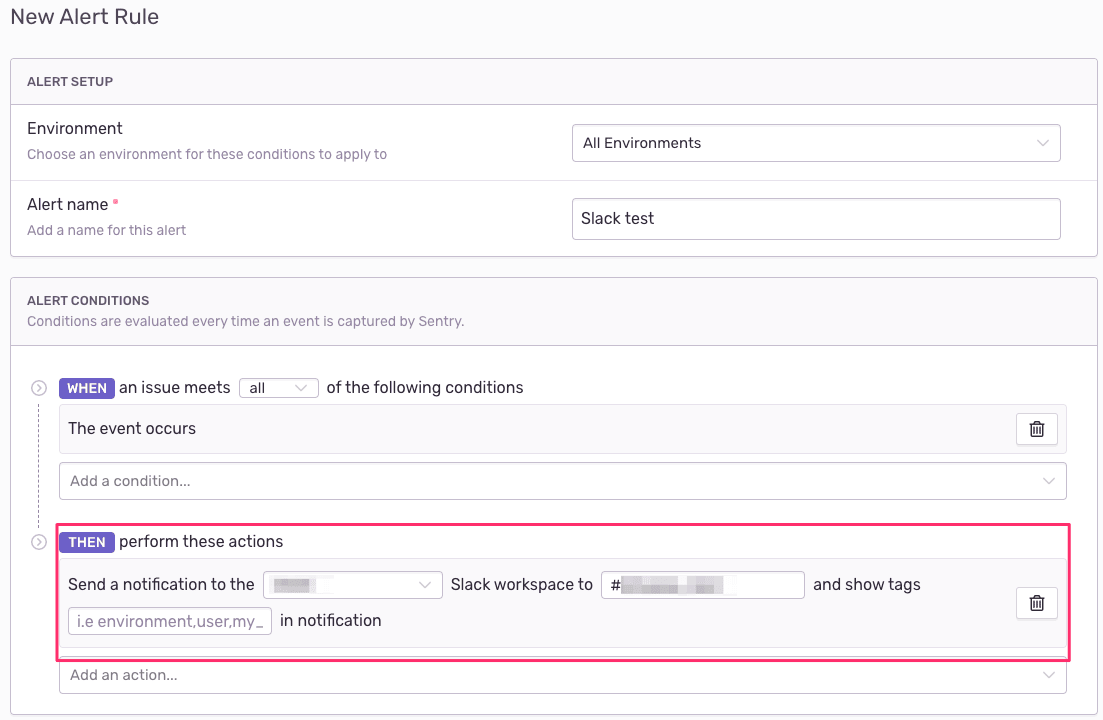
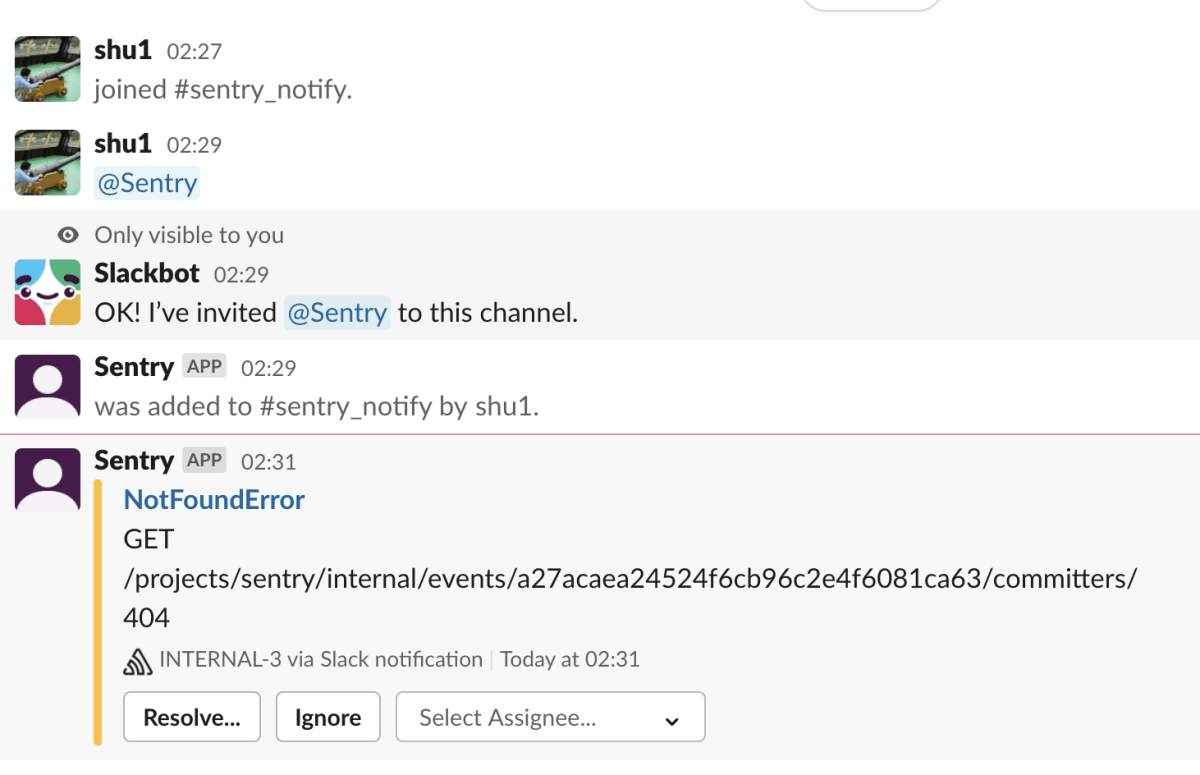
通知先チャンネルで Bot ユーザを招待すれば通知されるはず。ユーザの招待は忘れがちなので注意してください。
参考URL
- Install Docker Engine on Ubuntu | Docker Documentation
- Install Docker Compose | Docker Documentation
- Self-Hosted Sentry | Sentry Developer Documentation
- Install Sentry on Ubuntu 18.04 Using Nginx and Let's Encrypt Certificates | CLEODY
- How to Setup Sentry with Python on Ubuntu 18.04 – Clouding.io
- Self-Hosted 版 Sentry を CentOS 7 にインストールするメモ – どうのこうの
- How To Install Redis from Source on Ubuntu 18.04 | DigitalOcean
- ローカル環境にSentryを立ち上げる - Qiita
- Google Cloud Armor documentation
- GCP Cloud ArmorでXSS、SQLインジェクションのWAF導入 - Qiita
- Slack Integration | Sentry Developer Documentation
Discussion