はじめに
こんにちは!
プロダクト開発人材の副業転職プラットフォーム Offers を運営する株式会社 overflow で Offers のフロントエンドを開発している fumiya です。
10 月 1 日から Flexible メンバーとして週 3 で働かせていただいており、翌月の 11 月 16 日からは正式に Full メンバーとして参画させていただきます!
概要
この記事は React と Amplify を使って開発するための環境を整える記事になります。
分量が多くなったため、vol1 と vol2 に分けてお送りいたします。
React と Amplify だけでも開発を始めることが出来ますが、効率的に開発を進めるために GraphQL Code Generator や @tanstack/react-query を取り入れ、
似たようなコードを減らし、開発者体験を良くすることが出来ます。
これらのライブラリを用いて、少しでも楽に開発していくことが出来るように開発環境を事前に整えることがこの記事のゴールになります。
流れは以下になります。
- Amplify API と Auth を使って GraphQL サーバーを構築(本記事)
- React hooks を使い、GraphQL サーバーからデータを取得して画面に表示する(本記事)
- GraphQL サーバーからのデータ取得を GraphQL Code Generator と react-query を使って宣言的に書く(vol2)
ハンズオンで登場する技術は以下になります。
- Amplify API
- Amplify Auth
- React
- GraphQL Code Generator
- @tanstack/react-query
構築フロー
1. React 環境の構築
❯❯❯ npx create-react-app amplify_graphqlcodegenerator_template --template typescript

Creating a new React app in amplify_graphqlcodegenerator_template.

Installing packages. This might take a couple of minutes.
Installing react, react-dom, and react-scripts with cra-template-typescript...
~~~~~~~~~~~~省略~~~~~~~~~~~~
We suggest that you begin by typing:

  cd amplify_graphqlcodegenerator_template
  npm start

Happy hacking!
2. Amplify の導入
次は Amplify の環境を作っていきます。[1]
3. IAM ユーザーの作成
Amplify CLI でリソースを作成したりするために Amplify 用の IAM ユーザーを作ります。
AWS にサインインして、IAM サービス を選択します。
アクセス管理の中のユーザーを選択します。

ユーザーの追加ボタンを押します。

アクセスキー - プログラムによるアクセス にチェックを入れ、次に進みます。(ユーザー名は何でも大丈夫です。)

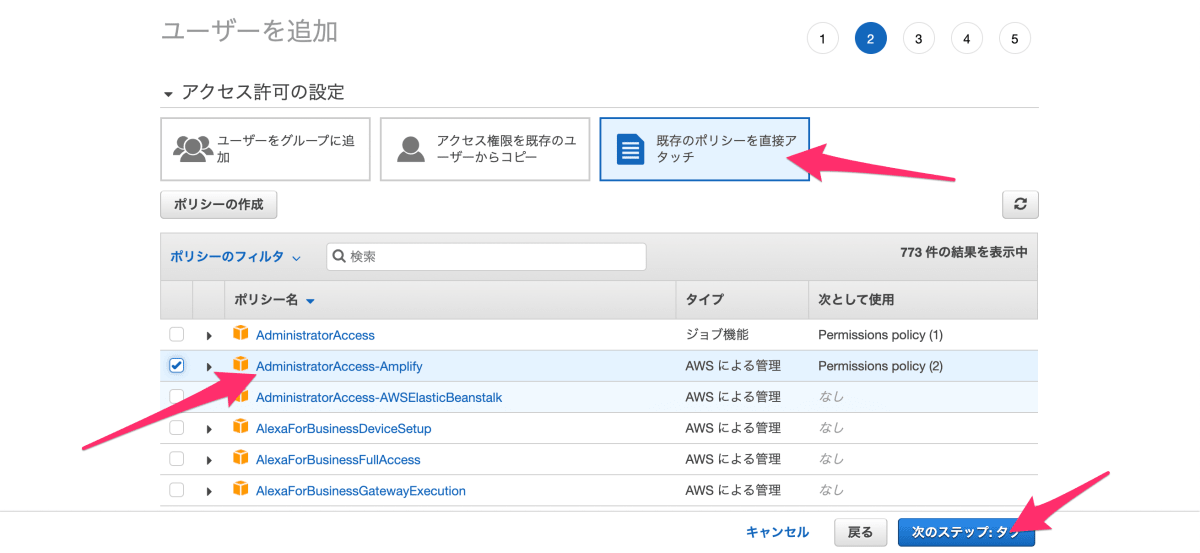
既存のポリシーを直接アタッチ から AdministratorAccess-Amplify にチェックを入れて、ユーザーの作成をします。
アクセスキー ID とシークレットアクセスキーは後で使用するのでメモしておいてください。

4. Amplify の初期設定
プロジェクトに Amplify を導入していきます。
先程メモしたアクセスキーと ID シークレットアクセスキーは Select the authentication method you want to use:AWS access keys の箇所で使用します。
amplify_graphqlcodegenerator_template ❯❯❯ amplify init
Note: It is recommended to run this command from the root of your app directory
? Enter a name for the project amplifygraphqlcodege
The following configuration will be applied:

Project information
| Name: amplifygraphqlcodege
| Environment: dev
| Default editor: Visual Studio Code
| App type: javascript
| Javascript framework: react
| Source Directory Path: src
| Distribution Directory Path: build
| Build Command: npm run-script build
| Start Command: npm run-script start

? Initialize the project with the above configuration? Yes
Using default provider  awscloudformation
? Select the authentication method you want to use: AWS access keys
? accessKeyId:  ********************
? secretAccessKey:  ****************************************
? region:  ap-northeast-1

~~~~~~~~~~~~省略~~~~~~~~~~~~

✔ Successfully created initial AWS cloud resources for deployments.
✔ Help improve Amplify CLI by sharing non sensitive configurations on failures (y/N) · no

✔ Initialized provider successfully.
✅ Initialized your environment successfully.

Your project has been successfully initialized and connected to the cloud!

Some next steps:
"amplify status" will show you what you've added already and if it's locally configured or deployed
"amplify add <category>" will allow you to add features like user login or a backend API
"amplify push" will build all your local backend resources and provision it in the cloud
"amplify console" to open the Amplify Console and view your project status
"amplify publish" will build all your local backend and frontend resources (if you have hosting category added) and provision it in the cloud

Pro tip:
Try "amplify add api" to create a backend API and then "amplify push" to deploy everything
これでプロジェクトに Amplify を導入できました!
5. AmplifyAPI の設定
次は Amplify API の追加をしていきます。
Authorization modes を API key (default, expiration time: 7 days from now) から Amazon Cognito User Pool に変更するところだけ間違えずに出来れば後はデフォルトの設定でどんどん進めていく事ができます。
amplify_graphqlcodegenerator_template ❯❯❯ amplify add api
? Select from one of the below mentioned services: GraphQL
? Here is the GraphQL API that we will create. Select a setting to edit or continue Authorization modes: API key (default, expiration time: 7 days f
rom now)
? Choose the default authorization type for the API Amazon Cognito User Pool
Using service: Cognito, provided by: awscloudformation

 The current configured provider is Amazon Cognito.

 Do you want to use the default authentication and security configuration? Default configuration
 Warning: you will not be able to edit these selections.
 How do you want users to be able to sign in? Email
 Do you want to configure advanced settings? No, I am done.
✅ Successfully added auth resource amplifygraphqlcodege5a93a4de locally

✅ Some next steps:
"amplify push" will build all your local backend resources and provision it in the cloud
"amplify publish" will build all your local backend and frontend resources (if you have hosting category added) and provision it in the cloud

? Configure additional auth types? No
? Here is the GraphQL API that we will create. Select a setting to edit or continue Continue
? Choose a schema template: Single object with fields (e.g., “Todo” with ID, name, description)

⚠️  WARNING: Some types do not have authorization rules configured. That means all create, read, update, and delete operations are denied on these types:
         - Todo
Learn more about "@auth" authorization rules here: https://docs.amplify.aws/cli/graphql/authorization-rules
✅ GraphQL schema compiled successfully.

Edit your schema at /Users/fumiya/programing/react/amplify_graphqlcodegenerator_template/amplify/backend/api/amplifygraphqlcodege/schema.graphql or place .graphql files in a directory at /Users/fumiya/programing/react/amplify_graphqlcodegenerator_template/amplify/backend/api/amplifygraphqlcodege/schema
✔ Do you want to edit the schema now? (Y/n) · no
✅ Successfully added resource amplifygraphqlcodege locally

✅ Some next steps:
"amplify push" will build all your local backend resources and provision it in the cloud
"amplify publish" will build all your local backend and frontend resources (if you have hosting category added) and provision it in the cloud
amplify add api の中で schema のテンプレートに Todo を選択しました。
どういったコードが生成されたか見てみましょう。
amplify_graphqlcodegenerator_template/amplify/backend/api/amplifygraphqlcodege/schema.graphql に schema が生成されています。
この Schema を編集することで GraphQL のデータ構造を編集できます!
# This "input" configures a global authorization rule to enable public access to
# all models in this schema. Learn more about authorization rules here: https://docs.amplify.aws/cli/graphql/authorization-rules
input AMPLIFY { globalAuthRule: AuthRule = { allow: public } } # FOR TESTING ONLY!

type Todo @model {
  id: ID!
  name: String!
  description: String
}
ユーザーが一人ひとり自分の Todo を登録出来るように、以下のように変更しておきます。[2][3]
超簡単に言うとデータを作成した人がオーナーになり、データの CRUD 処理が可能になります。
- # This "input" configures a global authorization rule to enable public access to
- # all models in this schema. Learn more about authorization rules here: https://docs.amplify.aws/cli/graphql/authorization-rules
- input AMPLIFY {
-   globalAuthRule: AuthRule = { allow: public }
- } # FOR TESTING ONLY!
- type Todo @model {
+ type Todo @model @auth(rules: [{ allow: owner }]) {
  id: ID!
  name: String!
  description: String
}
ここまでで Amplify を使って GraphQL サーバーを作成する準備が整いました。
実際に AWS へデプロイしてみましょう。
amplify_graphqlcodegenerator_template ❯❯❯ amplify push
~~~~~~~~~~~~省略~~~~~~~~~~~~
    Current Environment: dev

┌──────────┬──────────────────────────────┬───────────┬───────────────────┐
│ Category │ Resource name                │ Operation │ Provider plugin   │
├──────────┼──────────────────────────────┼───────────┼───────────────────┤
│ Auth     │ amplifygraphqlcodege5a93a4de │ Create    │ awscloudformation │
├──────────┼──────────────────────────────┼───────────┼───────────────────┤
│ Api      │ amplifygraphqlcodege         │ Create    │ awscloudformation │
└──────────┴──────────────────────────────┴───────────┴───────────────────┘
? Are you sure you want to continue? Yes
~~~~~~~~~~~~省略~~~~~~~~~~~~
✔ Would you like to create an API Key? (y/N) · no
~~~~~~~~~~~~省略~~~~~~~~~~~~
? Do you want to generate code for your newly created GraphQL API Yes
? Choose the code generation language target typescript
? Enter the file name pattern of graphql queries, mutations and subscriptions src/graphql/**/*.ts
? Do you want to generate/update all possible GraphQL operations - queries, mutations and subscriptions Yes
? Enter maximum statement depth [increase from default if your schema is deeply nested] 2
? Enter the file name for the generated code src/API.ts
~~~~~~~~~~~~省略~~~~~~~~~~~~
✔ Generated GraphQL operations successfully and saved at src/graphql
✔ Code generated successfully and saved in file src/API.ts
✔ All resources are updated in the cloud

GraphQL endpoint: https://wr7antkkkzayvd6pugpfwfj3gy.appsync-api.ap-northeast-1.amazonaws.com/graphql

GraphQL transformer version: 2
この処理は AWS リソースをたくさん作るので少し時間がかかりますが、終わったら GraphQL サーバーが完成しています。
6. フロントエンドと Amplify の紐付け
Amplify 公式ページ を参考にフロントと Amplify の紐付けを行っていきます。
まずは必要なライブラリをインストールしましょう。
Amplify が用意しているコンポーネントも使いたいので @aws-amplify/ui-react を一緒にインストールしておきます。
npm install aws-amplify @aws-amplify/ui-react
インストールが完了したら configuration file を読み込むように App.tsx のコードを追加します。
また、認証周りを楽出来るように withAuthenticator も使用しておきます。
import { Amplify, Auth } from "aws-amplify";

import { withAuthenticator } from "@aws-amplify/ui-react";
import "@aws-amplify/ui-react/styles.css";

import awsExports from "./aws-exports";
Amplify.configure(awsExports);

const App = () => {
  return (
    <>
      <h1>Hello Amplify</h1>
      <button
        onClick={() => {
          Auth.signOut();
        }}
      >
        Sign out
      </button>
    </>
  );
};

export default withAuthenticator(App);
これで一度 npm start してみましょう。
withAuthenticator を使ったので SignIn と CreateAccount の画面が出来ています。

適当にアカウントを作成してログインすると Hello Amplify が表示されます。

7. 実際にデータを入れてうまく表示出来るかの確認
ここまででフロントの準備と Amplify を使って GraphQL サーバーを作ることが出来ました。
実際に AWS へデータを持たせてフロント側で表示をさせてみましょう。
まずは AWS コンソールを操作してデータを保存します。
AWS AppSync の画面を開きましょう。

クエリを実行ボタンを押します。

ユーザープールでログインボタンを押し、先程アカウント登録したユーザーの情報でログインします。(ClientId はどちらを選んでも大丈夫です)

ログインが出来たらデータを登録しましょう。
mutation m {
  createTodo(input: {name: "todo1", description: "todo1 desc"}) {
    name
    updatedAt
    id
    description
    createdAt
  }
}
再生ボタンを押すと input に渡したデータで登録が出来ます。

これでサーバー側の準備が整いました。
それではフロント側で今登録したデータが表示出来るかを試してみましょう。
- import { Amplify, Auth } from "aws-amplify";
+ import { Amplify, API, Auth } from "aws-amplify";
+ import { GraphQLResult } from "@aws-amplify/api-graphql";
+ import { listTodos } from "./graphql/queries";
+ import { useEffect, useState } from "react";
+ import { ListTodosQuery } from "./API";

import { withAuthenticator } from "@aws-amplify/ui-react";
import "@aws-amplify/ui-react/styles.css";

import awsExports from "./aws-exports";
Amplify.configure(awsExports);

const App = () => {
+  const [todoList, setTodoList] = useState<ListTodosQuery | undefined>();
+  useEffect(() => {
+    const fetchTodos = async () => {
+      const todos = (await API.graphql({
+        query: listTodos,
+      })) as GraphQLResult<ListTodosQuery>;
+      setTodoList(todos.data);
+    };
+    fetchTodos();
+  }, []);
+
  return (
    <>
      <h1>Hello Amplify</h1>
+      {todoList?.listTodos?.items.map((item) => {
+        return (
+          <>
+            <div>id: {item?.id}</div>
+            <div>name: {item?.name}</div>
+            <div>desc: {item?.description}</div>
+            <div>createdAt: {item?.createdAt}</div>
+            <div>updatedAt: {item?.updatedAt}</div>
+            <br />
+          </>
+        );
+      })}
      <button
        onClick={() => {
          Auth.signOut();
        }}
      >
        Sign out
      </button>
    </>
  );
};

export default withAuthenticator(App);

GraphQL サーバーからデータが取得できて、表示されていることが確認できました。
まとめ
Vol.1 はここまでです。
次回の Vol.2 では、GraphQL Code Generator や React Query を使って開発者体験が良くなる感じを共有できるかと思います、気長にお待ちください!
最後にはなりますが、本記事を最後まで読んで頂き、ありがとうございました。「こんな記事を書いてほしい!」などありましたらコメントいただけると幸いです。
関連記事
-
Amplify CLI の設定はこちらを参考にしてください。https://docs.amplify.aws/cli/start/install/#option-2-follow-the-instructions/ ↩︎
-
データにアクセス出来るユーザーを制御したい場合はこちらを参考にしてください。https://docs.amplify.aws/cli/graphql/authorization-rules/ ↩︎
-
データの CRUD 操作はこちらを参考にしてください。https://docs.amplify.aws/lib/graphqlapi/mutate-data/q/platform/js/ ↩︎

Discussion