⚙️
【初学者向け】【個人開発でサクッと】CI/CDパイプライン構築したい時の手順書
想定読者
- 個人開発でも CI/CD パイプラインを整備したい初学者
- さくっと CI/CD を整えたい方
前提
- GitHub を利用している
- 最低限、Git/GitHub の使い方がわかる
手順
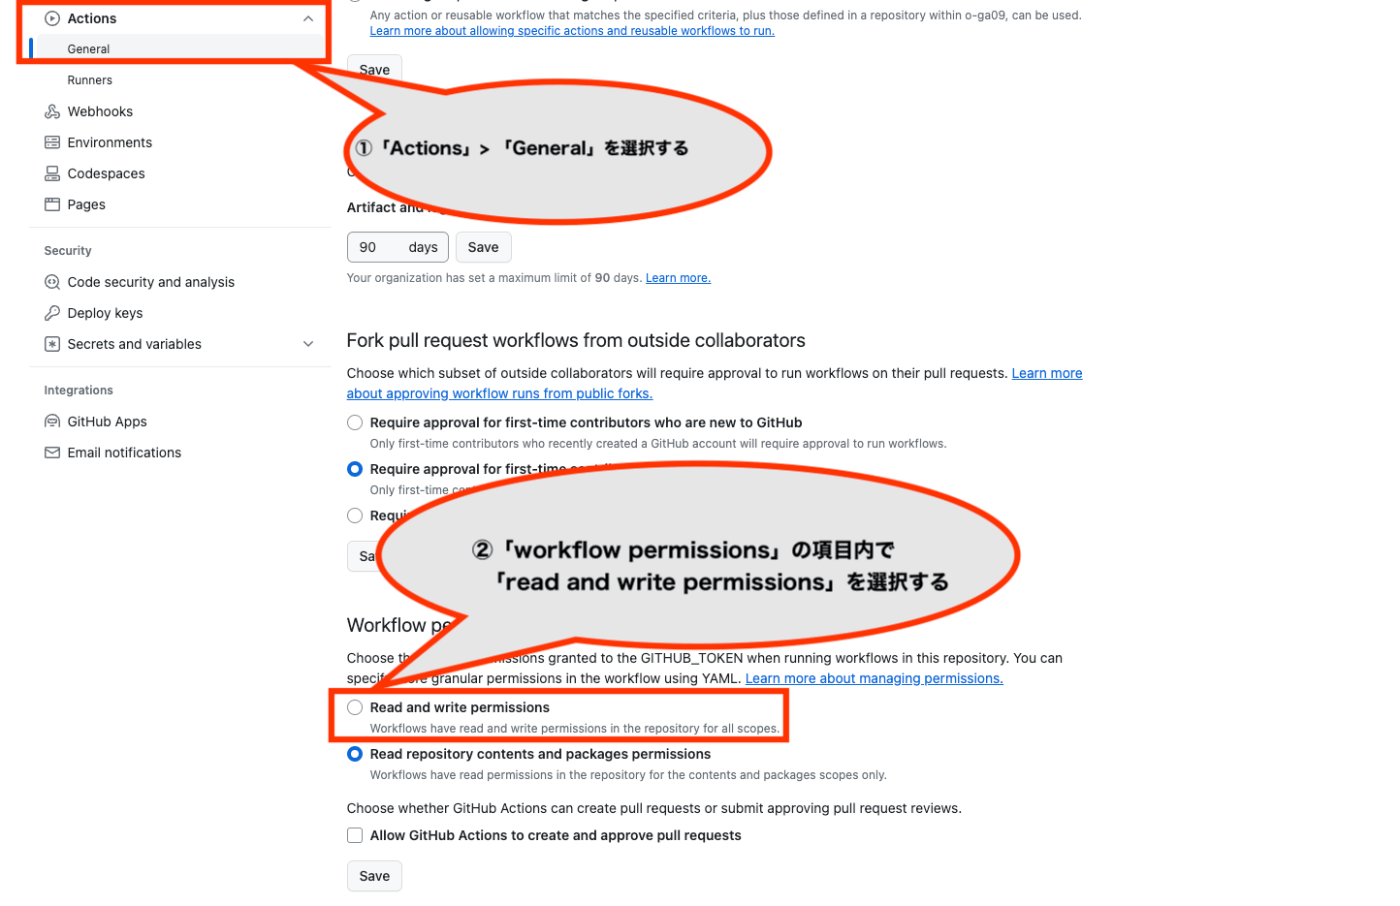
1. PR を作成した際に、実行結果を GitHub Action の bot が表示できるようにする
- リポジトリの「Setting」を開く

- 左ペインから「Actions」 > 「General」を選択する
2. git プロジェクト直下に .github/workflows というディレクトリを作成する
3. ワークフローを定義する yaml ファイルを作成する
以下は Go でのテストを実行する例
カバレッジレポートの設定ファイルについて
- 階層
リポジトリ
|_.github
| |_workflows
|    |_ci_backend.yml
|_.octocov.yml
-
配置するファイル名
- .octocov.yml
-
ファイルの内容
coverage:
  paths:
    - backend/coverage.out
codeToTestRatio:
  code:
    - "**/*.go"
    - "!**/*_test.go"
  test:
    - "**/*_test.go"
testExecutionTime:
  if: true
diff:
  datastores:
    - artifact://${GITHUB_REPOSITORY}
comment:
  if: is_pull_request
report:
  if: is_default_branch
  datastores:
    - artifact://${GITHUB_REPOSITORY}
```
# workflowの名前
name: Backend Test
# ワークフローを実行する条件
on:
# pushとpull requestがあった場合に、実行する
  push:
  pull_request:
# 実行するジョブを定義する
jobs:
  golang-test:
    name: test
    runs-on: ubuntu-latest
    steps:
      # ソースをチェックアウトする
      - uses: actions/checkout@v2

      # Goのセットアップをする
      - name: Set up Go
        uses: actions/setup-go@v2
        with:
          go-version: 1.21
      # Goのテストを実行する
      - name: testing
        run: |
          cd backend
          go test ./... -coverprofile=coverage.out
      # カバレッジレポートを出力する
      - name: create report
        uses: k1LoW/octocov-action@v0
以下は Node でのテストを実行する例
以下に、package.json を示します。
package.json
{
  "name": "frontend",
  "private": true,
  "version": "0.0.0",
  "type": "module",
  "scripts": {
    "dev": "vite",
    "build": "tsc && vite build",
    "lint": "eslint . --ext ts,tsx --report-unused-disable-directives --max-warnings 0",
    "preview": "vite preview",
    "test": "jest"
  },
  "dependencies": {
    "@swc/jest": "^0.2.29",
    "jest": "^29.7.0",
    "react": "^18.2.0",
    "react-dom": "^18.2.0"
  },
  "devDependencies": {
    "@types/react": "^18.2.15",
    "@types/react-dom": "^18.2.7",
    "@typescript-eslint/eslint-plugin": "^6.0.0",
    "@typescript-eslint/parser": "^6.0.0",
    "@vitejs/plugin-react": "^4.0.3",
    "eslint": "^8.45.0",
    "eslint-plugin-react-hooks": "^4.6.0",
    "eslint-plugin-react-refresh": "^0.4.3",
    "typescript": "^5.0.2",
    "vite": "^4.4.5"
  },
  "jest": {
    "transform": {
      "^.+\\.(t|j)sx?$": "@swc/jest"
    },
    "coverageReporters": [
      [
        "text",
        {
          "file": "report.json"
        }
      ]
    ]
  }
}
name: Frontend Test With Node
on:
  push:
  pull_request:
jobs:
  test:
    runs-on: ubuntu-latest

    steps:
      - name: Checkout code
        uses: actions/checkout@v2

      - name: Set up Node.js
        uses: actions/setup-node@v2
        with:
          node-version: "18"

      # node_modulesのあるディレクトリに移動してください
      - name: Install dependencies
        run: |
          cd frontend
          npm install

      # node_modulesのあるディレクトリに移動してください
      - name: Run lint
        run: |
          cd frontend
          npm run lint

      # node_modulesのあるディレクトリに移動してください
      - name: Run Jest tests
        run: |
          cd frontend
          npm run test
以下は Bun でのテストを実行する例
name: Frontend Test With Bun
on:
  push:
  pull_request:
jobs:
  tests:
    runs-on: ubuntu-latest

    steps:
      - name: Checkout
        uses: actions/checkout@v3

      - name: Setup Bun
        uses: oven-sh/setup-bun@v1

      # node_modulesのあるディレクトリに移動してください
      - name: Install dependencies
        run: |
          cd frontend
          bun install

      # node_modulesのあるディレクトリに移動してください
      - name: Run lint
        run: |
          cd frontend
          bun run lint

      # node_modulesのあるディレクトリに移動してください
      - name: Run test
        run: |
          cd frontend
          bun test
4. push、pull request を作成して Github Actions を実行する
5. 実行結果
ちなみに、Bun と Node における実行結果の比較
毎回、Bun の方が早く終わっていました。
Bun は、10 秒ほどで終了しますが、Node は遅いと 20 秒程掛かりました。
| 対象 | 実行時間(s) |
|---|---|
| Node | 18 |
| Bun | 12 |
まとめ
ただ、GitHub Actions を試すだけのリポジトリ
いかがだったでしょうか?
いざ、開発が終わって、CI/CD パイプラインを構築しようと思ったら
yaml 間違えたり、想定外の箇所でエラーになって GitHub Actions の結果の箇所に
赤で罰がいっぱいつくの嫌ですよね!!!そのな人がいなくなれば良いな、パッとできたら良いよねって
ところで今回記事を書いてみました。
これからも、ぱっとやってみるシリーズを書いていきたいと思いますので、よかったらいいねを
よろしくお願いいたします!!!
Discussion