📷
画像処理100本ノックに挑戦|グレースケール化(002/100)
これはなに?
画像処理100本ノックを、TypeScriptとlibvipsで挑戦してみる記事の2本目です。
前回
実装
お題
画像をグレースケールにせよ。 グレースケールとは、画像の輝度表現方法の一種であり下式で計算される。
Y = 0.2126 R + 0.7152 G + 0.0722 B
Coding
前回に引き続き imageProcessor.ts に、グレースケール用の処理を実装します。
便利なグレースケール用のAPIも用意されていますが、今回はTypeScriptの学習がメインなので利用しません。
import sharp from 'sharp';

export async function convertToGrayscale(inputPath: string, outputPath: string): Promise<void> {
  try {
    // 画像を読み込み、RAWピクセルデータを取得
    const image = await sharp(inputPath)
      .raw()
      .toBuffer({ resolveWithObject: true });

    const { data, info } = image;
    const { width, height, channels } = info;

    // 新しいバッファーを作成(グレースケールは1チャネル)
    const newBuf = Buffer.alloc(width * height);

    // 各ピクセルをグレースケールに変換
    for (let i = 0; i < data.length; i += channels) {
      const r = data[i];
      const g = data[i + 1];
      const b = data[i + 2];

      // グレースケール変換の係数を使用
      const gray = Math.round(
        0.2126 * r + // Red
        0.7152 * g + // Green
        0.0722 * b   // Blue
      );

      // グレースケール値を設定
      newBuf[i / channels] = gray;
    }

    // グレースケール画像として保存
    await sharp(newBuf, {
      raw: {
        width,
        height,
        channels: 1 // グレースケールは1チャネル
      }
    })
    .jpeg()
    .grayscale()
    .toFile(outputPath);

    console.log('グレースケール変換が完了しました');
  } catch (error) {
    console.error('画像処理中にエラーが発生しました:', error);
    throw error;
  }
}
Test
import { existsSync, unlinkSync } from 'fs';
import { join } from 'path';
import sharp from 'sharp';
import { convertToGrayscale } from './imageProcessor';

describe('Grayscale Conversion Tests', () => {
  const testInputPath = join(__dirname, '../test-images/test.jpeg');
  const testOutputPath = join(__dirname, '../test-images/test-gray.jpeg');

  afterEach(() => {
    if (existsSync(testOutputPath)) {
      unlinkSync(testOutputPath);
    }
  });

  test('should successfully convert image to grayscale', async () => {
    await convertToGrayscale(testInputPath, testOutputPath);
    expect(existsSync(testOutputPath)).toBe(true);
  });

  test('should produce equal RGB values for each pixel', async () => {
    await convertToGrayscale(testInputPath, testOutputPath);

    const outputImage = await sharp(testOutputPath)
      .raw()
      .toBuffer({ resolveWithObject: true });

    // サンプルとしていくつかのピクセルをチェック
    const { data, info } = outputImage;
    const channels = info.channels;

    // 最初の10ピクセルをチェック
    for (let pixel = 0; pixel < 10; pixel++) {
      const offset = pixel * channels;
      const r = data[offset];
      const g = data[offset + 1];
      const b = data[offset + 2];

      // グレースケールの場合、RGB値は等しくなるはず
      expect(r).toBe(g);
      expect(g).toBe(b);
    }
  });

  test('should maintain correct grayscale calculation', async () => {
    await convertToGrayscale(testInputPath, testOutputPath);

    const inputImage = await sharp(testInputPath)
      .raw()
      .toBuffer({ resolveWithObject: true });

    const outputImage = await sharp(testOutputPath)
      .raw()
      .toBuffer({ resolveWithObject: true });

    // 最初のピクセルの値をチェック
    const inChannels = inputImage.info.channels;
    const outChannels = outputImage.info.channels;

    const r = inputImage.data[0];
    const g = inputImage.data[1];
    const b = inputImage.data[2];

    const expectedGray = Math.round(0.2126 * r + 0.7152 * g + 0.0722 * b);
    const actualGray = outputImage.data[0];  // R値を確認(グレースケールならR=G=B)

    // 許容誤差を考慮して比較
    expect(Math.abs(expectedGray - actualGray)).toBeLessThanOrEqual(1);
  });

  test('should maintain image dimensions', async () => {
    await convertToGrayscale(testInputPath, testOutputPath);

    const inputMetadata = await sharp(testInputPath).metadata();
    const outputMetadata = await sharp(testOutputPath).metadata();

    expect(outputMetadata.width).toBe(inputMetadata.width);
    expect(outputMetadata.height).toBe(inputMetadata.height);
  });
});
結果
入力画像をグレースケールの画像に変換できました。
| 入力 | 出力 |
|---|---|
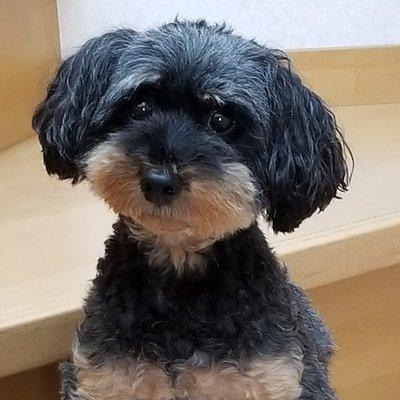 |
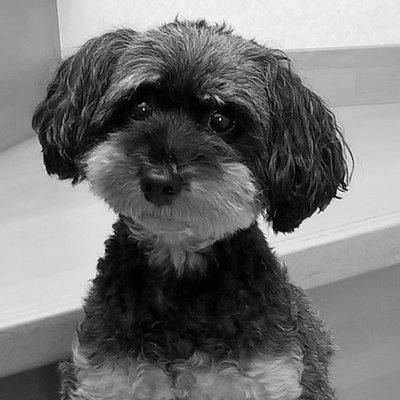 |
おまけ
.grayscale()を利用する場合は、以下のように実装できます。
現実的には下記のような実装にすることがシンプルかつ頑健で良いかと思います。
export async function convertToGrayscale(inputPath: string, outputPath: string): Promise<void> {
  try {
    await sharp(inputPath)
      .grayscale()     // グレースケールに変換
      .toFile(outputPath);

    console.log('グレースケール変換が完了しました');
  } catch (error) {
    console.error('画像処理中にエラーが発生しました:', error);
    throw error;
  }
}
Discussion