TanStack Tableこと調べ
Headless UI for building powerful tables & datagrids
であるTanStack Tableの使い方を調べる
テーブルのカラムを実装する
ドキュメントにHeadless UI記載されているように、TanStack TableからDOMなどは提供されない。
テーブルコンポーネントを表示、操作するための機能を提供してくれる感じ。
テーブルで扱うデータを定義
テーブルの表示に使うデータの型を定義
export type Nus3Info = {
  id: string;
  name: string;
  creator: string;
  createdAt: string;
  description: string;
};
実際使うデータを定義
const defaultData: Nus3Info[] = [
  {
    id: "1",
    name: "name-1",
    creator: "creator-1",
    createdAt: "2021-01-01",
    description: "description-1",
  },
  {
    id: "2",
    name: "name-2",
    creator: "creator-2",
    createdAt: "2021-01-01",
    description: "description-2",
  },
  // ...
];
カラムを定義
TanStack Tableではカラムの種類は3つある
- Accessor Columns
- ソート、フィルタ、グループ化ができる
- Display Columns
- ソートやフィルタはできないが、ボタンやチェックボックスなどを表示するのに使える
- Grouping Columns
- ソートやフィルタができずに他のカラムのグループ化のために使われる。ヘッダーやフッターを定義するのに一般的に使われる
これらのタイプをcreateColumnHelperというヘルパー関数を使い、定義する
const columnHelper = createColumnHelper<Nus3Info>();

const columns = [
  columnHelper.display({
    id: "edit",
    cell: (props) => (
      <button
        onClick={() => {
          console.info(props.row, "編集する行情報");
        }}
      >
        編集
      </button>
    ),
  }),
  columnHelper.accessor("id", {
    header: "ID",
    cell: (info) => info.getValue(),
  }),
  columnHelper.accessor("name", {
    header: "名前",
    cell: (info) => info.getValue(),
  }),
  //...
  columnHelper.display({
    header: "概要",
    id: "description",
    cell: (info) => (
      <span style={{ minWidth: "300px", display: "inline-block" }}>
        {info.row.original.description}
      </span>
    ),
  }),
];

columnHelper.accessorの第一引数にはテーブルに表示するデータのプロパティを指定できる
headerやcellには引数に対象の行にアクセスできる引数を受け取りつつ、stringだけでなくDOM要素を返すこともできる
hooksを使い、テーブル(オブジェクト)を生成する
Reactの場合、useReactTableに実際にテーブルに表示するデータやカラムを渡すことで、カラムとデータを紐づけ、テーブルでの表示や操作がしやすくなるAPIを提供してくれる
  const [data, setData] = useState(() => [...defaultData])
  const table = useReactTable({
    data,
    columns,
    getCoreRowModel: getCoreRowModel(),
  })
getCoreRowModel()はテーブルに表示するデータの行の部分に対して何かしらの変換処理を加える時に使う感じかな?
テーブルを表示する
useReactTableで受け取ったインスタンスを使って、テーブルを表示する
      <table className={classes.table}>
        <thead>
          {table.getHeaderGroups().map((headerGroup) => (
            <tr key={headerGroup.id}>
              {headerGroup.headers.map((header) => (
                <th key={header.id} className={classes.th}>
                  {header.isPlaceholder
                    ? null
                    : flexRender(
                        header.column.columnDef.header,
                        header.getContext()
                      )}
                </th>
              ))}
            </tr>
          ))}
        </thead>
        <tbody>
          {table.getRowModel().rows.map((row) => (
            <tr key={row.id}>
              {row.getVisibleCells().map((cell) => (
                <td key={cell.id} className={classes.td}>
                  {flexRender(cell.column.columnDef.cell, cell.getContext())}
                </td>
              ))}
            </tr>
          ))}
        </tbody>
      </table>
table.getHeaderGroups()でヘッダーグループ(後述)を取得し、headerGroup.headersで各カラムのヘッダーを取得する
表示する内容が独自に定義したDOMの場合はflexRenderを使ってヘッダーの中身をレンダリングする
また、table.getRowModel()で各行の情報を取得でき、同様に行のセルの中を独自に定義したDOMを表示したい場合はflexRenderを使ってレンダリングする
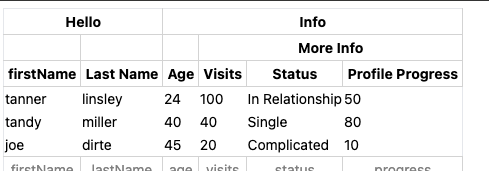
Column Groups
createColumnHelperを使ったカラムの定義時にネストしたカラムを定義することでGroupを定義できる

const columns = [
  columnHelper.group({
    id: "hello",
    header: () => <span>Hello</span>,
    columns: [
      columnHelper.accessor("firstName", {
        cell: (info) => info.getValue(),
      }),
      columnHelper.accessor((row) => row.lastName, {
        id: "lastName",
        cell: (info) => info.getValue(),
        header: () => <span>Last Name</span>,
      }),
    ],
  }),
  columnHelper.group({
    header: "Info",
    columns: [
      columnHelper.accessor("age", {
        header: () => "Age",
      }),
      columnHelper.group({
        header: "More Info",
        columns: [
          columnHelper.accessor("visits", {
            header: () => <span>Visits</span>,
          }),
          columnHelper.accessor("status", {
            header: "Status",
          }),
          columnHelper.accessor("progress", {
            header: "Profile Progress",
          }),
        ],
      }),
    ],
  }),
];
Pagination
useReactTableの宣言時にPaginationの情報を渡すことで、Paginationの状態を良しなに操作するAPIを提供してくれる
table.getCanPreviousPage()、table.setPageIndex(0)、table.nextPage()、table.setPageSize()などを使うことで、ページ送りなどの操作ができ、テーブルに表示する内容(状態)も更新する
また、manualPaginationを有効にすることで、サーバーサイド側でページネーション後のデータをレスポンスで受け取り、そのデータをテーブルに表示させつつ、ページネーションの状態を更新することもできる
以下は、manualPaginationを有効にし、サーバーサイドでページネーション後のデータを取得する例
import {
  PaginationState,
  // ...
} from "@tanstack/react-table";

// ...

  const [data, setData] = useState(() => [...defaultData]);
  // TanStack TableではpageIndex, pageSizeの状態を管理してくれる
  const [{ pageIndex, pageSize }, setPagination] = useState<PaginationState>({
    pageIndex: 0,
    pageSize: 3, // APIから取得する想定
  });
  const pagination = useMemo(
    () => ({
      pageIndex,
      pageSize,
    }),
    [pageIndex, pageSize]
  );

  const table = useReactTable({
    data,
    columns,
    state: {
      pagination,
    },
    pageCount: 3, // apiから取得する
    onPaginationChange: setPagination,
    getCoreRowModel: getCoreRowModel(),
    manualPagination: true, // サーバーサイド側から表示するデータは受け取る
  });
ページネーションの表示、操作周り
  // ...

  // TanStack Table側でpageIndexなどが変わると都度、useReactTableに渡すdataの値を更新するように
  // useEffectを使わずにonPaginationChangeの中でいい感じにできそうな気もする
  useEffect(() => {
    const handleChangePage = async () => {
      const { data, count } = await fetchPaginationData(pageIndex);
      setData(data);
      setTotalCount(count);
    };

    handleChangePage();
  }, [pageIndex, pagination]);

  // ...

  const from = useMemo(() => pageIndex * pageSize + 1, [pageIndex, pageSize]);
  const to = useMemo(() => from + pageSize - 1, [from, pageSize]);

  return (
    <div className={classes.wrapper}>
      <div className={classes.pagination}>
        {from} - {to} / {totalCount}件
        <button
          onClick={() => table.previousPage()}
          disabled={!table.getCanPreviousPage()}
        >
          前へ
        </button>
        <button
          onClick={() => table.nextPage()}
          disabled={!table.getCanNextPage()}
        >
          次へ
        </button>
      </div>
   // ...

Sort
Paginationと同様でuseReactTable宣言時にソートの情報を渡すことで、ソートの状態を良しなに操作するAPIを提供してくれる
-
header.column.getToggleSortingHandler(): ヘッダーをクリックしたときに、そのカラムのソートの状態を切り替え -
header.column.getIsSorted(): そのカラムがascかdescか未選択(false)かを返す -
header.column.getCanSort(): そのカラムがソートできるかどうか
またmanualSortingを有効にすることで、ソート後の表示するデータはサーバーサイドから取得する方法も選択できる
サンプル
import {
  //...
  SortingState,
} from "@tanstack/react-table";

//...

  const [sorting, setSorting] = useState<SortingState>([]);

  // TanStack Table側がソートの状態を更新したら、都度、サーバーサイドから取得したレスポンスの内容を表示するように
  // useEffectを使わずにonSortingChangeの中でいい感じにできそうな気もする
  useEffect(() => {
    const handleChangeSort = async () => {
      const data = await fetchSortedData(sorting);
      setData(data);
    };

    // サーバーサイド側の時は、データを取得するまではloadingの表示をしたほうが良さそう
    handleChangeSort();
  }, [sorting]);

  const table = useReactTable({
    data,
    columns,
    state: {
      sorting,
    },
    onSortingChange: setSorting,
    getCoreRowModel: getCoreRowModel(),
    manualSorting: true,
  });
表示、操作側
        <thead>
          {table.getHeaderGroups().map((headerGroup) => (
            <tr key={headerGroup.id}>
              {headerGroup.headers.map((header) => (
                <th key={header.id} className={classes.th}>
                  {header.isPlaceholder ? null : (
                    <div
                      className={
                        header.column.getCanSort() ? classes.sortBtn : undefined
                      }
                      {...{
                        onClick: header.column.getToggleSortingHandler(),
                      }}
                    >
                      {flexRender(
                        header.column.columnDef.header,
                        header.getContext()
                      )}
                      {{
                        asc: " 🔼",
                        desc: " 🔽",
                      }[header.column.getIsSorted() as string] ?? null}
                    </div>
                  )}
                </th>
              ))}
            </tr>
          ))}
        </thead>
export interface ColumnSort {
  desc: boolean;
  id: string;
}
export type SortingState = ColumnSort[];
ざっくりまとめ
- TanStack Tableが提供するヘルパー関数を使って、カラムを定義する
- テーブルに表示するデータとカラムはプロパティ名とaccessorを同一にすることで紐づく
-
useReactTableにデータとカラムを渡すことで、テーブルを操作、表示するのにいい感じに抽象化された機能を使えるようになる - ソートもページネーションもクライアントサイドで完結するものだけでなく、サーバーサイド込のオプションも用意されている
- Headless UI(厳密にはUIではなく、テーブルを扱いやすくするオブジェクトを提供してくれるのでHeadless UIかはさておき)DOMを提供してくれてるわけではないので、テーブルコンポーネントの見た目は利用者側が実装する
TanStack Tableを内部で利用するテーブルコンポーネントの定義を考える
サンプル実装した対象のプルリク
useReactTableでGitHubを全文検索したら、TanStack Tableが提供するAPIをre-exportしてる実装をしてるリポジトリを発見した
この実装であれば、テーブルのUI自体はUIライブラリ側(自分たち側)で定義でき、TanStack Tableの自由なカラム定義などはそのまま利用できるのでヨサソウ
- https://github.com/oxidecomputer/console/blob/e5b8d029d48b9d5c9212fbf5156d6a57cb0b5d5b/libs/table/react-table.ts#L19
- https://github.com/oxidecomputer/console/blob/e5b8d029d48b9d5c9212fbf5156d6a57cb0b5d5b/app/pages/settings/ProfilePage.tsx#L26
- https://github.com/oxidecomputer/console/blob/main/libs/table/Table.tsx#L22
カラムを自由に定義できるヘルパー関数とtableオブジェクトの生成、またPaginationとSortの際の状態をre-export
import {
  RowData,
  TableOptions,
  getCoreRowModel,
  useReactTable as useReactTableOrig,
  createColumnHelper,
  PaginationState,
  SortingState,
} from "@tanstack/react-table";

export const useReactTable = <T extends RowData>(
  options: Omit<TableOptions<T>, "getCoreRowModel">
) => useReactTableOrig({ ...options, getCoreRowModel: getCoreRowModel() });

export { createColumnHelper };

export type { PaginationState, SortingState };
Tableコンポーネントではtableオブジェクトとページネーションに必要な値をpropsで受け取り、コンポーネントのPresentationの部分を実装する
import { Table as TableInstance, flexRender } from "@tanstack/react-table";

type TableProps<T> = {
  table: TableInstance<T>;
  totalCount: number; // paginationの表示に必要な値
  pageIndex: number; // paginationの表示に必要な値
  pageSize: number; // paginationの表示に必要な値
};

export const Table = <T extends object>({
  table,
  totalCount,
  pageIndex,
  pageSize,
}: TableProps<T>) => {
  // table要素などのマークアップ
}
Tableコンポーネントの利用側でre-exportされたヘルパーやtableオブジェクトの生成を行う
import { Table } from "./components/Table";
import {
  createColumnHelper,
  useReactTable,
  PaginationState,
  SortingState,
} from "./functions/table";


const columnHelper = createColumnHelper<Nus3Info>();
const columns = [
  columnHelper.display({
    id: "edit",
    cell: (props) => (
      <button
        onClick={() => {
          console.info(props.row, "編集する行情報");
        }}
      >
        編集
      </button>
    ),
  }),
  columnHelper.accessor("id", {
    header: "ID",
    cell: (info) => info.getValue(),
  }),
//... 残りのカラムの定義
];


function App() {
  // ...ソートやページネーションのイベントハンドラを定義

  const table = useReactTable({
    data,
    columns,
    state: {
      sorting,
      pagination,
    },
    pageCount: 3, // apiから取得する
    onPaginationChange: setPagination,
    onSortingChange: setSorting,
    debugTable: true,
    manualSorting: true,
    manualPagination: true,
    enableMultiSort: false,
  });

  return (
    <>
      <h1>TanStack Table Demo</h1>
      <Table
        table={table}
        pageIndex={pageIndex}
        pageSize={pageSize}
        totalCount={totalCount}
      />
    </>
  );

}
サンプル実装だとSortとPaginationの状態の変更があった際にuseEffectの中で再fetchするようになってるが、useReactTableで渡すonPaginationChangeやonSortingChangeをTableコンポーネントのpropsとして設定できるようにすると、useEffectの中で再fetchしなくてもいいようにできそう