Wordpress環境の移行 (AWS Lightsail→ Google Cloud Compute Engine)


環境
- 移行前ホスティング:AWS Lightsail
- 移行後ホスティング:Google Cloud Compute Engine
- OS:Ubuntu 22.04
- DB:MariaDB
- WEBサーバ:nginx
以下、特に断りがない場合はGoogle Cloud Compute Engine(GCE)での作業とする。
事前準備
- パッケージのアップデート
sudo apt update -y && sudo apt upgrade -y
- SSHのセキュリティ設定
sudo vim /etc/sshd/sshd_config
以下の項目を変更
Port [任意のポート番号]
PermitEmptyPasswords no
PasswordAuthentication no
PermitRootLogin no
- ファイアウォール設定
「Google Cloud->ファイアウォール」に移動し、「default-allow-ssh」内のポート番号をsshd_configにて設定した内容に変更。

nginx
インストール
sudo apt install nginx
動作確認
http://[サーバのIPアドレス]/ へアクセスし、以下が表示されることを確認。

php
インストール
sudo apt install php php-fpm php-mysql
アップロードの上限サイズを変更
sudo vim /etc/php/[バージョン]/fpm/php.ini
以下の記述を変更
upload_max_filesize = 1000M
post_max_size = 1000M
apache2を削除
sudo apt purge apache2
sudo rm -r /etc/apache2/
suto apt autoremove
sudo systemctl restart nginx
MariaDB
インストール
sudo apt install mariadb-server
ユーザー・データベースの作成
sudo mysql -u root
CREATE DATABASE [サイト名];
CREATE USER '[ユーザ名]'@'localhost' IDENTIFIED BY '[パスワード]';
GRANT ALL PRIVILEGES ON [サイト名].* TO '[ユーザ名]'@'localhost';
wordpress
インストール
cd ~
wget https://ja.wordpress.org/latest-ja.zip
unzip latest-ja.zip
sudo mv wordpress /var/www/[サイト名]
rm latest-ja.zip
権限の変更
sudo chown -R www-data:www-data /var/www/[サイト名]
sudo chown -R 755 /var/www/[サイト名]
nginx設定ファイルを作成
sudo cd /etc/nginx
sudo cp sites-available/default sites-available/[サイト名]
sudo vim sites-available/[サイト名]
server {
        listen 80;
        listen [::]:80;

        root /var/www/[サイト名];
        index index.php;
        server_name _;

        location / {
                try_files $uri $uri/ /index.php?$args;
         }

        location ~ \.php$ {
                include snippets/fastcgi-php.conf;
                fastcgi_pass unix:/run/php/php8.1-fpm.sock;
        }
}
sudo ln -s sites-available/[サイト名] sites-enabled/ #nginxの設定が実際に読まれるのはsites-enabledディレクトリのため、シンボリックリンクを貼る形で対応。
sudo rm sites-enabled/default
sudo systemctl restart nginx
ログイン
- http://[IPアドレス] にアクセスし、「さぁ、始めましょう!」をクリック

- MariaDBセクションで設定したデータベース名、ユーザ名、パスワードを入れ「送信」をクリック

- 以下に記載されている内容を
/var/www/[サイト名]/wp-config.phpに記載し、「インストール実行」をクリック

- サイトのタイトル、ユーザー名、パスワード、メールアドレスを入力して「Wordpressをインストール」を実行

- 以下の画面にて「ログイン」をクリック

→ログインに成功するとダッシュボード画面に飛ぶ。

データの移行
エクスポート (AWS Lightsail)
- Duplicatorをインストールする

- Duplicator->パッケージから「新規作成」をクリック

- 「次」をクリック

- 「ビルド」をクリック

- 「両方のファイルをダウンロード」をクリック

→installer.phpとzipファイルがダウンロードされる。
インポート
- Duplicatorをインストールする(画像省略)
- ダウンロードしたファイルを
/var/www/[サイト名]に置く。 - ZipArchiveを有効にする
sudo apt install php-zip
-http://[IPアドレス]/installer.phpにアクセスし、「Archive File Name:」にダウンロードしたzipファイル名を入れ、「Submit」をクリック

- 「Apply」をクリックすると、ホスト名等が自動入力される。「Validate」をクリック

- 「terms & notices」にチェックを入れ、「Next」をクリック

- 「OK」をクリック

- 「Admin Login」をクリック

→環境が移行できていることを確認
ドメイン設定
Route53で取得済みドメインをCloud Domainsに移管したかったが、2024/4時点で移管はサポートされなくなった模様……。
登録済みドメインをサードパーティのドメイン登録事業者から Cloud Domains に移管することはできません。
悲しいがRoute53を使い続けることを選択。
移管する方法あれば誰か教えてほしい。
ホストゾーンの変更(AWS)
-
Route 53->ホストゾーンから、「レコードを編集」をクリック

-
移行先のIPアドレスを設定し、「保存」をクリック

→1分程度待つと変更が完了。
- nginxの設定ファイルを変更する
sudo vim /etc/nginx/sites-available/[サイト名]
server {
        listen 80;
        listen [::]:80;

        root /var/www/www.[ドメイン名];
        index index.php;
        server_name www.[ドメイン名]; #←ここをドメイン名に変更

        location / {
                try_files $uri $uri/ /index.php?$args;
         }

        location ~ \.php$ {
                include snippets/fastcgi-php.conf;
                fastcgi_pass unix:/run/php/php8.1-fpm.sock;
        }
}
設定ファイル上の名前をドメイン名に変更する。
cd /var/www/[ドメイン名]
sudo vim wp-config.php
define( 'WP_HOME', 'http://www.[ドメイン]' );
define( 'WP_SITEURL', 'http://www.[ドメイン]' );
→http://www.[ドメイン名]にアクセスし、サイトが表示されることを確認。
SSL
証明書の取得
sudo apt install certbot python3-certbot-nginx
sudo certbot --nginx -d [ドメイン名] -d www.[ドメイン名]
Saving debug log to /var/log/letsencrypt/letsencrypt.log
Enter email address (used for urgent renewal and security notices)
 (Enter 'c' to cancel): [メールアドレス]

- - - - - - - - - - - - - - - - - - - - - - - - - - - - - - - - - - - - - - - -
Please read the Terms of Service at
https://letsencrypt.org/documents/LE-SA-v1.4-April-3-2024.pdf. You must agree in
order to register with the ACME server. Do you agree?
- - - - - - - - - - - - - - - - - - - - - - - - - - - - - - - - - - - - - - - -
(Y)es/(N)o: Y

- - - - - - - - - - - - - - - - - - - - - - - - - - - - - - - - - - - - - - - -
Would you be willing, once your first certificate is successfully issued, to
share your email address with the Electronic Frontier Foundation, a founding
partner of the Let's Encrypt project and the non-profit organization that
develops Certbot? We'd like to send you email about our work encrypting the web,
EFF news, campaigns, and ways to support digital freedom.
- - - - - - - - - - - - - - - - - - - - - - - - - - - - - - - - - - - - - - - -
(Y)es/(N)o: Y
Account registered.
Requesting a certificate for [ドメイン名] and [ドメイン名]

Successfully received certificate.
Certificate is saved at: /etc/letsencrypt/live/[ドメイン名]/fullchain.pem
Key is saved at:         /etc/letsencrypt/live/[ドメイン名]/privkey.pem
This certificate expires on 2024-07-26.
These files will be updated when the certificate renews.
Certbot has set up a scheduled task to automatically renew this certificate in the background.

Deploying certificate
Could not install certificate

NEXT STEPS:
- The certificate was saved, but could not be installed (installer: nginx). After fixing the error shown below, try installing it again by running:
  certbot install --cert-name [ドメイン名]

Could not automatically find a matching server block for [ドメイン名]. Set the `server_name` directive to use the Nginx installer.
Ask for help or search for solutions at https://community.letsencrypt.org. See the logfile /var/log/letsencrypt/letsencrypt.log or re-run Certbot with -v for more details.
サーバ名(www)無しの方は弾かれたが、この後リダイレクトの設定をするため問題なし。
nginxの設定
www.[ドメイン名]へのHTTPSアクセスを基本として、[ドメイン名]のアクセスをHTTPアクセスをリダイレクトする。
HTTPSへのアクセスと、HTTP
server {
    listen 80;
    server_name [ドメイン名];
    return 301 https://[ドメイン名]$request_uri;
}

server {
    listen 80;
    server_name www.[ドメイン名];
    return 301 https://$host$request_uri;
}

server {
    listen 443 ssl;
    server_name [ドメイン名];

    ssl_certificate /etc/letsencrypt/live/[ドメイン名]/fullchain.pem;
    ssl_certificate_key /etc/letsencrypt/live/[ドメイン名]/privkey.pem;

    return 301 https://[ドメイン名]$request_uri;
}

server {
    listen 443 ssl;
    server_name www.[ドメイン名];

    ssl_certificate /etc/letsencrypt/live/[ドメイン名]/fullchain.pem;
    ssl_certificate_key /etc/letsencrypt/live/[ドメイン名]/privkey.pem;

    client_max_body_size 1000M;

    root /var/www/www.[ドメイン名];
    index index.php;

    location / {
        try_files $uri $uri/ /index.php?$args;
    }

    location ~ \.php$ {
        include snippets/fastcgi-php.conf;
        fastcgi_pass unix:/run/php/php[バージョン]-fpm.sock;
    }
}
sudo systemctl restart nginx
→https://www.[ドメイン名]にアクセスし、サイトが表示されることを確認。
→http://www.[ドメイン名]、http://[ドメイン名]、https://[ドメイン名]にアクセスし、リダイレクトされることを確認。
リンク先の変更
リンクがおかしい部分があったため置換する。
-
「Search Regex」をインストール

-
「ツール->Search Regex」をクリックし、「検索」にhttpやドメイン名移行前の文字列を入れ「検索」をクリック

-
置換項目を確認

-
置換文字列を入力し、「すべて置換」をクリック
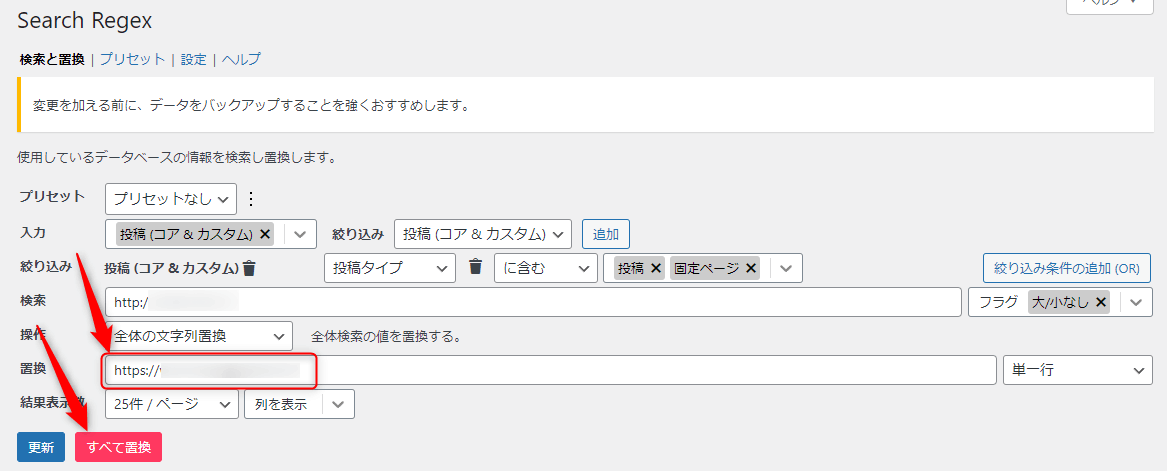
→対象のページに飛び、リンクが正しく張られていることを確認。
Discussion