Closed7
terraformのimportブロックでEC2環境をインポートする
参考
公式
外部サイト
インポートする環境

環境
Linux
Ubuntu 20.04
Terraform
$ terraform --version
Terraform v1.5.1
on linux_amd64
手順
-
terraform initする - インポートブロックを定義する
- 以下のどちらかを行う
- 対応するリソースブロックをtfファイルに追加する
-
-generate-config-outオプションでそのリソースのデータを出力する
- (必要であれば)出力したファイルのオプションを修正する
-
terraform plan実行 -
terraform apply実行、リソースがインポートされることを確認する - terraform管理下に入っていることを確認する
ここに書いてある
VPCで試す
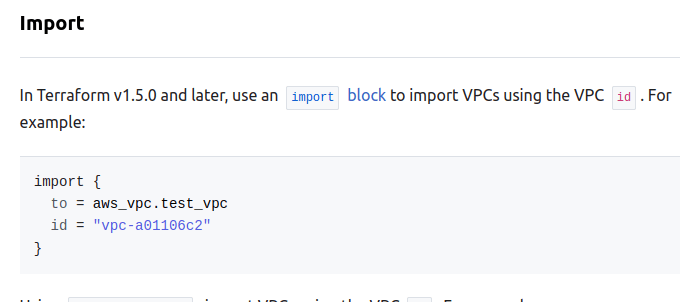
1. インポートブロックを定義する
import {
  to = aws_vpc.test_vpc
  id = "vpc-xxxxxxxx"
}
-
to:tfファイルでのリソース名 -
id:import idを指定する
インポートブロックについてはドキュメントのimport欄を参照。
例えばVPCの場合、import idはVPCIDとなります。

2. -generate-config-outオプションでそのリソースのデータを出力する
terraform plan -generate-config-out <ファイル名>で
importブロックで指定したリソースの状態を指定したファイルに出力することができます。
$ terraform plan -generate-config-out vpc.tf
aws_vpc.test_vpc: Preparing import... [id=vpc-xxx]
aws_vpc.test_vpc: Refreshing state... [id=vpc-xxx]

Planning failed. Terraform encountered an error while generating this plan.

╷
│ Warning: Config generation is experimental
│
│ Generating configuration during import is currently experimental, and the generated configuration format may change in future versions.
╵
╷
│ Error: Missing required argument
│
│   with aws_vpc.test_vpc,
│   on vpc.tf line 12:
│   (source code not available)
│
│ "ipv6_netmask_length": all of `ipv6_ipam_pool_id,ipv6_netmask_length` must be specified
╵
vpc.tfを見ると、このようにリソース情報が反映されています。
# __generated__ by Terraform
# Please review these resources and move them into your main configuration files.

# __generated__ by Terraform
resource "aws_vpc" "test_vpc" {
  assign_generated_ipv6_cidr_block     = false
  cidr_block                           = "10.10.0.0/16"
  enable_dns_hostnames                 = true
  enable_dns_support                   = true
  enable_network_address_usage_metrics = false
  instance_tenancy                     = "default"
  ipv4_ipam_pool_id                    = null
  ipv4_netmask_length                  = null
  ipv6_cidr_block                      = null
  ipv6_cidr_block_network_border_group = null
  ipv6_ipam_pool_id                    = null
  ipv6_netmask_length                  = 0
  tags = {
    Name      = "terraform-test-vpc"
    env       = "test"
    provision = "terraform"
  }
  tags_all = {
    Name      = "terraform-test-vpc"
    env       = "test"
    provision = "terraform"
  }
}
3. (必要であれば)出力したファイルのオプションを修正する
VPCの場合、この後のterraform plan実行時にエラーで引っかかります。
エラーメッセージに記載の通り、ipv6_netmask_lengthとipv6_ipam_pool_id,ipv6_netmask_lengthを修正をしましょう。
今回はコメントアウトしました。
- ipv6_ipam_pool_id                    = null
- ipv6_netmask_length                  = 0
+ #ipv6_ipam_pool_id                    = null
+ #ipv6_netmask_length                  = 0
4. terraform plan実行
tfファイルが問題なければ、このように表示されます。
普段のadd,change,destroyに加えて、importが追加されています。
$ terraform plan
aws_vpc.test_vpc: Preparing import... [id=vpc-xxx]
aws_vpc.test_vpc: Refreshing state... [id=vpc-xxx]

Terraform will perform the following actions:

  # aws_vpc.test_vpc will be imported
    resource "aws_vpc" "test_vpc" {
// 略
    }

Plan: 1 to import, 0 to add, 0 to change, 0 to destroy.
5. terraform apply実行、リソースがインポートされることを確認する
terraform applyを実行することでリソースのインポートを開始します。
1 importedとあるので問題なさそう
$ terraform apply
// 略
Plan: 1 to import, 0 to add, 0 to change, 0 to destroy.

Do you want to perform these actions?
  Terraform will perform the actions described above.
  Only 'yes' will be accepted to approve.

  Enter a value: yes
// 略
Apply complete! Resources: 1 imported, 0 added, 0 changed, 0 destroyed.
6. terraform管理下に入っていることを確認する
stateを確認すると
$ terraform state list
aws_vpc.test_vpc
このように追加される
複数リソース追加
サブネット2つをimport.tfに追加すればOK
import.tf
import {
  to = aws_vpc.test_vpc
  id = "vpc-xxx"
}

+import {
+  to = aws_subnet.pubsub_1_a
+  id = "subnet-xxx"
+}

+import {
+ to = aws_subnet.pubsub_1_c
+  id = "subnet-xxx"
+}
terraform plan -generate-config-out subnet.tfを実行すると
subnet.tf
# __generated__ by Terraform
# Please review these resources and move them into your main configuration files.

# __generated__ by Terraform
resource "aws_subnet" "pubsub_1_a" {

// 略
}

# __generated__ by Terraform
resource "aws_subnet" "pubsub_1_c" {
// 略
}
このようにサブネットの情報がsubnet.tfへ反映されます。
必要な修正箇所を直してplan,applyすると
$ terraform state list
aws_subnet.pubsub_1_a
aws_subnet.pubsub_1_c
aws_vpc.test_vpc
このように複数追加可能です
このスクラップは2023/08/05にクローズされました