ハイパフォーマンスにGIFを再生する技術
こんにちは、noppeです。
今回は先日公開したアニメーションイメージライブラリ、AnimatedImageの仕組みについて解説します。
なお、AnimatedImageではgif,webp,apngの3つをサポートしていますが便宜上gifを再生する技術として解説します。(それぞれ違いはありません)
通常の再生手法
UIImageで表示
iOSでは、UIImageを使ってgifを表示させることはできますが、表示されるのは最初のフレームのみでアニメーションさせることはできません。
let url = Bundle.main.url(forResource: "elephant", withExtension: "gif")!
let image = UIImage(contentsOfFile: url.path())
imageView.image = image

animationImagesで表示
そのため、gifデータから全ての画像を取り出し、UIImageView.animationImagesを使って再生してみます。
let url = Bundle.main.url(forResource: "elephant", withExtension: "gif")!
let source = CGImageSourceCreateWithURL(url as CFURL, nil)!
let count = CGImageSourceGetCount(source)
let images = (0..<count)
	.map { index in
		CGImageSourceCreateImageAtIndex(source, index, nil)!
	}
	.map(UIImage.init(cgImage:))
imageView.animationImages = images
imageView.startAnimating()
これで、gifを再生する事ができました。
しかし、いくつかの問題があります。
メインスレッドの問題
今回、全ての処理をメインスレッドで行いました。
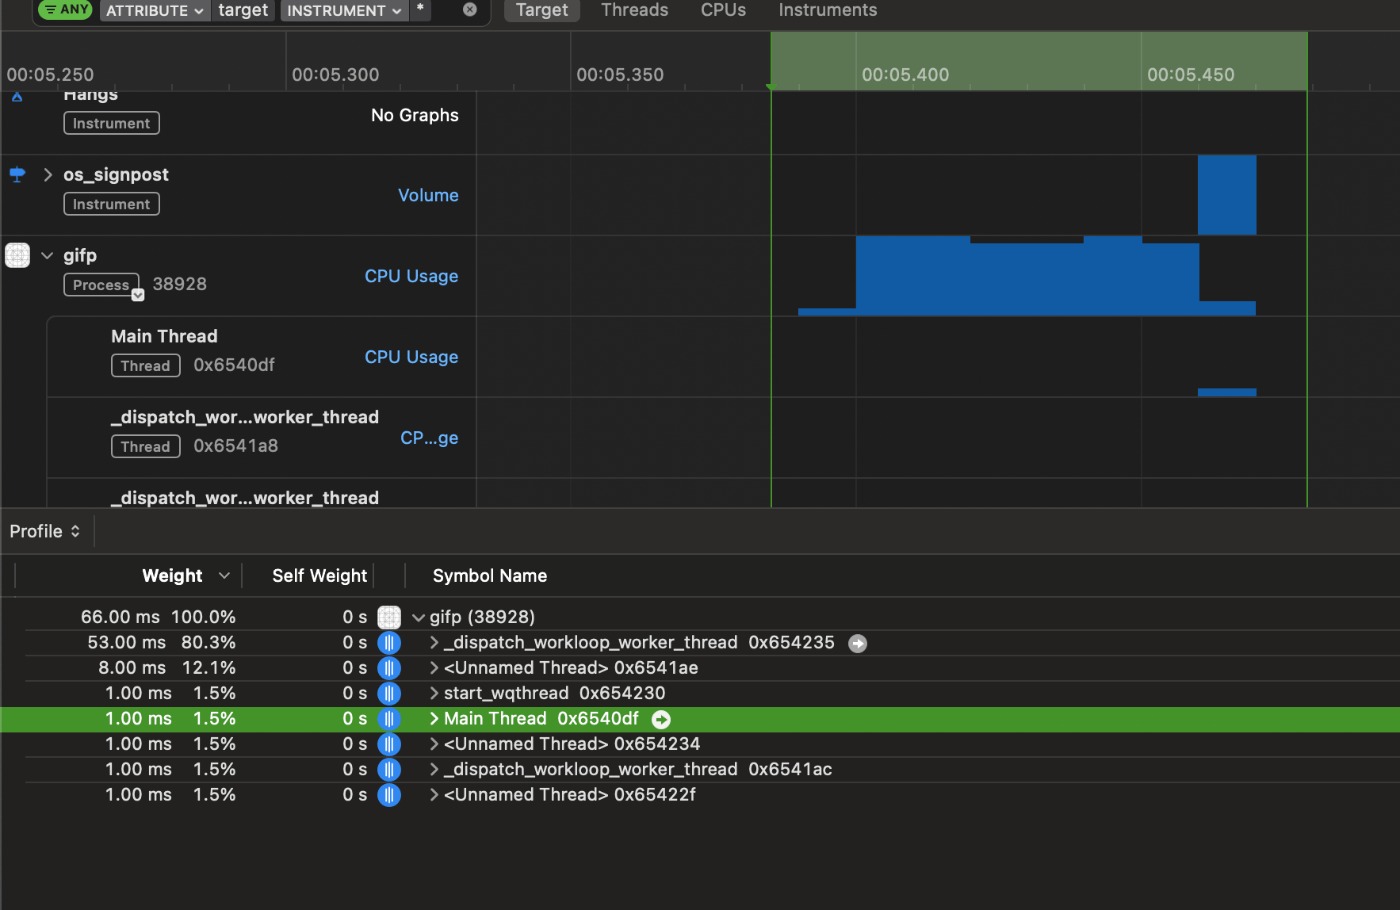
処理の時間をos signpostで計測すると、8.47msかかっていることが分かります。
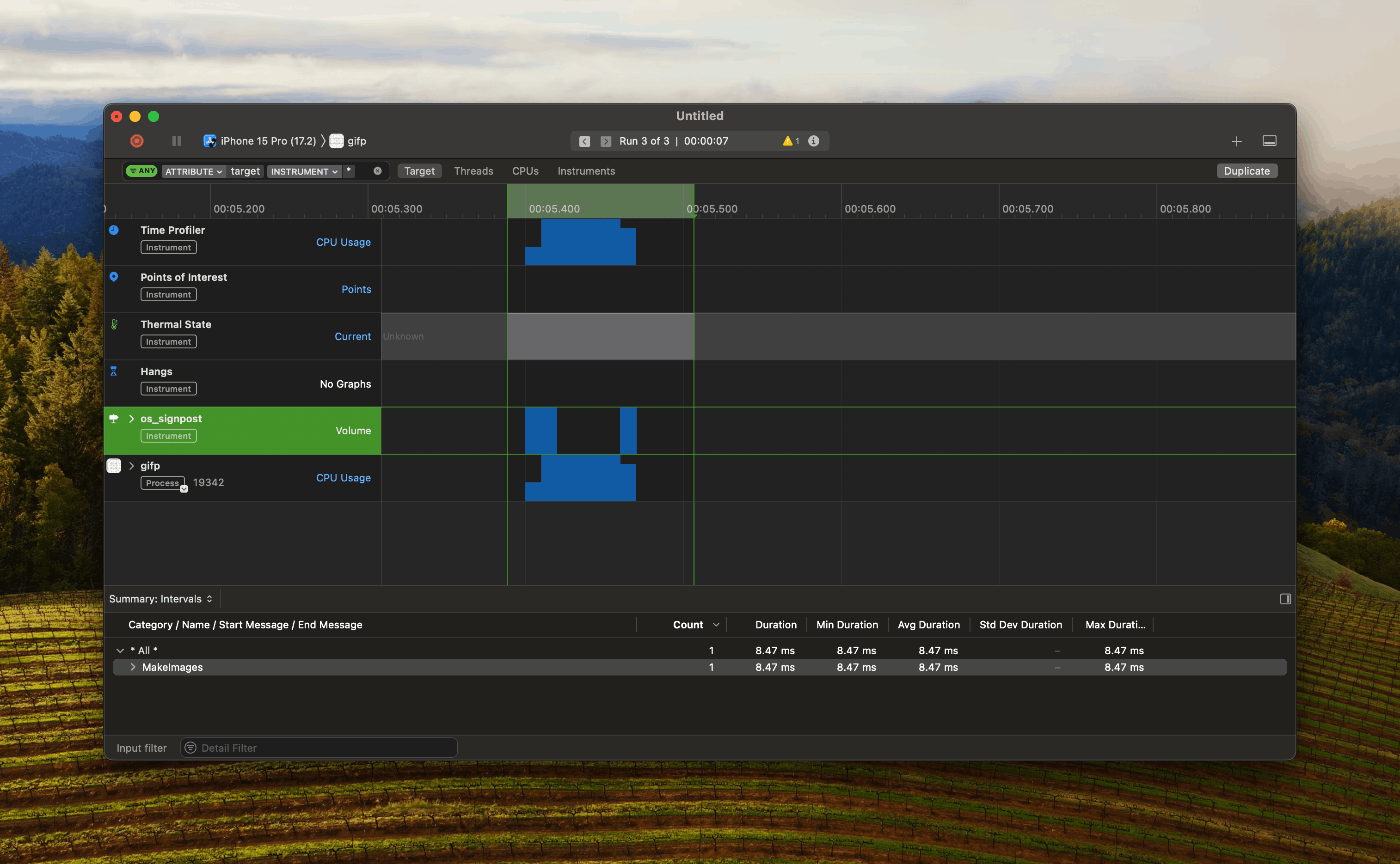
アプリケーションを120fpsで動作させるためには、8ms以内に処理を完了しなければならないのでこの処理はアニメーションヒッチを起こします。
60fpsのアプリでも、gifのサイズや枚数に依存して処理時間が増減するのも明白です。
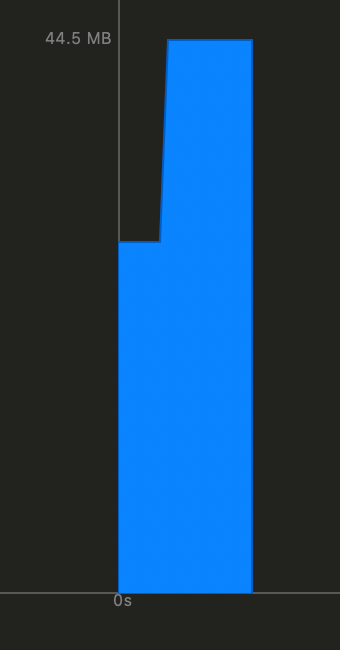
メモリ消費の問題
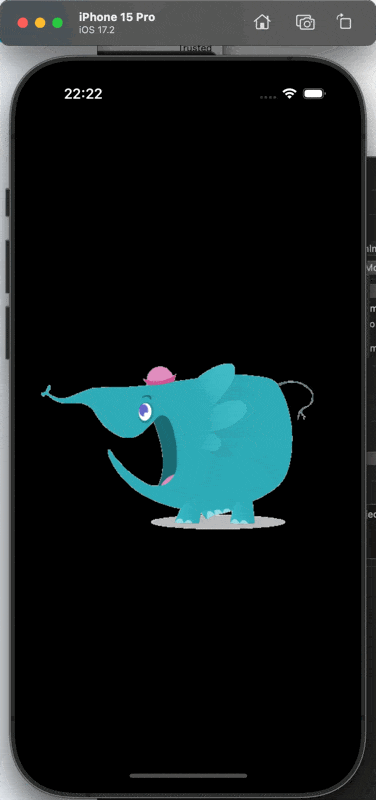
今回、400x480の34フレームgifを再生しました。
ファイルサイズが337KBである反面、アプリは20MB近いメモリを確保しました。
メインスレッドの問題の対策
UIImageView以外の処理はメインスレッド以外に逃がせるため、次のようにサブスレッドで処理されるように変更します。
Task.detached {
    let url = Bundle.main.url(forResource: "elephant", withExtension: "gif")!
    let source = CGImageSourceCreateWithURL(url as CFURL, nil)!
    let count = CGImageSourceGetCount(source)
    let images = (0..<count)
        .map { index in
            CGImageSourceCreateImageAtIndex(source, index, nil)!
        }
        .map(UIImage.init(cgImage:))

    await MainActor.run {
        self.imageView.animationImages = images
        self.imageView.startAnimating()
    }
}

これで、メインスレッドからCGImageSourceCreateImageAtIndexを逃すことは出来ましたが実はこれでは不十分です。
メインスレッドの処理を見てみましょう。
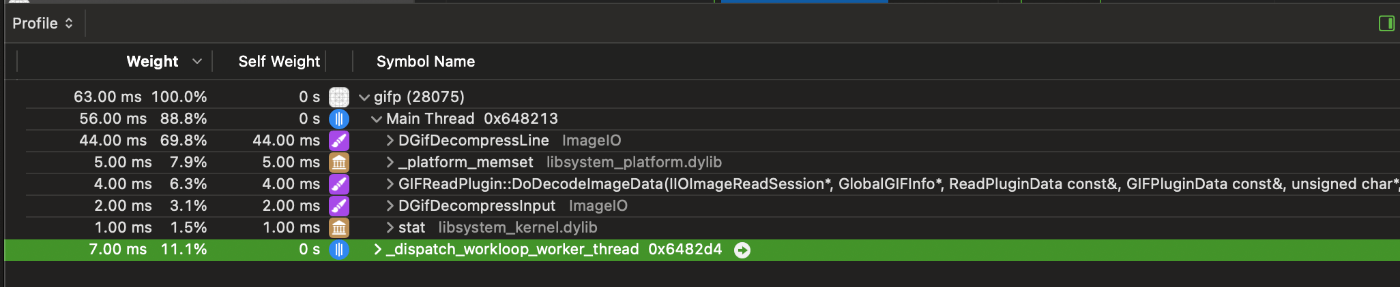
メインスレッドでは、DGifDecompressという処理が行われておりメインスレッドは依然として高負荷に見舞われています。
これはシステムライブラリによる処理のため参考になるドキュメントはありませんが、名前からgifのデコードに関係していることが分かります。
このことから、UIImageは描画のギリギリまでデコード処理を遅延させることが予想できます。
そこで、iOS15から追加された描画の準備を事前に済ませたUIImageを取得するbyPreparingForDisplay()を使ってみます。
@available(iOS 15.0, *)
open func byPreparingForDisplay() async -> UIImage?
let decodedImages = await withTaskGroup(
    of: (Int, UIImage).self,
    returning: [UIImage].self
) { taskGroup in
    for (index, image) in images.enumerated() {
        taskGroup.addTask {
            let decodedImage = await image.byPreparingForDisplay()!
            return (index, decodedImage)
        }
    }
    var result = Array(repeating: UIImage(), count: images.count)
    for await (index, image) in taskGroup {
        result[index] = image
    }
    return result
}
この処理によって、メインスレッドは大幅に解放されました。
AnimatedImageがGifuやSwiftyGifなどと比較してパフォーマンスが良いのは、この処理の影響が大きいです。
メモリ消費の問題の解決
メモリ消費を大きく解決する方法として、バッファリングが挙げられます。
この処理は、Gifuが採用しており次のように、赤い部分を再生しつつ、オレンジの画像を用意するという処理になっています。

↑GifuのREADMEより引用
こうすることで、直近の数フレームのみのメモリ消費に抑えることができます。
AnimatedImageでは、先述した事前デコードの時間がかかるため、この方法の実装は難しく別のアプローチを採用しました。
描画サイズに合わせてリサイズする
画像の表示サイズが、描画サイズを上回る場合はその差分が無駄になります。
そこで、UIImageViewのサブクラスを作りlayoutSubviews()の中でサイズの変更を検知してフレーム画像のリサイズをしています。
func layoutSubviews() {
  super.layoutSubviews()
  updateImageCache(size: bounds.size)
}
この処理は特に絵文字などの小さな領域でgifを表示する際に強力に作用します。
消費メモリの上限値を決める
消費メモリの上限値を決めることで、メモリのコントロールが容易になります。
消費メモリは次の式で計算することができます。
width x height x channel x frame count
channelはRGBAの場合、R,G,B,Aの4つになります。
記事の前半で使ったgifはw:480, h:400の34フレームなので、
400x480x4x34 = 26,112,000Byte = 26.112MB
となります。
設定したメモリ上限値と想定消費メモリから、全体のフレーム数をどの程度損失させるかを決定し次の項目の処理でフレームを間引きます。
フレームを間引く
/// Compute backing data for this gif
///
/// - Parameter delaysArray: decoded delay times for this gif
/// - Parameter levelOfIntegrity: 0 to 1, 1 meaning no frame skipping
private func calculateFrameDelay(_ delaysArray: [Float], levelOfIntegrity: GifLevelOfIntegrity) {
    let levelOfIntegrity = max(0, min(1, levelOfIntegrity))
    var delays = delaysArray

    var displayRefreshFactors = [Int]()

    displayRefreshFactors.append(contentsOf: [60, 30, 20, 15, 12, 10, 6, 5, 4, 3, 2, 1])

    // maxFramePerSecond,default is 60
    let maxFramePerSecond = displayRefreshFactors[0]

    // frame numbers per second
    var displayRefreshRates = displayRefreshFactors.map { maxFramePerSecond / $0 }

    if #available(iOS 10.3, *) {
        // Will be 120 on devices with ProMotion display, 60 otherwise.
        let maximumFramesPerSecond = UIScreen.main.maximumFramesPerSecond
        if maximumFramesPerSecond == 120 {
            displayRefreshRates.append(maximumFramesPerSecond)
            displayRefreshFactors.insert(maximumFramesPerSecond, at: 0)
        }
    }

    // time interval per frame
    let displayRefreshDelayTime = displayRefreshRates.map { 1 / Float($0) }

    // calculate the time when each frame should be displayed at(start at 0)
    for i in delays.indices.dropFirst() {
        delays[i] += delays[i - 1]
    }

    //find the appropriate Factors then BREAK
    for (i, delayTime) in displayRefreshDelayTime.enumerated() {
        let displayPosition = delays.map { Int($0 / delayTime) }

        var frameLoseCount: Float = 0

        for j in displayPosition.indices.dropFirst() where displayPosition[j] == displayPosition[j - 1] {
            frameLoseCount += 1
        }

        if displayPosition.first == 0 {
            frameLoseCount += 1
        }

        if frameLoseCount <= Float(displayPosition.count) * (1 - levelOfIntegrity) || i == displayRefreshDelayTime.count - 1 {
            imageCount = displayPosition.last
            displayRefreshFactor = displayRefreshFactors[i]
            displayOrder = []
            var oldIndex = 0
            var newIndex = 1
            let imageCount = self.imageCount ?? 0

            while newIndex <= imageCount && oldIndex < displayPosition.count {
                if newIndex <= displayPosition[oldIndex] {
                    displayOrder?.append(oldIndex)
                    newIndex += 1
                } else {
                    oldIndex += 1
                }
            }
            break
        }
    }
}
与えられたlevelOfIntegrityに対して、適切なフレーム表示間隔を求めるために使用されます。
AnimatedImageでは、levelOfIntegrityに当たる部分を先述した最大消費メモリ数から算出しており、自動的にフレームドロップを行うようにしています。
まとめ
これらの処理を、適切なactorで実行するように整え、メモリ消費とスレッドパフォーマンスの最適化をしています。
ぜひAnimatedImageを使ってみてください。
Discussion