Milk-V を動かす
デバイス
-
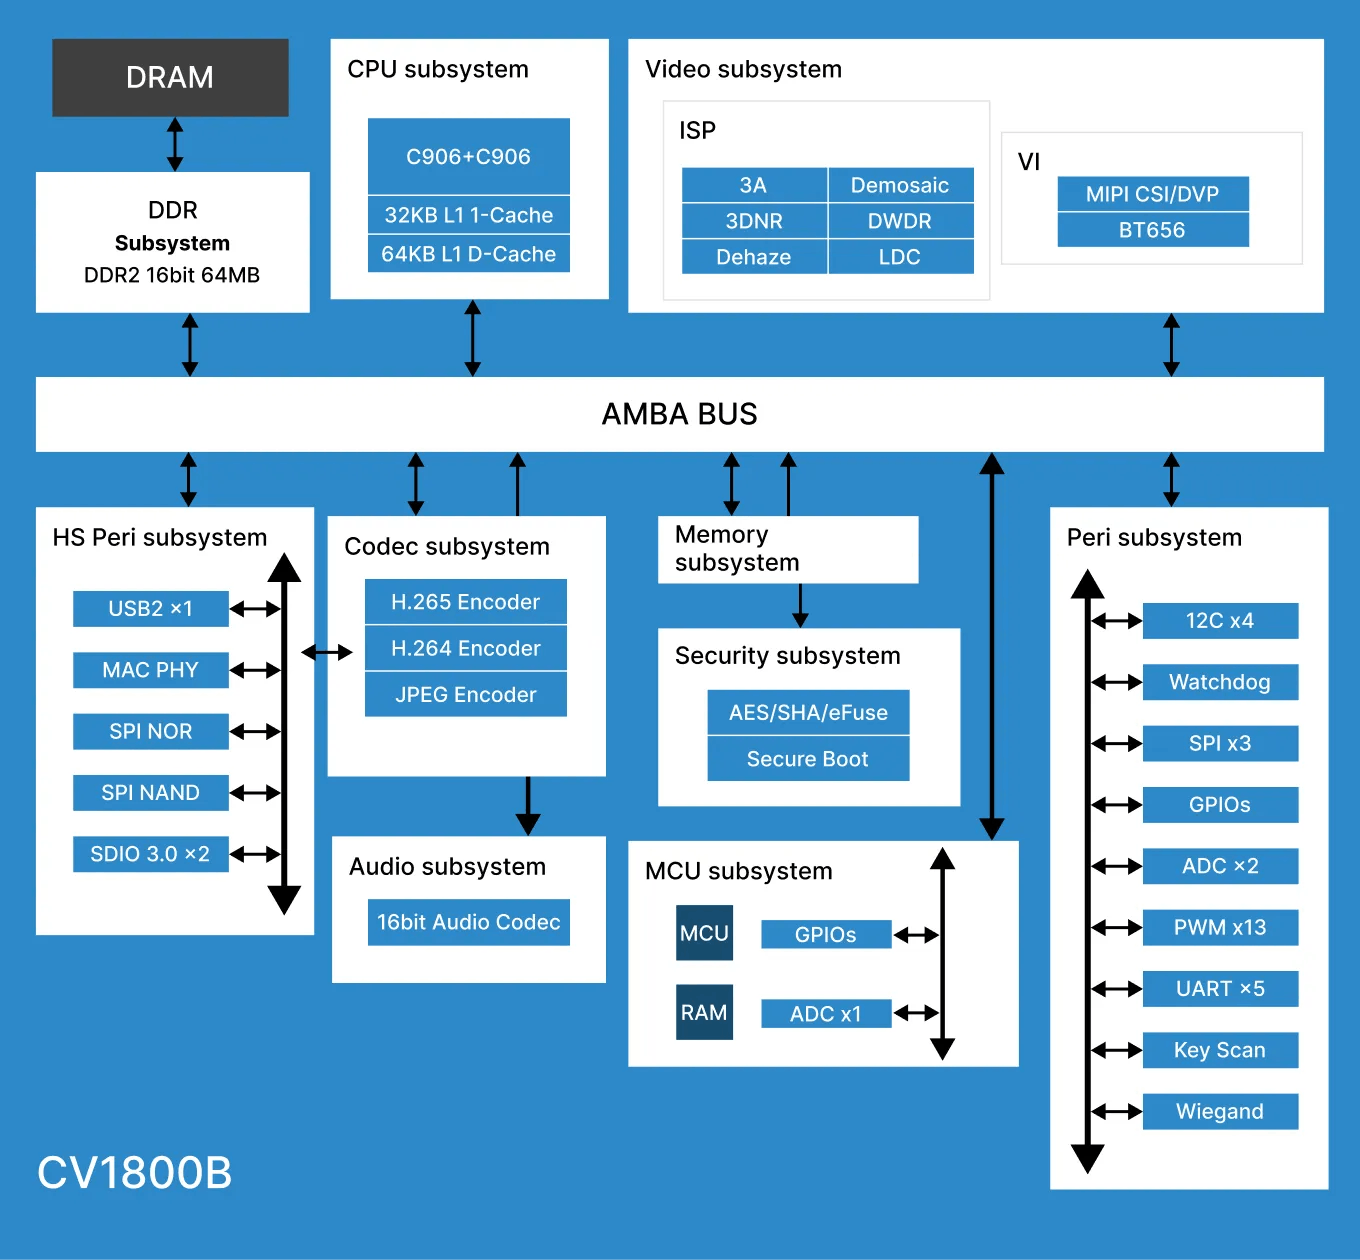
MILK-V DUO CV1800B
- CPU : RISC-V C906 x2
- クロック : 1GHz
- メモリ : DDR2 : 64MB
- L1 1-Cache : 32KB
- L1 D-Cache : 64KB
- CAM-GC2083

セットアップ
イメージをインストールする
https://milkv.io/ja/docs/duo/getting-started/boot を参考に進めていく。環境は Linux Mint 21.1 (Ubuntu 22.04 ベース)
リリースページ から最新のイメージをダウンロードする。64MBモデルなので、 milkv-duo-**.img.zip を選択する。ダウンロードしたら解凍する。
unzip milkv-duo-v1.1.0-2024-0410.img.zip
SDカード(32GBを使用)に焼くために、balenaEtcher もダウンロードして実行権限を付与する。
chmod +x balenaEtcher-1.18.11-x64.AppImage
# 起動
./balenaEtcher-1.18.11-x64.AppImage
balenaEtcher で解凍したイメージを選択し、SDカードに焼く。
(ddコマンドでも実行できるはず)
USBをPCに接続する。青いLEDが点滅すればOK。
USBnet をセットアップする
USBネットワークを使うための設定。
Linux では RNDIS をデフォルトで使える。
❯ sudo dmesg | grep usb0
[sudo] password for nonno:
[38756.978271] rndis_host 1-2:1.0 usb0: register 'rndis_host' at usb-0000:0e:00.0-2, RNDIS device, 82:88:7b:77:32:6c
(renamed from usb0 といったメッセージがないが大丈夫そう?)
❯ ip addr show usb0
12: usb0: <BROADCAST,MULTICAST,UP,LOWER_UP> mtu 1500 qdisc fq_codel state UNKNOWN group default qlen 1000
    link/ether 82:88:7b:77:32:6c brd ff:ff:ff:ff:ff:ff
    inet 192.168.42.232/24 brd 192.168.42.255 scope global dynamic noprefixroute usb0
       valid_lft 3192sec preferred_lft 3192sec
    inet6 fe80::f09c:663e:2847:91c8/64 scope link noprefixroute
       valid_lft forever preferred_lft forever
❯ ping 192.168.42.1 -c 5
PING 192.168.42.1 (192.168.42.1) 56(84) bytes of data.
64 bytes from 192.168.42.1: icmp_seq=1 ttl=64 time=0.291 ms
64 bytes from 192.168.42.1: icmp_seq=2 ttl=64 time=0.611 ms
64 bytes from 192.168.42.1: icmp_seq=3 ttl=64 time=0.307 ms
64 bytes from 192.168.42.1: icmp_seq=4 ttl=64 time=0.317 ms
64 bytes from 192.168.42.1: icmp_seq=5 ttl=64 time=0.308 ms

--- 192.168.42.1 ping statistics ---
5 packets transmitted, 5 received, 0% packet loss, time 4081ms
rtt min/avg/max/mdev = 0.291/0.366/0.611/0.122 ms
192.168.42.1 が milk-v のIPアドレスになる。 ip addr show で出る 192.168.42.232 は、milk-v との接続で使用されるネットワーク上での、Linux マシン側のアドレス。
ssh で接続する。パスワードはデフォルトで milkv。
❯ ssh root@192.168.42.1
root@192.168.42.1's password:
[root@milkv-duo]~#
シリアルコンソール
半田付けするのが面倒なので後回し。
メモリ状況
# free -h
              total        used        free      shared  buff/cache   available
Mem:          28.5M       14.4M        3.0M       76.0K       11.1M       11.4M
Swap:             0           0           0
ストレージ状況
# df -h
Filesystem      Size  Used Avail Use% Mounted on
/dev/root       752M  142M  568M  20% /
devtmpfs         15M     0   15M   0% /dev
tmpfs            15M     0   15M   0% /dev/shm
tmpfs            15M   48K   15M   1% /tmp
tmpfs            15M   28K   15M   1% /run
CPU状況
# cat /proc/cpuinfo
processor	: 0
hart		: 0
isa		: rv64imafdvcsu
mmu		: sv39
Swap を設定
# mkswap /dev/mmcblk0p3
Setting up swapspace version 1, size = 256 MiB (268431360 bytes)
no label, UUID=9125b3b9-7933-4dd5-a206-9c7608b8a23f

# swapon /dev/mmcblk0p3
# free -h
              total        used        free      shared  buff/cache   available
Mem:          28.5M       14.4M        2.9M       76.0K       11.2M       11.4M
Swap:        256.0M           0      256.0M
デフォルトでは 256MB になる。 これは、デフォルトのパーティションサイズと一致する。
Swap サイズを増やすには、ファームウェアをリビルドするか、fdisk で直接変更するかの二択になる。ここでは後者を使用する。
初期状態
# fdisk -l /dev/mmcblk0
Disk /dev/mmcblk0: 29.72 GiB, 31914983424 bytes, 62333952 sectors
Units: sectors of 1 * 512 = 512 bytes
Sector size (logical/physical): 512 bytes / 512 bytes
I/O size (minimum/optimal): 512 bytes / 512 bytes
Disklabel type: dos
Disk identifier: 0x00000000

Device         Boot   Start     End Sectors  Size Id Type
/dev/mmcblk0p1 *          1  262144  262144  128M  c W95 FAT32 (LBA)
/dev/mmcblk0p2       262145 1835008 1572864  768M 83 Linux
/dev/mmcblk0p3      1835009 2359296  524288  256M  0 Empty
パーティションを操作して Swap用の領域を1GBにする。
[root@milkv-duo]~# fdisk /dev/mmcblk0

Welcome to fdisk (util-linux 2.36.2).
Changes will remain in memory only, until you decide to write them.
Be careful before using the write command.

Command (m for help): d
Partition number (1-3, default 3):

Partition 3 has been deleted.

Command (m for help): n
Partition type
   p   primary (2 primary, 0 extended, 2 free)
   e   extended (container for logical partitions)
Select (default p): p
Partition number (3,4, default 3): 3
First sector (1835009-62333951, default 1837056): 1835009
Last sector, +/-sectors or +/-size{K,M,G,T,P} (1835009-62333951, default 62333951): +1G

Created a new partition 3 of type 'Linux' and of size 1024 MiB.
Partition #3 contains a swap signature.

Do you want to remove the signature? [Y]es/[N]o: y

The signature will be removed by a write command.

Command (m for help): w
The partition table has been altered.
Syncing disks.

[root@milkv-duo]~# reboot
再起動後。
[root@milkv-duo]~# mkswap /dev/mmcblk0p3
Setting up swapspace version 1, size = 1024 MiB (1073733632 bytes)
no label, UUID=f699ea73-36b4-4f6c-8e3a-7b8f8923caba
[root@milkv-duo]~# swapon /dev/mmcblk0p3
[root@milkv-duo]~# free -h
              total        used        free      shared  buff/cache   available
Mem:          28.5M       14.6M        4.2M       84.0K        9.7M       11.1M
Swap:       1024.0M           0     1024.0M
なお、reboot 毎に swapon を実行しないと Swap は有効にならない。(スタートアップスクリプトに登録すれば良いとは思うが)
Buildroot SDK はスキップ。
アプリをビルドする
duo-examples を参考に。
Hello World
bash で実行すること。(SDKのセットアップスクリプトが bash なので)
git clone https://github.com/milkv-duo/duo-examples.git
cd duo-examples
source envsetup.sh
cd hello-world
make
scp helloworld root@192.168.42.1:/root/
これで helloworld が転送される。(毎回パスワードを打つのも面倒なので sshpass を使うと良いかも)
[root@milkv]~# ./helloworld
Hello, World!