Closed7
【AWS公式チュートリアル】「Amazon Amplify でウェブアプリケーションをデプロイする」対応メモ
はじめに
Amplifyの理解を深めるべく、AWSの公式チュートリアルを進めていきます。
対象のチュートリアル
開発環境
MacPCにAWS CLIをインストールして進めます。
| 環境 | バージョンなど | 備考 |
|---|---|---|
| MacOS | Sonoma v14.5 | - |
| AWS CLI | aws-cli/2.17.22 Python/3.11.9 Darwin/23.5.0 exe/x86_64 | - |
| Node.js | v20.11.1 | 元々PCに入っていたバージョンを利用 |
| npm | v10.2.4 | Node.jsと一緒にインストールされたバージョンを利用 |
※環境に関する補足
今まではCloud9上でコマンド実行などしていたのですが、2024年7月25日にCloud9の新規利用受付を終了した様です。
参考:AWS、「Cloud9」「CodeCommit」などの新規利用を終了 エバンジェリスト明かす
モジュール 1: 新しい Amplify プロジェクトを作成する
環境を確認する
Node.jsのバージョン確認
node -v
# v16.16.0

npm -v
# 8.11.0
Amplify CLIのインストール
npm install -g @aws-amplify/cli
Amplify CLIの設定
amplify configure

# 本来はブラウザ上でIMAユーザー作成したあと、リージョン情報など入力する
Specify the AWS Region
? region:  # Your preferred region
Specify the username of the new IAM user:
? user name:  # User name for Amplify IAM user
Complete the user creation using the AWS console

# 作成したIAMユーザーの認証情報を設定する
Enter the access key of the newly created user:
? accessKeyId:  # YOUR_ACCESS_KEY_ID
? secretAccessKey:  # YOUR_SECRET_ACCESS_KEY
This would update/create the AWS Profile in your local machine
? Profile Name:  # (default)

Successfully set up the new user.
React アプリケーションを作成する
Reactアプリケーション作成後、「amplify init」でAmplifyを初期化する
# note npx is installed with npm
npx create-react-app amplify-app
cd amplify-app
amplify init
# 実行内容詳細
% amplify init
Note: It is recommended to run this command from the root of your app directory
? Enter a name for the project amplifywebapp
The following configuration will be applied:

Project information
| Name: amplifywebapp
| Environment: dev
| Default editor: Visual Studio Code
| App type: javascript
| Javascript framework: react
| Source Directory Path: src
| Distribution Directory Path: build
| Build Command: npm run-script build
| Start Command: npm run-script start

? Initialize the project with the above configuration? Yes
Using default provider  awscloudformation
? Select the authentication method you want to use: AWS profile

For more information on AWS Profiles, see:
https://docs.aws.amazon.com/cli/latest/userguide/cli-configure-profiles.html

? Please choose the profile you want to use amplify-dev-profile
Adding backend environment dev to AWS Amplify app: xxxxxxxxxxxxx

Deployment completed.
モジュール 2: フロントエンドを構築し、API を接続する
Amplify ライブラリをインストールする
ライブラリのインストール
npm install @aws-amplify/ui-react
「src/App.js」のコード修正
-- import { withAuthenticator, AmplifySignOut } from '@aws-amplify/ui-react';
-- import Amplify from 'aws-amplify';
-- import awsExports from './aws-exports';
++ import React from 'react';
++ import { Amplify } from 'aws-amplify';

++ import { withAuthenticator, Authenticator } from '@aws-amplify/ui-react';
++ import '@aws-amplify/ui-react/styles.css';

++ import awsExports from './aws-exports';
Amplify.configure(awsExports);

function App() {
--   return (
--     <div>
--       <h1>Notes App</h1>
--       <AmplifySignOut />
--     </div>
--   );
++   return (
++     <Authenticator>
++       {({ signOut, user }) => (
++         <main>
++           <h1>Hello {user.username}</h1>
++           <button onClick={signOut}>Sign out</button>
++         </main>
++       )}
++     </Authenticator>
  );
}

export default withAuthenticator(App);
アプリケーションをテストする
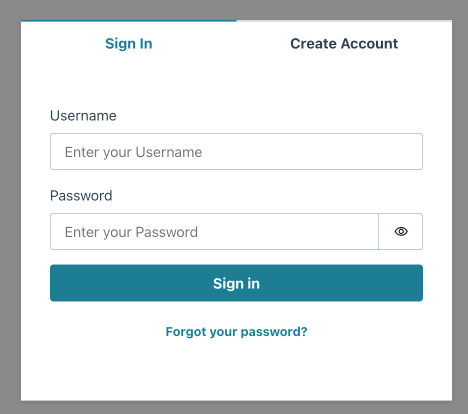
- ブラウザ起動後、ログイン画面が表示されたら成功
npm start
Amplify で GraphQL API を追加する
amplify add api
# 今回実行した内容の詳細
% amplify add api
? Select from one of the below mentioned services: GraphQL
? Here is the GraphQL API that we will create. Select a setting to edit or continue Authorization modes: API key (default, expiration time: 7 days from now)
? Choose the default authorization type for the API Amazon Cognito User Pool
Using service: Cognito, provided by: awscloudformation

 The current configured provider is Amazon Cognito.

 Do you want to use the default authentication and security configuration? Default configuration
 Warning: you will not be able to edit these selections.
 How do you want users to be able to sign in? Username
 Do you want to configure advanced settings? No, I am done.
✅ Successfully added auth resource amplifywebappxxxxxxxx locally

✅ Some next steps:
"amplify push" will build all your local backend resources and provision it in the cloud
"amplify publish" will build all your local backend and frontend resources (if you have hosting category added) and provision it in the cloud

? Configure additional auth types? No
? Here is the GraphQL API that we will create. Select a setting to edit or continue Conflict detection (required for DataStore): Disabled
? Enable conflict detection? No
? Here is the GraphQL API that we will create. Select a setting to edit or continue Continue
? Choose a schema template: Single object with fields (e.g., “Todo” with ID, name, description)
GraphQL スキーマを作成する
type Note @model @auth(rules: [{ allow: owner }]) {
  id: ID!
  text: String!
}
アプリケーションをデプロイする
amplify push
# 今回実行した内容の詳細
% amplify push
⠇ Building resource api/amplifywebapp⚠️ WARNING: owners may reassign ownership for the following model(s) and role(s): Note: [owner]. If this is not intentional, you may want to apply field-level authorization rules to these fields. To read more: https://docs.amplify.aws/cli/graphql/authorization-rules/#per-user--owner-based-data-access.
✅ GraphQL schema compiled successfully.
API を使用するようにフロントエンドを更新する
import { Component } from 'react';
-- import { API, graphqlOperation } from 'aws-amplify';
++ import { Amplify }  from 'aws-amplify';
++ import '@aws-amplify/ui-react/styles.css';
++ import { generateClient }  from 'aws-amplify/api';
import { createNote, deleteNote } from './graphql/mutations';
import { listNotes } from './graphql/queries';

-- import { withAuthenticator, AmplifySignOut } from '@aws-amplify/ui-react';
++ import { withAuthenticator, Authenticator } from '@aws-amplify/ui-react';
import awsExports from './aws-exports';

Amplify.configure(awsExports);
++ const API = generateClient();

class AddNote extends Component {
  constructor(props) {
    super(props);
    this.state = { text: '' };
  }

  handleChange = (event) => {
    this.setState({ text: event.target.value });
  }

  handleClick = () => {
    this.props.addNote(this.state);
    this.setState({ text: '' });
  }

  render() {
    return (
      <div style={styles.form}>
        <input
          value={this.state.text}
          onChange={this.handleChange}
          placeholder="New Note"
          style={styles.input}
        />
        <button onClick={this.handleClick} style={styles.addButton}>Add Note</button>
      </div>
    );
  }
}

class NotesList extends Component {
  render() {
    return (
      <div>
        {this.props.notes.map(note =>
          <div key={note.id} style={styles.note}>
            <p>{note.text}</p>
            <button onClick={() => { this.props.deleteNote(note) }} style={styles.deleteButton}>x</button>
          </div>
        )}
      </div>
    );
  }
}

class App extends Component {
  constructor(props) {
    super(props);
    this.state = { notes: [] };
  }

  async componentDidMount() {
--     var result = await API.graphql(graphqlOperation(listNotes));
++     var result = await API.graphql({query: listNotes});
    this.setState({ notes: result.data.listNotes.items });
  }

  deleteNote = async (note) => {
    const id = {
      id: note.id
    };
--     await API.graphql(graphqlOperation(deleteNote, { input: id }));
++     await API.graphql({query: deleteNote, variables: {input: id}});
    this.setState({ notes: this.state.notes.filter(item => item.id !== note.id) });
  }

  addNote = async (note) => {
--     var result = await API.graphql(graphqlOperation(createNote, { input: note }));
++     var result = await API.graphql({query: createNote, variables: {input: note}});
    this.state.notes.push(result.data.createNote);
    this.setState({ notes: this.state.notes });
  }

  render() {
    return (
--       <div style={styles.container}>
--         <h1>Notes App</h1>
--         <AddNote addNote={this.addNote} />
--         <NotesList notes={this.state.notes} deleteNote={this.deleteNote} />
--         <AmplifySignOut />
--       </div>
++       <Authenticator>
++         {({ signOut, user }) => (
++           <div style={styles.container}>
++             <h1>Notes App</h1>
++             <AddNote addNote={this.addNote} />
++             <NotesList notes={this.state.notes} deleteNote={this.deleteNote} />
++             <button onClick={signOut}>Sign out</button>
++           </div>
++         )}
++       </Authenticator>
    );
  }
}

export default withAuthenticator(App);

const styles = {
  container: { width: 480, margin: '0 auto', padding: 20 },
  form: { display: 'flex', marginBottom: 15 },
  input: { flexGrow: 2, border: 'none', backgroundColor: '#ddd', padding: 12, fontSize: 18 },
  addButton: { backgroundColor: 'black', color: 'white', outline: 'none', padding: 12, fontSize: 18 },
  note: { display: 'flex', justifyContent: 'space-between', alignItems: 'center', fontSize: 22, marginBottom: 15 },
  deleteButton: { fontSize: 18, fontWeight: 'bold' }
}
動作イメージ
- チュートリアルのUIと若干異なるが、動作したため良しとした


モジュール 3: デプロイを自動化する
継続的デプロイ
GitHubで新規リポジトリを作成し、ローカルのReactプロジェクトをGitHubと連携
git remote add origin https://github.com/xxxxx/amplify-xxxxx.git
git branch -M main
git push -u origin main
AWSマネジメントコンソールから、Amplify用のIAMロールを作成
- IAMコンソールの「ロールの作成」より、以下内容で作成した(ロール名は適当な値を入力)
- 信頼できるエンティティのタイプ: AWS のサービス
- サービス: Amplify
- ユースケース: Amplify - バックエンドデプロイ
- アクセス許可ポリシー: AdministratorAccess-Amplify
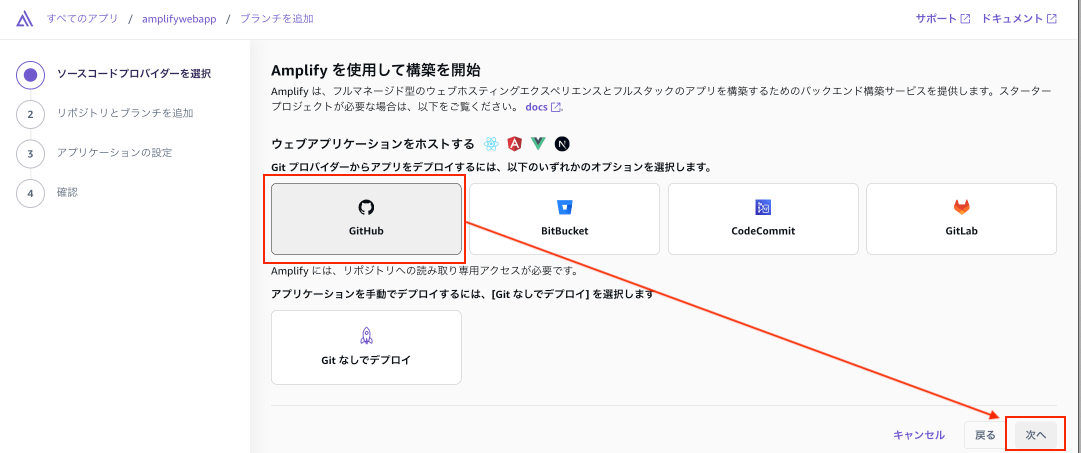
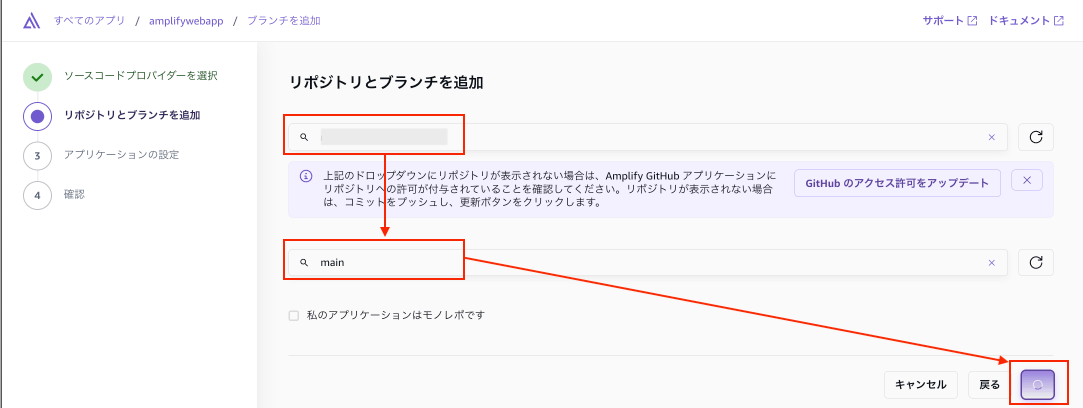
Amplifyコンソール上の、「ソースコードプロバイダーを選択」から連携を実施
- 画面に表示される項目を順次設定して実施した


ローカルのプロジェクトで「コミット&プッシュ」して、CI/CDの動作確認
- ローカルのプロジェクトから「コミット&プッシュ」し、Amplifyのプロジェクトへデプロイ連携できたら完了
※今回はタイトル部分に少し変更を加えた後、「コミット&プッシュ」してCI/CDの動作を確認しました

モジュール 4: リソースをクリーンアップする
AWS環境をクリーンアップする
バックエンド環境の削除
- Amplifyコンソールから、以下を進めた
対象のプロジェクト選択 > [アプリケーションの設定] > [全般設定] > [バックエンドを管理] > [アクション] > [削除] を選択
プロジェクトの削除
- Amplifyコンソールから、以下を進めた
対象のプロジェクト選択 > [アプリケーションの設定] > [全般設定] > [アプリの削除] を選択
チュートリアル全体を確認することができたため、クローズします。
このスクラップは2024/08/12にクローズされました