機材費6000円で始めるIoTカメラ入門(Groveシリアルカメラ編)
はじめに
記事をご覧くださりありがとうございます。
フリーランス学生エンジニアのたつのぶです🐉
今回の記事は、「機材費6000円で始めるIoTカメラ入門」
ということで、だいたい2秒おきに画像を送信するIoTカメラを作ってみた内容になっています。
機材リストやソースコードも載せているので気軽にレッツTry✌~~
それでは本題に入っていきます。
利用例
- 防犯カメラ
- 子供の見守りカメラ
- ペットのリモート監視
- etc...
できたもの
実際にブラウザから見たイメージです。

二秒おきにサーバデータを更新する仕様になっています✋
①機材を調達しよう
| 機材名 | 価格 |
|---|---|
| ESP32-WROOM-32E開発ボード 4MB | ¥1,230 |
| Grove-シリアルカメラキット | ¥3,880 |
| 専用基板(※1) | ¥600 |
| 鉛フリーのはんだ | ¥280 |
②ハードウェアを組み立てよう
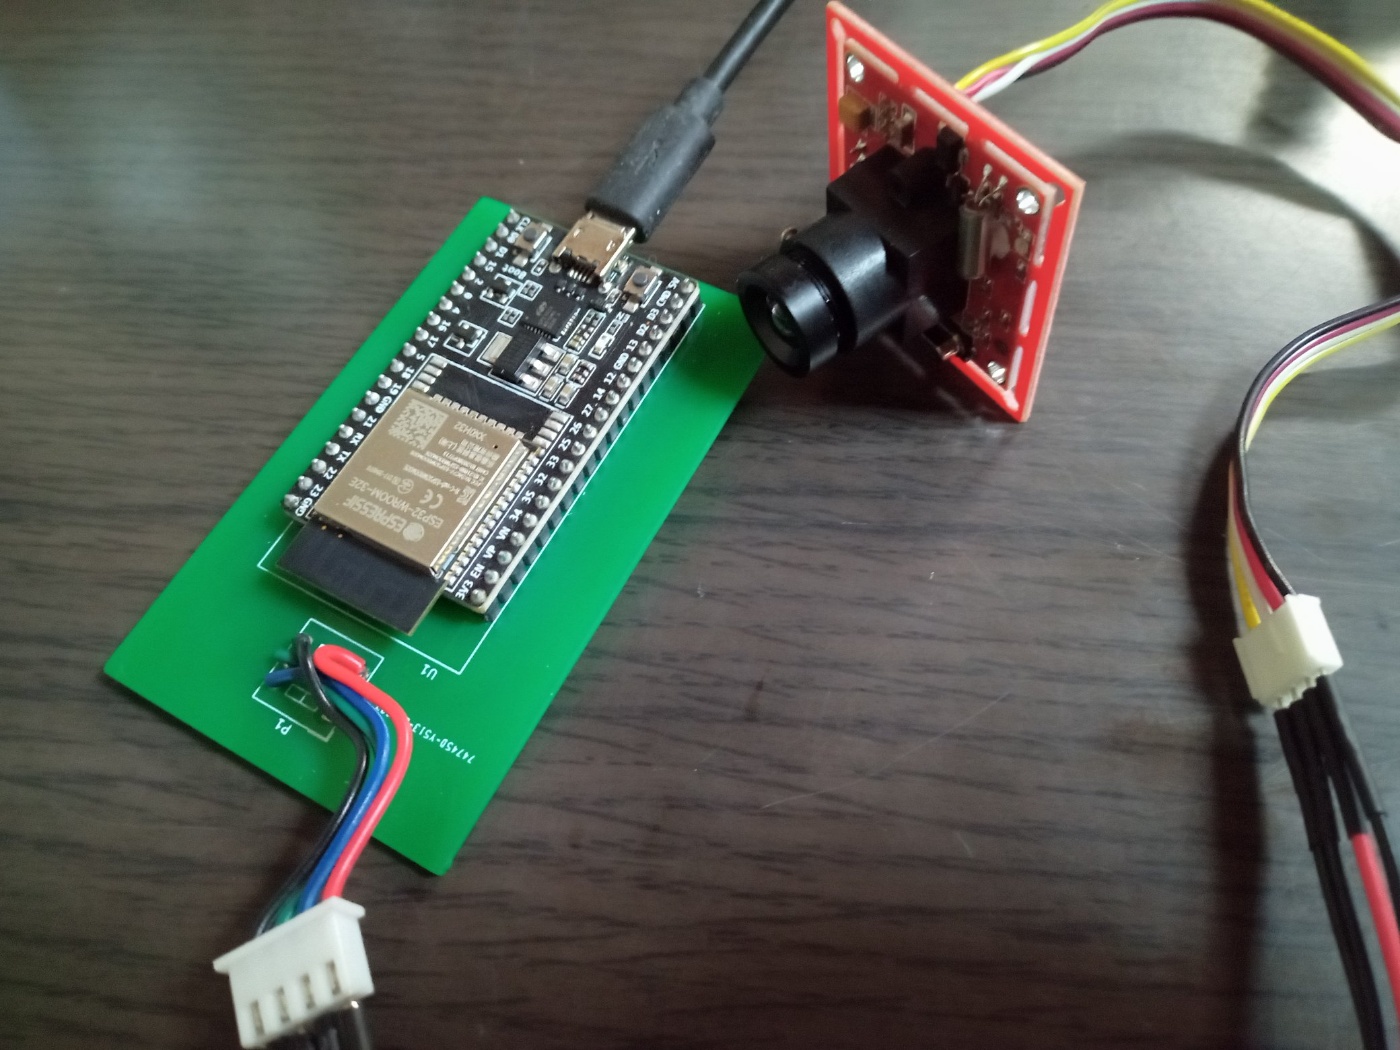
上記画像のように、5V GND UART(21,22)を接続して半田付け行う。
③ESP32のファームウェアを書き込む
自分の環境に合わせて下記3つを変更ください。
const char* ssid = "SSID";←接続するWIFIのSSIDを記述
const char* password = "PASS";←接続するWIFIのパスワードを記述
const char* URL = "ENDPOINT"; ←送信先サーバのURLを記述
base64形式で画像データとして送信しています。
ソースコード
#include<SoftwareSerial.h>
#include <base64.h>
#include <WiFi.h>
#include <HTTPClient.h>

const char* ssid = "SSID";
const char* password =  "PASS";
const char* URL =  "ENDPOINT";
#define PIC_MAX_SIZE 10000

#define PIC_PKT_LEN    128        //data length of each read, dont set this too big because ram is limited
#define PIC_FMT_VGA    7
#define PIC_FMT_CIF    5
#define PIC_FMT_OCIF   3
#define CAM_ADDR       0

#define PIC_FMT        PIC_FMT_CIF

#define SEREAL_RX 21 //21
#define SEREAL_TX 22 //22
SoftwareSerial CAM_SERIAL(SEREAL_RX, SEREAL_TX);

const byte cameraAddr = (CAM_ADDR << 5);  // addr
unsigned long picTotalLen = 0;            // picture length

unsigned char image_data[PIC_MAX_SIZE];
unsigned long image_length = 0;

void setup() {
  Serial.begin(115200);
  CAM_SERIAL.begin(9600);        // GROVE端子の場合
   delay(4000);   //Delay needed before calling the WiFi.begin

  WiFi.begin(ssid, password);

  while (WiFi.status() != WL_CONNECTED) { //Check for the connection
    delay(1000);
    Serial.println("Connecting to WiFi..");
  }

  Serial.println("Connected to the WiFi network");
  initialize();
  preCapture();
}

void loop() {
  Capture();
  GetData();
  delay(2000);
}

void clearRxBuf()
{
  while (CAM_SERIAL.available())
  {
    CAM_SERIAL.read();
  }
}

void sendCmd(char cmd[], int cmd_len)
{
  for (char i = 0; i < cmd_len; i++) CAM_SERIAL.write(cmd[i]);
}

int readBytes(char *dest, int len, unsigned int timeout)
{
  int read_len = 0;
  unsigned long t = millis();
  while (read_len < len)
  {
    while (CAM_SERIAL.available()<1)
    {
      if ((millis() - t) > timeout)
      {
        return read_len;
      }
    }
    *(dest+read_len) = CAM_SERIAL.read();
    // Serial.write(*(dest+read_len));
    read_len++;
  }
  return read_len;
}

void initialize()
{
  char cmd[] = {0xaa,0x0d|cameraAddr,0x00,0x00,0x00,0x00} ;
  unsigned char resp[6];

  Serial.print("initializing camera...");

  while (1)
  {
    sendCmd(cmd,6);
    if (readBytes((char *)resp, 6,1000) != 6)
    {
      Serial.print(".");
      continue;
    }
    if (resp[0] == 0xaa && resp[1] == (0x0e | cameraAddr) && resp[2] == 0x0d && resp[4] == 0 && resp[5] == 0)
    {
      if (readBytes((char *)resp, 6, 500) != 6) continue;
      if (resp[0] == 0xaa && resp[1] == (0x0d | cameraAddr) && resp[2] == 0 && resp[3] == 0 && resp[4] == 0 && resp[5] == 0) break;
    }
  }
  cmd[1] = 0x0e | cameraAddr;
  cmd[2] = 0x0d;
  sendCmd(cmd, 6);
  //Serial.println("\nCamera initialization done.");
}

void preCapture()
{
  char cmd[] = { 0xaa, 0x01 | cameraAddr, 0x00, 0x07, 0x00, PIC_FMT };
  unsigned char resp[6];

  while (1)
  {
    clearRxBuf();
    sendCmd(cmd, 6);
    if (readBytes((char *)resp, 6, 100) != 6) continue;
    if (resp[0] == 0xaa && resp[1] == (0x0e | cameraAddr) && resp[2] == 0x01 && resp[4] == 0 && resp[5] == 0) break;
  }
}

void Capture()
{
  char cmd[] = { 0xaa, 0x06 | cameraAddr, 0x08, PIC_PKT_LEN & 0xff, (PIC_PKT_LEN>>8) & 0xff ,0};
  unsigned char resp[6];

  while (1)
  {
    clearRxBuf();
    sendCmd(cmd, 6);
    if (readBytes((char *)resp, 6, 100) != 6) continue;
    if (resp[0] == 0xaa && resp[1] == (0x0e | cameraAddr) && resp[2] == 0x06 && resp[4] == 0 && resp[5] == 0) break;
  }
  cmd[1] = 0x05 | cameraAddr;
  cmd[2] = 0;
  cmd[3] = 0;
  cmd[4] = 0;
  cmd[5] = 0;
  while (1)
  {
    clearRxBuf();
    sendCmd(cmd, 6);
    if (readBytes((char *)resp, 6, 100) != 6) continue;
    if (resp[0] == 0xaa && resp[1] == (0x0e | cameraAddr) && resp[2] == 0x05 && resp[4] == 0 && resp[5] == 0) break;
  }
  cmd[1] = 0x04 | cameraAddr;
  cmd[2] = 0x1;
  while (1)
  {
    clearRxBuf();
    sendCmd(cmd, 6);
    if (readBytes((char *)resp, 6, 100) != 6) continue;
    if (resp[0] == 0xaa && resp[1] == (0x0e | cameraAddr) && resp[2] == 0x04 && resp[4] == 0 && resp[5] == 0)
    {
      if (readBytes((char *)resp, 6, 1000) != 6)
      {
        continue;
      }
      if (resp[0] == 0xaa && resp[1] == (0x0a | cameraAddr) && resp[2] == 0x01)
      {
        picTotalLen = (resp[3]) | (resp[4] << 8) | (resp[5] << 16);
        Serial.print("picTotalLen:");
        Serial.println(picTotalLen);
        break;
      }
    }
  }
}

void GetData()
{
  unsigned int pktCnt = (picTotalLen) / (PIC_PKT_LEN - 6);
  if ((picTotalLen % (PIC_PKT_LEN-6)) != 0) pktCnt += 1;

  char cmd[] = { 0xaa, 0x0e | cameraAddr, 0x00, 0x00, 0x00, 0x00 };
  unsigned char pkt[PIC_PKT_LEN];

  image_length = 0;

  for (unsigned int i = 0; i < pktCnt; i++)
  {
    cmd[4] = i & 0xff;
    cmd[5] = (i >> 8) & 0xff;

    int retry_cnt = 0;
  retry:
    delay(10);
    clearRxBuf();
    sendCmd(cmd, 6);
    uint16_t cnt = readBytes((char *)pkt, PIC_PKT_LEN, 200);

    unsigned char sum = 0;
    for (int y = 0; y < cnt - 2; y++)
    {
      sum += pkt[y];
    }
    if (sum != pkt[cnt-2])
    {
      if (++retry_cnt < 100) goto retry;
      else break;
    }

    if(picTotalLen < PIC_MAX_SIZE)
    {
      int co;
      for(co = 0; co < (cnt-6) ; co++)
      {
        image_data[image_length] = pkt[co + 4];
        image_length++;
      }
    }
  }

  if(picTotalLen < PIC_MAX_SIZE)
  {
    //Serial.print("data:image/jpeg;base64,");
    String encoded = base64::encode(image_data, image_length);
    Serial.println("{ \"img\": \""+encoded+ "\"}");
    if(WiFi.status()== WL_CONNECTED){   //Check WiFi connection status
        HTTPClient http;
        http.begin(URL);  //Specify destination for HTTP request
        http.addHeader("Content-Type", "text/plain");             //Specify content-type header
        int httpResponseCode = http.POST("{ \"img\": \""+encoded+ "\"}");   //Send the actual POST request
        if(httpResponseCode>0){
            String response = http.getString();                       //Get the response to the request
            Serial.println(httpResponseCode);   //Print return code
            Serial.println(response);           //Print request answer
        }else{
            Serial.print("Error on sending POST: ");
            Serial.println(httpResponseCode);
        }
        http.end();  //Free resources
    }else{
        Serial.println("Error in WiFi connection");
    }
  }
  cmd[4] = 0xf0;
  cmd[5] = 0xf0;
  sendCmd(cmd, 6);
}
④画像保存用のサーバスクリプトを実装
たった五行の記述でサーバに画像を保存することができます🤗
今回は、指定ディレクトリにtest.jpgで毎回保存していましたが、保存ファイル名をタイムスタンプにすることで画像を蓄積させることも可能です!また、DBに保存するのもいいかもしれません。
ソースコード
<?php
  $postdata = file_get_contents('php://input');
  $datajson = (array)json_decode($postdata, true);
  $data =  $datajson['img'];
  $img = base64_decode($data);
  file_put_contents('./folder/test.jpg', $img);
?>
⑤画像表示用のHTMLコードを実装
ソースコード
<!DOCTYPE html>
<html>
  <head>
   <title>CAM View</title>
    <script>
      document.addEventListener('DOMContentLoaded', function(){
        const RELOAD_SPAN = 2000;
        function reload(){
          document.getElementById('figure').src = './folder/test.jpg' + '?' + Date.now();
	  //画像を回転する場合に利用↓
          //var d = 180;
          //var e = document.getElementById("figure");
          //e.style.transform = "rotate(" + d + "deg)";
        }
        setInterval(reload, RELOAD_SPAN);
      });
    </script>
  </head>
  <body>
    <h1>CAM View</h1>
    <img id="figure" width="50%" height="50%" src="./folder/test.jpg"><br>
  </body>
</html>
最後に
いかがだったでしょうか。
IoTネットワークカメラを作ってみました。
IoTはハードウェアからソフトウェア、ネットワークと多岐にわたる知識が必要となり、敷居が高く感じていた方が多いと思います。
ですが、今回の記事で思ったより気軽に体感できたのではないでしょうか?
今回の記事の内容をさらに拡張させたり付加機能をつけていって、自分なりのカメラソリューションを作ってみるのもありですね👍
この記事が安価でIoTカメラを作ってみたい人にとって何らかの手助けになると幸いです。
また、コメントや指摘、質問等お待ちしております。気軽にどうぞ^^
zenn初投稿の記事を締めくくらせていただきます。それでは✋
Discussion