🍇
WPFでフォントリソース(Noto Sans JP)を適用する
WPF開発で、フォントファイル(.ttf)からフォントを読み込んで表示する機会があったので、その方法を記述します。
前準備
使用したフォントは「Noto Sans JP」です。
以下のページからフォントファイルをダウンロードしました。
zipファイルを適当な場所であらかじめ解凍しておきます。
本記事ではNotoSansJP-Regular.ttfを表示することを例にします。
zipファイルを解凍するとstaticフォルダの中にNotoSansJP-Regular.ttfがあります。
Visual Studioでの操作
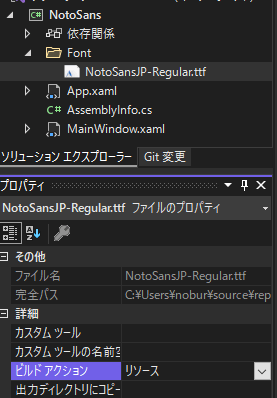
(1)プロジェクトにFontフォルダを作成します(フォルダ名は任意です)。
(2)Fontフォルダに、zipファイルの中にあるNotoSansJP-Regular.ttfファイルを追加します。
(3)ビルドアクションを「リソース」に設定します。
※出力ディレクトリにコピーするオプションを設定する必要はありません。

(4)App.xamlの<Application.Resources>を以下のように編集します。
App.xaml
<Application x:Class="NotoSans.App"
             xmlns="http://schemas.microsoft.com/winfx/2006/xaml/presentation"
             xmlns:x="http://schemas.microsoft.com/winfx/2006/xaml"
             xmlns:local="clr-namespace:NotoSans"
             StartupUri="MainWindow.xaml">
    <Application.Resources>
        <ResourceDictionary>
            <FontFamily x:Key="NotoSansJP">
                /NotoSans;component/Font/NotoSansJP-Regular.ttf#Noto Sans JP Regular
            </FontFamily>
        </ResourceDictionary>
    </Application.Resources>
</Application>
※「NotoSans」はVisual Studioのプロジェクト名です。
(5)フォントを使用するUI要素のFontFamilyに(4)で設定したキーを割り当てます。
MainWindow.xaml
<Window x:Class="NotoSans.MainWindow"
        xmlns="http://schemas.microsoft.com/winfx/2006/xaml/presentation"
        xmlns:x="http://schemas.microsoft.com/winfx/2006/xaml"
        xmlns:d="http://schemas.microsoft.com/expression/blend/2008"
        xmlns:mc="http://schemas.openxmlformats.org/markup-compatibility/2006"
        xmlns:local="clr-namespace:NotoSans"
        mc:Ignorable="d"
        Title="MainWindow" Height="450" Width="800">
    <Grid>
        <StackPanel>
            <TextBlock Text="サンプル文字列(Yu Gothic UI)" FontSize="20"/>
            <TextBlock Text="サンプル文字列(Noto Sans JP Regular)" FontSize="20" FontFamily="{StaticResource NotoSansJP}"/>
        </StackPanel>
    </Grid>
</Window>
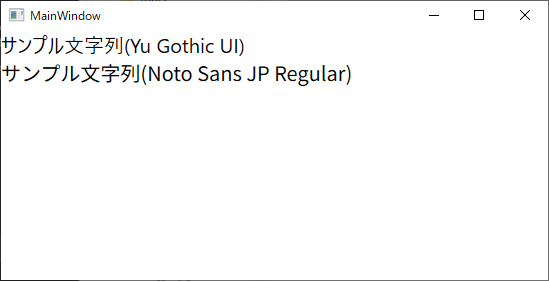
実行結果

備考
Noto Sans JPの他のフォント(MediumやThinなど)も同様に表示することができます。
Discussion