Honoを使ってシンプルなCRUD機能を持つAPIを作成
内容
Honoを使用してOpenapiに沿った形式でSwagger-uiでテストができるようなCRUD機能を持つAPIを作成する
目的
自分でCRUD機能を実装する際にどんな順番で実装してたかを伝わるように書きたかった
環境構築
プロジェクト作成
Hello world
$ pnpm create hono@latest .
bun, Yes, pnpmの順番で選択してください.
import { Hono } from 'hono';

const app = new Hono();

app.get('/', (c) => {
  return c.text('Hello Hono!');
})

export default app;
がsrc以下に作成されます
$ pnpm dev

> honoCRUD@ dev D:\vscodeprojects\honoCRUD
> bun run --hot src/index.ts

Started development server: http://localhost:3000

にアクセスすることが可能になります.
ディレクトリ構成を考える
FE開発との切り分けを意識して今回はviewを使用しないことにしましょう.
src
├─handlers
├─models
├─routes
└─services
のディレクトリ構成で開発を進めます.
-
Route: URLとHTTPメソッドを,どの処理に結びつけるかだけを定義します.(例:
GET /users/:idはgetUser処理へ) -
Handler: HTTPリクエストを直接受け取り,レスポンスを返すことだけに責任を持ちます.
- リクエストの解析(パスパラメータ、クエリ、ボディの取得)
- 簡単なバリデーション
-
Serviceを呼び出してビジネスロジックを実行させる -
Serviceから受け取った結果をJSONなどの形式に整形し、HTTPステータスコードと共にクライアントに返す
- Service: アプリケーションのコアとなるビジネスロジックに責任を持ちます.HTTPのことは一切関知しません.
シンプルなAPIの作成
まずはメモリ上でテキストを操作するCRUD機能を作成してみましょう.
APIとしての実装を考えているためindex.tsに変更を加えます.
import { Hono } from "hono";

+ const api = new Hono().basePath("/api");
- const app = new Hono();

+ api.get("/", (c) => {
- app.get('/', (c) => {
    return c.text("Hello Hono!");
});

+ export default api;
- export default app;
ダミーデータを追加し,GETメソッドの作成に移ります
export interface Post {
    id: number;
    authorId: string;
    content: string;
    createdAt: Date;
}
import { Post } from "../models/posts";

export const POSTS: Post[] = [
    {
        id: 1,
        authorId: "1",
        content: "Hello World",
        createdAt: new Date(),
    },
    {
        id: 2,
        authorId: "2",
        content: "Hono is fast",
        createdAt: new Date(),
    },
    {
        id: 3,
        authorId: "3",
        content: "Use fast tools",
        createdAt: new Date(),
    },
];
routes以下にpost.tsを作成し,routeの設定を行っていきましょう
import { Hono } from "hono";
import { POSTS } from "../utils/dummyData";

const postRouter = new Hono();

postRouter.get("/", (c) => {
    const posts = POSTS;
    return c.json(posts, 200);
});

export { postRouter };
作成したpostRouterをindex.tsでimportし,利用していきます.
import { Hono } from "hono";
+ import { postRouter } from "./routes/posts";

const api = new Hono().basePath("/api");

+ api.route("/posts", postRouter);

api.get("/", (c) => {
    return c.text("Hello Hono!");
});

export default api;
http://localhost:3000/api/postsにアクセスすることで
[
  {
    "id": 1,
    "authorId": "1",
    "content": "Hello World",
    "createdAt": "2025-08-28T05:27:35.991Z"
  },
  {
    "id": 2,
    "authorId": "2",
    "content": "Hono is fast",
    "createdAt": "2025-08-28T05:27:35.991Z"
  },
  {
    "id": 3,
    "authorId": "3",
    "content": "Use fast tools",
    "createdAt": "2025-08-28T05:27:35.991Z"
  }
]
が表示されます.
本来であればこの後POSTメソッドを作成し,Postmanなどを使用してPOSTメソッドの確認などを行うのですが,今回はHonoに用意されている@hono/zod-openapi, @hono/swagger-uiを使用していきます.
index.tsの書き換え
+ import { OpenAPIHono } from "@hono/zod-openapi";
+ import { swaggerUI } from "@hono/swagger-ui";
- import { Hono } from "hono";
import { postRouter } from "./routes/posts";


const api = new OpenAPIHono().basePath("/api");

+ api.doc("/doc", {
+     openapi: "3.0.0",
+     info: {
+         version: "1.0.0",
+         title: "simple CRUD API",
+     },
+ });
+ api.get("/ui", swaggerUI({ url: "/api/doc" }));

api.route("/posts", postRouter);

api.get("/", (c) => {
    return c.text("Hello Hono!");
});

export default api;
こうすることでhttp://localhost:3000/api/uiでAPIを可視化することができます.

レスポンスの形状を定めるためにzod schemaを設定します.
詳細な情報についてはこちらのgithubを参照
+ import { z } from "@hono/zod-openapi";

- export interface Post {
-     id: number
-     authorId: string;
-     content: string;
-     createdAt: Date;
- }

+ export const postSchema = z
+     .object({
+         id: z.number()
+         authorId: z.string(),
+         content: z.string(),
+         createdAt: z.date(),
+     })
+     .openapi("Post");

+ export type Post = z.infer<typeof postSchema>;

+ export const postArraySchema = z.array(postSchema).openapi("PostArray");
同様にroutes/posts.tsについても変更を加えます.
+ import { OpenAPIHono, createRoute } from "@hono/zod-openapi";
+ import { postArraySchema } from "../models/posts";
- import { Hono } from "hono";
import { POSTS } from "../utils/dummyData";

- const postRouter = new Hono();
const postRouter = new OpenAPIHono();

+ const getUserRoute = createRoute({
+     path: "/",
+     method: "get",
+     description: "Getting posts",
+     responses: {
+         200: {
+             description: "Successful response",
+             content: {
+                 "application/json": {
+                     schema: postArraySchema,
+                 },
+             },
+         },
+     },
+ });

+ postRouter.openapi(getUserRoute, (c: Context) => {
+    return c.json(POSTS, 200);
+ });
- postRouter.get("/", (c) => {
-     const posts = POSTS;
-     return c.json(posts, 200);
- });

export { postRouter };
その他のルートの作成
雛形の作成
同様にcreate, update, deleteについてもルートを追加していきます.
変更量が多くなってくるためここからは追加部分を中心に説明します.
// post投稿用ルート
const createPostRoute = createRoute({
    path: "/",
    method: "post",
    description: "Creating post",
    request: {
        body: {
            content: {
                "application/json": {
                    schema: postSchema,
                    example: POSTS[0],
                },
            },
        },
    },
    responses: {
        200: {
            description: "Successful response",
        },
    },
});

postRouter.openapi(createPostRoute, (c) => {
    return c.json(null, 200);
});

// post編集用ルート
const updatePostRoute = createRoute({
    path: "/{id}",
    method: "put",
    description: "Updating post",
    request: {
        body: {
            content: {
                "application/json": {
                    schema: postSchema,
                    example: POSTS[1],
                },
            },
        },
    },
    responses: {
        200: {
            description: "Successful response",
        },
    },
});

postRouter.openapi(updatePostRoute, (c) => {
    return c.json(null, 200);
});

// post削除用ルート
const deletePostRoute = createRoute({
    path: "/{id}",
    method: "delete",
    description: "Deleting post",
    responses: {
        200: {
            description: "Successful response",
        },
    },
});

postRouter.openapi(deletePostRoute, (c) => {
    return c.json(null, 200);
});
CREATE(POST)
まず初めにpost投稿用のルートを作成していきます
// post投稿用ルート
const createPostRoute = createRoute({
    path: "/",
    method: "post",
    description: "Creating post",
    request: {
        body: {
            content: {
                "application/json": {
-                   schema: postSchema,
-                   example: POSTS[0],
+                   schema: PostRequestSchema,
+                   example: NEWPOST,
                },
            },
        },
    },
    responses: {
        200: {
            description: "Successful response",
        },
    },
});

// 投稿用ロジック
postRouter.openapi(createPostRoute, (c) => {
-   return c.json(null, 200);
+   const newId = POSTS.length + 1;
+   const newPost: Post = {
+       id: newId,
+       authorId: c.req.valid("json").authorId,
+       content: c.req.valid("json").content,
+       createdAt: new Date(),
+   };
+   console.log(newPost);
+   POSTS.push(newPost);
+   return c.json(newPost, 200);
});
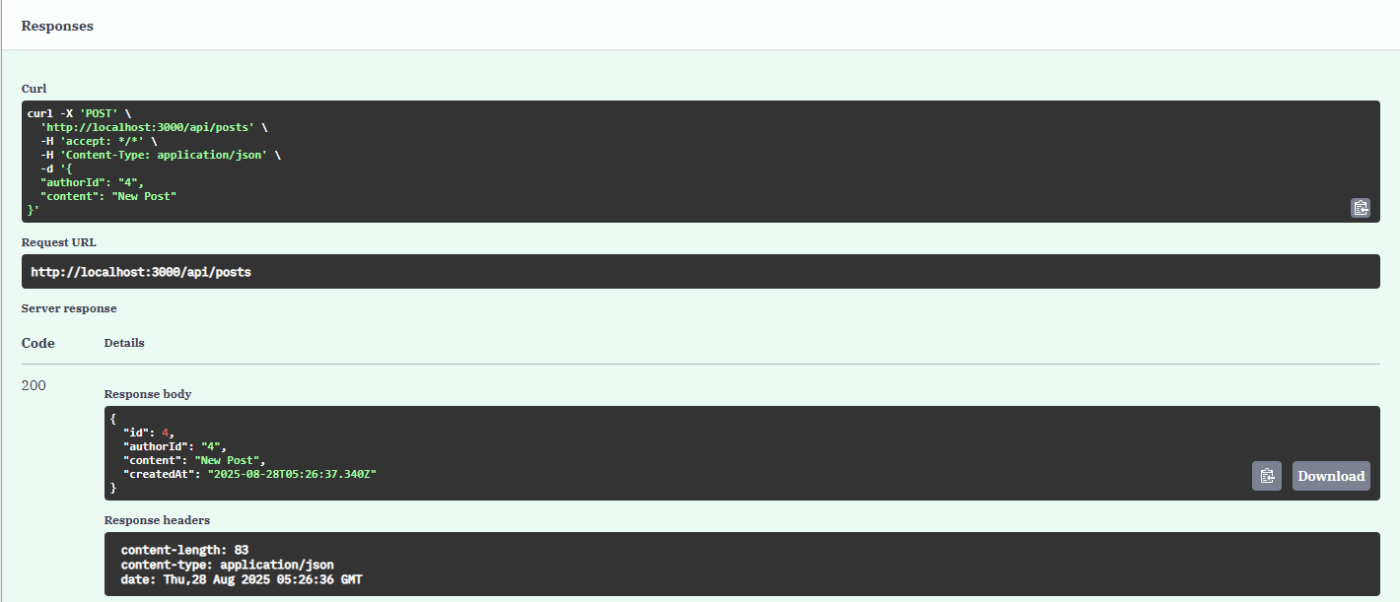
これでPOSTSに新たなPOSTが追加されることになります.
実際にSwagger-uiを使用してpostが追加されることを確認しましょう.

UPDATE(PUT)
次にpost編集用のメソッドを追加していきましょう.
余談ですがREST API講座に出てきた冪等性についても思い出しておきましょう.
まず編集用のschemaを追加していきます.
export const ParamsSchema = z.object({
    id: z.string().openapi({
        param: {
            name: "id",
            in: "path",
        },
        example: "1",
    }),
});

export const PostUpdateSchema = z.object({
    content: z.string(),
});
paramのin: "path"をin: "query"に変更することでqueryにも対応することが可能です.
routeの書き換えは以下の様になります.
// post編集用ルート
const updatePostRoute = createRoute({
    path: "/{id}",
    method: "put",
    description: "Updating post",
    request: {
        params: ParamsSchema,
        body: {
            content: {
                "application/json": {
                    schema: PostUpdateSchema,
-                   example: POSTS[1].content,
+                   example: { content: POSTS[1].content },
                },
            },
        },
    },
    responses: {
        200: {
            description: "Successful response",
        },
    },
});

// post編集用ロジック
postRouter.openapi(updatePostRoute, (c) => {
-   return c.json(null, 200);
+   console.log(c.req.valid("json").content);
+   const id = c.req.valid("param").id;
+   const index = POSTS.findIndex((post) => post.id === Number(id));
+   console.log(POSTS[0].id);
+   POSTS[index].content = c.req.valid("json").content;
+   return c.json(POSTS[index], 200);
});
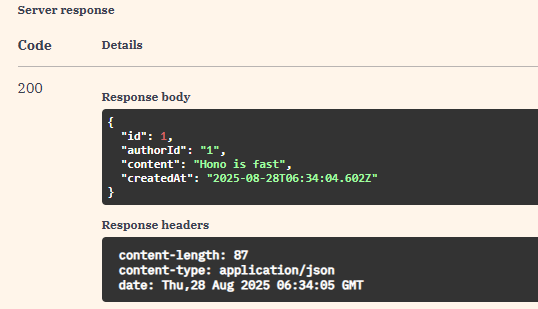
Swagger-uiでテストを行い2つめのpostの内容が変更されていることを確認しましょう

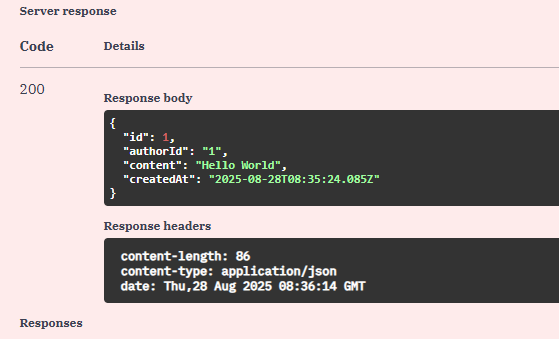
DELETE(DELETE)
最後にpost削除を行うためのルートを設定します.
これはPUTメソッドより簡単で削除したいpostのidだけを指定すれば実装できます.
// post削除用ルート
const deletePostRoute = createRoute({
    path: "/{id}",
    method: "delete",
    description: "Deleting post",
+   request: {
+       params: ParamsSchema,
+   },
    responses: {
        200: {
            description: "Successful response",
        },
    },
});

// post削除用ロジック
postRouter.openapi(deletePostRoute, (c) => {
-   return c.json(null, 200);
+   const id = c.req.valid("param").id;
+   const deletedPost = POSTS.find((post) => post.id === Number(id));
+   POSTS.splice(Number(id) - 1, 1);
+   return c.json(deletedPost, 200);
});

Discussion