CDK v2 でAzureADとOIDC連携するAPI Gateway - Lambdaを作成する
背景
AzureADに登録されている特定のユーザーだけにwebAPI叩かせたい時ってありますよね。
色々調べると、API Gateway v2 (HTTP API)ではかなり楽にIdPと連携できるようになっていたので、存分にその恩恵を享受しました。
さて、いい感じに出来たし、CDKで構築しますか
↓
CDK v2の記事全然ねえ....
ということで備忘録を兼ねてまとめておきます。
詳しく書かないこと
- OIDC認証について
- ReactアプリとAzureAD連携の部分
構成
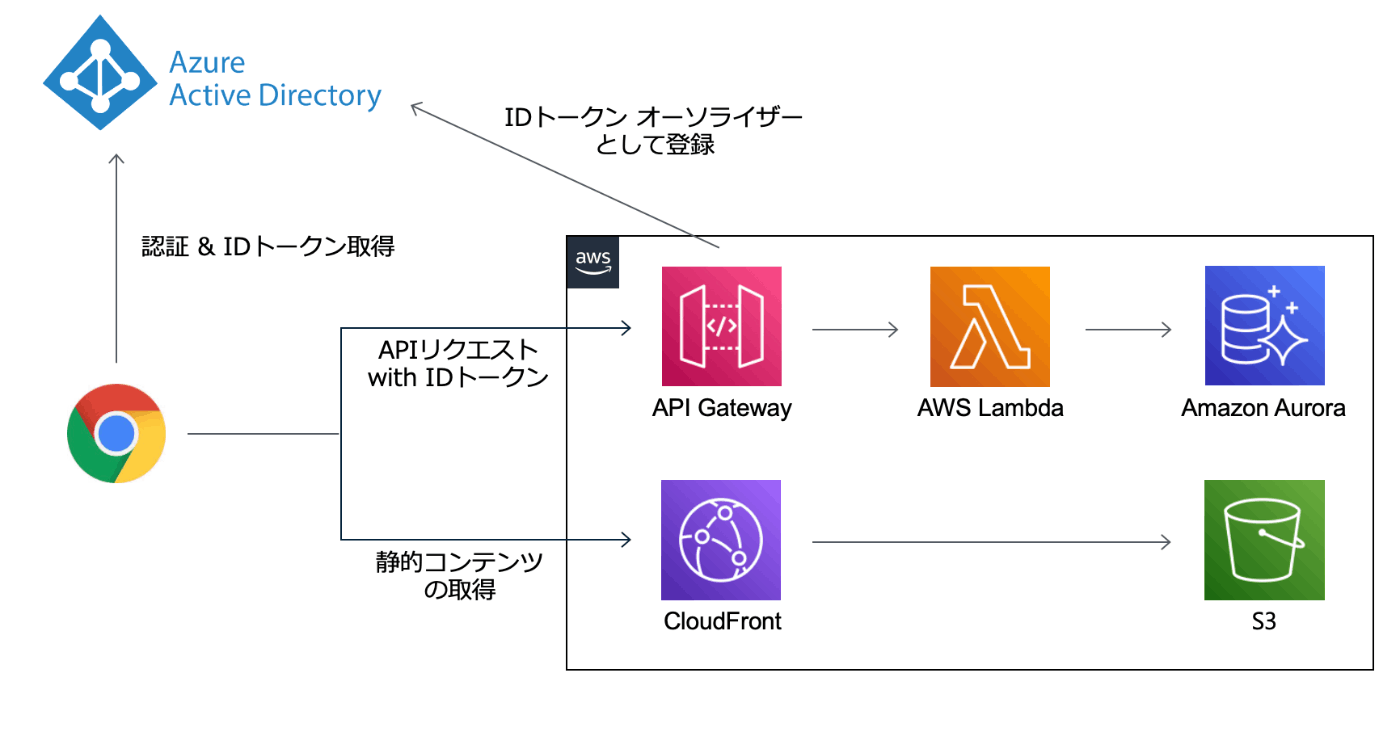
AzureAD
連携するアプリをクライアントとして登録します。
書きたいことは山程ありますが、、割愛!AzureAD GUIのクセがすごいんじゃ。
フロントエンド
create-react-appで作成。npm buildした成果物をS3に配置し、cloudfrontで提供。
まずログイン画面を表示し、AzureADでの認証に成功するとIDトークンの取得を行うようにした。
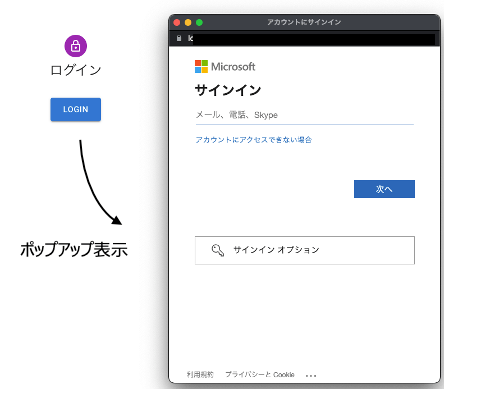
reactアプリとAzureADの連携は、MicroSoft Authenticate Library(MSAL)にお世話になりました。機会があれば紹介します。
取得したIDトークンはただの文字列なので、axiosでheaderに載せてAPIアクセスを行います。
const response = await axios
    .get(`${API_URL}`, {
        headers: {
	    Authorization: `Bearer ${idToken}`,
	},
    })
    .catch((error) => {...})
ここでのBearerはBearerトークンであることの意思表示です。
Bearerトークンは持参人トークンというピンとこない日本語で呼ばれており、「トークンさえ持っていれば、その持ち主の検証はしない。」ということを意味しています。(切符みたいなものですね)
バックエンド
API Gateway v2 & lambda & RDSの基本的な構成を採用。JWTオーソライザーとしてIdPを簡単に登録できるのでREST APIではなくHTTP APIにしました。
API Gatewayにおいて、ヘッダーで受け取ったIDトークンの検証をAzureADと連携して行い、
AzureAD上に登録されたユーザーからのリクエストであれば後続のlambdaを呼び出します。
不正なIDトークンの場合は401 Unauthorizedを返します。
これにより、lambda上でIDトークンの検証を行う必要がなくなります。
lambdaからはAurora serverlessクラスターにクエリを投げます。
AuroraはVPC&private subnetが必要なので、そのあたりも適宜用意します。
環境
$ cdk --version
2.16.0 (build 4c77925)
バックエンドのCDKコード
例として https://API_ROOT_URL/name に対するGETリクエストのAPIを作成します。
とりあえずコード全体はこちら。
import {
  Stack,
  StackProps,
  Duration,
  aws_lambda as lambda,
  aws_ec2 as ec2,
  aws_rds as rds,
} from "aws-cdk-lib";
import * as apigw from "@aws-cdk/aws-apigatewayv2-alpha";
import { HttpLambdaIntegration } from "@aws-cdk/aws-apigatewayv2-integrations-alpha";
import { Construct } from "constructs";
import * as path from "path";

export class CdkStack extends Stack {
  constructor(scope: Construct, id: string, props?: StackProps) {
    super(scope, id, props);

    // Aurora用VPCの定義
    const vpc = new ec2.Vpc(this, "Vpc", {
      cidr: VPC_CIDR,
      // privatesubnetのみ作成。isolatedなので、NAT Gatewayも作られない。
      subnetConfiguration: [
        {
          cidrMask: 26,
          name: "rds",
          subnetType: ec2.SubnetType.PRIVATE_ISOLATED,
        },
      ],
      maxAzs: 2,
      vpcName: "vpcName",
    });

    // Aurora serverlessの定義
    const cluster = new rds.ServerlessCluster(this, "Cluster", {
      engine: rds.DatabaseClusterEngine.AURORA_MYSQL,
      vpc,
      parameterGroup: rds.ParameterGroup.fromParameterGroupName(
        this,
        "ParameterGroup",
        "default.aurora-mysql5.7"
      ),
      scaling: {
        autoPause: Duration.minutes(10),
        minCapacity: rds.AuroraCapacityUnit.ACU_1,
        maxCapacity: rds.AuroraCapacityUnit.ACU_2,
      },
      enableDataApi: true,
      vpcSubnets: {
        subnetType: ec2.SubnetType.PRIVATE_ISOLATED,
      },
    });

    // API Gatewayの定義
    const httpApi = new apigw.HttpApi(this, "httpApi", {
      apiName: "apiName",
      corsPreflight: {
        allowHeaders: ["Authorization", "Content-Type"],
        allowMethods: [
          apigw.CorsHttpMethod.GET,
          apigw.CorsHttpMethod.POST,
          apigw.CorsHttpMethod.OPTIONS,
        ],
        allowOrigins: ["*"],
        maxAge: Duration.seconds(300),
      },
    });
    // API Gateway Authorizerの定義
    const httpApiAuthorizer = new apigw.HttpAuthorizer(
      this,
      "httpApiAuthorizer",
      {
        httpApi: httpApi,
        identitySource: ["$request.header.Authorization"],
        type: apigw.HttpAuthorizerType.JWT,
        authorizerName: "AzureAD",
	// アプリケーションIDを指定
        jwtAudience: [JWT_AUDIENCE],
	// JWTのIssuerを指定
        jwtIssuer: JWT_ISSUER,
      }
    );
    // 何故かhttpApiAuthorizerはaddRoutesのauthorizerに渡せないので、渡せる形式に変換
    const iHttpRouteAuthorizer =
      apigw.HttpAuthorizer.fromHttpAuthorizerAttributes(
        this,
        "iHttpRouteAuthorizer",
        {
          authorizerId: httpApiAuthorizer.authorizerId,
          authorizerType: "JWT",
        }
      );

    // APIのlambda
    const getNameLambda = new lambda.Function(
      this,
      "get-name-lambda",
      {
        runtime: lambda.Runtime.PYTHON_3_9,
        handler: "getName.lambda_handler",
        code: lambda.Code.fromAsset(path.join(__dirname, "../lambda")),
        environment: {
          CLUSTER_ARN: cluster.clusterArn,
          SECRET_ARN: cluster.secret!.secretArn,
        },
        functionName: "get-name",
        timeout: Duration.minutes(2),
      }
    );
    cluster.grantDataApiAccess(getNameLambda);
    // API path指定
    httpApi.addRoutes({
      path: "/name",
      methods: [apigw.HttpMethod.GET],
      integration: new HttpLambdaIntegration(
        "get-name-integration",
        getNameLambda
      ),
      // JWT認証のオーソライザーを定義
      authorizer: iHttpRouteAuthorizer,
    });
API Gateway向けライブラリのimport
まだstableではないので-alphaライブラリからimport
import * as apigw from "@aws-cdk/aws-apigatewayv2-alpha";
import { HttpLambdaIntegration } from "@aws-cdk/aws-apigatewayv2-integrations-alpha";
API Gateway
素直に設定していく。CORS設定はcorsPreflightに詰めていく。allowMethodsは適宜修正する。
const httpApi = new apigw.HttpApi(this, "httpApi", {
  apiName: "apiName",
    corsPreflight: {
      allowHeaders: ["Authorization", "Content-Type"],
      allowMethods: [
        apigw.CorsHttpMethod.GET,
        apigw.CorsHttpMethod.POST,
        apigw.CorsHttpMethod.OPTIONS,
      ],
      allowOrigins: ["*"],
      maxAge: Duration.seconds(300),
    },
  }
);
API Gateway Authorizer
JWTオーソライザーの設定。
jwtAudienceはAzureAD上で登録したアプリケーションのアプリケーション(クライアント)ID、
jwtIssuerは https://login.microsoftonline.com/{AzureADのテナントID}/v2.0
これらはIDトークンをデコードして、audとissから取得することも出来る。
// API Gateway Authorizerの定義
const httpApiAuthorizer = new apigw.HttpAuthorizer(
  this,
  "httpApiAuthorizer",
  {
    httpApi: httpApi,
    identitySource: ["$request.header.Authorization"],
    type: apigw.HttpAuthorizerType.JWT,
    authorizerName: "AzureAD",
    // アプリケーションIDを指定
    jwtAudience: [JWT_AUDIENCE],
    // JWTのIssuerを指定
    jwtIssuer: JWT_ISSUER,
  }
);
更に、定義したauthorizerをimportし、httpApiで受け取れる変数(iHttpRoute型)に変換する
const iHttpRouteAuthorizer =
  apigw.HttpAuthorizer.fromHttpAuthorizerAttributes(
    this,
    "iHttpRouteAuthorizer",
    {
      authorizerId: httpApiAuthorizer.authorizerId,
      authorizerType: "JWT",
    }
  );
lambdaの定義
RDSにアクセスするための権限を付与するのを忘れない(忘れた)
    // APIのlambda
    const getNameLambda = new lambda.Function(
      this,
      "get-name-lambda",
      {
        runtime: lambda.Runtime.PYTHON_3_9,
        handler: "getName.lambda_handler",
        code: lambda.Code.fromAsset(path.join(__dirname, "../lambda")),
	// DataApiでアクセスするので、自動生成されるclusterArnとsecretArnを渡してあげればOK
        environment: {
          CLUSTER_ARN: cluster.clusterArn,
          SECRET_ARN: cluster.secret!.secretArn,
        },
        functionName: "get-name",
        timeout: Duration.minutes(2),
      }
    );
    // DataApiへのアクセス権限をlambdaに付与!!!
    cluster.grantDataApiAccess(getNameLambda);
APIの定義
addRoutesメソッドでAPIを追加していく。
authorizerにはiHttpRoute型の変数を渡してあげる。
// API path指定
httpApi.addRoutes({
  path: "/name",
  methods: [apigw.HttpMethod.GET],
  integration: new HttpLambdaIntegration(
    "get-name-integration",
    getNameLambda
  ),
  // JWT認証のオーソライザーを定義
  authorizer: iHttpRouteAuthorizer,
});
最後に
v2の情報は本当に少ないですね、、、
どなたかの役に立てば嬉しいです。
Discussion