Gradle入門
Gradle徹底入門 次世代ビルドツールによる自動化基盤の構築を買ったはいいものの、バージョンが2.0だった。(最新のGradleは7.2)
だいぶ書き方が変わっているようなので、最新バージョンの場合と読み替えて、その内容をメモしていく。
HelloWorld
task hello {
  doLast{
    println 'Hello Gradle world!'
  }
}
doLastはタスク内部のActionのリストの末尾に追加するメソッド。doFirstにするとリストの先頭に追加する。
なので、上記はdoLastをdoFirstにしても同じように動作する。
実行結果
> Task :hello
Hello Gradle world!

BUILD SUCCESSFUL in 2s
1 actionable task: 1 executed
末尾の1 actionable task: 1 executedは2.0では無かったみたい。
タスクに1つのActionがあり、1つのActionが実行されたということだろう。
組込タスク
gradle tasks
を実行すると、デフォルトで利用できるタスクの一覧が表示される。
> Task :tasks

------------------------------------------------------------
Tasks runnable from root project 'first-gradle'
------------------------------------------------------------

Build Setup tasks
-----------------
init - Initializes a new Gradle build.
wrapper - Generates Gradle wrapper files.

Help tasks
----------
buildEnvironment - Displays all buildscript dependencies declared in root project 'first-gradle'.
dependencies - Displays all dependencies declared in root project 'first-gradle'.
dependencyInsight - Displays the insight into a specific dependency in root project 'first-gradle'.
help - Displays a help message.
javaToolchains - Displays the detected java toolchains.
outgoingVariants - Displays the outgoing variants of root project 'first-gradle'.
projects - Displays the sub-projects of root project 'first-gradle'.
properties - Displays the properties of root project 'first-gradle'.
tasks - Displays the tasks runnable from root project 'first-gradle'.

To see all tasks and more detail, run gradle tasks --all

To see more detail about a task, run gradle help --task <task>

BUILD SUCCESSFUL in 2s
1 actionable task: 1 executed
tasksも組込タスクのひとつ。
デバッグ実行
コマンドラインオプションを指定することで、ログレベルを変更できる。
以下はデバッグ情報を出力する場合のコマンド例。
gradle -d hello
initタスクでプロジェクトの自動生成
空のディレクトリにを作成して以下コマンドを実行する。
gradle init --type java-library
DSLにGroovyとKotlinどちらを選ぶのか聞かれるので、とりあえずデフォルトのGroovyにする。
Select build script DSL:
  1: Groovy
  2: Kotlin
Enter selection (default: Groovy) [1..2]
テストフレームワークが選べるので、デフォルトのJUnit Jupiterを選ぶ。
(JUnit JupiterはJUnit5のこと?)
Select test framework:
  1: JUnit 4
  2: TestNG
  3: Spock
  4: JUnit Jupiter
Enter selection (default: JUnit Jupiter) [1..4]
次にプロジェクト名を入力する。ここではデフォルトのinit-projectを入力。
Project name (default: init-project):
最後にパッケージ名を入力する。デフォルトのinit.projectを入力。
Source package (default: init.project):
以下のディレクトリ構成が作成される。
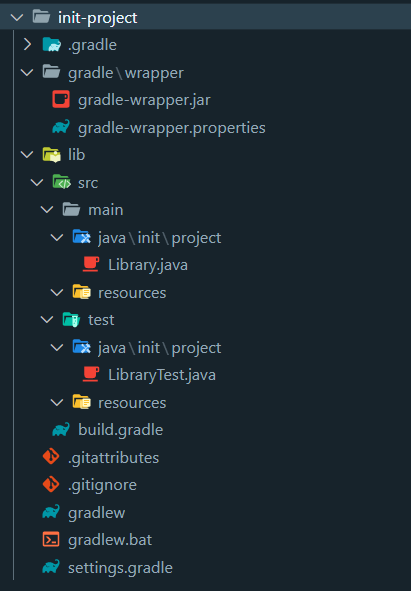
build.gradleは以下の内容。
/*
 * This file was generated by the Gradle 'init' task.
 *
 * This generated file contains a sample Java library project to get you started.
 * For more details take a look at the 'Building Java & JVM projects' chapter in the Gradle
 * User Manual available at https://docs.gradle.org/7.2/userguide/building_java_projects.html
 */

plugins {
    // Apply the java-library plugin for API and implementation separation.
    id 'java-library'
}

repositories {
    // Use Maven Central for resolving dependencies.
    mavenCentral()
}

dependencies {
    // Use JUnit Jupiter for testing.
    testImplementation 'org.junit.jupiter:junit-jupiter:5.7.2'

    // This dependency is exported to consumers, that is to say found on their compile classpath.
    api 'org.apache.commons:commons-math3:3.6.1'

    // This dependency is used internally, and not exposed to consumers on their own compile classpath.
    implementation 'com.google.guava:guava:30.1.1-jre'
}

tasks.named('test') {
    // Use JUnit Platform for unit tests.
    useJUnitPlatform()
}
上から順に見ていく。
plugins {
    // Apply the java-library plugin for API and implementation separation.
    id 'java-library'
}
プラグインとしてjava-libraryを指定している。
java-libraryは、プロジェクトのひな型としては最もシンプルな形式。
詳細は以下を参照。
- https://docs.gradle.org/current/userguide/building_java_projects.html
- https://docs.gradle.org/current/userguide/java_library_plugin.html
repositories {
    // Use Maven Central for resolving dependencies.
    mavenCentral()
}
依存関係解決のためのリポジトリとしてMaven Centralを指定。Mavenを使ったことがある人には馴染み深い。
dependencies {
    // Use JUnit Jupiter for testing.
    testImplementation 'org.junit.jupiter:junit-jupiter:5.7.2'

    // This dependency is exported to consumers, that is to say found on their compile classpath.
    api 'org.apache.commons:commons-math3:3.6.1'

    // This dependency is used internally, and not exposed to consumers on their own compile classpath.
    implementation 'com.google.guava:guava:30.1.1-jre'
}
Maven Centralから取得する依存ライブラリを指定している。
- testImplementation:テスト時のみコンパイルされる。
- api:対象のライブラリをAPIとして公開する。つまり、今作成した
init-projectを利用する側は、ここで指定されているライブラリも利用できる。 - implementation:対象のライブラリをAPIとして公開しない。つまり、
init-projectを利用する側は、ここで指定されているライブラリを利用できない。
tasks.named('test') {
    // Use JUnit Platform for unit tests.
    useJUnitPlatform()
}
JUnitを実行するtestタスクに、JUnit5を使うための設定としてuseJUnitPlatformの実行を追加している。
ここで、次のコマンドでタスク一覧を確認してみる。
gradle tasks
すると、HelloWorldでのタスクよりも多くのタスクが追加されていることがわかる。
Build tasks
-----------
assemble - Assembles the outputs of this project.
build - Assembles and tests this project.
buildDependents - Assembles and tests this project and all projects that depend on it.
buildNeeded - Assembles and tests this project and all projects it depends on.
classes - Assembles main classes.
clean - Deletes the build directory.
jar - Assembles a jar archive containing the main classes.
testClasses - Assembles test classes.

Build Setup tasks
-----------------
init - Initializes a new Gradle build.
wrapper - Generates Gradle wrapper files.

Documentation tasks
-------------------
javadoc - Generates Javadoc API documentation for the main source code.

Help tasks
----------
buildEnvironment - Displays all buildscript dependencies declared in root project 'init-project'.
dependencies - Displays all dependencies declared in root project 'init-project'.
dependencyInsight - Displays the insight into a specific dependency in root project 'init-project'.
help - Displays a help message.
javaToolchains - Displays the detected java toolchains.
outgoingVariants - Displays the outgoing variants of root project 'init-project'.
projects - Displays the sub-projects of root project 'init-project'.
properties - Displays the properties of root project 'init-project'.
tasks - Displays the tasks runnable from root project 'init-project' (some of the displayed tasks may belong to subprojects).

Verification tasks
------------------
check - Runs all checks.
test - Runs the unit tests.
ビルドを実行してみる。
gradle build
成功すると、以下のように表示される。
また、lib/build/libsにjarが生成される。
BUILD SUCCESSFUL in 20s
4 actionable tasks: 4 executed
ちなみにもう一度ビルドを実行すると、4 up-to-dateと表示される。
BUILD SUCCESSFUL in 1s
4 actionable tasks: 4 up-to-date
これは前回のビルドからの変更点をチェックし、変更がない(=up-to-date)場合はスキップしている。
Webプロジェクトの作成
Tomcatプラグインを利用して、簡易なWebプロジェクトを作成する。
まず、initでjava-libraryを作成する。
gradle init --type java-library
build.gradleを編集する。
plugins {
    id "war"
    id "com.bmuschko.tomcat" version "2.7.0"
}

repositories {
    mavenCentral()
}

dependencies {
    providedCompile 'javax:javaee-web-api:6.0'

    def tomcatVersion = '7.0.76'
    tomcat "org.apache.tomcat.embed:tomcat-embed-core:${tomcatVersion}",
           "org.apache.tomcat.embed:tomcat-embed-logging-juli:${tomcatVersion}",
           "org.apache.tomcat.embed:tomcat-embed-jasper:${tomcatVersion}"
}
src/main/java/exampleにHelloServlet.javaを作成する。
package example;

import java.io.*;
import javax.servlet.*;
import javax.servlet.http.*;
import javax.servlet.annotation.*;

@WebServlet(name="HelloServlet", urlPatterns={"/hello"})
public class HelloServlet extends HttpServlet {
  @Override
  protected void doGet(HttpServletRequest reg, HttpServletResponse res) throws ServletException, IOException {
    res.getWriter().print("hello!");
  }
}
src/main/webappにindex.htmlを作成する。
<h1>It's index.html</h1>
Webアプリケーションを実行する。
gradle tomcatRunWar
正常に実行できると、URLが表示される。今回だと http://localhost:8080/lib になる。
gradleのタスクとしては待ち状態のため、80% EXECUTINGで止まるが気にしない。
To honour the JVM settings for this build a single-use Daemon process will be forked. See https://docs.gradle.org/7.2/userguide/gradle_daemon.html#sec:disabling_the_daemon.
Daemon will be stopped at the end of the build

> Task :lib:tomcatRunWar
Started Tomcat Server
The Server is running at http://localhost:8080/lib
<==========---> 80% EXECUTING [14s]
> :lib:tomcatRunWar
http://localhost:8080/lib でindex.htmlが表示され、
http://localhost:8080/lib/hello でHttpServlet#doGetの内容が表示される。
Ctrl+Cでアプリケーションを停止できる。
再度、アプリケーションを実行してみる。
gradle tomcatRunWar
すると、エラーが発生してスタックトレースが表示される。
A child container failed during start
java.util.concurrent.ExecutionException: org.apache.catalina.LifecycleException: Failed to start component [StandardEngine[Tomcat].StandardHost[localhost].StandardContext[/lib]]
        at java.base/java.util.concurrent.FutureTask.report(FutureTask.java:122)
        (省略...)
Caused by: java.lang.Error: factory already defined
        at java.base/java.net.URL.setURLStreamHandlerFactory(URL.java:1184)
   (省略...)
原因はgradleのデーモン。
以下コマンドでデーモンを停止すれば解消する。
gradle --stop
デーモンは繰り返しビルドする際に高速に実行できるようになるが、このように悪さをする場合もある。
デーモンを無効にしたい場合は、プロジェクト直下に以下のgradle.propertiesを作成する。
org.gradle.daemon=false