ラズパイでT-Potを構築する
シリーズ紹介
この記事は、自宅で運用するハニーポットシリーズ#2 です。
#1ではWireGuardサーバの構築について解説しています。
環境
- RaspberryPi4 4GB
- Raspbian OS Lite (64bit)
免責
この記事はハニーポット運用における通信の秘密、マルウェアの解析などについて法的な見解を述べるものではありません。サイバーセキュリティを学習するとともに、その技術を倫理的に使用することが強く求められます。また、筆者はこの記事の内容について一切の責任を負わないものとします。
T-Potとは何か
T-Potは、様々なハニーポットが一体となったソフトウェアです。そもそもハニーポットとは、攻撃者に狙われるサーバで、それにきた攻撃を分析することが目的です。
T-Potではポート別にみると以下のようなサービスをホストしています。公式より引用しています。(2025,09,08 時点)
| Port(s) | Protocol | Direction | Description |
|---|---|---|---|
| 80, 443 | TCP | Outgoing | T-Pot Management: Install, Updates, Logs (OS, GitHub, DockerHub, Sicherheitstacho, etc.) |
| 11434 | TCP | Outgoing | LLM based honeypots: Access your Ollama installation |
| 64294 | TCP | Incoming | T-Pot Management: Sensor data transmission to hive (through NGINX reverse proxy) to 127.0.0.1:64305 |
| 64295 | TCP | Incoming | T-Pot Management: Access to SSH |
| 64297 | TCP | Incoming | T-Pot Management: Access to NGINX reverse proxy |
| 5555 | TCP | Incoming | Honeypot: ADBHoney |
| 22 | TCP | Incoming | Honeypot: Beelzebub (LLM required) |
| 5000 | UDP | Incoming | Honeypot: CiscoASA |
| 8443 | TCP | Incoming | Honeypot: CiscoASA |
| 443 | TCP | Incoming | Honeypot: CitrixHoneypot |
| 80, 102, 502, 1025, 2404, 10001, 44818, 47808, 50100 | TCP | Incoming | Honeypot: Conpot |
| 161, 623 | UDP | Incoming | Honeypot: Conpot |
| 22, 23 | TCP | Incoming | Honeypot: Cowrie |
| 19, 53, 123, 1900 | UDP | Incoming | Honeypot: Ddospot |
| 11112 | TCP | Incoming | Honeypot: Dicompot |
| 21, 42, 135, 443, 445, 1433, 1723, 1883, 3306, 8081 | TCP | Incoming | Honeypot: Dionaea |
| 69 | UDP | Incoming | Honeypot: Dionaea |
| 9200 | TCP | Incoming | Honeypot: Elasticpot |
| 22 | TCP | Incoming | Honeypot: Endlessh |
| 80, 443, 8080, 8443 | TCP | Incoming | Honeypot: Galah (LLM required) |
| 8080 | TCP | Incoming | Honeypot: Go-pot |
| 80, 443 | TCP | Incoming | Honeypot: H0neytr4p |
| 21, 22, 23, 25, 80, 110, 143, 443, 993, 995, 1080, 5432, 5900 | TCP | Incoming | Honeypot: Heralding |
| 3000 | TCP | Incoming | Honeypot: Honeyaml |
| 21, 22, 23, 25, 80, 110, 143, 389, 443, 445, 631, 1080, 1433, 1521, 3306, 3389, 5060, 5432, 5900, 6379, 6667, 8080, 9100, 9200, 11211 | TCP | Incoming | Honeypot: qHoneypots |
| 53, 123, 161, 5060 | UDP | Incoming | Honeypot: qHoneypots |
| 631 | TCP | Incoming | Honeypot: IPPHoney |
| 80, 443, 8080, 9200, 25565 | TCP | Incoming | Honeypot: Log4Pot |
| 25 | TCP | Incoming | Honeypot: Mailoney |
| 2575 | TCP | Incoming | Honeypot: Medpot |
| 9100 | TCP | Incoming | Honeypot: Miniprint |
| 6379 | TCP | Incoming | Honeypot: Redishoneypot |
| 5060 | TCP/UDP | Incoming | Honeypot: SentryPeer |
| 80 | TCP | Incoming | Honeypot: Snare (Tanner) |
| 8090 | TCP | Incoming | Honeypot: Wordpot |
また、これらで得たログを視覚化するためにも様々なツールをホストします。
| Service | Account Type | Username / Group | Description |
|---|---|---|---|
| SSH | OS | <OS_USERNAME> | The user you chose during the installation of the OS. |
| Nginx | BasicAuth | <WEB_USER> | <web_user> you chose during the installation of T-Pot. |
| CyberChef | BasicAuth | <WEB_USER> | <web_user> you chose during the installation of T-Pot. |
| Elasticvue | BasicAuth | <WEB_USER> | <web_user> you chose during the installation of T-Pot. |
| Geoip Attack Map | BasicAuth | <WEB_USER> | <web_user> you chose during the installation of T-Pot. |
| Spiderfoot | BasicAuth | <WEB_USER> | <web_user> you chose during the installation of T-Pot. |
| T-Pot | OS | tpot | tpot this user / group is always reserved by the T-Pot services. |
| T-Pot Logs | BasicAuth | <LS_WEB_USER> | LS_WEB_USER are automatically managed. |
どんなふうになるの(ゴール)
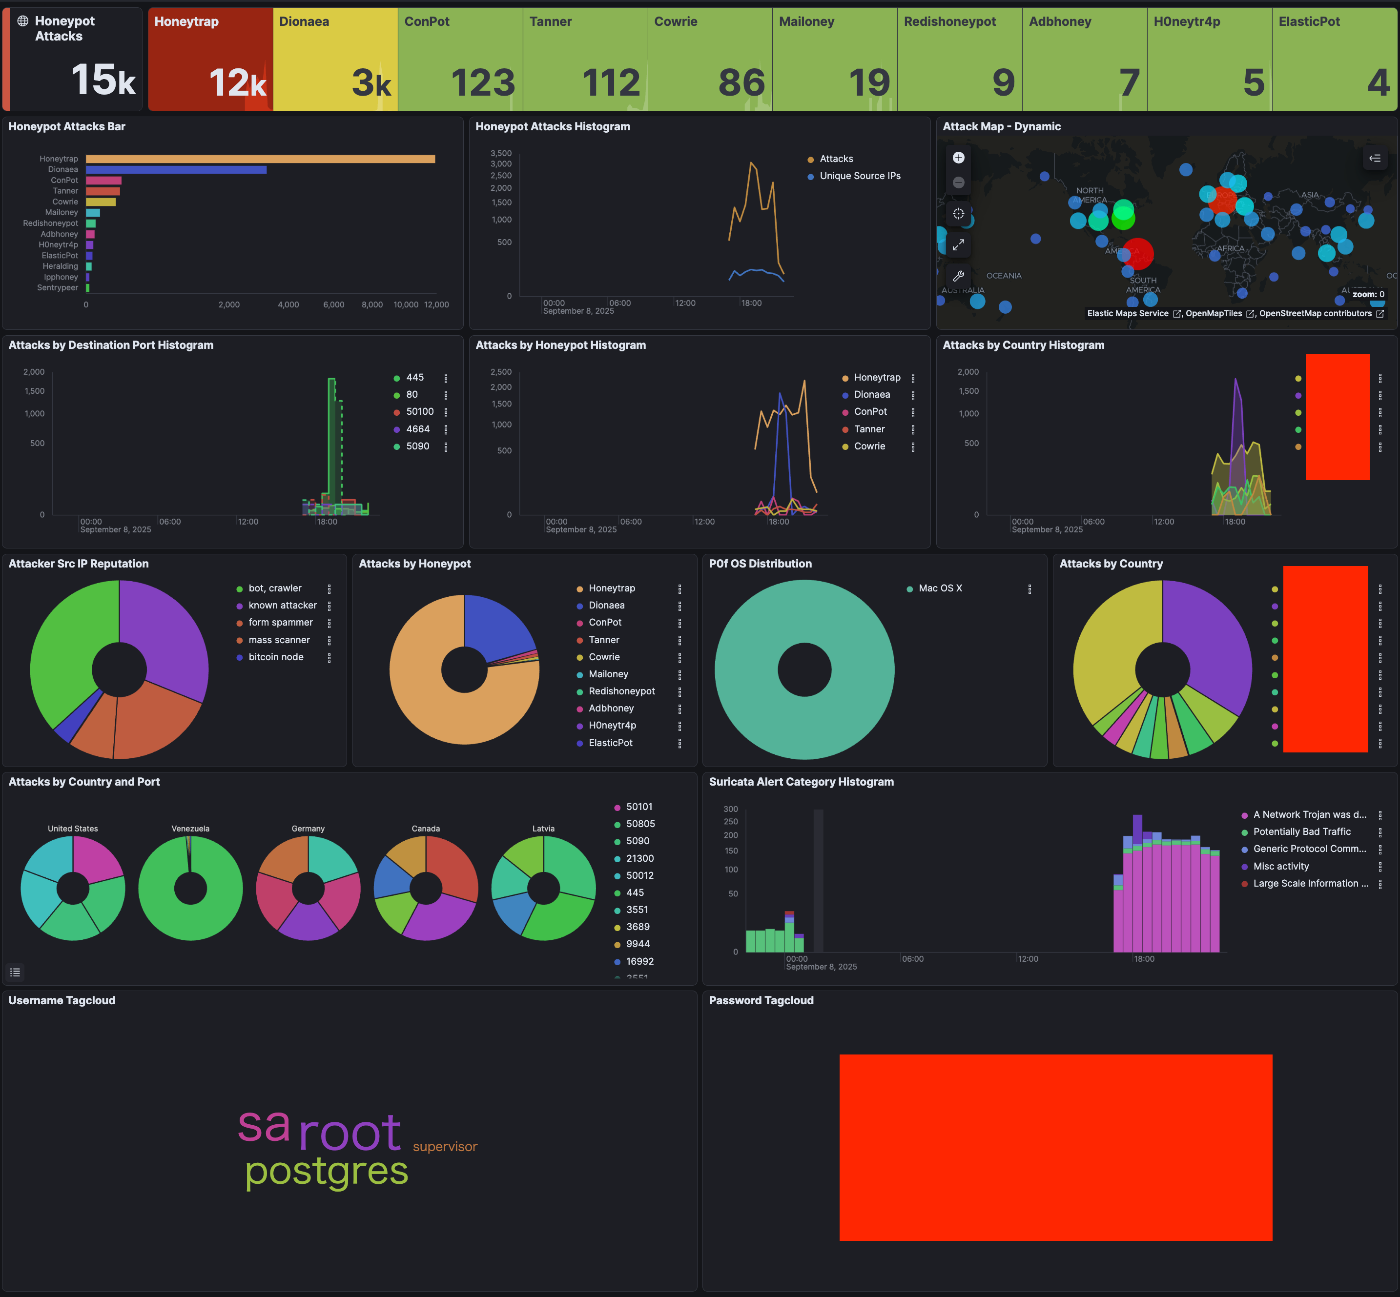

このように、いつ、どこから、どんな攻撃が来たのか、さらにはそれをリアルタイムで見ることができます。これを見るだけでも満足できると思いますが、様々な可能性があるのではないでしょうか。
- リージョンによる攻撃傾向の違い
- クラウドによる攻撃傾向の違い
- 社会情勢による攻撃傾向への影響
動作要件
公式によると、以下のような要件が定められています。(最近更新されたみたいです。)
| T-Pot Type | RAM | Storage | Description |
|---|---|---|---|
| Hive | 16GB | 256GB SSD | As a rule of thumb, the more honeypots, sensors & data, the more RAM and storage is needed. |
| Sensor | 8GB | 128GB SSD | Since honeypot logs are persisted (~/tpotce/data) for 30 days, storage depends on attack volume. |
これに合致するEC2(t4g.large)の料金は8000円/月くらいになります。なかなか厳しいですね。
Raspberry Pi4 4GBでもとりあえず動いてます。
Elastic Searchの立ち上げが多少重いですが、許容できる範囲です。ログの保存期間などを工夫すれば運用できるかもしれません。また、Raspberry Pi4 8GBは公式にサポートされています。
インストール準備
T-Pot運用用のユーザを追加し、コマンドを管理者権限で実行できるようにします。
sudo useradd tpot
sudo usermod -aG sudo tpot
運用ユーザでログインして作業します。
ssh tpot@xxx.xxx.xxx.xxx
passwd
パスワードを設定します。
WireGuardサーバの設定変更(VPNサーバがある場合)
管理ページのアクセス制限
#1でWireGuard VPNを構築しました。T-Potインストール後に自分以外がSSHや管理画面にアクセスすることを防ぐため、EC2のファイアウォールを更新します。
WireGuardサーバにて /etc/wireguard/wg0.conf を編集します。
[Interface]
----- 省略 -----
PostUp   = iptables -A FORWARD -i enX0 -p tcp --dport 64295 -j DROP
PostDown = iptables -D FORWARD -i enX0 -p tcp --dport 64295 -j DROP
PostUp   = iptables -A FORWARD -i enX0 -p tcp --dport 64297 -j DROP
PostDown = iptables -D FORWARD -i enX0 -p tcp --dport 64297 -j DROP
これで、外部からのパケットを破棄できます。
SSHのポート変更
T-Potにはポート22を利用したSSHになりすますサービスがあります。そのため、WireGuardサーバの管理ポートを22222などに変更します。
#Port 22
Port 22222
sudo systemctl restart ssh
configでポートを変更した上で再起動します。これで反映されます。
インストール
OSはRaspberry Pi OS(64Bit, Lite)を利用します。GUIは不要です。
インストール後のSSHポートは64295になります。UFWなどでアクセス遮断している場合には事前に解除してください。
sudo apt update
sudo apt upgrade

git clone https://github.com/telekom-security/tpotce
cd tpotce
./install.sh
タイプを選択する際にはhive(h)を選択します。ユーザーネームとパスワードは管理画面のBASIC認証で使用します。インストールには大体20分くらいかかりました。
T-Potインストール後にはSSHが64295,HTTPSが64297ポートでアクセスできます。インストール後にrebootするように促されるので、その前に64295ポートがファイアウォールなどでアクセスできないことがないことを確認しましょう。
はじめてみる
再起動し、64927ポートにアクセスすると、KibanaやAttackMapなどホーム画面に飛びます。
主に搭載されてるのは以下の機能です。
- AttackMap 攻撃がリアルタイムで地図上に表示されるかっこいいやつ
- Kibana ログの可視化ソフトウェア
- ElasticVue ログ解析基盤
httpsで64297にアクセスしてみましょう。
どのように使いこなすかはまた別の記事で書きたいと思います。(学習中)
まずは、AttackMapを楽しみましょう!
マルウェアについて
Dionaeaにはマルウェアの収集機能がついています。適切な対策を講じる必要があります。例えば、次で紹介するEwsposterの無効化と同じ手順で、Dionaea自体の起動を無効化できます。
Telekomへのデータ送信について
T-Potはデフォルトの設定で、T-Potの開発元であるドイツのTelekomに攻撃に関するデータを送信しています。法令を熟読の上、必要に応じて機能を無効化してください。
停止の手順
sudo systemctl stop tpotce
自分の場合は送信用ポットの設定をすべてコメントアウトして対応しました。
# Ewsposter service
#  ewsposter:
#    container_name: ewsposter
#    restart: always
#    depends_on:
#      tpotinit:
#        condition: service_healthy
#    networks:
#     - ewsposter_local
#    environment:
#     - EWS_HPFEEDS_ENABLE=false
#     - EWS_HPFEEDS_HOST=host
#     - EWS_HPFEEDS_PORT=port
#     - EWS_HPFEEDS_CHANNELS=channels
#     - EWS_HPFEEDS_IDENT=user
#     - EWS_HPFEEDS_SECRET=secret
#     - EWS_HPFEEDS_TLSCERT=false
#     - EWS_HPFEEDS_FORMAT=json
#    image: ${TPOT_REPO}/ewsposter:${TPOT_VERSION}
#    pull_policy: ${TPOT_PULL_POLICY}
#    volumes:
#     - ${TPOT_DATA_PATH}:/data
#     - ${TPOT_DATA_PATH}/ews/conf/ews.ip:/opt/ewsposter/ews.ip
sudo systemctl start tpotce
次は、ハニーポットのセキュリティ監視のため、EC2でT-Potからのトラフィックをキャプチャしてみます。
構築にあたり参考にさせていただいたブログ
Discussion