ラズパイでArkimeを動かして、S3に保存したパケットも取り込む
シリーズ紹介
この記事は、自宅で運用するハニーポットシリーズ#4 です。
#3ではEC2でキャプチャしたパケットのS3への保存について解説しています。
Arkimeってなに
Arkimeはパケットキャプチャ&分析 OSSです。ElasticSearchにインデックス化して保存したパケットをWEBインターフェースで確認できます。
引用・参考
Arkimeに関して日本語記事が少なく、以下の記事をベースに進めさせていただきました。 基本的な流れはサイバーディフェンス研究所様の記事に沿っています。
環境
- Raspberry Pi4 4GB
- Raspbian OS Lite (64bit)
流れ
- ElasticSearchインストール
- Arkimeインストール
- Arkimeパケット取り込み設定
- Arkimeを使ってみる
ElasticSearchインストール
公式ドキュメントを参考に進めていきます。
sudo apt update
sudo apt upgrade

wget -qO - https://artifacts.elastic.co/GPG-KEY-elasticsearch | sudo gpg --dearmor -o /usr/share/keyrings/elasticsearch-keyring.gpg
sudo apt install apt-transport-https
echo "deb [signed-by=/usr/share/keyrings/elasticsearch-keyring.gpg] https://artifacts.elastic.co/packages/7.x/apt stable main" | sudo tee /etc/apt/sources.list.d/elastic-7.x.list
sudo apt update
sudo apt install elasticsearch
起動、再起動時の起動設定をします。
sudo systemctl status elasticsearch
sudo systemctl start elasticsearch
curlして正常に立ち上がったことを確認します。
curl http://localhost:9200
{
  "name" : "RaspberryPi",
  "cluster_name" : "elasticsearch",
  "cluster_uuid" : "553BIWPXTrq-uuid",
  "version" : {
    "number" : "7.17.29",
    "build_flavor" : "default",
    "build_type" : "deb",
    "build_hash" : "580aff1a0064ce4c93293aaab6fcc55e22c10d1c",
    "build_date" : "2025-06-19T01:37:57.847711500Z",
    "build_snapshot" : false,
    "lucene_version" : "8.11.3",
    "minimum_wire_compatibility_version" : "6.8.0",
    "minimum_index_compatibility_version" : "6.0.0-beta1"
  },
  "tagline" : "You Know, for Search"
}
Arkimeインストール
ここにリリースがまとめられています。OSバージョンが異なるとインストールできません。
必要なパッケージをインストールしてからArkimeをインストールします。
sudo apt install curl
sudo apt install openjdk-17-jdk

wget https://github.com/arkime/arkime/releases/download/v5.7.1/arkime_5.7.1-1.debian12_arm64.deb
sudo apt update
sudo apt install ./arkime_5.7.1-1.debian12_arm64.deb
初期設定
sudo /opt/arkime/bin/Configure

Found interfaces: eth0;
Semicolon ';' seperated list of interfaces to monitor [eth1] eth0
Install Elasticsearch server locally for demo, must have at least 3G of memory, NOT recommended for production use (yes or no) [no]
OpenSearch/Elasticsearch server URL [https://localhost:9200] http://localhost:9200
OpenSearch/Elasticsearch user [empty is no user]
Password to encrypt S2S and other things, don't use spaces [must create one] thisispassword
Arkime - Creating configuration files
Installing sample /opt/arkime/etc/config.ini
Download GEO files? You'll need a MaxMind account https://arkime.com/faq#maxmind (yes or no) [yes] yes
データベースの内容をクリアします。以下のコマンドを実行した後にINITと入力することを求められます。
sudo /opt/arkime/db/db.pl http://localhost:9200 init
管理者を作成します。
sudo /opt/arkime/bin/arkime_add_user.sh admin "SuperAdmin" thisispassword --admin
この時、Elastic Searchのアドレスが誤っているとエラーが出ます。config.iniをの設定を書き換えることで修正できます。
[default]
elasticsearch=http://localhost:9200
arkimeviewerを起動
sudo systemctl enable --now arkimeviewer
sudo systemctl status arkimeviewr
起動順番を設定
sudo sed -i 's/network.target/network.target elasticsearch.service/' /etc/systemd/system/arkimeviewer.service
sudo sed -i '/After=/a Requires=network.target elasticsearch.service' /etc/systemd/system/arkimeviewer.service
sudo systemctl daemon-reload
GeoIP設定
パケットの情報について、マップ上で表示してくれる機能です。APIKEYが必要なのでとってきます。
GeoIP.confをダウンロードできるのでこれを保存しておきます。
sudo apt install geoipupdate
sudo vim /etc/GeoIP.conf
# GeoIP.conf file for `geoipupdate` program, for versions >= 3.1.1.
# Used to update GeoIP databases from https://www.maxmind.com.
# For more information about this config file, visit the docs at
# https://dev.maxmind.com/geoip/updating-databases.

# `AccountID` is from your MaxMind account.
AccountID xxxxxx

# `LicenseKey` is from your MaxMind account.
LicenseKey xxxxxxxxxxxxxxxxxxxxxxxxxxxxxxxx

# `EditionIDs` is from your MaxMind account.
EditionIDs GeoLite2-ASN GeoLite2-City GeoLite2-Country
sudo geoipupdate
パケットの取り込み設定
パケットの保存先ディレクトリを作成します。
sudo mkdir -p /data/eth0
パケットの取り込みスクリプトを作成します。
#!/bin/bash

dumpcap -i eth0 -b duration:300 -w /data/eth0/capture.pcap &

CAPTURE_DIR="/data/eth0"
ARKIME_BIN="/opt/arkime/bin/capture"
inotifywait -m -e close_write --format "%w%f" $CAPTURE_DIR |while read FILE
do
  $ARKIME_BIN -r $FILE
done
起動用のサービスを作成します。
[Unit]
Description=Arkime Import Script
After=network.target

[Service]
Type=simple
Restart=on-failure
ExecStart=/bin/bash /data/import-eth0.sh

[Install]
WantedBy=multi-user.target
立ち上げます。
sudo systemctl daemon-reload
sudo systemctl start import-eth0
sudo systemctl status import-eth0
Arkimeを見てみる
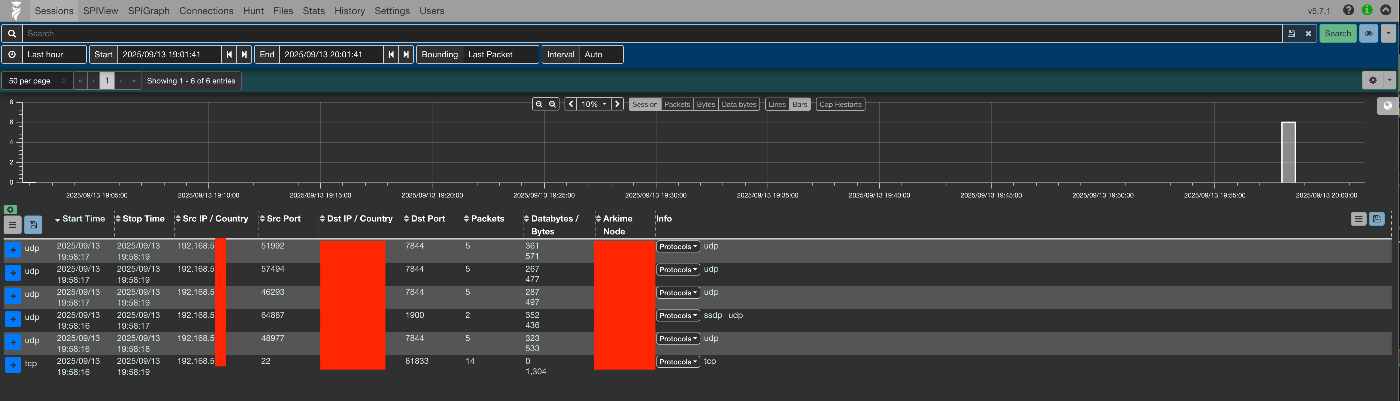
反映されていますね。ひとまず、パケットのキャプチャはできたみたいです。
S3に保存したパケットを分析
このシリーズでは自宅で運用するT-Potに不審な通信がないか監視する目的でArkimeを導入します。前回、VPNのトラフィックをS3に保存したのでそれをArkimeで分析します。
eth0のキャプチャの停止
自分の場合は本体のキャプチャは不要だったので止めました。
sudo systemctl stop import-eth0
sudo systemctl disable import-eth0
awsコマンドのインストール
公式ドキュメントに従って進めます。
curl "https://awscli.amazonaws.com/awscli-exe-linux-aarch64.zip" -o "awscliv2.zip"
unzip awscliv2.zip
sudo ./aws/install
また、インストール先のパスも控えておきます。
which aws
IAMユーザ作成
パブリックアクセスを禁止しているS3に接続するための権限設定を行います。
AWSでIAMコンソールを開いて、操作を行います。
ポリシー作成
{
    "Version": "2012-10-17",
    "Statement": [
        {
            "Effect": "Allow",
            "Action": [
                "s3:GetObject",
                "s3:ListBucket"
            ],
            "Resource": [
                "arn:aws:s3:::ec2-packets",
                "arn:aws:s3:::ec2-packets/*"
            ]
        }
    ]
}
ユーザ作成
- IAMでユーザーの作成をクリックし、ユーザ名を入力します。
- 作成したポリシーをアタッチします。
- アクセスキーを作成、をクリックし控えておきます。
アクセスキー設定
控えたアクセスキーとシークレットを入力します。
aws configure
インポートスクリプトの作成
S3からパケットを取り込むスクリプトを作成します。
S3とArkimeサーバの同期システム
キャプチャしたファイルの保存先を作ります。
mkdir /data/s3
インストールしたAWSコマンドを利用した、スクリプトを作成します。
/usr/local/bin/aws s3 sync s3://ec2-packets/ /data/s3/ --exact-timestamps
cronを設定して定期実行するようにします。
crontab -e
5分おきに実行してS3バケットのファイルと同期します。5の値を変えれば、任意の時間で同期できます。
*/5 * * * * /data/sync.sh >> /data/sync.log 2>&1
同期に関わる料金
東京リージョン(2025.09.14時点)ではS3に関するコマンドの実行は以下のような料金体系になっています。
 こちらの記事で解説されている内容に基づくと、SYNCには5分おきにGETとLISTリクエストが発生するでしょう。また、5分おきにEC2からS3にファイルをPUTすること、保存期間を設定(14日と仮定)し、計算すると、月当たり20円もかかってしまうみたいです。(笑)
(4*12*24*30*$0.0047)/1000 + (1*12*24*30*$0.00036)/1000 = $0.166
Arkime取り込みシステム
先ほど作成したimport-eth0.serviceと同じように進めます。
まずは取り込みスクリプトを書きます。
#!/bin/bash

CAPTURE_DIR="/data/s3"
ARKIME_BIN="/opt/arkime/bin/capture"
inotifywait -m -e moved_to --format "%w%f" $CAPTURE_DIR |while read FILE
do
  $ARKIME_BIN -r $FILE
done
起動用のサービスを作成します。
[Unit]
Description=Arkime Import Script
After=network.target

[Service]
Type=simple
Restart=on-failure
ExecStart=/bin/bash /data/import-s3.sh

[Install]
WantedBy=multi-user.target
立ち上げます。
sudo systemctl daemon-reload
sudo systemctl start import-s3
sudo systemctl status import-s3
確認
Webコンソールの /files には同期されたファイルの一覧が表示されます。ここに、pcapファイルが表示されていれば同期が成功しています。

今回は、Arkimeを動かすのとS3からの取り込みをまとめました。次は取り込んだパケットをどのように分析するか、について触れます。
Discussion