概要
最近の音声認識技術の進歩はすごいですね!
特にOpenAIの最新モデルであるWhisper large-v3は、日本語の音声データでもかなりの高精度で文字起こしを行うことができ、APIも公開されています。
ただし簡単に使用でき汎用性も高い一方で、大量に使用する場合の高コストやプライバシーの懸念もあるため、ローカル環境で効率よく高精度な文字起こしを実現するモデルが多数開発されています。
今回は、その中でもGPUを使用した高速推論が可能な「Faster Whisper」を用いて、AWS SageMakerでカスタム文字起こしエンドポイントを構築してみたので、手順を解説していきたいと思います。
実装コードは以下のリポジトリにあります。
順番通りJupyterNotebookを実行すると問題なく動作するはずです。
Faster Whisperとは
Faster WhisperはOpenAIのWhisperモデルを基に、翻訳モデル用の高速推論エンジンであるCTranslate2を使用して再実装されたものです。
公式のドキュメントによると、同等の精度を保ちながらもOpenAIのWhisperよりも最大4倍高速で、メモリ使用量も少ないとされています。
AWS SageMakerとは
AWS SageMakerは、機械学習モデルの構築・トレーニング・デプロイを容易に行えるように設計された完全マネージド型の機械学習サービスです。
今回は既存のモデルを使用するためトレーニングは行わず、GPUを使用した推論を行うエンドポイントの構築に焦点を当てます。
エンドポイントのデプロイには主に以下の3つのパターンがあります。
- リアルタイム推論
- 非同期推論
- サーバーレス推論
今回は以下の理由から「非同期推論」を採用し、構築していきます。
- GPUを使用(サーバーレス推論は非対応)
- オートスケール設定により、リクエストがない時にインスタンスを0にスケールインできるため、リアルタイム推論と比べてコストを抑えることが可能
前提条件
この記事では、以下の各種バージョンを使用して構築を行います。
(後述するSageMaker公式のDockerイメージに合わせて選定しています)
- Python: 3.10
- CUDA: 11.8
- PyTorch: 2.20
- Faster Whisper: 1.0.2 (CTranslate2: 3.24.0)
※ここでは詳しく解説しませんが、PyTorchとGPU/CUDA周りの依存関係は複雑なのでバージョン選定は慎重に行いましょう。
構築手順
では実際に構築していきます。
主に以下の公式ドキュメントと実装例のリポジトリを参考にさせていただきました。(YouTubeで動画も公開されています)
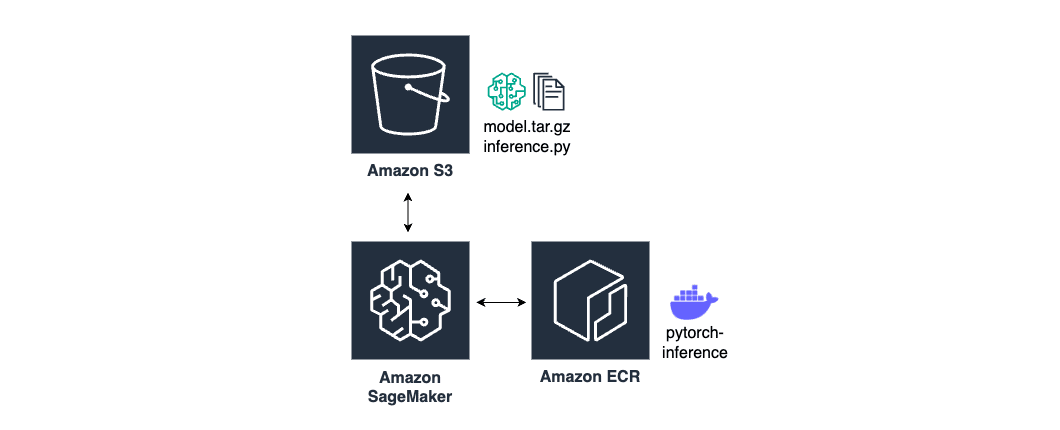
構成図は以下です。
ECRにベースイメージ、S3にモデルと推論コードを配置します。
1. ベースイメージの作成
今回は、SageMakerが公式に提供しているPyTorchの推論用Dockerイメージをベースに使用します。
以下のPythonコードを実行することで、対応するECRレジストリパスを取得できます。
from sagemaker import image_uris
image_uris.retrieve(framework='pytorch',region='ap-northeast-1',version='2.2.0',py_version='py310',image_scope='inference', instance_type='ml.g4dn.xlarge')
Faster Whisperのインストールが必要なため、以下のDockerfileを作成します。
(※記事執筆現在SageMakerの推論用イメージはCUDA12に対応していないため、CTranslate2は 3.24.0 を使用しています)
FROM 763104351884.dkr.ecr.ap-northeast-1.amazonaws.com/pytorch-inference:2.2.0-gpu-py310

# faster-whisper のインストール
RUN pip install faster-whisper==1.0.2
RUN pip install --force-reinstall ctranslate2==3.24.0
Dockerイメージをビルドし、自分のAWSアカウントのECRにプッシュしましょう。
今回はPythonコードで実行してますが、ターミナルで実行しても問題ありません。
import os
import boto3

# AWSのリージョンとアカウントIDを取得
region     = boto3.session.Session().region_name
account_id = boto3.client('sts').get_caller_identity().get('Account')

# ECRのリポジトリ名とイメージのタグを設定
repository_name = 'whisper-transcribe'
image_tag       = 'GPU'

# DockerイメージのURIを作成
image_uri = f'{account_id}.dkr.ecr.{region}.amazonaws.com/{repository_name}:{image_tag}'

# AWS公式のDockerイメージをPull
os.system('aws ecr get-login-password --region ap-northeast-1 | docker login --username AWS --password-stdin 763104351884.dkr.ecr.ap-northeast-1.amazonaws.com')
os.system('docker pull 763104351884.dkr.ecr.ap-northeast-1.amazonaws.com/pytorch-inference:2.2.0-gpu-py310')

# Dockerイメージをビルド
os.system(f'docker build -t {repository_name}:{image_tag} .')

# ECRにログイン
os.system(f'$(aws ecr get-login --region {region} --no-include-email)')

# ECRのリポジトリを作成(すでに存在する場合はスキップ)
os.system(f'aws ecr create-repository --repository-name {repository_name}')

# DockerイメージをECRにプッシュ
os.system(f'docker tag {repository_name}:{image_tag} {image_uri}')
os.system(f'docker push {image_uri}')
これでベースイメージの作成は完了です。
2. モデルと推論コードの準備
非同期推論エンドポイントでは、モデルと推論コードを model.tar.gz というファイル名でまとめてS3に配置する必要があります。
まずは推論用のコードを作成しましょう。
SageMaker Endpointでは以下の4つの関数を定義します。
-
model_fn()-
model.tar.gzにあるモデルをロードする関数です。model_dirを引数として受け取ります。この関数の返り値がそのままpredict_fnの第二引数となります。
-
-
input_fn()- リクエストデータを受け取り、前処理を行う関数です。
input_dataとcontent_typeの2つを引数として受け取ります。この関数の返り値がそのままpredict_fnの第一引数となります。
- リクエストデータを受け取り、前処理を行う関数です。
-
predict_fn()- 推論を実行する関数です。引数にそれぞれ
input_fnとmodel_fnの返り値が入っています。この関数の返り値がそのままoutput_fnの第一引数となります。
- 推論を実行する関数です。引数にそれぞれ
-
output_fn()- 推論後の後処理を行う関数です。引数にそれぞれ
predict_fnの返り値と、レスポンスの形式(accept)が入っています。この関数の返り値が推論結果としてS3に格納されます。
- 推論後の後処理を行う関数です。引数にそれぞれ
import os
import uuid
from faster_whisper import WhisperModel

def model_fn(model_dir):
    model = WhisperModel(
        model_dir,
        device="cuda",
        compute_type="float16"
    )
    return model

def input_fn(input_data, content_type):
    if content_type == 'audio/mpeg':
        os.makedirs('/tmp', exist_ok=True)
        unique_filename = str(uuid.uuid4())
        local_path = f'/tmp/{unique_filename}.mp3'

        with open(local_path, 'wb') as f:
            f.write(input_data)
    else:
        raise ValueError(f"Illegal content type {content_type}. The only allowed content_type is audio/mpeg")

    return local_path

def predict_fn(local_path, model):
    segments, info = model.transcribe(local_path, beam_size=5, vad_filter=True, without_timestamps=True)

    results = []
    for segment in segments:
        result = {
            "start": segment.start,
            "end":   segment.end,
            "text":  segment.text
        }
        results.append(result)
        print(f"[{float(segment.start):.2f}s -> {float(segment.end):.2f}s] {segment.text}")

    return results, local_path

def output_fn(results, accept):
    if accept == 'text/plain':
        transcription_text = "\n".join([segment['text'] for segment in results[0]])
        os.remove(results[1])
        return transcription_text, accept
    else:
        raise ValueError(f"Illegal accept {accept}. The only allowed content_type is text/plain")
次にモデルをダウンロードし、推論コードと共に model.tar.gz という名前で圧縮します。
!pip install faster-whisper==1.0.2
import os
from typing import Final
from faster_whisper import download_model

# 作業ディレクトリに移動
os.chdir('/home/ec2-user/SageMaker/')

# モデル配置用のディレクトリ名を設定
model_dir: Final[str] = 'whisper-model'

# モデルのダウンロード
model_name = 'large-v3'
download_model(model_name, output_dir=model_dir)

# モデルの圧縮
%cd {model_dir}
!cp ../inference.py ./
!tar zcvf model.tar.gz ./*
%cd ..
最後にモデルをS3にアップロードしましょう。
# モデルをS3にアップロード
model_s3_uri: Final[str] = sagemaker.Session().upload_data(
    f'./{model_dir}/model.tar.gz',
    key_prefix='whisper-transcribe'
)
print(model_s3_uri)
これでモデルと推論コードの準備も完了です。
3. エンドポイントの作成(デプロイ)
ここからエンドポイントを作成していきます。
まずは必要となるクライアント・変数を定義します。
import os
import boto3
import sagemaker
from typing import Final
from time import sleep

# 各種クライアントの設定
smr_client:      Final = boto3.client('sagemaker-runtime')
sm_client:       Final = boto3.client('sagemaker')
s3_client:       Final = boto3.client('s3')
endpoint_waiter: Final = sm_client.get_waiter('endpoint_in_service')

# 各種変数の設定
role:       Final[str] = sagemaker.get_execution_role()
region:     Final[str] = sagemaker.Session().boto_region_name
bucket:     Final[str] = sagemaker.Session().default_bucket()
account_id: Final[str] = boto3.client('sts').get_caller_identity().get('Account')

# デプロイリソース名の設定
model_name:           Final[str] = 'WhisperTranscribeModel'
variant_name:         Final[str] = 'AllTrafic'
endpoint_name:        Final[str] = model_name + 'Endpoint'
endpoint_config_name: Final[str] = model_name + 'EndpointConfig'
次にモデルと推論環境(推論コードやコンテナイメージ、環境変数の設定)をパッケージ化したSageMaker Modelを作成します。
# Sagemaker Model 作成
sm_client.create_model(
    ModelName=model_name,
    PrimaryContainer={
        'Image': f'{account_id}.dkr.ecr.{region}.amazonaws.com/whisper-transcribe:GPU',
        'ModelDataUrl': model_s3_uri,
        'Environment': {
            'SAGEMAKER_CONTAINER_LOG_LEVEL': '20',
            'SAGEMAKER_PROGRAM':             'inference.py',
            'SAGEMAKER_REGION':              region,
            'SAGEMAKER_SUBMIT_DIRECTORY':    '/opt/ml/model/code',
            'TS_MAX_REQUEST_SIZE':           '1000000000',
            'TS_MAX_RESPONSE_SIZE':          '1000000000',
            'TS_DEFAULT_RESPONSE_TIMEOUT':   '3600'
        }
    },
    ExecutionRoleArn=role,
)
次にSagemaker EndpointConfigを作成します。
これは使用するSageMaker Modelや、推論に使うコンピューティングリソース(インスタンスタイプ、台数など)を設定するためのものです。
# Sagemaker EndpointConfig 作成
sm_client.create_endpoint_config(
    EndpointConfigName=endpoint_config_name,
    ProductionVariants=[
        {
            'VariantName':          variant_name,
            'ModelName':            model_name,
            'InitialInstanceCount': 1,
            'InstanceType':         'ml.g4dn.xlarge'
        }
    ],
    AsyncInferenceConfig={
        "OutputConfig": {
            "S3OutputPath": f"s3://{bucket}/whisper-transcribe/async-inference/output"
        }
    }
)
最後にEndpointConfigの設定を元にエンドポイントの作成(デプロイ)を行います。
create_endpointは非同期APIなので、endpoint_waiter.waitで作成完了を待っています。
# 非同期 Endpoint 作成
sm_client.create_endpoint(
    EndpointName=endpoint_name,
    EndpointConfigName=endpoint_config_name,
)
# Endpoint が有効化されるまで待つ
endpoint_waiter.wait(
    EndpointName=endpoint_name,
    WaiterConfig={'Delay': 5}
)
これでエンドポイントの作成は完了です!
実際にリクエストしてみると、一定時間が経過したのちにOutputConfigで設定したS3バケットパスに推論結果がテキストファイルとして格納されていると思います。
(input_dataはあらかじめS3に格納しておきましょう)
# 非同期 Endpoint 呼び出し
response = smr_client.invoke_endpoint_async(
    EndpointName=endpoint_name,
    InputLocation=f"s3://{bucket}/whisper-transcribe/async-inference/input/input_data.mp3",
    ContentType='audio/mpeg',
    Accept='text/plain'
)

# S3に保存されるまでポーリング
output_s3_uri = response['OutputLocation']
output_key    = output_s3_uri.replace(f's3://{bucket}/', '')
while True:
    result = s3_client.list_objects(Bucket=bucket, Prefix=output_key)
    exists = True if "Contents" in result else False
    if exists:
        print('!')
        obj         = s3_client.get_object(Bucket=bucket, Key=output_key)
        predictions = obj['Body'].read().decode()
        print(predictions)
        break
    else:
        print('.', end='')
        sleep(0.1)
SageMaker特有のルールが多くて結構大変でしたが、これで無事文字起こし用エンドポイントの作成は完了です。
4. オートスケール設定
エンドポイントの構築は完了しましたが、最後にオートスケールの設定を行います。
オートスケールの設定により、使用していない時間帯にインスタンスの可動台数を0にできるので、コストの削減に繋がります。
Amazon SageMakerでのスケーリングポリシーは主に以下の2つのタイプがあります:
-
TargetTrackingScaling- このタイプではCloudWatchアラームの設定は必要なく、特定のメトリクスが目標値を維持するようにAWSが自動的にスケーリングします。(裏で自動でCloudWatchアラームが作成されているようです)
-
StepScaling- このタイプではCloudWatchアラームの設定が必要で、特定のメトリクスに基づいてスケーリングをトリガーするよう自分で設定を行います。
基本的にはTargetTrackingScalingが推奨されているようですが、スケールインが少し遅い気がしたのでStepScalingで構築します。
ここでは以下のメトリクスを使用します。
ApproximateBacklogSizeHasBacklogWithoutCapacity
詳細や、非同期推論で使用できるその他のメトリクスに関しては以下のリンクを参照してください。
まずはエンドポイントに対するスケーリング設定を行います。
ここではインスタンス数を0から1までの範囲でスケーリングするように設定しています。
as_client: Final = boto3.client('application-autoscaling')
cw_client: Final = boto3.client('cloudwatch')

# ResourceIdの設定
resource_id = f'endpoint/{endpoint_name}/variant/{variant_name}'

# スケーリング設定を登録
as_client.register_scalable_target(
    ServiceNamespace='sagemaker',
    ResourceId=resource_id,
    ScalableDimension='sagemaker:variant:DesiredInstanceCount',
    MinCapacity=0,
    MaxCapacity=1
)
次にスケーリングポリシーとメトリクスアラームの設定を行います。
# スケーリングポリシーの設定
response = as_client.put_scaling_policy(
    PolicyName="ApproximateBacklogSize-ScalingPolicy",
    ServiceNamespace="sagemaker",
    ResourceId=resource_id,
    ScalableDimension="sagemaker:variant:DesiredInstanceCount",
    PolicyType="StepScaling",
    StepScalingPolicyConfiguration={
        "AdjustmentType": "ChangeInCapacity",
        "MetricAggregationType": "Average",
        "Cooldown": 300,
        "StepAdjustments": [
            {
                "MetricIntervalUpperBound": 1,
                "ScalingAdjustment": -1
            }
        ]
    }
)
scaling_policy_arn = response['PolicyARN']

# メトリクスアラームの設定
cw_client.put_metric_alarm(
    AlarmName='ScaleInAlarm-ApproximateBacklogSize',
    MetricName='ApproximateBacklogSizePerInstance',
    Namespace='AWS/SageMaker',
    Statistic='Average',
    EvaluationPeriods=1,
    DatapointsToAlarm=1,
    Threshold=1,
    ComparisonOperator='LessThanThreshold',
    TreatMissingData='missing',
    Dimensions=[
        {'Name': 'EndpointName', 'Value': endpoint_name}
    ],
    Period=60,
    AlarmActions=[scaling_policy_arn]
)
# スケーリングポリシーの設定
response = as_client.put_scaling_policy(
    PolicyName="HasBacklogWithoutCapacity-ScalingPolicy",
    ServiceNamespace="sagemaker",
    ResourceId=resource_id,
    ScalableDimension="sagemaker:variant:DesiredInstanceCount",
    PolicyType="StepScaling",
    StepScalingPolicyConfiguration={
        "AdjustmentType": "ChangeInCapacity",
        "MetricAggregationType": "Average",
        "Cooldown": 300,
        "StepAdjustments":
            [
                {
                    "MetricIntervalLowerBound": 0,
                    "ScalingAdjustment": 1
                }
            ]
    }
)
scaling_policy_arn = response['PolicyARN']

# メトリクスアラームの設定
cw_client.put_metric_alarm(
    AlarmName='ScaleOutAlarm-HasBacklogWithoutCapacity',
    MetricName='HasBacklogWithoutCapacity',
    Namespace='AWS/SageMaker',
    Statistic='Average',
    EvaluationPeriods=1,
    DatapointsToAlarm=1,
    Threshold=1,
    ComparisonOperator='GreaterThanOrEqualToThreshold',
    TreatMissingData='missing',
    Dimensions=[
        {'Name': 'EndpointName', 'Value': endpoint_name}
    ],
    Period=60,
    AlarmActions=[scaling_policy_arn]
)
これでオートスケールを含む全ての設定が完了しました!
更なる速度の改善案や、より良いスケーリング設定などがありましたら、ぜひコメントで教えてください。
最後まで読んでいただきありがとうございました。

Discussion