ネクスタの畠山です。
絶賛、AI駆動開発のPoCを実務としてやらせていただいています。
今回は、Cursor CLI を導入してXMLコメントを半自動で作成する仕組化の備忘録です。
CursorのIDEを使ってだとコンテキストサイズの都合で数ファイルずつしか出来ないので一括で出来る仕組みが欲しかったのと、将来CI/CDに盛り込んでいくにあたってコマンドラインでのAIエージェントの実効ではClaudeCode等で実現できているのですが、Cursorでの実現も手段の1つとして持ってきたい、というのが背景になります。
まずは、上記の公式通りに環境構築を進める。
早速「curl https://cursor.com/install -fsS | bash」を実行したらbashがないとエラー。
調べたところ、同様の課題と対策が載っていたので参考にしながら作業を進める。
wsl.exe --list --onlineで一覧がいっぱい出てきたので、Geminiに聞いたところ「Ubuntu 24.04 LTS」がおすすめとのことでこれにする。

Happy coding! 🚀

Next Stepsに書いてある通り、cursor-agent へのPATH登録を行う。
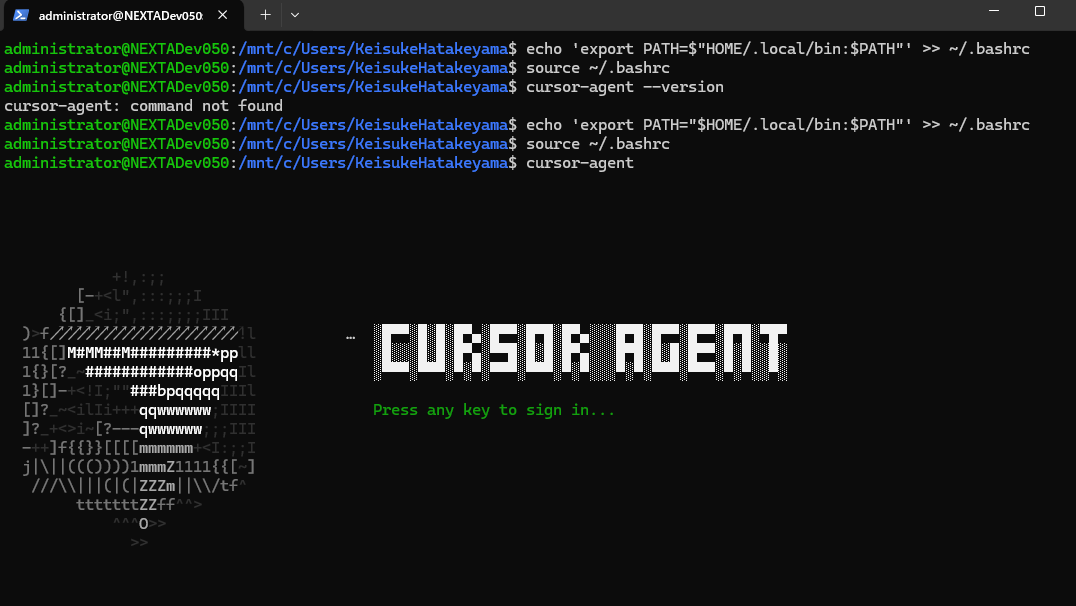
「対象のワークスペースは、WSLから見たWindowsのCドライブのあなたのユーザーホームディレクトリ全体を指しています」とのことなので、開発作業用フォルダ配下でwslを実行してcursor-agentを実行する。
これが"インタラクティブセッション"というモードらしい。

cursor-agent "プロンプト"
という形式で、当該ファイル群に対してプロンプトを逐次処理できるみたいなので、AIを使って以下の要件でPowerShellを作成。
- プロジェクト直下に prompts というフォルダがあり、そこにプロンプトが入っている
- PowerShell実行時に prompts フォルダ配下のプロンプトを選択して実行できる
- プロンプトからは0...N個のコンテキストファイルを参照できる
- プロンプトの適用対象ファイルは .cs(C#のソースコード)ファイルのみとする
- 対象ファイルは「フォルダ単位」で指定可能とする
作成してもらったPowerShellはこちら。
param (
    [string]$TargetFolder = $null
)

# PowerShellの出力エンコーディングをUTF-8に設定
[Console]::OutputEncoding = [System.Text.Encoding]::UTF8
$PSDefaultParameterValues['*:Encoding'] = 'utf8'

# --- 1. スクリプトフォルダの取得 ---
$ScriptFolder = $PSScriptRoot

# --- 2. プロンプトファイル(Instruction)の選択 ---
$PromptsFolder = Join-Path -Path $ScriptFolder -ChildPath "prompts"

Write-Host ""
Write-Host "Searching for prompts in: '$PromptsFolder'..."

try {
    $PromptFiles = Get-ChildItem -Path $PromptsFolder -File -ErrorAction Stop
} catch {
    Write-Error "ERROR: Could not find '$PromptsFolder' or it contains no files."
    return
}

Write-Host ""
Write-Host "--- Select a prompt to use ---"
for ($i = 0; $i -lt $PromptFiles.Count; $i++) {
    Write-Host (" [{0}]: {1}" -f ($i + 1), $PromptFiles[$i].Name)
}
Write-Host "---------------------------------"

$Selection = 0
while ($Selection -lt 1 -or $Selection -gt $PromptFiles.Count) {
    try {
        $Input = Read-Host "Enter number (1 - $($PromptFiles.Count))"
        $Selection = [int]$Input
        if ($Selection -lt 1 -or $Selection -gt $PromptFiles.Count) {
            Write-Warning "Invalid number. Please select from the list."
        }
    } catch {
        Write-Warning "Please enter a valid number."
    }
}

$PromptFile = $PromptFiles[$Selection - 1].FullName
Write-Host "Selected prompt: $PromptFile"


# --- 2.5. プロンプトファイルからコンテキストファイルのパスを抽出 ---
$MyPromptRaw = Get-Content -Path $PromptFile -Raw -Encoding UTF8
$ContextFileRelativePaths = @()  # 配列として初期化
$MyPrompt = $MyPromptRaw

# プロンプトファイルから全ての #CONTEXT_FILE: 行を抽出
$ContextMatches = [regex]::Matches($MyPromptRaw, '(?m)^#CONTEXT_FILE:\s*(.+?)\s*$')
if ($ContextMatches.Count -gt 0) {
    foreach ($Match in $ContextMatches) {
        $ContextFileRelativePaths += $Match.Groups[1].Value.Trim()
    }
    # プロンプトから全ての #CONTEXT_FILE: 行を除去
    $MyPrompt = $MyPromptRaw -replace '(?m)^#CONTEXT_FILE:.+?\r?\n?', ''
    Write-Host "Context files specified in prompt: $($ContextFileRelativePaths.Count)"
    foreach ($Path in $ContextFileRelativePaths) {
        Write-Host "  - $Path"
    }
} else {
    Write-Host "No context files specified in prompt"
}

# --- 2.6. コンテキストファイルのパスを準備と検証 ---
$ContextFileWslPaths = @()  # WSLパスの配列

foreach ($RelativePath in $ContextFileRelativePaths) {
    # Windowsパスを作成
    $ContextFileWindowsPath = Join-Path $ScriptFolder $RelativePath

    # ファイルの存在チェック
    if (-not (Test-Path -Path $ContextFileWindowsPath)) {
        Write-Error "ERROR: Context file not found: $ContextFileWindowsPath"
        return
    }

    # WSLパスに変換
    $ContextFileWslPath = $ContextFileWindowsPath -replace ':', '' -replace '\\', '/'
    $ContextFileWslPath = "/mnt/" + $ContextFileWslPath.ToLower()

    $ContextFileWslPaths += $ContextFileWslPath
    Write-Host "Context file loaded: $ContextFileWslPath"
}

if ($ContextFileWslPaths.Count -eq 0) {
    Write-Host "No context files will be used"
}


# --- 3. 対象フォルダ(.cs)の入力チェック ---
if ([string]::IsNullOrEmpty($TargetFolder)) {
    while ([string]::IsNullOrEmpty($TargetFolder)) {
        $TargetFolder = Read-Host "Enter the root folder path containing .cs files"

        if (-not (Test-Path -Path $TargetFolder)) {
            Write-Warning "Path not found: $TargetFolder"
            $TargetFolder = $null
        }
    }
}


# --- 4. メイン処理 ---
echo "--------------------------"
Write-Host "Target folder: $TargetFolder"

try {
    $TargetFiles = Get-ChildItem -Path $TargetFolder -Filter "*.cs" -Recurse -ErrorAction Stop
} catch {
    Write-Error "ERROR: No *.cs files found. Check the path: $TargetFolder"
    return
}

echo "Prompt loaded..."
echo "Processing $($TargetFiles.Count) files..."
echo "--------------------------"


# 5. ファイル一覧 ($TargetFiles) でループ処理
foreach ($File in $TargetFiles) {

    # 6. .cs ファイルのWSLパスを変換
    $WslPath = $File.FullName -replace ':', '' -replace '\\', '/'
    $WslPath = "/mnt/" + $WslPath.ToLower()

    # 7. $FullPrompt の組み立て
    # 「@対象ファイル @コンテキストファイル1 @コンテキストファイル2 ... 指示」 の順で文字列を組み立てる
    $ContextFilesString = ""
    foreach ($ContextPath in $ContextFileWslPaths) {
        $ContextFilesString += "@$ContextPath "
    }
    $FullPrompt = "@$WslPath $ContextFilesString$MyPrompt"

    echo "Processing (via WSL): $WslPath ..."

    # デバッグ情報を表示
    Write-Host "DEBUG - Full prompt: $FullPrompt" -ForegroundColor Yellow

    # 8. 実行(エラーも含めて出力を表示)
    # cursor-agentのフルパスを使用してPATH問題を回避
    Write-Host "Testing cursor-agent path..." -ForegroundColor Yellow
    $testPath = wsl /bin/bash -c 'ls -la /home/administrator/.local/bin/cursor-agent 2>&1'
    Write-Host "Path check result: $testPath" -ForegroundColor Cyan

    # より単純な方法でコマンドを実行
    Write-Host "Executing cursor-agent with full path..." -ForegroundColor Yellow
    $output = $FullPrompt | wsl /bin/bash -c 'cat | /home/administrator/.local/bin/cursor-agent -p --force 2>&1'

    # 結果を表示
    if ($output) {
        Write-Host "Output:" -ForegroundColor Cyan
        Write-Host $output
    } else {
        Write-Host "WARNING: No output from cursor-agent" -ForegroundColor Yellow
    }

    echo "Done: $($File.FullName)."
    echo "--------------------------"
}

echo "All tasks completed."
次に、このPowerShellから実行するプロンプトを以下の通り作成する。
#CONTEXT_FILE: documents/xml-document-coding-rule.md
あなたはITエンジニアです。
指定されたXMLドキュメントコメント規約に沿うよう、対象ファイルのXMLドキュメントコメントを書き直してください。
追加したコメントは基本仕様書として運用されます。
PowerShellを実行して上記プロンプトを選択して実行する。
(CursorのIDE上で実行するよりも見える情報が少ないため本当に動いているのか心配になる)

実行結果は以下の通り。
別途用意しているXMLドキュメントコメント規約に沿って、ソースコード上にXMLコメントが追記される。

これで、CursorのIDEからではなくPowerShellからCursor CLIを使ってXMLコメントを自動生成できるようになりました。

Discussion