Heroku上でdiscordgoを使ってbotを動かす
DiscordのbotをGo言語のラッパーライブラリである DiscordGo で作ります。
自分はもともとdiscord.pyで作っていたのですが、最近Goを学習し始めたので、DiscordのbotをGoで書き直してみることにしました。
Go初心者なのでコードに至らぬ点があればお許しを...。一応動作確認はしています。
記事を書くにあたって以下の記事を参考にさせていただきました。
1. botアカウントの作成と招待
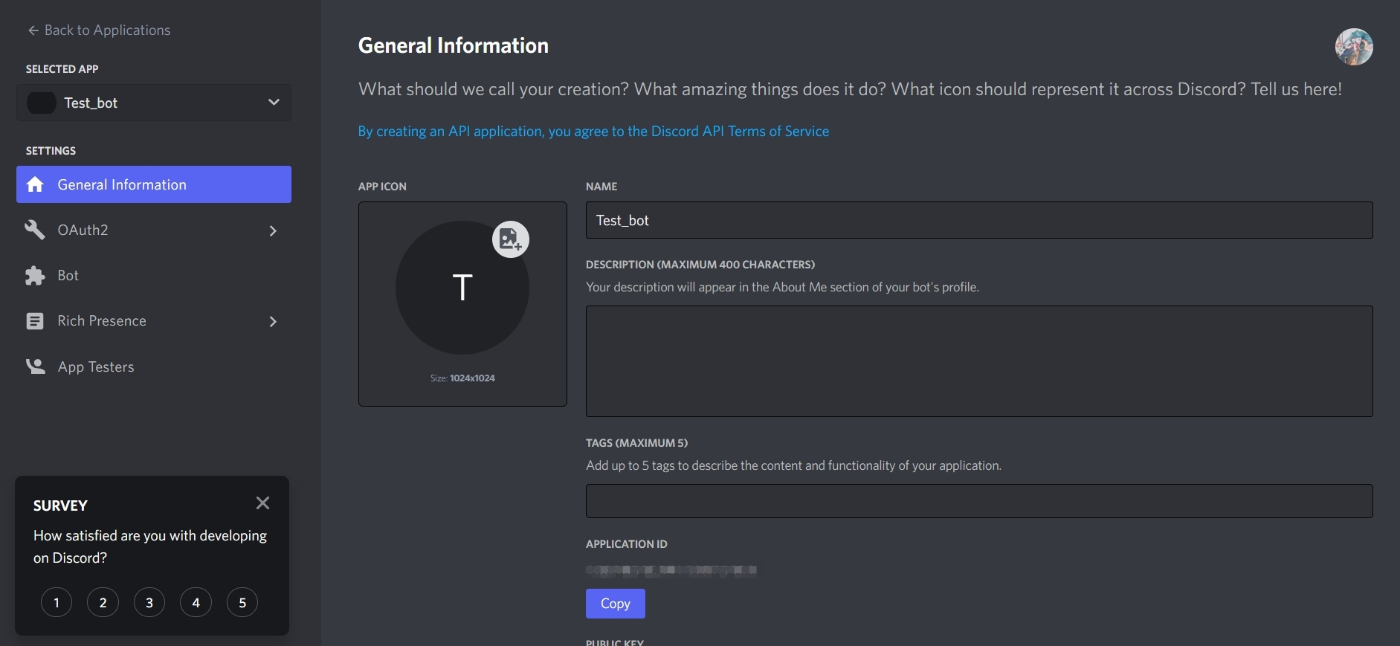
上のリンクから「New Application」をクリックし、名前を入れて「Create」してください。
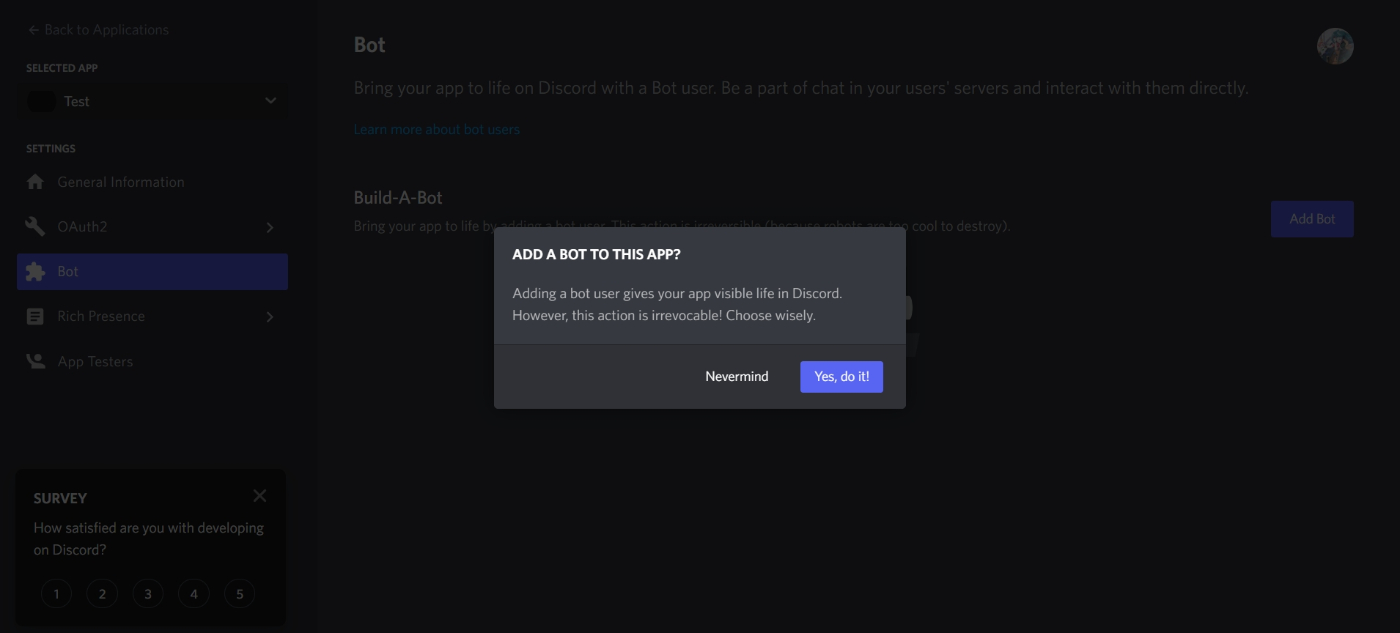
左側の「Bot」をクリックし、「Add Bot」からボットを作成します。
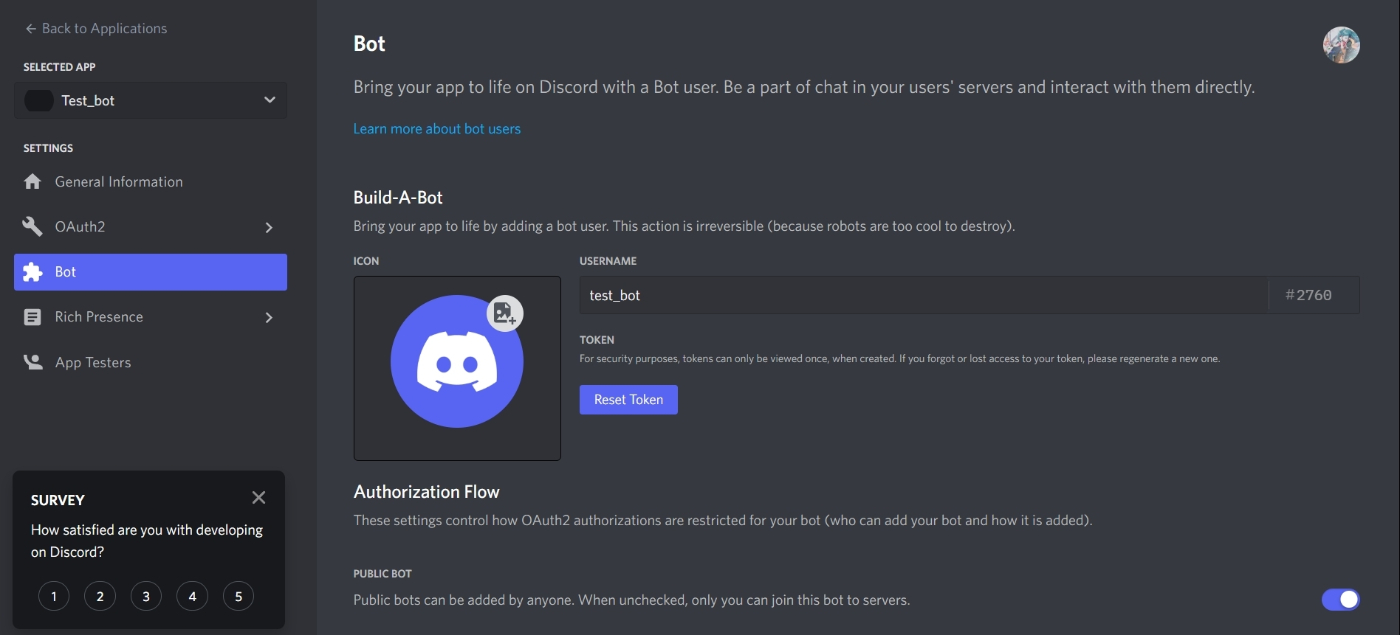
下のような画面が出るので、「Reset Token」をクリックし、表示されたTokenをコピーしてください。このTokenは一度しか表示されないのでなくさないようにしましょう。
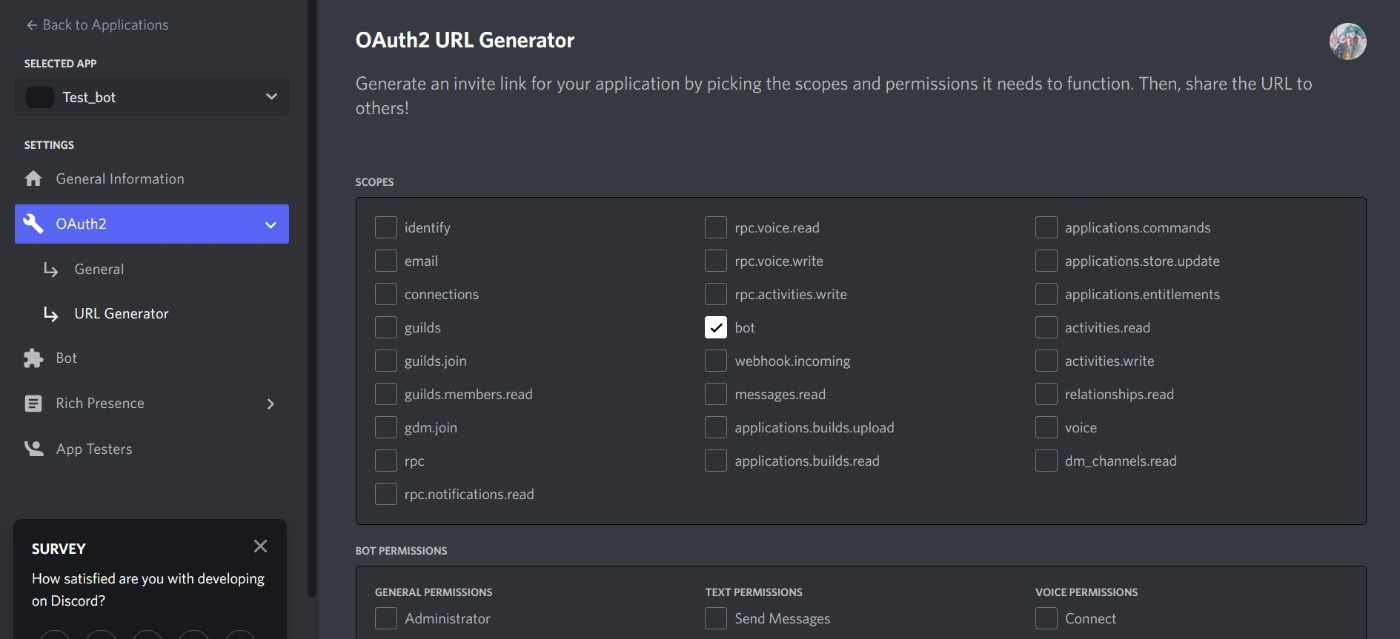
左側の「OAuth2」→「URL Generator」を開き、Scopesの「bot」にチェックを入れたら一番下までスクロールしてURLをコピーします。
URLを開くとどのサーバーにこのbotを入れたいか聞かれるので対象のサーバーを選択してください。
認証後サーバーを確認してメンバーにbotの名前があれば完了です。
2. コードを書く
下記環境で動作確認しています。
- Git 2.33.1
- Go 1.18.1
まず以下のコマンドを実行してください。
git init
go mod init
次に.env と main.go 、 handlers/OnMessageCreate.go を作り、それぞれ下のような感じで書いてください。
CLIENT_ID="botのユーザーID。名前右クリックで「IDをコピー」"
TOKEN="さっきコピーしたやつ"
package main

import (
	"fmt"
	"os"
	"os/signal"
	"syscall"

	"github.com/bwmarrin/discordgo"
	"github.com/joho/godotenv"
)

func main() {
	godotenv.Load(".env")

	discord, err := discordgo.New("Bot " + os.Getenv("TOKEN"))
	if err != nil {
		fmt.Println("ログインに失敗しました")
		fmt.Println(err)
	}

	discord.AddHandler(handlers.OnMessageCreate)
	discord.Open()
	if err != nil {
		fmt.Println(err)
	}

	defer discord.Close()

	fmt.Println("bot is running")

	stopBot := make(chan os.Signal, 1)
	signal.Notify(stopBot, syscall.SIGINT, syscall.SIGTERM, os.Interrupt)
	<-stopBot
}
package handlers

import (
	"os"

	"github.com/bwmarrin/discordgo"
)

func OnMessageCreate(s *discordgo.Session, m *discordgo.MessageCreate) {
	clientId := os.Getenv("CLIENT_ID")
	u := m.Author
	if u.ID != clientId {
    discord.ChannelMessageSend(m.channelID, "Hello World!")
	}
}
早速動かしてみましょう。 go run main.go すると bot のステータスがオンラインになり、何かしらメッセージを送ると「Hello, World!」と返ってくると思います。
インポート部分でエラーが発生している場合は go mod tidy してください。
3. 定時にembedメッセージの送信
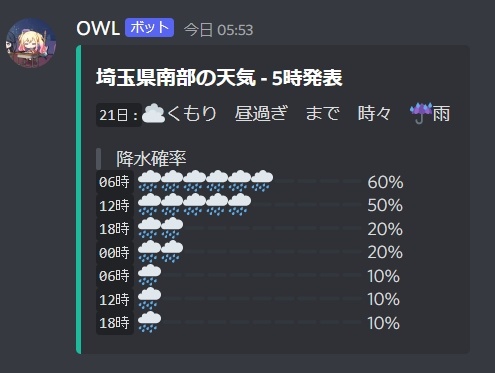
これだけでは面白くないので、毎日定時にお天気情報を通知してくれるプログラムを作りたいと思います。見た目は下のような感じです。
簡易的なものなので、認証無しで使える気象庁のAPIを使います。気象庁のAPIについてはいくつか注意点があるので、詳しい利用方法などは下の記事をご覧ください。
埼玉の気象情報は https://www.jma.go.jp/bosai/forecast/data/forecast/130000.json から確認できます。
他の地域はコードを https://www.jma.go.jp/bosai/common/const/area.json から確認できるようなので 130000 の部分を好きなように変えてみてください。
次にリンクを開きレスポンスの全文をコピーしてください。
これを下のサイトで貼り付け、構造体のコードを生成してもらいましょう。
これをそのまま貼り付け、したいところなんですが、このレスポンス、 timeSeries 配列にある3つの要素はそれぞれ型が違うのです。今回は降水確率の情報を載せたいので配列の2つめの情報を取ってきたいのですが、上のシステムはおそらく配列の1つ目の要素で型判断をしているようなので、フィールドを追加してあげます。するとこんな感じになると思います。
type WeatherResponseStruct []struct {
	PublishingOffice string    `json:"publishingOffice"`
	ReportDatetime   time.Time `json:"reportDatetime"`
	TimeSeries       []struct {
		TimeDefines []time.Time `json:"timeDefines"`
		Areas       []struct {
			Area struct {
				Name string `json:"name"`
				Code string `json:"code"`
			} `json:"area"`
+			Pops         []string
			WeatherCodes []string `json:"weatherCodes"`
			Weathers     []string `json:"weathers"`
			Winds        []string `json:"winds"`
		} `json:"areas"`
	} `json:"timeSeries"`
	TempAverage struct {
		Areas []struct {
			Area struct {
				Name string `json:"name"`
				Code string `json:"code"`
			} `json:"area"`
			Min string `json:"min"`
			Max string `json:"max"`
		} `json:"areas"`
	} `json:"tempAverage,omitempty"`
	PrecipAverage struct {
		Areas []struct {
			Area struct {
				Name string `json:"name"`
				Code string `json:"code"`
			} `json:"area"`
			Min string `json:"min"`
			Max string `json:"max"`
		} `json:"areas"`
	} `json:"precipAverage,omitempty"`
}
では実装していきましょう。
まずは通知させたいチャンネルを .env ファイルに追加します。
そして先ほどの構造体と合わせて以下のコードを書いてください。
package functions

import (
	"encoding/json"
	"io"
	"net/http"
	"os"
	"strconv"
	"strings"
	"time"

	"github.com/bwmarrin/discordgo"
)

func GetWeather(discord *discordgo.Session) {
	weatherChannel, _ := discord.Channel(os.Getenv("WEATHER_CHANNEL_ID"))

	url := "https://www.jma.go.jp/bosai/forecast/data/forecast/110000.json"
	req, _ := http.NewRequest(http.MethodGet, url, nil)
	client := new(http.Client)
	raw, _ := client.Do(req)
	body, _ := io.ReadAll(raw.Body)
	var response WeatherResponseStruct
	json.Unmarshal(body, &response)

	pops := response[0].TimeSeries[1].Areas[1].Pops
	timeDefines := response[0].TimeSeries[1].TimeDefines

	if strings.Contains(response[0].TimeSeries[0].Areas[1].Weathers[0], "雨") {
		title := "埼玉県南部の天気 - " + strconv.Itoa(response[0].ReportDatetime.Hour()) + "時発表\n"
		day1Weather := strings.ReplaceAll(response[0].TimeSeries[0].Areas[1].Weathers[0], "晴れ", "🌞晴れ")
		day1Weather = strings.ReplaceAll(day1Weather, "くもり", "☁くもり")
		day1Weather = strings.ReplaceAll(day1Weather, "雨", "☔雨")
		day1Weather = strings.ReplaceAll(day1Weather, "雷", "⚡雷")
		body := "`" + strconv.Itoa(response[0].TimeSeries[0].TimeDefines[0].Day()) + "日:`" + day1Weather + " \n"
		for i := 0; i < len(pops); i++ {
			if i == 0 {
				body += "\n> 降水確率\n"
			}
			weatherCount, _ := strconv.Atoi(pops[i])
			icon := strings.Repeat("🌧", weatherCount/10) + strings.Repeat("➖", 10-weatherCount/10)
			hour := timeDefines[i].Hour()
			var hourStr string
			if hour < 10 {
				hourStr = "0" + strconv.Itoa(hour)
			} else {
				hourStr = strconv.Itoa(hour)
			}
			body += "`" + hourStr + "時` " + icon + " " + pops[i] + "%\n"
		}
		discord.ChannelMessageSendEmbed(weatherChannel.ID, &discordgo.MessageEmbed{
			Title:       title,
			Description: body,
			Color:       1752220,
		})
	}
}
多少強引な書き方感は否めませんが...。
ちなみにこのプログラムでは予報の文字に「雨」が含まれないときはメッセージが送信されないようにしています。毎日来ても読まなくなるだけなので。まあその部分は各自でカスタマイズして使ってください。
あと、embedの色を指定していますがこの数字はHEXを10進数に直したものです。いちいち計算するのも面倒なので、下のページを参考にすると良いと思います。
あとは main.go にちょこっと追加します。stopBot の前にこれを追加してください。
	ticker := time.NewTicker(time.Hour)
	go func() {
		for t := range ticker.C {
			fmt.Println(t)
			functions.GetShipNews(discord)
			functions.GetNarou(discord)
			if t.Hour() == 5 {
				functions.GetWeather(discord)
			}
		}
	}()
1時間ごとにループ処理を実行し、現在時刻が5時であれば getWeather 関数を実行します。
以上で完成です!
4. Herokuへデプロイ
動作が確認できたら、次はプログラムを常駐化するため Heroku へデプロイします。ここでは詳しくは説明しないので他の記事も参考にしてください。
まず Procfile を追加し、下のように書き込みます。
worker: bin/app_name
Gitでコミット後、GitHubへデプロイします。
Heroku側でアプリを作成し、GitHubと連携するとデプロイが始まると思います。
環境変数の追加はHerokuのコンソールの「Settings」→「Config Vars」からできます。
5. おまけ:メッセージ展開
大きなサーバーとかだとよくある、Discordのリンクを送るとその本文を表示してくれるアレです。最近は Message Content Intent の導入によって大規模botではメッセージの取得ができなくなっているのであまり見ない気もします。ただこのbotは個人のサーバーで動かすレベルの小さなもので影響はないので、実装してみました。
if strings.Contains(m.Content, "https://discord.com/channels/") {
	channelId := strings.Split(m.Content, "/")[5]
	messageId := strings.Split(m.Content, "/")[6]
	message, _ := s.ChannelMessage(channelId, messageId)
	channel, _ := s.Channel(channelId)
	s.ChannelMessageSendEmbed(m.ChannelID, &discordgo.MessageEmbed{
		Description: message.Content,
		Color:       15158332,
		Timestamp:   message.Timestamp.Format(time.RFC3339),
		Author: &discordgo.MessageEmbedAuthor{
			Name:    message.Author.Username,
			IconURL: message.Author.AvatarURL(""),
		},
		Footer: &discordgo.MessageEmbedFooter{
			Text: channel.Name,
		},
	})
}
対応しているのはテキストメッセージのみです。画像メッセージとか、embedメッセージとかだと動かないと思います。
5. 最後に
Discordgoの記事が少ないように感じたので書いてみました。少しでも誰かの参考になれば幸いです。
Discussion