🎨
【SwiftUI】上タブ(スクロール可能・固定)
はじめに
モバイルアプリのUIでよくみる上タブをSwiftUIで実装しました。
スクロール可能な上タブ
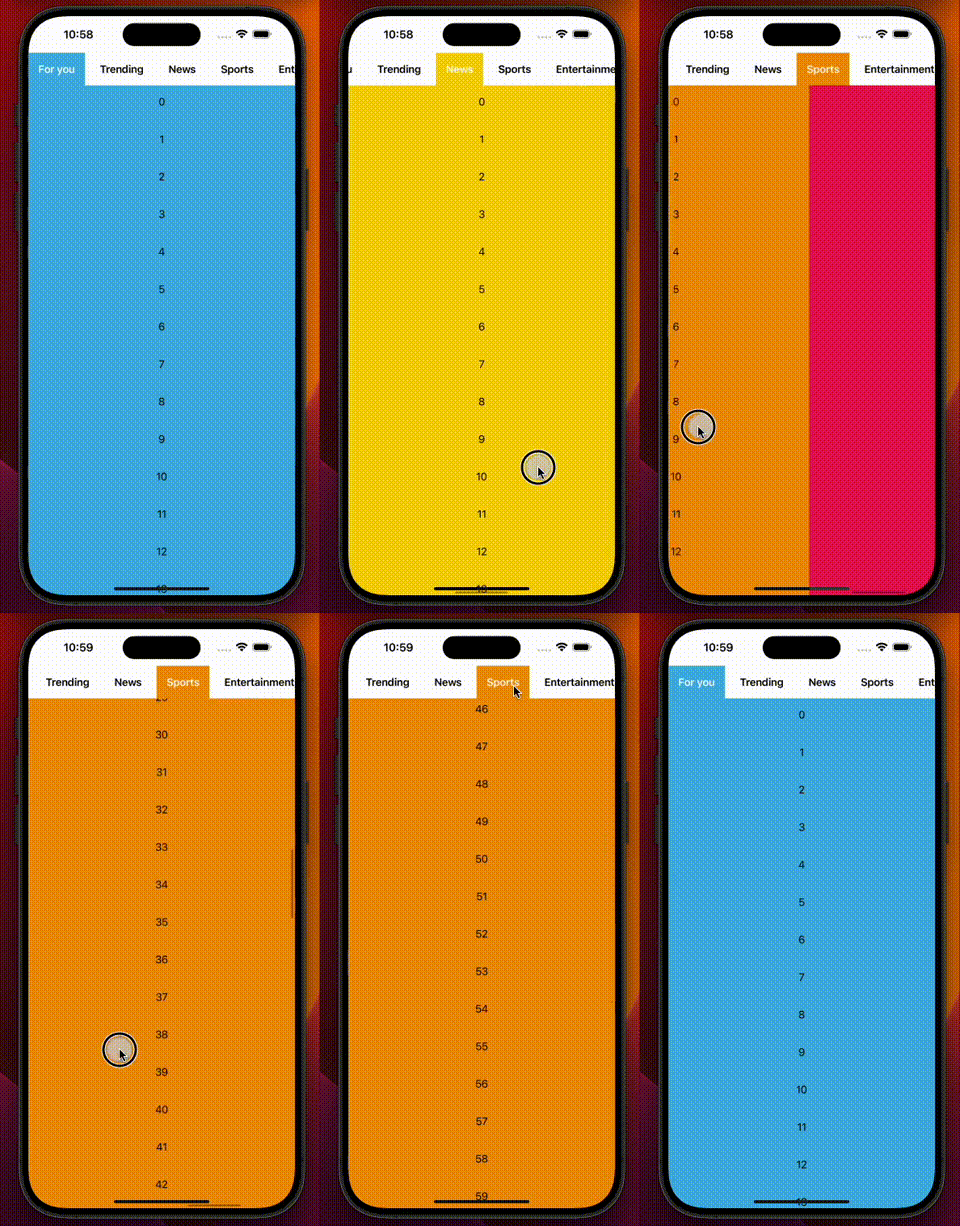
タブがスクロール可能、また横スワイプでの画面の切り替えによって、タブも同期してスクロールされていく上タブです。

実装
全体の実装は以下の通りです。
全体コード
import Foundation
import struct SwiftUI.Color

struct Tab: Identifiable {
    var id: UUID = .init()
    let title: String
    let color: Color
}
import SwiftUI

private let tabs: [Tab] = [
    .init(title: "For you", color: .cyan),
    .init(title: "Trending", color: .green),
    .init(title: "News", color: .yellow),
    .init(title: "Sports", color: .orange),
    .init(title: "Entertainment", color: .pink)
]

struct ScrollableTopTabBarView: View {

    @State private var selectedTabId: UUID? = tabs[0].id

    @Namespace private var tabNamespace

    var body: some View {
        VStack(spacing: 0) {
            // Tab
            ScrollViewReader { scrollProxy in
                ScrollView(.horizontal, showsIndicators: false) {
                    HStack {
                        ForEach(tabs) { tab in
                            Button {
                                selectedTabId = tab.id
                            } label: {
                                Text(tab.title)
                                    .bold()
                                    .foregroundStyle(
                                        selectedTabId == tab.id ? .white : .primary
                                    )
                            }
                            .id(tab.id)
                            .padding()
                            // 💡1️⃣
                            .matchedGeometryEffect(
                                id: tab.id, in: tabNamespace, isSource: true
                            )
                        }
                    }
                }
                .onChange(of: selectedTabId, { _, newTabId in
                    if let newTabId,
                       let index = tabs.firstIndex(where: { $0.id == newTabId }) {
                        withAnimation(.easeInOut) {
                            // 💡2️⃣
                            scrollProxy.scrollTo(
                                newTabId,
                                anchor: UnitPoint(
                                    x: CGFloat(index) / CGFloat(tabs.count), y: 0
                                )
                            )
                        }
                    }
                })
            }
            .background {
                if let selectedTabId,
                   let color = tabs.first(where: { $0.id == selectedTabId })?.color {
                    Rectangle()
                        .fill(color)
                        // 💡1️⃣
                        .matchedGeometryEffect(
                            id: selectedTabId, in: tabNamespace, isSource: false
                        )
                }
            }

            // Content
            // 💡3️⃣
            ScrollView(.horizontal) {
                LazyHStack(spacing: 0) {
                    ForEach(tabs) { tab in
                        ScrollView {
                            ZStack {
                                tab.color
                                VStack {
                                    ForEach(0..<100, id: \.self) { num in
                                        Text(num.description)
                                            .padding()
                                    }
                                }
                            }
                            .containerRelativeFrame(.horizontal)
                        }
                    }
                }
                .scrollTargetLayout()
            }
            .scrollTargetBehavior(.viewAligned)
            .scrollPosition(id: $selectedTabId)
        }
        .ignoresSafeArea(edges: [.bottom])
        .animation(.easeInOut, value: selectedTabId)
    }
}
ポイント
UIKitなどでは面倒な座標計算が必要そうなUIの機能に対して、実装量がかなり少なく感じられたのではないでしょうか。
ポイントは以下の通りです。
-
matchedGeometryEffect(id:in:properties:anchor:isSource:)の仕組みによって、タブの要素のサイズや座標を気にすることなく、選択中タブの移動や色の変化のアニメーションが可能。ScrollViewReader { scrollProxy in ScrollView(.horizontal, showsIndicators: false) { HStack { ForEach(tabs) { tab in Button { // ... } // ... // 💡1️⃣ .matchedGeometryEffect(id: tab.id, in: tabNamespace, isSource: true) } } } .onChange(of: selectedTabId, { _, newTabId in // ... }) } .background { if let selectedTabId, let color = tabs.first(where: { $0.id == selectedTabId })?.color { Rectangle() .fill(color) // 💡1️⃣ .matchedGeometryEffect(id: selectedTabId, in: tabNamespace, isSource: false) } } - 横スワイプでの画面移動とタブのスクロール位置の同期は
ScrollViewReaderを使用。scrollTo(_:anchor:)のanchor引数に配列のインデックスを正規化した値を入れることで、徐々に末尾までスクロールされていく動きを表現。ScrollView(.horizontal, showsIndicators: false) { HStack { ForEach(tabs) { tab in // ... } } } .onChange(of: selectedTabId, { _, newTabId in if let newTabId, let index = tabs.firstIndex(where: { $0.id == newTabId }) { withAnimation(.easeInOut) { // 💡2️⃣ scrollProxy.scrollTo( newTabId, anchor: UnitPoint(x: CGFloat(index) / CGFloat(tabs.count), y: 0) ) } } }) - コンテンツには、iOS17+でリッチになった
ScrollViewを使用。ViewAlignedScrollTargetBehaviorを使用したページングの動作。各画面のスクロール位置も保持。// 💡3️⃣ ScrollView(.horizontal) { LazyHStack(spacing: 0) { ForEach(tabs) { tab in ScrollView { ZStack { tab.color VStack { ForEach(0..<100, id: \.self) { num in Text(num.description).padding() } } } .containerRelativeFrame(.horizontal) } } } .scrollTargetLayout() } .scrollTargetBehavior(.viewAligned) .scrollPosition(id: $selectedTabId)
固定の上タブ

実装
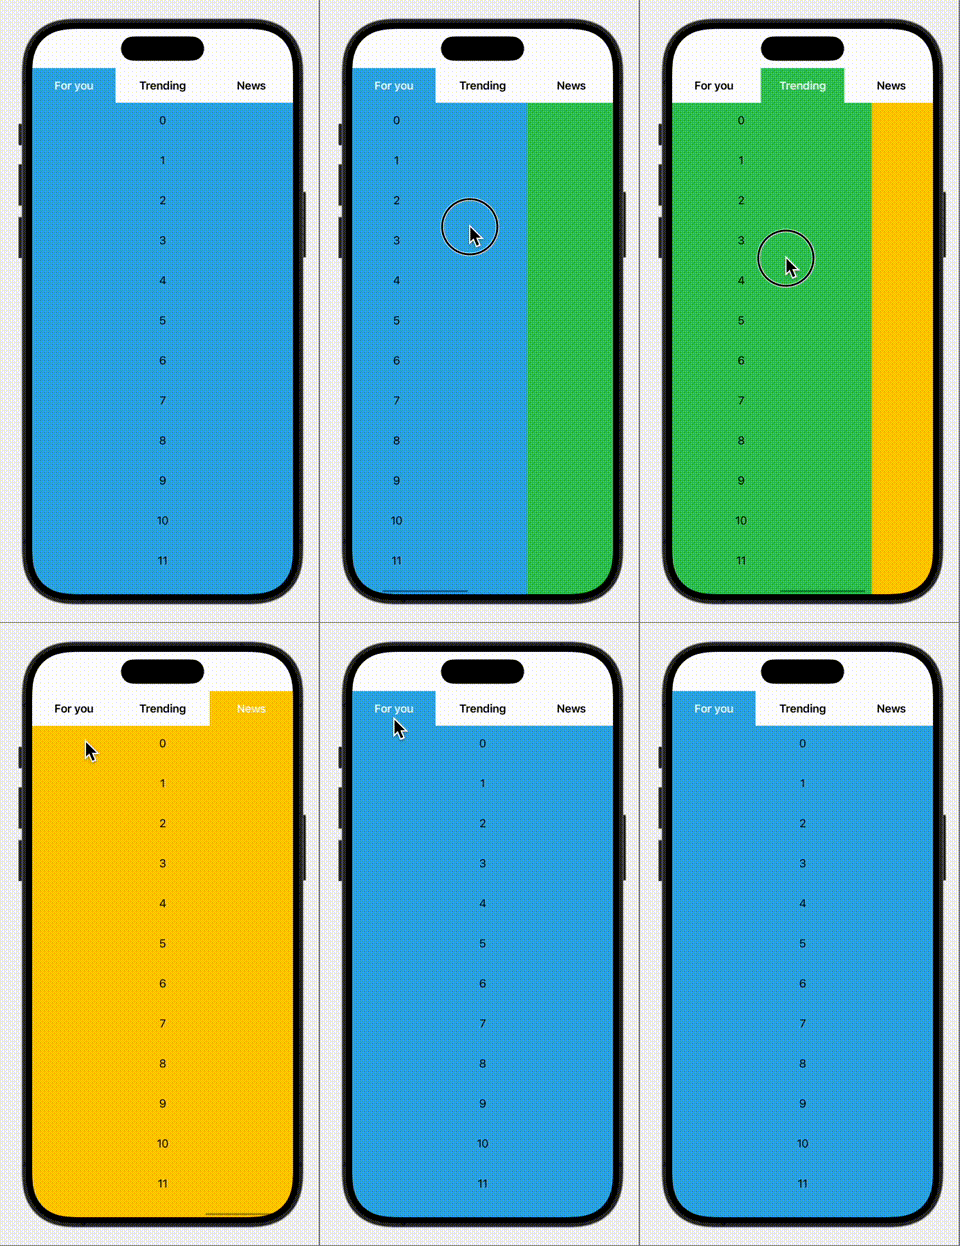
タブのスクロールと同期を取り除けば固定の上タブになります。
全体コード
import SwiftUI

private let tabs: [Tab] = [
    .init(title: "For you", color: .cyan),
    .init(title: "Trending", color: .green),
    .init(title: "News", color: .yellow),
]

struct FixedTopTabBarView: View {

    @State private var selectedTabId: UUID? = tabs[0].id

    @Namespace private var tabNamespace

    var body: some View {
        VStack(spacing: 0) {
            // Tab
            HStack {
                ForEach(tabs) { tab in
                    Button {
                        selectedTabId = tab.id
                    } label: {
                        Text(tab.title)
                            .bold()
                            .foregroundStyle(
                                selectedTabId == tab.id ? .white : .primary
                            )
                    }
                    .frame(maxWidth: .infinity)
                    .padding()
                    .matchedGeometryEffect(
                        id: tab.id, in: tabNamespace, isSource: true
                    )
                }
            }
            .background {
                if let selectedTabId,
                   let color = tabs.first(where: { $0.id == selectedTabId })?.color {
                    Rectangle()
                        .fill(color)
                        .matchedGeometryEffect(
                            id: selectedTabId, in: tabNamespace, isSource: false
                        )
                }
            }

            // Content
            ScrollView(.horizontal) {
                LazyHStack(spacing: 0) {
                    ForEach(tabs) { tab in
                        ScrollView {
                            ZStack {
                                tab.color
                                VStack {
                                    ForEach(0..<100, id: \.self) { num in
                                        Text(num.description)
                                            .padding()
                                    }
                                }
                            }
                            .containerRelativeFrame(.horizontal)
                        }
                    }
                }
                .scrollTargetLayout()
            }
            .scrollTargetBehavior(.viewAligned)
            .scrollPosition(id: $selectedTabId)
        }
        .ignoresSafeArea(edges: [.bottom])
        .animation(.easeInOut, value: selectedTabId)
    }
}
さいごに
SwiftUIの標準APIの仕組みを組み合わせるだけのシンプルなコードで、上タブを実装することができました。
各画面のライフサイクルをLazyHStackに任せることなく個別で管理したい場合などは、もうひと工夫必要そうです。

Discussion