はじめに
初めまして、neoAIでソフトウェアエンジニアをしている松岡です。
本記事では、Google Cloud の Workload Identity Federation を使用して、Azure Container Apps から サービスアカウントキーを使用せずにGoogle CloudのサービスであるVertex AI に認証する方法を解説します。
サービスアカウントキーを使用しないことで、以下のようなメリットがあります。
- 秘匿情報の漏洩リスクの軽減
- キーローテーションなどの管理コストの削減
Workload Identity を用いた連携方法については、公式ドキュメント でも説明されています。しかし、Azure Container Apps では公式手順通りに進められない部分があったため、本記事ではその違いに焦点を当てて解説します。
ゴール
本記事では、Workload Identity で認証し、Azure Container Apps から Google Cloud の Vertex AI (Gemini)を利用する構成を実装します。
手順
Azure側
マネージド ID の作成と割り当て
まずは、Azure マネージド ID を作成して、Azure Container Apps に割り当てます。マネージド ID は Azure リソース用に自動的に割り当てられる一意の ID です。この仕組みによって、アプリケーションコードを変更する必要なく Azure Active Directory (AD) へのアクセスが可能になります。
- Azure Portal または CLI を使用して、マネージド ID を有効化してください。
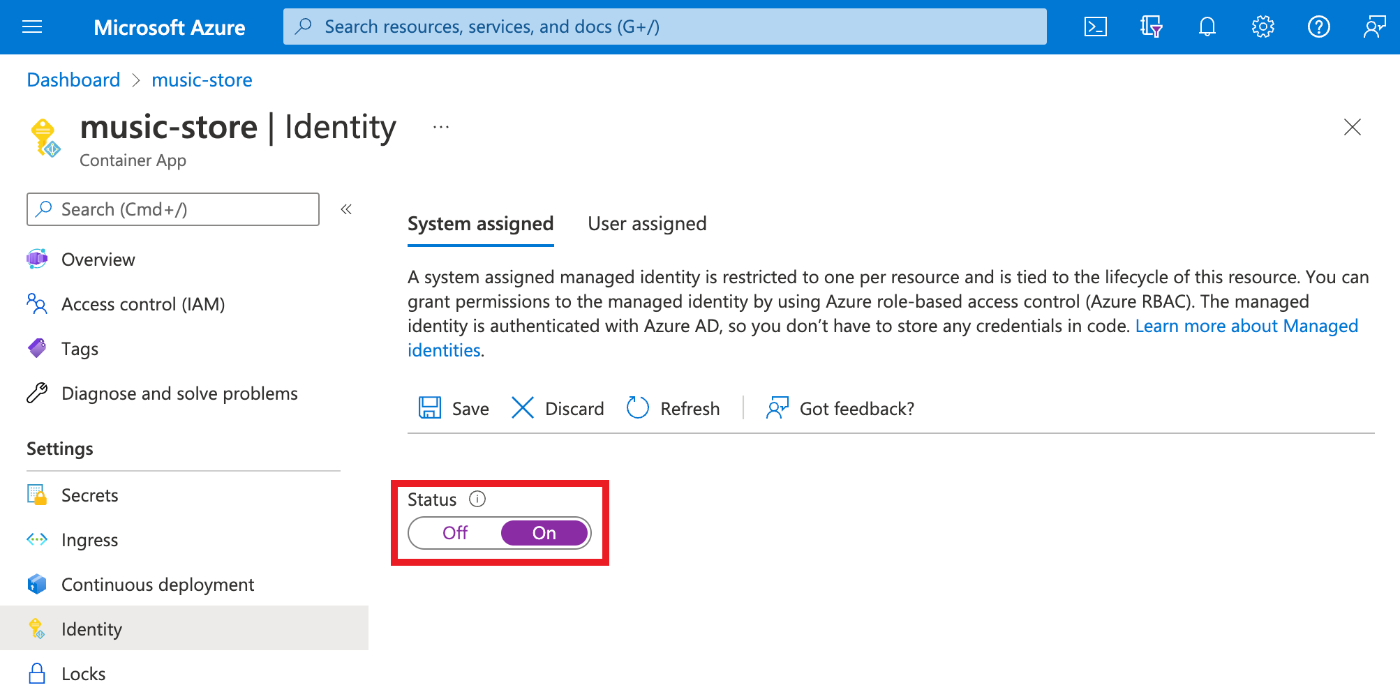
- 対象のコンテナー アプリ → [
設定] → [ID] → [システム割り当て済み] タブで、 [状態] を [オン] に切り替え [保存] をクリックします。
 公式から引用
- 対象のコンテナー アプリ → [
アクセストークン情報の取得
マネージド ID を使用して、Microsoft Entra ID を使用しているAzureリソースにアクセスするためのトークンを取得できます。このトークンに含まれる sub(マネージド ID のオブジェクト ID)を Google Cloud 側の構成でマッピングする形で認証を行います。
手順
-
Azureにログインし、Container Apps のコンテナ内に入ります。
$ az login $ az containerapp exec --name "<コンテナ名>" --resource-group "<リソースグループ>" --command bash -
以下のコマンドでアクセストークンを取得します
curl -s -H "x-identity-header: ${IDENTITY_HEADER}" \ "${IDENTITY_ENDPOINT}?resource=https://vault.azure.net&api-version=2019-08-01" # (補足)エラーが出た際には curl のインストール状態やネットワークを確認してください -
するとレスポンスで、アクセストークン情報が取得できます。
{ "access_token":"xxxxxxxxxxxx", "expires_on":"1736848910", "resource":"https://vault.azure.net", "token_type":"Bearer", "client_id":"06992xx-xxxx-xxxx-xxxx-xxxxxxxxx" } -
デコードしてクレーム情報を確認します
-
https://jwt.ms を使い、レスポンス内の
access_tokenをデコードして確認します。 - 必要なクレーム (
aud,iss,sub) をコピーしておきます。この値は後ほど使用します。
-
https://jwt.ms を使い、レスポンス内の
Google Cloud側
Workload Identity Federation の構成
次に、Google Cloud 側で Workload Identity Federation を作成します。この手順では Workload Identity Pool と Provider を設定します。
Workload Identity プールの作成
以下のコマンドで、Workload Identity プールを作成します。
gcloud iam workload-identity-pools create azure-ca-workload-identity \
    --location="global" \
    --description="Workload Identity enabling Azure Container Apps to access Google Cloud" \
    --display-name="AzureContainerApps-WorkloadIdentity"
-
POOL_ID:azure-ca-workload-identity(名前に用途や環境を含める) -
DESCRIPTION: 説明文(例: "Azure Container Apps から認証")
Workload Identity プールのプロバイダを追加
以下のコマンドで、Workload Identity プールのプロバイダを追加します:
例
gcloud iam workload-identity-pools providers create-oidc azure-ca-workload-identity-provider \
    --location="global" \
    --workload-identity-pool="azure-ca-workload-identity" \
    --issuer-uri="https://sts.windows.net/g97dl245-xxxx-xxxx-xxxx-xxxxxxxxxx/" \
    --allowed-audiences="cfaxxxxxxxxxxxxxxx" \
    --attribute-mapping="google.subject=assertion.sub"
-
issuer-uri: JWTのissフィールドと一致する必要があります。"https://sts.windows.net/<AzureTenantID>/"
-
allowed-audiences: JWTのaudフィールドと一致する値を設定します。 -
attribute-mapping: クレーム(トークンに含まれる情報)を Google Cloud の Workload Identity に定義する属性にマッピングします。- デフォルト例として
google.subject=assertion.subを使用。
- デフォルト例として
ロールの割り当て
Azure Container Apps から Google Cloud の Vertex AI にアクセスするためには、Workload Identity Federation を使用して適切な IAM(アクセス権限)を割り当てる必要があります。
そのため、「Vertex AI Prompt Request」というカスタムロールを作成し、aiplatform.endpoints.predict の権限を付与します。
このロールを付与することで、Azure 上のアプリが Google Cloud の Vertex AI 推論 API にアクセス できるようになります。
1️⃣ カスタムロールの作成
以下のコマンドを実行し、Vertex AI の推論リクエストを実行できるカスタムロールを作成します。
gcloud iam roles create vertex_ai_prompt_request \
    --project=${プロジェクトID} \
    --title="Vertex AI Prompt Request" \
    --description="Custom role for Vertex AI Prediction requests" \
    --permissions="aiplatform.endpoints.predict" \
    --stage="GA"
2️⃣ Workload Identity Federation にロールを割り当て
次に、「Workload Identity Federation」を介して Azure Container Apps に「Vertex AI Prompt Request」ロールを付与 します。
これにより、Azure で動作するアプリケーションが Google Cloud の Vertex AI を認証付きで利用できるようになります。
gcloud projects add-iam-policy-binding ${プロジェクトID} \
    --member="principal://iam.googleapis.com/projects/${プロジェクトID}/locations/global/workloadIdentityPools/azure-workload-dev/subject/${JWTのsub クレーム値}" \
    --role="projects/${プロジェクトID}/roles/vertex_ai_prompt_request"
アプリケーション側
Azure Container Apps から Google Cloud にアクセスするための実装です。今回はPythonを用いて実装します。
公式ドキュメントでは、認証情報の構成をダウンロードしたファイルを、サーバーの任意のパスに配置して GOOGLE_APPLICATION_CREDENTIALS という環境変数でファイルパスを指定するようにしています。しかし、公式ドキュメント通りにダウンロードをしても、JSON内で指定されるエンドポイントがIMDSへの向き先になっているので、今回はContainer Apps用に自作する必要があります。
方法は至って簡単で、認証情報をソースコード上にハードコーディングします。サービスアカウントキーと違い、秘匿情報を含んでいるわけではないのでハードコーディングしても問題はありません。
Vertex AI クライアントの実装
import os
from google.auth import load_credentials_from_dict
from google.auth.credentials import Credentials

class VertexAIClient:
    """Azure Container Apps から Google Cloud に Workload Identity Federation を使って認証するクライアント"""

    ENV_VARS = [
        "GOOGLE_CLOUD_PROJECT_NUMBER",
        "GOOGLE_CLOUD_PROJECT_ID",
        "GOOGLE_CLOUD_WORKLOAD_IDENTITY_POOL_ID",
        "GOOGLE_CLOUD_WORKLOAD_IDENTITY_PROVIDER_ID",
        "IDENTITY_ENDPOINT",
        "IDENTITY_HEADER",
    ]

    def __init__(self):
        """必要な環境変数の確認と認証情報の取得"""
        for var in self.ENV_VARS:
            if not os.getenv(var):
                raise EnvironmentError(f"Missing required environment variable: {var}")

        self.credentials = self._get_credentials()

    def _get_credentials(self) -> Credentials:
        """Workload Identity Federation を使用して Google Cloud の認証情報を取得"""
        workload_identity_info = {
            "type": "external_account",
            "audience": f"//iam.googleapis.com/projects/{os.getenv('GOOGLE_CLOUD_PROJECT_NUMBER')}/locations/global/workloadIdentityPools/{os.getenv('GOOGLE_CLOUD_WORKLOAD_IDENTITY_POOL_ID')}/providers/{os.getenv('GOOGLE_CLOUD_WORKLOAD_IDENTITY_PROVIDER_ID')}",
            "subject_token_type": "urn:ietf:params:oauth:token-type:jwt",
            "token_url": "https://sts.googleapis.com/v1/token",
            "credential_source": {
                "url": f"{os.getenv('IDENTITY_ENDPOINT')}?resource=https://vault.azure.net&api-version=2019-08-01",
                "headers": {"X-IDENTITY-HEADER": os.getenv("IDENTITY_HEADER")},
                "format": {"type": "json", "subject_token_field_name": "access_token"},
            },
        }

        credentials, _ = load_credentials_from_dict(
            workload_identity_info, scopes=["https://www.googleapis.com/auth/cloud-platform"]
        )

        return credentials
import os
import vertexai
from vertex_ai_client import VertexAIClient

if __name__ == "__main__":
    try:
        print("Initializing authentication...")

        # クライアントを作成し、認証情報を取得
        client = VertexAIClient()
        credentials = client.credentials

        print("Authentication successful!")

        # Vertex AI の初期化(認証情報を適用)
        vertexai.init(
            project=os.getenv("GOOGLE_CLOUD_PROJECT_ID"),
            location="us-central1",
            credentials=credentials  # ここで認証情報を適用
        )

        print("Vertex AI initialized successfully!")

    except Exception as e:
        print(f"Error: {e}")
おわりに
本記事では、Azure Container Apps から Workload Identity Federation を利用し、Google Cloud に認証する方法 を解説しました。
サービスアカウントキーを使わずに認証することで、セキュアかつ効率的に Google AI サービスを活用できます。
この記事が、マルチクラウド環境での AI 活用に役立てば幸いです。
Discussion