
これはLCM-LoRAなし
学習不要で特定の人物をStable Diffusionで出力できる手法「PhotoMaker」が発表されました!今回はこのPhotoMakerの特にStyleという機能をLCM-LoRAと一緒に触っていこうと思います。
PhotoMakerとは
PhotoMakerとはTencentが発表したStable Diffusionを学習不要でカスタマイズできる手法です。以前は、特定の人物をStable Diffusionで出力するにはその人物の画像を10枚以上集めてLoRAを学習させなければいけませんでした。しかし、PhotoMakerでは特定の人物の画像1枚から学習不要でその人をStable Diffusionで出力できます。これまで人物LoRAでできていたことは大体できるようです。今回は写真ではなく、違う画風で出力する Style というモードを触ってみます。
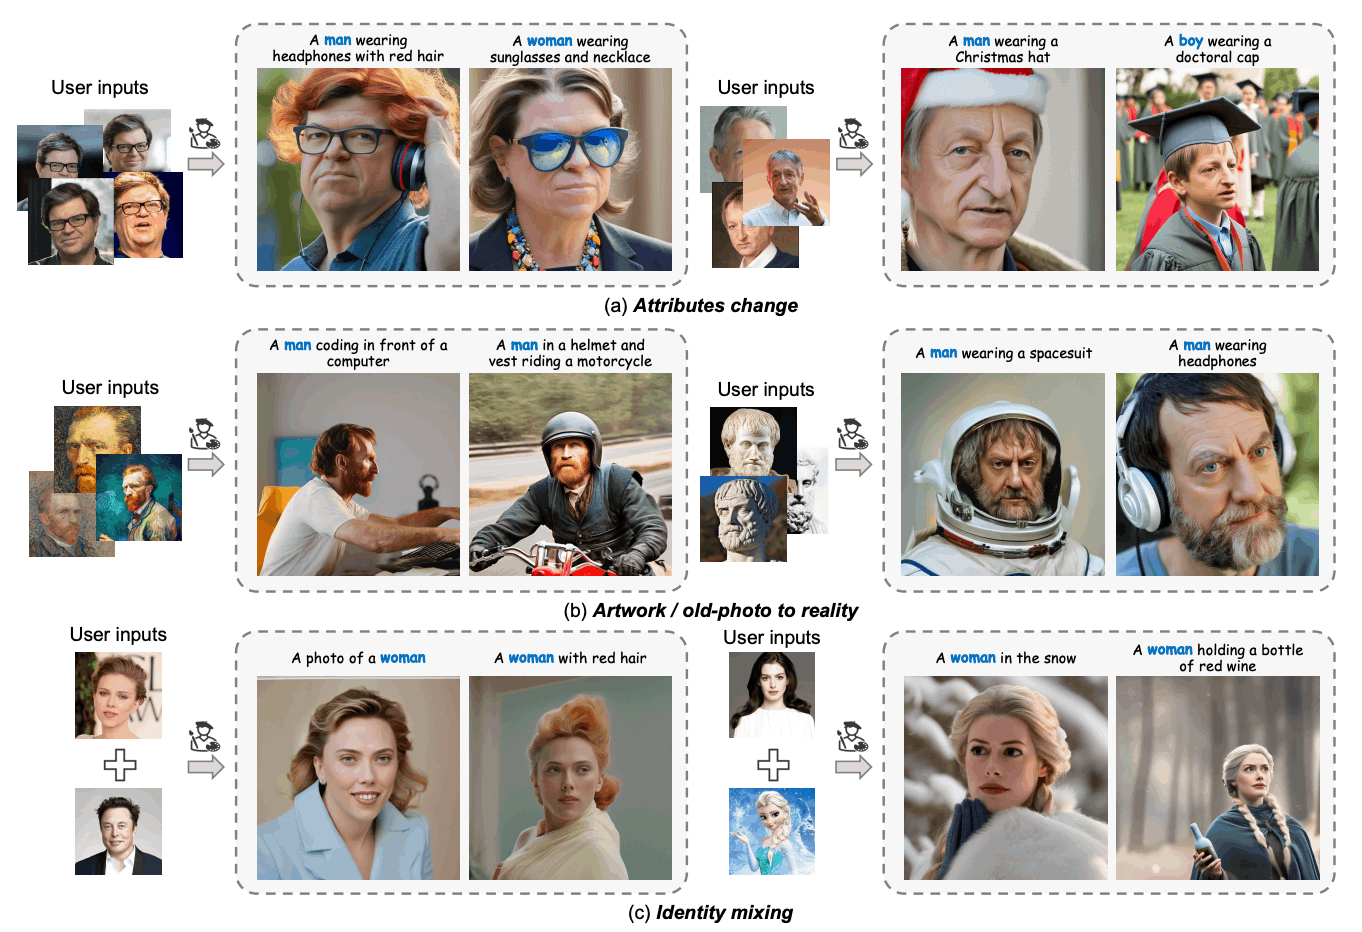

詳細な仕組みは別の機会で解説しますが、簡単に説明するとU-Netに対するConditioningを工夫しています。人物の特徴を反映できるImage Embeddingと従来のText Embeddingを一緒にMLPに通すことでStacked ID Embeddingというものに合成して、それを加えたText EmbeddingをU-Netに渡しています。

PhotoMakerはLoRAと併用可能ということで、LCM-LoRAも使えるか試します。
今回はPhotoMakerの機能のごく一部のみの検証となるので、他にどのようなことができるかどうかは是非論文を見てください!
PhotoMakerが優れている点は以下の3点であると考えられます。
- 学習が不要
- 任意のSDXLのモデル、SDXLのLoRAと併用可能
- 生成時間がほとんど増えない
触ってみる
HuggingFaceデモ
PhotoMakerの公式が出しているデモです。ちょっと触ってみたい人はここから試してみると良いと思います。
Google Colabで動かす(LCM-LoRAなし)
まずはLCM-LoRAは使わずに動かしてみます。PhotoMakerの開発者はDiffusersの上で動くパイプラインを作ってくれていて、今回は折角なのでそれを使います。Google ColabではA100でしか動かないので注意が必要です。まとまったコードは記事末尾に記載しています。
- まずは必要な必要なライブラリのインストールと設定を行います。
from google.colab import drive
drive.mount('/content/drive')

!pip install diffusers omegaconf peft -qqq
!git clone https://github.com/TencentARC/PhotoMaker.git

import torch
import numpy as np
import random
import os
from PIL import Image

from diffusers.utils import load_image
from diffusers import DDIMScheduler
from huggingface_hub import hf_hub_download

os.environ['CUDA_LAUNCH_BLOCKING'] = "1"
os.chdir("./PhotoMaker")
from photomaker import PhotoMakerStableDiffusionXLPipeline

device = "cuda"
save_path = "./outputs"
- 次に必要なファイルのダウンロードを行います。モデルはStable Diffusion XL、 LoRAはPhotomakerの公式の使っていたxl_more_art-fullを使用します。
lora_path = "/content/PhotoMaker/xl_more_art-full.safetensors"
!wget -O /content/PhotoMaker/xl_more_art-full.safetensors https://civitai.com/api/download/models/152309?type=Model&format=SafeTensor

photomaker_ckpt = hf_hub_download(repo_id="TencentARC/PhotoMaker", filename="photomaker-v1.bin", repo_type="model")
- 次に画像生成のpipeを作成します。
pipe = PhotoMakerStableDiffusionXLPipeline.from_pretrained(
    "stabilityai/stable-diffusion-xl-base-1.0",
    torch_dtype=torch.float16, #bf16だとT4やV100では動かない
).to(device)

# Load PhotoMaker checkpoint
pipe.load_photomaker_adapter(
    os.path.dirname(photomaker_ckpt),
    subfolder="",
    weight_name=os.path.basename(photomaker_ckpt),
    trigger_word="img"
)

pipe.scheduler = DDIMScheduler.from_config(pipe.scheduler.config)

print("Loading lora...")
pipe.load_lora_weights(os.path.dirname(lora_path), weight_name=os.path.basename(lora_path), adapter_name="xl_more_art-full")
pipe.set_adapters(["photomaker", "xl_more_art-full"], adapter_weights=[1.0, 0.5])
pipe.fuse_lora()
- 次に対象人物の画像をアップロードして、listに格納します。今回はこの女性の画像を3枚使います。1枚でも全然大丈夫です。
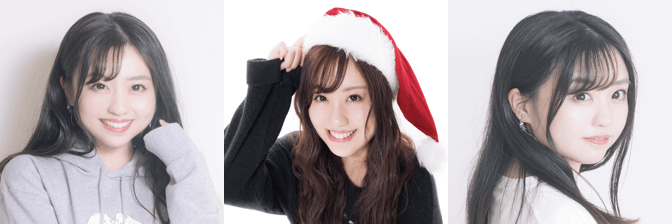
# define and show the input ID images
image_path_list = ['/content/test_image_1.png', '/content/test_image_2.png', '/content/test_image_3.png']

input_id_images = []
for image_path in image_path_list:
    input_id_images.append(load_image(image_path))
- pipeができ、対象の人物も設定できたので、プロンプトや生成パラメータをセットして実際に生成します。
prompt = "a woman img, retro futurism, retro game art style but extremely beautiful, intricate details, masterpiece, best quality, space-themed, cosmic, celestial, stars, galaxies, nebulas, planets, science fiction, highly detailed"
negative_prompt = "realistic, photo-realistic, worst quality, greyscale, bad anatomy, bad hands, error, text"

generator = torch.Generator(device=device).manual_seed(500)

## Parameter setting
num_steps = 50
style_strength_ratio = 20
start_merge_step = int(float(style_strength_ratio) / 100 * num_steps)
if start_merge_step > 30:
    start_merge_step = 30

images = pipe(
    prompt=prompt,
    input_id_images=input_id_images,
    negative_prompt=negative_prompt,
    num_images_per_prompt=2,
    num_inference_steps=num_steps,
    start_merge_step=start_merge_step,
    generator=generator,
).images
imagesにはPillowの画像が入っているので、可視化してみます。すると
このような画像が生成されたことがわかります。
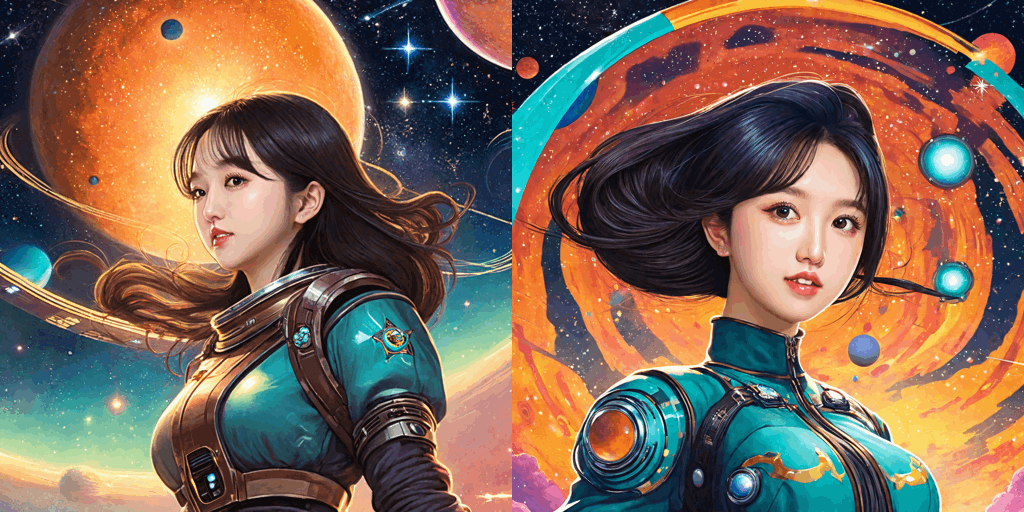
見比べると特徴は捉えられてますが、あと一歩といった感じでしょうか。
LCM-LoRAとの組み合わせ
Diffusersを継承しているおかげで、LCM-LoRAも併用できます。LCM-LoRAで動かすコードは記事の末尾に掲載してますので、試してみたい人は動かしてみてください!
結果はこのようになってます。これは10stepsでStyle Strength RatioとCFG Scaleを変化させた時の比較図です。Style Strength Ratioは下げるほど対象人物に似ますが、promptで指定した画風からは離れていくことがわかりました。CFGもLCM-LoRAが推奨している値より少し大きくしないと画風がうまく反映されないことがわかりました。一つ一つの画像のクオリティが下がってしまうのはLCM-LoRAの特性なのでしょうがないですが、それを加味してもなかなか良い画像が生成されないことがわかりますね。
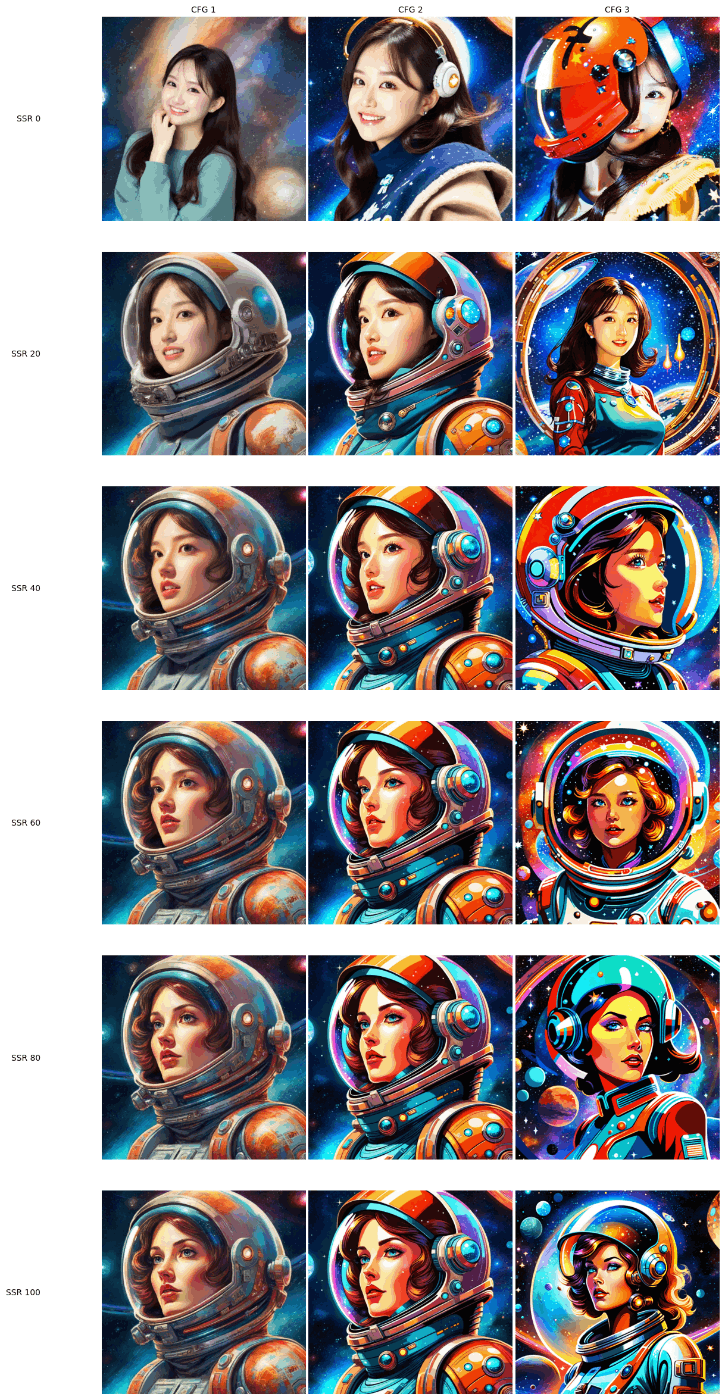
LCM-LoRAはstep数を大幅に減らして高速化を行なっていますが、今回のPhotoMakerは途中のstepから人物に関する条件をU-Netへのconditioningに加えるという方法をとっているので、いい塩梅のところを見つけるのが難しかったです。
結論
PhotoMakerはLCM-LoRAとも併用できることがわかりました。クオリティは下がってしまいますが、リアルタイムのAIフィルターに利用できそうです。
LCM-LoRAを併用しない際のコード
from google.colab import drive
drive.mount('/content/drive')

!pip install diffusers omegaconf peft -qqq
!git clone https://github.com/TencentARC/PhotoMaker.git

import torch
import numpy as np
import random
import os
from PIL import Image

from diffusers.utils import load_image
from diffusers import DDIMScheduler
from huggingface_hub import hf_hub_download

os.environ['CUDA_LAUNCH_BLOCKING'] = "1"
os.chdir("./PhotoMaker")
from photomaker import PhotoMakerStableDiffusionXLPipeline

# gloal variable and function
def image_grid(imgs, rows, cols, size_after_resize):
    assert len(imgs) == rows*cols

    w, h = size_after_resize, size_after_resize

    grid = Image.new('RGB', size=(cols*w, rows*h))
    grid_w, grid_h = grid.size

    for i, img in enumerate(imgs):
        img = img.resize((w,h))
        grid.paste(img, box=(i%cols*w, i//cols*h))
    return grid

device = "cuda"
save_path = "./outputs"

lora_path = "/content/PhotoMaker/xl_more_art-full.safetensors"
!wget -O /content/PhotoMaker/xl_more_art-full.safetensors https://civitai.com/api/download/models/152309?type=Model&format=SafeTensor

photomaker_ckpt = hf_hub_download(repo_id="TencentARC/PhotoMaker", filename="photomaker-v1.bin", repo_type="model")

pipe = PhotoMakerStableDiffusionXLPipeline.from_pretrained(
    "stabilityai/stable-diffusion-xl-base-1.0",
    torch_dtype=torch.float16, #bf16だとT4やV100では動かない
).to(device)

# Load PhotoMaker checkpoint
pipe.load_photomaker_adapter(
    os.path.dirname(photomaker_ckpt),
    subfolder="",
    weight_name=os.path.basename(photomaker_ckpt),
    trigger_word="img"
)

pipe.scheduler = DDIMScheduler.from_config(pipe.scheduler.config)

print("Loading lora...")
pipe.load_lora_weights(os.path.dirname(lora_path), weight_name=os.path.basename(lora_path), adapter_name="xl_more_art-full")
pipe.set_adapters(["photomaker", "xl_more_art-full"], adapter_weights=[1.0, 0.5])
pipe.fuse_lora()

# define and show the input ID images
image_path_list = ['/content/test_image_1.png', '/content/test_image_2.png', '/content/test_image_3.png']

input_id_images = []
for image_path in image_path_list:
    input_id_images.append(load_image(image_path))

prompt = "a woman img, retro futurism, retro game art style but extremely beautiful, intricate details, masterpiece, best quality, space-themed, cosmic, celestial, stars, galaxies, nebulas, planets, science fiction, highly detailed"
negative_prompt = "realistic, photo-realistic, worst quality, greyscale, bad anatomy, bad hands, error, text"

generator = torch.Generator(device=device).manual_seed(500)

## Parameter setting
num_steps = 50
style_strength_ratio = 20
start_merge_step = int(float(style_strength_ratio) / 100 * num_steps)
if start_merge_step > 30:
    start_merge_step = 30

images = pipe(
    prompt=prompt,
    input_id_images=input_id_images,
    negative_prompt=negative_prompt,
    num_images_per_prompt=2,
    num_inference_steps=num_steps,
    start_merge_step=start_merge_step,
    generator=generator,
).images

grid = image_grid(images, 1, 2, size_after_resize=512)

os.makedirs(save_path, exist_ok=True)
for idx, image in enumerate(images):
    image.save(os.path.join(save_path, f"photomaker_style_3img_lcm_10s_sche_cfg1_ss20{idx:02d}.png"))

print("Results:")
grid
LCM-LoRAを併用する際のコード
schedulerをLCM-LoRAのものに変更し、fuseするLoRAにLCM-LoRAを加えただけです。
from google.colab import drive
drive.mount('/content/drive')

!pip install diffusers omegaconf peft -qqq
!git clone https://github.com/TencentARC/PhotoMaker.git

import torch
import numpy as np
import random
import os
from PIL import Image

from diffusers.utils import load_image
from diffusers import DDIMScheduler
from huggingface_hub import hf_hub_download

os.environ['CUDA_LAUNCH_BLOCKING'] = "1"
os.chdir("./PhotoMaker")
from photomaker import PhotoMakerStableDiffusionXLPipeline

# gloal variable and function
def image_grid(imgs, rows, cols, size_after_resize):
    assert len(imgs) == rows*cols

    w, h = size_after_resize, size_after_resize

    grid = Image.new('RGB', size=(cols*w, rows*h))
    grid_w, grid_h = grid.size

    for i, img in enumerate(imgs):
        img = img.resize((w,h))
        grid.paste(img, box=(i%cols*w, i//cols*h))
    return grid

device = "cuda"
save_path = "./outputs"

# Download models

lora_path = "/content/PhotoMaker/xl_more_art-full.safetensors"
!wget -O /content/PhotoMaker/xl_more_art-full.safetensors https://civitai.com/api/download/models/152309?type=Model&format=SafeTensor

photomaker_ckpt = hf_hub_download(repo_id="TencentARC/PhotoMaker", filename="photomaker-v1.bin", repo_type="model")

from diffusers import LCMScheduler

pipe = PhotoMakerStableDiffusionXLPipeline.from_pretrained(
    "stabilityai/stable-diffusion-xl-base-1.0",
    torch_dtype=torch.float16, #bf16だとT4やV100では動かない
).to(device)

# Load PhotoMaker checkpoint
pipe.load_photomaker_adapter(
    os.path.dirname(photomaker_ckpt),
    subfolder="",
    weight_name=os.path.basename(photomaker_ckpt),
    trigger_word="img"
)

# pipe.scheduler = DDIMScheduler.from_config(pipe.scheduler.config)
pipe.scheduler = LCMScheduler.from_config(pipe.scheduler.config)

print("Loading lora...")
pipe.load_lora_weights(os.path.dirname(lora_path), weight_name=os.path.basename(lora_path), adapter_name="xl_more_art-full")
pipe.load_lora_weights("latent-consistency/lcm-lora-sdxl", adapter_name="lcm")

pipe.set_adapters(["photomaker", "xl_more_art-full", "lcm"], adapter_weights=[1.0, 0.5, 1.0])
pipe.fuse_lora()

# define and show the input ID images
image_path_list = ['/content/test_image_1.png', '/content/test_image_2.png', '/content/test_image_3.png']

input_id_images = []
for image_path in image_path_list:
    input_id_images.append(load_image(image_path))

## Note that the trigger word `img` must follow the class word for personalization
prompt = "a woman img, retro futurism, retro game art style but extremely beautiful, intricate details, masterpiece, best quality, space-themed, cosmic, celestial, stars, galaxies, nebulas, planets, science fiction, highly detailed"
negative_prompt = "realistic, photo-realistic, worst quality, greyscale, bad anatomy, bad hands, error, text"

generator = torch.Generator(device=device).manual_seed(500)

## Parameter setting
num_steps = 10
style_strength_ratio = 20
start_merge_step = int(float(style_strength_ratio) / 100 * num_steps)
if start_merge_step > 30:
    start_merge_step = 30

images = pipe(
    prompt=prompt,
    input_id_images=input_id_images,
    negative_prompt=negative_prompt,
    num_images_per_prompt=2,
    num_inference_steps=num_steps,
    start_merge_step=start_merge_step,
    generator=generator,
    guidance_scale=1
).images

grid = image_grid(images, 1, 2, size_after_resize=512)

os.makedirs(save_path, exist_ok=True)
for idx, image in enumerate(images):
    image.save(os.path.join(save_path, f"photomaker_style_3img_lcm_10s_sche_cfg1_ss20{idx:02d}.png"))

print("Results:")
grid

Discussion