【Laravel】CRUD機能を作成する②読み取り機能(Read)
はじめに
下記の続きになります。
ユーザーの一覧から名前を押すと詳細が表示され、URLの末尾(ID)も変化するようにしたいと思います。
ユーザーの一覧を表示する
resources/views/welcome.blade.phpを削除してユーザーの一覧を表示するためのresources/views/users/index.blade.phpを作成してください。
rm resources/views/welcome.blade.php &&
php artisan make:view users/index
@extends('layouts.app')

@section('title', 'ユーザー一覧')

@section('content')
    <h1 class="text-2xl font-bold mb-4">ユーザー一覧</h1>

    <!-- ユーザー登録ページへのリンク -->
    <a href="{{ route('users.create') }}"
        class="mb-4 inline-block bg-blue-500 hover:bg-blue-700 text-white font-bold py-2 px-4 rounded">
        ユーザー登録
    </a>

    <!-- セッションメッセージ -->
    @if (session('message'))
        <div><strong>{{ session('message') }}</strong></div>
    @endif

    <div class="overflow-x-auto">
        <table class="min-w-full divide-y divide-gray-200">
            <thead>
                <tr>
                    <th class="px-6 py-3 bg-gray-50 text-xs font-medium text-gray-500 uppercase tracking-wider">ID</th>
                    <th class="px-6 py-3 bg-gray-50 text-xs font-medium text-gray-500 uppercase tracking-wider">名前</th>
                </tr>
            </thead>
            <tbody class="bg-white divide-y divide-gray-200">
                @if (isset($users))
                    @foreach ($users as $user)
                        <tr>
                            <td class="px-6 py-4 whitespace-nowrap">{{ $user->id }}</td>
                            <td class="px-6 py-4 whitespace-nowrap"><a href="{{ route('users.show', $user->id) }}"
                                    class="text-blue-500 hover:underline">{{ $user->name }}</a></td>
                        </tr>
                    @endforeach
                @endif
            </tbody>
        </table>
    </div>
@endsection
route関数
指定されたルート名に対応するURLを生成します。第一引数にはルート名、第二引数にはそのルートに渡すパラメーターを指定します。ここでは、users.showルートにユーザーのIDを渡しています。
例えば、$user->id(ユーザのID)が14の場合、このコードは以下のようになっています。
<a href="http://localhost/users/14">山田太郎</a>
XSS攻撃対策
LaravelのBladeテンプレートエンジンにおける{{ }}構文は、ユーザーからの入力されたデータを自動的に安全な文字列に変換しています。
この変換処理により、ブラウザが入力データをHTMLコードやJavaScriptとして解釈して実行することが防がれています。
例えば、ユーザーが入力フィールドに<script>タグを含む文字列を入力しても、Bladeテンプレートはそれをただのテキストとして解釈します。
このようにして、LaravelではXSS攻撃を防止しています。
エスケープを回避する方法
もし意図的にHTMLタグを解釈させたい場合は{!! !!}構文を使用すると、エスケープ処理を回避できます。
XSS攻撃とは
攻撃者がユーザーのブラウザに対して悪意のあるスクリプトを実行させることで情報を盗み取る行為です。
フォーム入力やURLパラメーターなどを介して、スクリプトやHTMLを含む悪意のあるコードをWebアプリケーションに送信します。例えば、コメントフォームに<script>alert('XSS');</script>といったJavaScriptコードを入力し、送信する場合がこれに該当します。
コントローラー設定
indexとshowメゾットを編集してください。
    public function index()
    {
        $users = User::all();
        return view('users.index', compact('users'));
    }

    public function show($id)
    {
        $user = User::find($id);
        return view('users.show', compact('user'));
    }
find
指定されたIDに対応するレコードが見つからない場合、nullを返します。
次に記述しているfindOrFailとの違いですが、レコードが存在することが保証されている場合はfindを使用します。
findOrFail
指定されたIDに対応するレコードが見つからない場合、ModelNotFoundExceptionがスローされます。
レコードの存在が確実でない場合は、findOrFailを使用して、レコードが見つからなかった場合にエラー処理をしてください。
all()メソッド
モデルに関連付けられたテーブル内の全てのレコードを取得します。https://readouble.com/laravel/11.x/ja/eloquent.html
テーブルとモデルの紐付け
Eloquentではデータベーステーブルとモデルの紐付けを簡単に行うために、名前から自動で紐付けを行っています。自動で紐付けを行うためには、モデル名とテーブル名が命名規則に則っている必要があります。
モデル名の命名規則
テーブル名の単数形の名称:通常、モデル名は対応するテーブル名の単数形です。
アッパーキャメルケース:単語の頭文字が大文字で、複数の単語がつながっている場合はそれぞれの単語の頭文字が大文字となります。
テーブル名の命名規則
モデル名の複数形の名称:モデル名が単数形の場合、対応するテーブル名は複数形にします。
スネークケース:単語をアンダースコアで区切り、全体を小文字で表記します。
| モデル名 | テーブル名 |
|---|---|
| User(単数形) | users(モデル名の複数形) |
| UserProfile(アッパーキャメルケース) | user_profiles(スネークケース) |
手動でモデルとテーブルを紐付ける
protected $table = '紐付けたいテーブル名';を追記してください。
class User extends Authenticatable
{
    use HasFactory, Notifiable;

    /**
     * The name of the table associated with the model.
     *
     * @var string
     */
    protected $table = '紐付けたいテーブル名';

    /**
     * The attributes that are mass assignable.
     *
     * @var array<int, string>
     */
    protected $fillable = [
        'name',
        'email',
        'password',
    ];

    /**
     * The attributes that should be hidden for serialization.
     *
     * @var array<int, string>
     */
    protected $hidden = [
        'password',
        'remember_token',
    ];

    /**
     * Get the attributes that should be cast.
     *
     * @return array<string, string>
     */
    protected function casts(): array
    {
        return [
            'email_verified_at' => 'datetime',
            'password' => 'hashed', // パスワードをハッシュ化
        ];
    }
}
SQLインジェクション対策
User::find($id)はLaravelのEloquent ORMのfindメソッドを使用しているので、LaravelのSQLインジェクション対策が行われています。
findメソッドは、データベースから特定のIDを持つユーザーを見つけるために使われます。例えば、あるユーザーのIDが1だった場合、User::find(1)というコードを使ってそのユーザーの情報を取得することができます。
このfindメソッドは非常に安全に設計されており、ユーザーからの不正な入力を防ぐためにPDOパラメーターバインディングという技術を使用しています。
PDOパラメーターバインディング
PDO(PHP Data Objects)パラメーターバインディングとは、データベースに送る命令文において、直接データを書き込むのではなく、プレースホルダを使います。これにより、誰かが不正なコマンドを送ろうとしても、そのコマンドはただの文字列として扱われ、データベースに悪影響を与えることはありません。
SQLインジェクションとは
データベースに不正なSQLコマンドを注入し、データベースを悪用する攻撃です。
ルート設定
グループ化します。
<?php

use Illuminate\Support\Facades\Route;
use App\Http\Controllers\UsersController;

Route::prefix('users')->group(function () {
    Route::get('/', [UsersController::class, 'index'])->name('users.index');
    Route::get('/create', [UsersController::class, 'create'])->name('users.create');
    Route::post('/store', [UsersController::class, 'store'])->name('users.store');
    Route::get('/{id}', [UsersController::class, 'show'])->name('users.show');
});
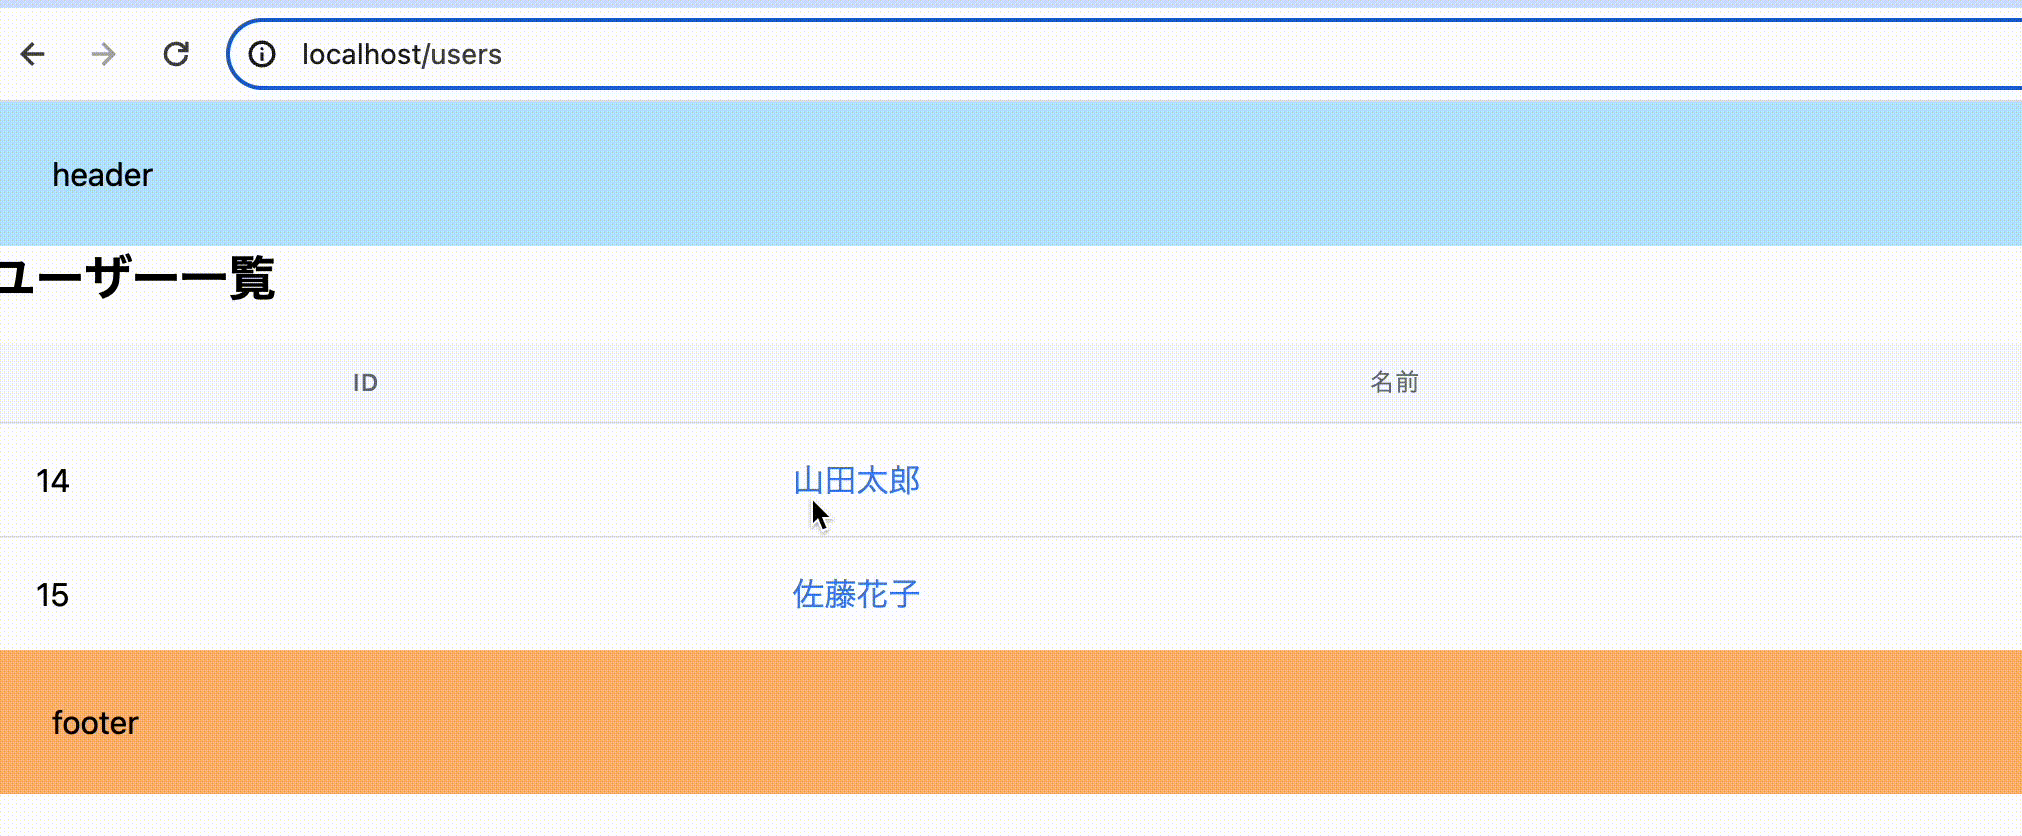
http://localhost/users でユーザーのIDと名前の一覧が表示されていることを確認してください。
この後、名前を押すとユーザーの詳細が確認できるページ
 を作成します。
ユーザーの詳細を表示する
ユーザーの詳細を表示するためのresources/views/users/show.blade.phpを作成してください。
php artisan make:view users/show
@extends('layouts.app')

@section('title', 'ユーザー情報')

@section('content')
    <div class="container mx-auto">
        @isset($user)
            <h1 class="text-2xl font-semibold mb-4">{{ $user->name }} さんの情報</h1>
            <table class="min-w-full border-collapse border border-gray-200">
                <tr>
                    <td class="border border-gray-200 px-4 py-2 font-semibold">ID</td>
                    <td class="border border-gray-200 px-4 py-2">{{ $user->id }}</td>
                </tr>
                <tr>
                    <td class="border border-gray-200 px-4 py-2 font-semibold">名前</td>
                    <td class="border border-gray-200 px-4 py-2">{{ $user->name }}</td>
                </tr>
                <tr>
                    <td class="border border-gray-200 px-4 py-2 font-semibold">メールアドレス</td>
                    <td class="border border-gray-200 px-4 py-2">{{ $user->email }}</td>
                </tr>
            </table>
        @else
            <p>ユーザー情報が見つかりません。</p>
        @endisset
        <div class="mt-4">
            <a href="{{ route('users.index') }}" class="text-blue-500 hover:underline">ユーザー一覧に戻る</a>
        </div>
    </div>
@endsection
http://localhost/users にアクセスして名前を押すと詳細が表示され、URLの末尾(ID)も変化していることを確認してください。
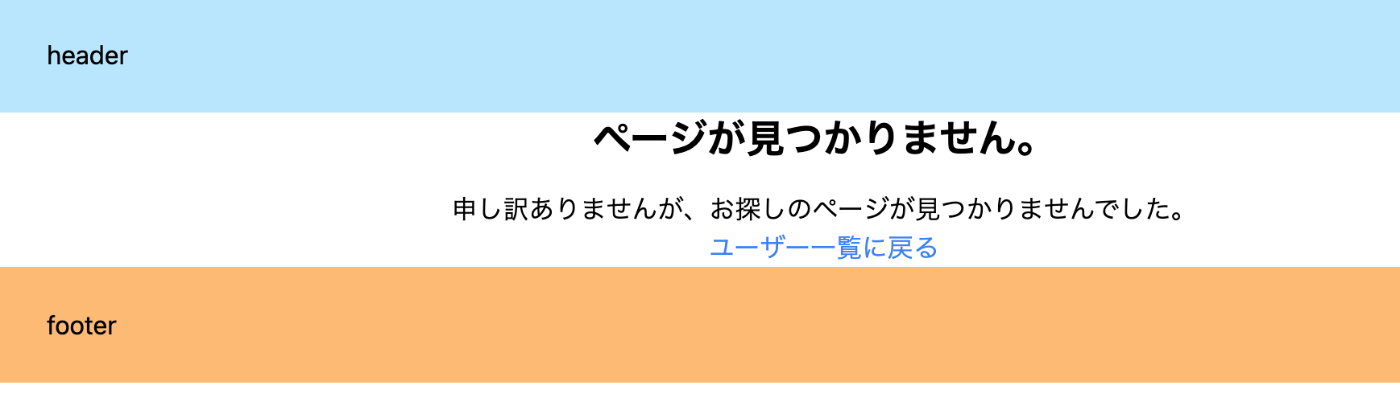
http://localhost/users/100 など存在しないIDを手入力してアクセスすると、次のように表示されるかも試してください。

エラーページの作成
showメソッドの$user = User::find($id);を$user = User::findOrFail($id);に変更すると、データが見つからない場合にはHTTPステータスコード404(Not Found)が表示されます。

今回はこの404ページのデザインを修正してみます。
resources/views/errorsディレクトリ内に404.blade.phpというファイルを作成します。
php artisan make:view errors/404
@extends('layouts.app')

@section('title', 'ページが見つかりません')

@section('content')
    <div class="container mx-auto px-4 py-8">
        <h1 class="text-center font-bold text-2xl mb-4">ページが見つかりません。</h1>
        <p class="text-center">申し訳ありませんが、お探しのページが見つかりませんでした。</p>
        <div class="flex justify-center mt-6">
            <a href="{{ route('users.index') }}" class="text-blue-500 hover:underline">ユーザー一覧に戻る</a>
        </div>
    </div>
@endsection
ルート設定
<?php

use Illuminate\Support\Facades\Route;
use App\Http\Controllers\UsersController;

Route::prefix('users')->group(function () {
    Route::get('/', [UsersController::class, 'index'])->name('users.index');
    Route::get('/create', [UsersController::class, 'create'])->name('users.create');
    Route::post('/store', [UsersController::class, 'store'])->name('users.store');
    Route::get('/{id}', [UsersController::class, 'show'])->name('users.show');
});

Route::fallback(function () {
    return view('errors.404');
});
http://localhost/users/100 にアクセスすると、次のように表示されるようになっていると思います。
Route::fallback()
他のすべてのルートが該当しない場合に、特定の処理を行うために使用されます。
Laravelのルーティングは、定義された順序でマッチングが試行され、最初に一致したルートが使用されます。
しかし、どのルートにも一致しない例外などの場合があります。そのような場合にRoute::fallback()を使用することで、エラーハンドリングやカスタムの処理を行うことができます。
コントローラにおける条件付きレスポンスの処理
Laravelでは、単一のリクエストに対して一つのレスポンスフォーマットのみを選択することが基本です。
Railsのように同一のアクションから条件に応じて異なるタイプ(HTML、JSONなど)を同時にレスポンス処理することはできません。
public function show($id)
{
    $user = User::findOrFail($id);

    if (request()->wantsJson()) {
        return response()->json($user);
    }

    return view('users.show', compact('user'));
}
次はCRUDの③更新機能(Update)についての記事を書いています!
終わりに
何かありましたらお気軽にコメント等いただけると助かります。
ここまでお読みいただきありがとうございます🎉
Discussion