🌤
KotlinとRetrofitを使った初めてのAndroidアプリ開発
Hack U KOSEN 2021 で Android アプリを作ることになったのでそれのチュートリアルとして作ったアプリの作り方的なところを備忘録として(超絶雑に)残しておく。
やること
- Kotlin を使って Android アプリ開発
- Open Weather Map の Current weather data から天気情報を GET して Activity に表示する
出来上がったリポジトリ
開発環境
- M1 Mac
- Android Studio Arctic Fox | 2020.3.1 Patch 3 arm64 Preview
- Kotlin 203-1.6.0-release-798-AS7717.8
- Gradle 7.0.2
- Android Studio Arctic Fox | 2020.3.1 Patch 3 arm64 Preview
- デバッグ端末
- Android Emulator - Pixel_3a_API_31_arm64-v8a
- Android 12
- SHARP AQUOS R2 Compact SH-M09
- Android 11
- Android Emulator - Pixel_3a_API_31_arm64-v8a
プロジェクトを作る
- New Project をクリック
- Empty Activity を選択し、次へをクリック
- プロジェクトの設定を適当に選択して Finish をクリック
- Name: WeatherAndroidApp
- Minimum SDK: API 24: Android 7.0 (Nougat)
(これは手持ちの Xperia XZ でもデバッグするかなと思ったためこのバージョンに)
開発準備
マニュフェストファイルにネットワークについて追記
- Open Weather Map API にアクセスするためはインターネットが必要なので
app/src/main/AndroidManifest.xmlにユーザーパーミッションについて追加する
app/src/main/AndroidManifest.xml
<manifest xmlns:android="http://schemas.android.com/apk/res/android"
    package="com.id.packagename">

    <uses-permission android:name="android.permission.INTERNET" />  <!-- これ -->
    <application
        android:allowBackup="false"
        android:icon="@mipmap/ic_launcher"
        android:label="@string/app_name"
        android:roundIcon="@mipmap/ic_launcher_round" … >
API アクセスをするために Gradle で Retrofit を追加
-
app/build.gradleのdependenciesに Retrofit と Moshi を追加
app/build.gradle
dependencies {
    …
    androidTestImplementation 'androidx.test.espresso:espresso-core:3.4.0'

    // 各 2021/11/23 時点の最新版
    // Retrofit
    def retrofit_version = '2.9.0'
    implementation "com.squareup.retrofit2:retrofit:$retrofit_version"
    implementation "com.squareup.retrofit2:converter-moshi:$retrofit_version"

    // Moshi
    def moshi_version = '1.12.0'
    implementation "com.squareup.moshi:moshi:$moshi_version"
    implementation "com.squareup.moshi:moshi-kotlin:$moshi_version"
}
いざ開発
API から JSON を受け取ったときにオブジェクト化するためのクラスを追加
- Open Weather Map API からは以下のようなフォーマットで天気データが送られてくる
Open Weather Map API のレスポンス
response
{
    "coord": {
        "lon": 134.5594,
        "lat": 34.0658
    },
    "weather": [
        {
            "id": 803,
            "main": "Clouds",
            "description": "broken clouds",
            "icon": "04n"
        }
    ],
    "base": "stations",
    "main": {
        "temp": 7.97,
        "feels_like": 7.29,
        "temp_min": 7.96,
        "temp_max": 10.79,
        "pressure": 1013,
        "humidity": 66
    },
    "visibility": 10000,
    "wind": {
        "speed": 1.54,
        "deg": 20
    },
    "clouds": {
        "all": 75
    },
    "dt": 1637673400,
    "sys": {
        "type": 1,
        "id": 8027,
        "country": "JP",
        "sunrise": 1637617309,
        "sunset": 1637654083
    },
    "timezone": 32400,
    "id": 1850158,
    "name": "Tokushima",
    "cod": 200
}
- これ用に data class を作成する
これって毎回必要になってくるんだろうか…
WeatherInfo.kt
package com.id.packagename

data class WeatherInfo(
    val coord: Coord,
    val weather: List<Weather>,
    val base: String,
    val main: Main,
    val visibility: Int,
    val wind: Wind,
    val clouds: All,
    val dt: Int,
    val sys: Sys,
    val timezone: Int,
    val id: Int,
    val name: String,
    val cod: Int
)

data class Coord(
    val lon: Double,
    val lat: Double
)

data class Weather(
    val id: Int,
    val main: String,
    val description: String,
    val icon: String
)

data class Main(
    val temp: Double,
    val feels_like: Double,
    val temp_min: Double,
    val temp_max: Double,
    val pressure: Int,
    val humidity: Int
)

data class Wind(
    val speed: Double,
    val deg: Int
)

data class All(
    val all: Int
)

data class Sys(
    val type: Int,
    val id: Int,
    val country: String,
    val sunrise: Int,
    val sunset: Int
)
Refrofit で GET アクセスをするためにインターフェースを作成
- Open Weather Map の Current weather data API のアクセス URL は
api.openweathermap.org/data/2.5/weather?q={city name}&appid={API key} - ドメイン以下のパスを GET アノテーションの引数にわたすのでこの場合は
data/2.5/weather/を渡す- GET のパラメーターが必要な場合は
@Queryオプションで指定できる
- GET のパラメーターが必要な場合は
WeatherService.kt
package com.id.packagename

import retrofit2.Call
import retrofit2.http.GET
import retrofit2.http.Query

interface WeatherService {
    @GET("data/2.5/weather/")
    fun fetchWeather(
        @Query("q") cityName: String,
        @Query("appid") apiKey: String,
        @Query("units") units: String
    ): Call<WeatherInfo>
}
Layout Editor で UI を作る
- City Name を入力してボタンを押すと温度が表示されるようにする。
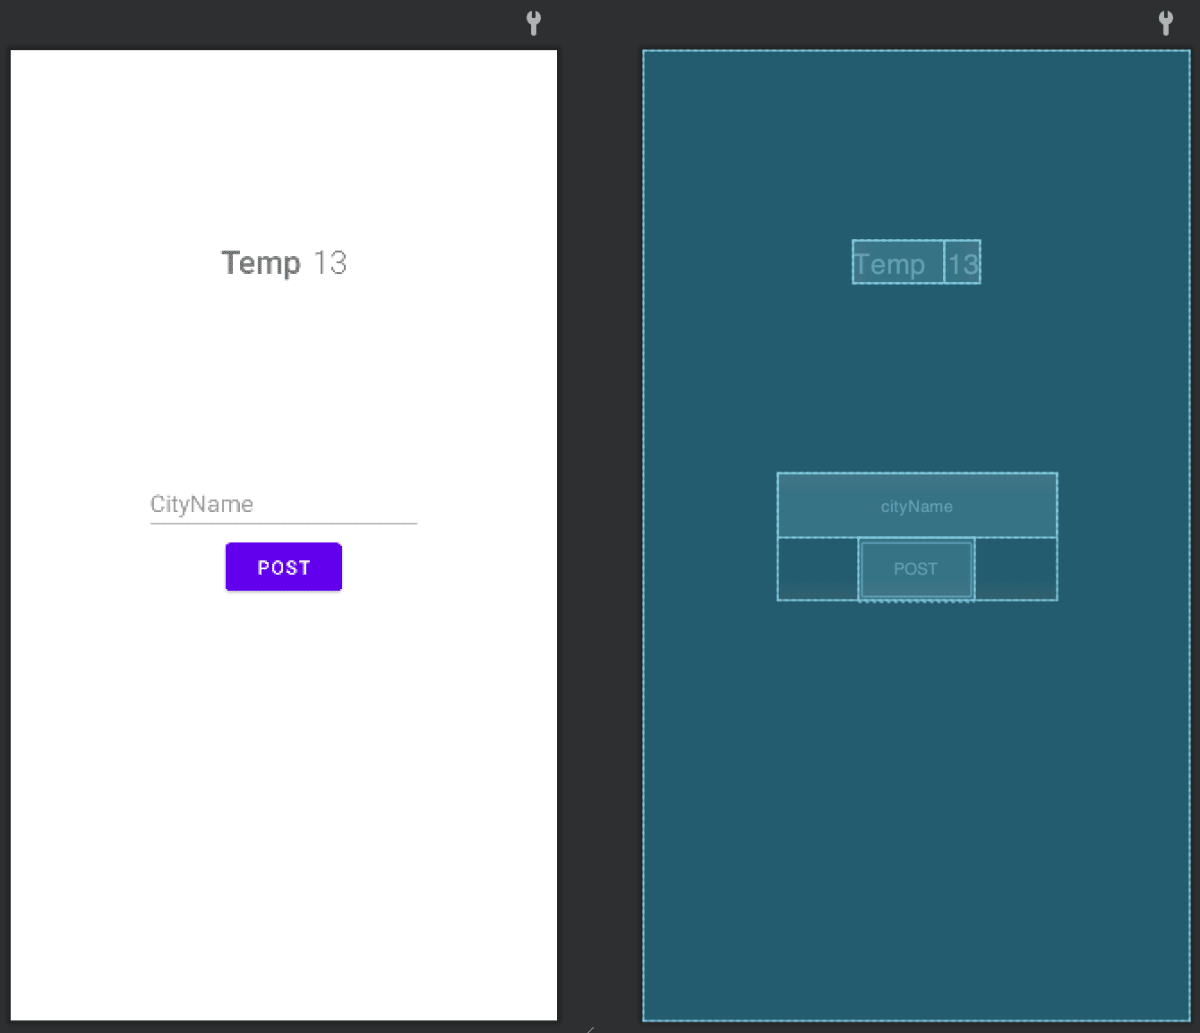
- ソース
activity_main.xml
<?xml version="1.0" encoding="utf-8"?>
<androidx.constraintlayout.widget.ConstraintLayout xmlns:android="http://schemas.android.com/apk/res/android"
    xmlns:app="http://schemas.android.com/apk/res-auto"
    xmlns:tools="http://schemas.android.com/tools"
    android:layout_width="match_parent"
    android:layout_height="match_parent"
    tools:context=".MainActivity">

    <LinearLayout
        android:id="@+id/linearLayout"
        android:layout_width="wrap_content"
        android:layout_height="wrap_content"
        android:gravity="center_horizontal"
        android:orientation="vertical"
        app:layout_constraintBottom_toBottomOf="parent"
        app:layout_constraintEnd_toEndOf="parent"
        app:layout_constraintStart_toStartOf="parent"
        app:layout_constraintTop_toTopOf="parent">

        <EditText
            android:id="@+id/cityName"
            android:layout_width="wrap_content"
            android:layout_height="48dp"
            android:autofillHints="no"
            android:ems="10"
            android:hint="@string/text_placeholder"
            android:inputType="text"
            tools:ignore="SpeakableTextPresentCheck,SpeakableTextPresentCheck,TextContrastCheck" />

        <Button
            android:id="@+id/postButton"
            android:layout_width="wrap_content"
            android:layout_height="wrap_content"
            android:text="@string/post_button" />
    </LinearLayout>

    <LinearLayout
        android:layout_width="wrap_content"
        android:layout_height="wrap_content"
        android:orientation="horizontal"
        app:layout_constraintBottom_toTopOf="@+id/linearLayout"
        app:layout_constraintEnd_toEndOf="parent"
        app:layout_constraintStart_toStartOf="parent"
        app:layout_constraintTop_toTopOf="parent">

        <TextView
            android:id="@+id/textView"
            android:layout_width="wrap_content"
            android:layout_height="wrap_content"
            android:fontFamily="sans-serif-medium"
            android:paddingStart="0dp"
            android:paddingEnd="8dp"
            android:text="@string/text_temp"
            android:textAlignment="textStart"
            android:textSize="24sp" />

        <TextView
            android:id="@+id/tempText"
            android:layout_width="wrap_content"
            android:layout_height="wrap_content"
            android:fontFamily="sans-serif-light"
            android:textAlignment="textEnd"
            android:textSize="24sp"
            tools:text="13" />
    </LinearLayout>

</androidx.constraintlayout.widget.ConstraintLayout>
API キーを隠すために Secrets Gradle Plugin for Android を使う
- Open Weather Map の API キーを GitHub に push するわけにはいかないので Secrets Gradle Plugin for Android で隠せるようにする
- プロジェクトルートの
build.gradle(PackageName)のdependenciesに追記
build.gradle
dependencies {
    …
    classpath "com.google.android.libraries.mapsplatform.secrets-gradle-plugin:secrets-gradle-plugin:2.0.0"
}
- アプリレベルの
build.gradle(:app)のpluginsに追記
build.gradle
plugins {
    …
    id 'com.google.android.libraries.mapsplatform.secrets-gradle-plugin'
}
-
local.propertiesに値を追加する
local.properties
OWM_API_KEY=your_api_key
-
BuildConfig.OWM_API_KEYと書くことでソースからアクセスできる- 最初はエラーが出るが、ビルドしたら正常にうごく(はず)
API アクセスの用の記述を追加
- 今回は
MainActivityに追加 - Retrofit でアクセスするときはメインスレッドでやるとエラーが起こるので
threadで行う
MainActivity.kt
class MainActivity : AppCompatActivity() {

    override fun onCreate(savedInstanceState: Bundle?) {
        super.onCreate(savedInstanceState)
        setContentView(R.layout.activity_main)

        val editCityNameText = findViewById<EditText>(R.id.cityName)
        val postButton = findViewById<Button>(R.id.postButton)

        postButton.setOnClickListener {
            fetchApi(editCityNameText.text.toString(), "metric")
        }
    }

    private fun fetchApi(cityName: String, units: String) {
        val moshi = Moshi.Builder()
            .add(KotlinJsonAdapterFactory())
            .build()

        val retrofit = Retrofit.Builder()
            .baseUrl("https://api.openweathermap.org/")
            .addConverterFactory(MoshiConverterFactory.create(moshi))
            .build()

        val tempText = findViewById<TextView>(R.id.tempText)

        thread {
            try {
                val service: WeatherService = retrofit.create(WeatherService::class.java)
                val weatherApiResponse = service.fetchWeather(
                    cityName,
                    BuildConfig.OWM_API_KEY,
                    units
                ).execute().body()
                    ?: throw IllegalStateException("bodyがnullだよ!")

                Handler(Looper.getMainLooper()).post {
                    tempText.text = weatherApiResponse.main.temp.toString()
                    Log.d("response-weather", weatherApiResponse.toString())
                }
            } catch (e: Exception) {
                Log.d("response-weather", "debug $e")
            }
        }
    }
}
詰まったところ
Layout Editor で Rendering Problems が出て UI が表示されない
- こんな状態になった
-
Code表示にしてEditTextを確認する-
android:autofillHints="no"に変更したら UI が表示された
-
activity_main.xml
<EditText
    …
    android:autofillHints="no">
まとめ
超絶雑にまとめてみました。初めての Android アプリ開発でとりあえず API アクセスまで確認できてよかったです。
参考サイト
Discussion