react-native-firebaseでmessagingを使う時にやる作業メモ
概要
react-native-firebaseを組み込んだアプリでプッシュ通知を行う際の作業メモ。
具体的なソース実装よりは、権限設定などの事務的な内容多め。
前提として、react-native-firebaseと関連モジュール(/coreとか/messagingとか)はインストール済み(+pod installやAppDelegate.mの追記)で、GoogleService-Info.plistやgoogle-service.jsonはネイティブディレクトリに組み込み済みとする。
※要するにreact-native-firebaseのイントロダクションは終わっている前提
【iOS】Apple Developersでやること
- 【Certificates, Identifiers & Profiles】から【Identifiers】のメニューを選択し、対象のアプリのIdentifierを開く
-
Push Notificationsを有効にする

【iOS】Capabilityの追加
- Xcodeで対象のプロジェクトを開く
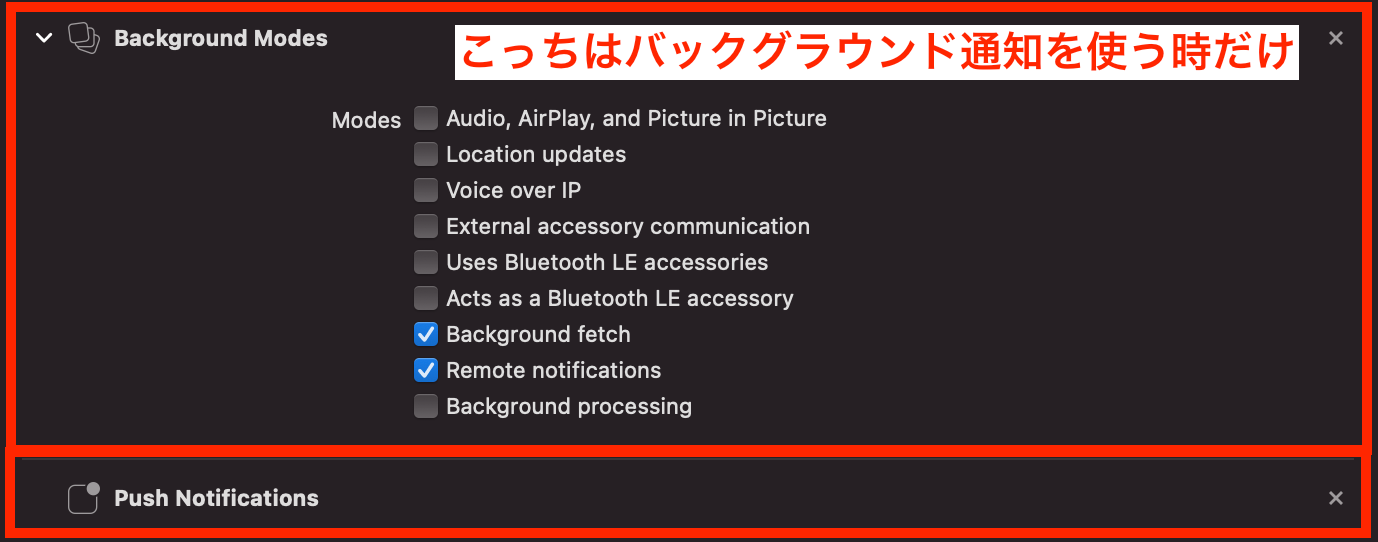
- 【Signin & Capability】のタブから【+Capability】のメニューをクリックし、【Push Notifications】と【Background Modes】を追加する
- 【Background Modes】は文字通り、バックグラウンド時にプッシュ通知を受け取る場合に使用するので必須ではない
- 例えば、LINEの未読件数通知のインクリメントのように、バックグラウンドで通知を受けた際に何かしたい場合は追加が必要
- 【Remote Notifications】と【Background Fetch】にチェックを入れているが、後者はもしかしたら不要かもしれない
【Android】AndroidManifest.xmlの追加
- 権限が必要なものを
AndroidManifest.xmlに追加する- 権限通知とバイブレーション
- 通知時のアイコンや色設定
<manifest xmlns:android="http://schemas.android.com/apk/res/android" package="【パッケージ名】">
  <!-- プッシュ通知の受信 -->
  <uses-permission android:name="android.permission.SYSTEM_ALERT_WINDOW"/>
  <!-- バイブレーション -->
  <uses-permission android:name="android.permission.VIBRATE" />
  <application>
    <!-- 通知アイコン -->
    <meta-data
      android:name="com.google.firebase.messaging.default_notification_icon"
      android:resource="@mipmap/ic_launcher" />
    <!-- 通知カラー(ここでは自作の値orangeを指定) -->
    <meta-data
      android:name="com.google.firebase.messaging.default_notification_color"
      android:resource="@color/orange"
      tools:replace="android:resource" />
  </application>
</manifest>
Firebaseでの設定
- 【プロジェクトの設定】から【Cloud Messaging】を選択
- 【iOS アプリの構成】から(あらかじめ登録済みの)iOSアプリケーションを選択し、【APNs 認証キー】を追加する
- 【Key ID】の入力が必要なので、
Apple Developersの【Keys】メニューから確認しておくこと
- 【Key ID】の入力が必要なので、
- 正常に埋め込まれれば下記のようになる

※今回は認証キーを使う方法だが、証明書を使う方法は現在は非推奨とのことなので割愛
パーミッションリクエスト
アプリ起動時に実行されるようにするとよい。
import messaging from '@react-native-firebase/messaging';

const authStatus = await messaging().requestPermission();
const enabled =
  authStatus === messaging.AuthorizationStatus.AUTHORIZED ||
  authStatus === messaging.AuthorizationStatus.PROVISIONAL;
if(enabled) console.log("認証OK");
- 初回実行時は色々なアプリでお馴染みの「プッシュ通知を許可しますか?」的なモーダルが出てきて、「OK」を選ぶと
messaging.AuthorizationStatus.AUTHORIZEDが返る。 - 2回目以降の実行時はモーダルは出ずに認証の状態を示す値が返る
- 従って初回で「許可しない」とした場合は、「未許可」のステータスが返るので、「プッシュ通知が届かない」旨のメッセージや、「アプリ設定に飛ばす」など何かしらの処理をアプリで記述する必要がある
トークンの取得
FCMのトークンを取得する。
ログイン時、ログインユーザ切り替え時など、プッシュの対象が切り替わったタイミングでは能動的に実行しておくとよい。
※一定期間でリフレッシュが走るため、この処理だけだと不完全で、後述のリフレッシュイベントハンドラを設定する必要がある。
import messaging from '@react-native-firebase/messaging';
const token: string = await messaging().getToken();
トークンのリフレッシュ
一定のタイミング(アプリのバージョンアップなど)でトークンにリフレッシュが走る。
イベントハンドラ的な使い方をするので、アプリのルートに近い位置で下記を実行しておくとよい。
import messaging from '@react-native-firebase/messaging';
messaging().onTokenRefresh((token: string) => {
  // トークンリフレッシュ時の処理
});
【iOS】Simulatorでのプッシュ通知のデバッグ
-
Xcode11.4よりSimulatorでもプッシュ通知のデバッグができるようになった- 注意点として
APNsトークンが発行されるようになったわけではない(従って、依然としてFCMからプッシュ通知を出してもSimulatorには届かない)
- 注意点として
- 方法は
XXX.apnsというファイルを作ってSimulatorにドラッグするだけ(対象アプリのBundle、文言などをカスタマイズする)
{
    "Simulator Target Bundle": "【Bundle Id】",
    "aps":{
        "alert":"Test",
        "sound":"default",
        "badge":1
    }
}
当然ながら、アプリ側でプッシュ通知を許可していないと何もおこらない。
従って、プッシュの導通チェックを行う前段階として、権限等々のreact-native-firebaseのモジュールや設定がしっかり組み込まれているかどうかの検証に使うとよい。
また、この手法はFirebaseを経由したわけではないので、「プッシュ通知にパラメータを付けて、アプリ内のプッシュ通知イベントハンドラでそれらを解析して処理を分ける」といったことのデバッグもできない。
プッシュ通知受信時のイベントハンドラ
基本的にイベントハンドラを設定する方式なので第二引数に空配列を渡した状態のuseEffect(クラスコンポーネントでいうところのcomponentDidMount)で設定すること。
また、各種ハンドラの戻り値はハンドラの購読を解除するための関数なので、これも上記のuseEffect内のreturn(クラスコンポーネントでいうところのcomponentWillUnmount)で実行すること。
起動中のプッシュ通知受信
import messaging, {
  FirebaseMessagingTypes.RemoteMessage
} from '@react-native-firebase/messaging';

// 起動中のメッセージ受信
const unsubscribeMessage = messaging().onMessage((
  message: FirebaseMessagingTypes.RemoteMessage
) => {
  // 何かしらの処理
  // 例えば、端末を振動させる等
});
プッシュ通知をタップしてバックグラウンドから復帰した際の処理
import messaging, {
  FirebaseMessagingTypes.RemoteMessage
} from '@react-native-firebase/messaging';

// 起動中のメッセージ受信
const unsubscribeNotificationOpenedApp = messaging().onNotificationOpenedApp((
  message: FirebaseMessagingTypes.RemoteMessage
) => {
  // 何かしらの処理
  // 例えば、message内に付随するコンテンツのIDをキーに詳細画面を表示する等
});
プッシュ通知をタップしてアプリを起動した際の処理
import messaging, {
  FirebaseMessagingTypes.RemoteMessage
} from '@react-native-firebase/messaging';

// 起動中のメッセージ受信
messaging().getInitialNotification().then((
  message: FirebaseMessagingTypes.RemoteMessage
) => {
  // 何かしらの処理
  // 例えば、message内に付随するコンテンツのIDをキーに詳細画面を表示する等
});
【iOS】プッシュ通知が届く毎にホーム画面のアイコンバッジの数字をインクリメントする
ホーム画面におけるアイコンのバッジにアクセスするにはpush-notification-iosを使う必要がある。
インストール
yarn add @react-native-community/push-notification-ios
cd ios && pod install
AppDelegate系ファイルの更新
まずはAppDelegate.h
+ #import <UserNotifications/UNUserNotificationCenter.h>

+ @interface AppDelegate : UIResponder <UIApplicationDelegate, RCTBridgeDelegate, UNUserNotificationCenterDelegate>
- @interface AppDelegate : UIResponder <UIApplicationDelegate, RCTBridgeDelegate>
次にAppDelegate.m
// impoertに2種類追加
#import <UserNotifications/UserNotifications.h>
#import <RNCPushNotificationIOS.h>

/** ここからどかっと追加 */
// Required for the register event.
- (void)application:(UIApplication *)application didRegisterForRemoteNotificationsWithDeviceToken:(NSData *)deviceToken
{
 [RNCPushNotificationIOS didRegisterForRemoteNotificationsWithDeviceToken:deviceToken];
}
// Required for the notification event. You must call the completion handler after handling the remote notification.
- (void)application:(UIApplication *)application didReceiveRemoteNotification:(NSDictionary *)userInfo
fetchCompletionHandler:(void (^)(UIBackgroundFetchResult))completionHandler
{
  [RNCPushNotificationIOS didReceiveRemoteNotification:userInfo fetchCompletionHandler:completionHandler];
}
// Required for the registrationError event.
- (void)application:(UIApplication *)application didFailToRegisterForRemoteNotificationsWithError:(NSError *)error
{
 [RNCPushNotificationIOS didFailToRegisterForRemoteNotificationsWithError:error];
}
// Required for localNotification event
- (void)userNotificationCenter:(UNUserNotificationCenter *)center
didReceiveNotificationResponse:(UNNotificationResponse *)response
         withCompletionHandler:(void (^)(void))completionHandler
{
  [RNCPushNotificationIOS didReceiveNotificationResponse:response];
}

/** ここまで */

- (BOOL)application:(UIApplication *)application didFinishLaunchingWithOptions:(NSDictionary *)launchOptions
{

  // 以下2行を追加
  UNUserNotificationCenter *center = [UNUserNotificationCenter currentNotificationCenter];
  center.delegate = self;
  return YES
}

// 以下も追加
//Called when a notification is delivered to a foreground app.
-(void)userNotificationCenter:(UNUserNotificationCenter *)center willPresentNotification:(UNNotification *)notification withCompletionHandler:(void (^)(UNNotificationPresentationOptions options))completionHandler
{
  completionHandler(UNNotificationPresentationOptionSound | UNNotificationPresentationOptionAlert | UNNotificationPresentationOptionBadge);
}
バッジ数の処理
index.js上でmessagingのsetBackgroundMessageHandlerを設定する。
これは、その名の通り、バックグラウンドでプッシュ通知を受信した際に行う処理イベントを設定でき、ここでpush-notification-iosを使ってバッジに表示している数字をインクリメントする。
/**
 * @format
 */
import React from 'react';
import {AppRegistry, Platform} from 'react-native';
import messaging from '@react-native-firebase/messaging';
import PushNotificationIOS from '@react-native-community/push-notification-ios';
import App from './src/App';
import {name as appName} from './app.json';

/**
 * 通知受信時イベント
 */
messaging().setBackgroundMessageHandler(async (remoteMessage) => {
  if (Platform.OS === 'ios') {
    // プッシュ通知件数をインクリメント
    PushNotificationIOS.getApplicationIconBadgeNumber((number) => {
      PushNotificationIOS.setApplicationIconBadgeNumber(number + 1);
    });
  }
});

/**
 * RNFB公式より追加
 * 参考:https://rnfirebase.io/messaging/usage#data-only-messages
 */
HeadlessCheck = ({isHeadless}) => {
  if (isHeadless) {
    // App has been launched in the background by iOS, ignore
    return null;
  }

  return <App />;
};

AppRegistry.registerComponent(appName, () => HeadlessCheck);
ここで加算した数値はどこかで減算や0に戻す等の処理を加えない限り変わらないので注意。
たとえば「未読メッセージを開封すると減算」とか「アプリを開いた時点でバッジのカウントは0にする」とか、アプリの性質に合わせて処理を記載する必要がある。