Next.js + HeadlessWordPress + 少しだけNest.js で友人のwebサイトを作り直してみた。
はじめに
タイトルの通りですが友人のお寺webサイトを作り直してみました。
もともと私が1年程前にWordPressを使用して作ったwebサイトでした。
使用技術、ツール
-
デザイン
- Figma
-
CMS
- WordPress
-
フロント
- 言語 TypeScript
- フレームワーク Next.js
- その他 GraphQL
-
API
- 言語 TypeScript
- フレームワーク Nest.js
-
ホスティング
- Vercel (Next.js)
- render (Nest.js)
構成
Jamstack構成となっています。
WordPressで記事の管理を行い、Next.jsでコンテンツを生成しています。

課題
1.画像のURLからWordPressのURLが見えてしまう。
解決方法としては、画像用のサーバーを用意しました。
保存した画像は画像用サーバーにアップロードされる様にWordPressの設定を行いました。
具体的には、option.phpからupload_pathとupload_url_pathの設定を行いました。
2.お問い合わせフォームの送信先からWordPressのURLが見えてしまう。
お問い合わせはWordPressのプラグインContact Form 7のAPIを使用しています。
そのままContact Form 7のAPIを使用してしまうとWordPressのURLが見えてしまうので
Nest.jsで作ったAPIを経由してデータを送信する事にしました。
デザイン
まずは、デザインから始まりました。
落ち着いた雰囲気のあるwebサイトになるようデザインをしました。(したつもり)
具体的には、
1.背景色は白ではなくベージュ色にしました。
感覚的な事ですが真っ白より淡いベージュ色の方が落ち着いた雰囲気がでると思いました。
あと目に優しい?
2.フォントの色は黒(#000)ではなく#333にしました。
真っ黒(#000)だと重い印象になるので少し薄い#333にしました。
デザイナーさんが作ったデザインを見ていると真っ黒(#000)ではなく#333など少し薄い色をフォントに使用している事があったので真似てみました。
3.日本語フォントはSawarabi Minchoを使用しました。
明朝体で和の雰囲気がでれば良いなと思い選びました。
CMS
既存のWordPressを使い回すことにしました。
Headless化にともない追加したプラグインは、下記の3つです。
- WP GraphQL
- WPGraphQL for Advanced Custom Fields
- Vercel Deploy Hooks
WP GraphQL、WPGraphQL for Advanced Custom Fields
WP GraphQLとWPGraphQL for Advanced Custom FieldsはWordPressでGraphQLを使用できるようになるプラグインです。
データはWordPress REST APIを使用して取得する事も可能だと思いますが、GraphQLを勉強したかったのでこのようにしました。
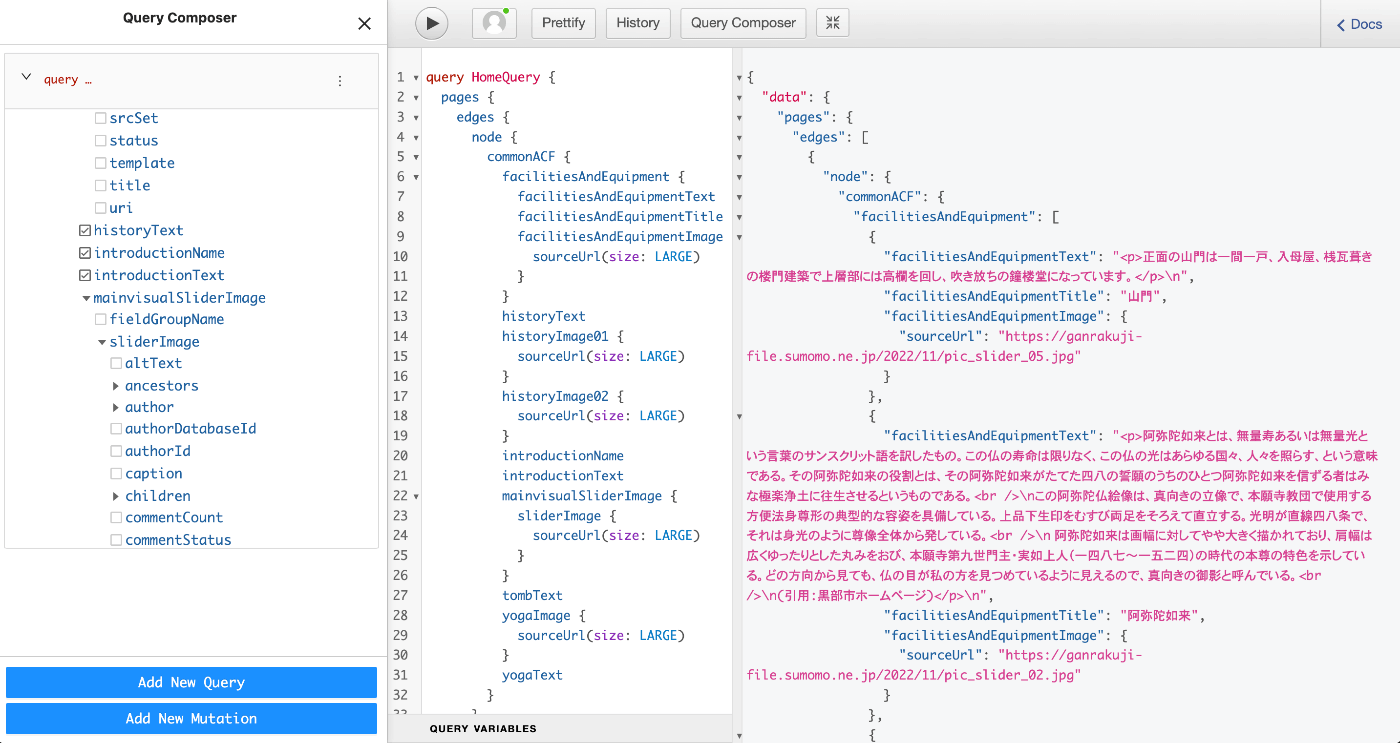
プラグインを追加すると下記の様にクエリを作成できます。

Vercel Deploy Hooks
Vercel Deploy HooksはWordPressからVercelのDeploy HooksにPOSTリクエストをなげてビルドをしてもらう為のプラグインになります。
使い方としては、Vercel Deploy Hook URLにVercelで生成したDeploy Hookを設定。

Build Siteを押すとビルドされました。

プラグインの中を少し見てみましたが、ajaxを使用してPOSTリクエストを投げているみたいでした。
Vercel Deploy Hooksのコード
function vercelDeploy() {
  return $.ajax({
    type: 'POST',
    url: webhook_url,
    dataType: 'json',
  });
}

$('#build_button').on('click', function (e) {
  e.preventDefault();

  vercelDeploy()
    .done(function (res) {
      console.log('success');
      $('#build_status').html('Building in progress');
      $('#build_status_id').removeAttr('style');
      $('#build_status_id').html('<b>ID</b>: ' + res.job.id);
      $('#build_status_state').removeAttr('style');
      $('#build_status_state').html('<b>State</b>: ' + res.job.state);
      $('#build_status_createdAt').removeAttr('style');
      $('#build_status_createdAt').html(
        '<b>Created At</b>: ' + new Date(res.job.createdAt).toLocaleString(),
      );
    })
    .fail(function () {
      console.error('error res => ', this);
      $('#build_status').html(
        'There seems to be an error with the build',
        this,
      );
    });
});
フロントエンド
ディレクトリ構成
ディレクトリ構成
├── components
│   ├── atoms
│   ├── molecules
│   ├── organisms
│   ├── providers
│   └── templates
├── graphql
│   ├── config
│   ├── documents
│   └── generated
├── hooks
├── lib
├── pages
├── public
├── router
├── schema
└── styles
    ├── components
    │   ├── atoms
    │   ├── molecules
    │   ├── organisms
    │   └── providers
    ├── config
    │   ├── mixins.scss
    │   ├── reset.scss
    │   └── variables.scss
    └── globals.scss
コンポーネントのディレクトリ構成に関してはAtomic Designを採用しました。
これまでAtomic Designという手法に触れてこなかったので勉強の為に選択しました。
moleculesとorganismsの分け方
organismsとmoleculesの分け方で迷う事がありました。
他の記事を参考に下記の事を意識して分けました。
molecules
他のコンポーネントを補助する役割。
汎用性がある。
inputフォームなど
organisms
単体で存在できる。
特定のコンテンツ、機能をもっている。
お問い合わせフォームなど
providersディレクトリ
こちらはAtomic Designにはない新規に追加したディレクトリになります。
役割としては、アニメーションなどコンポーネントをまとめています。
こちらの記事のfunctionalディレクトリに該当します。
GraphQL
WordPressからデータを取得する為にgraphql-requestを使用しています。
リクエストを投げてデータを取得する。それ以上の機能は必要なかったのでgraphql-requestを選択しました。
GraphQLのスキーマからTypeScriptの型を生成するためにGraphQL Code Generatorを使用しました。
設定ファイルなど
設定ファイル
import type { CodegenConfig } from '@graphql-codegen/cli';

const config: CodegenConfig = {
  overwrite: true,
  schema: 'WordPressで設定したgraphqlのエンドポイントを設定する',
  // documents クエリのファイルを指定する。
  documents: 'graphql/documents/*.graphql',
  // generates 出力先のファイルと設定
  generates: {
    'graphql/generated/client.ts': {
      config: {
        skipTypename: true,
        avoidOptionals: true,
        maybeValue: 'T',
      },
      plugins: [
        'typescript',
        'typescript-operations',
        'typescript-graphql-request',
      ],
    },
  },
};

export default config;
WordPressのGraphiQL IDEを使用して作成したクエリをコピペします。
query fetchHomePageQuery {
  pages {
    edges {
      node {
        commonACF {
          facilitiesAndEquipment {
            facilitiesAndEquipmentText
            facilitiesAndEquipmentTitle
            facilitiesAndEquipmentImage {
              sourceUrl(size: LARGE)
            }
          }
          historyText
          historyImage01 {
            sourceUrl(size: LARGE)
          }
          historyImage02 {
            sourceUrl(size: LARGE)
          }
          introductionName
          introductionText
          mainvisualSliderImage {
            sliderImage {
              sourceUrl(size: LARGE)
            }
          }
          tombText
          yogaImage {
            sourceUrl(size: LARGE)
          }
          yogaText
        }
      }
    }
  }
}
package.jsonにコマンド追加
"codegen": "graphql-codegen --config codegen.ts"
codegenを実行すると型などが記述されたファイルが生成されます。
生成されたファイル(一部)
export type FetchHomePageQueryQueryVariables = Exact<{ [key: string]: never }>;

export type FetchHomePageQueryQuery = {
  pages: {
    edges: Array<{
      node: {
        commonACF: {
          historyText: string;
          introductionName: string;
          introductionText: string;
          tombText: string;
          yogaText: string;
          facilitiesAndEquipment: Array<{
            facilitiesAndEquipmentText: string;
            facilitiesAndEquipmentTitle: string;
            facilitiesAndEquipmentImage: { sourceUrl: string };
          }>;
          historyImage01: { sourceUrl: string };
          historyImage02: { sourceUrl: string };
          mainvisualSliderImage: Array<{ sliderImage: { sourceUrl: string } }>;
          yogaImage: { sourceUrl: string };
        };
      };
    }>;
  };
};

export const FetchHomePageQueryDocument = gql`
  query fetchHomePageQuery {
    pages {
      edges {
        node {
          commonACF {
            facilitiesAndEquipment {
              facilitiesAndEquipmentText
              facilitiesAndEquipmentTitle
              facilitiesAndEquipmentImage {
                sourceUrl(size: LARGE)
              }
            }
            historyText
            historyImage01 {
              sourceUrl(size: LARGE)
            }
            historyImage02 {
              sourceUrl(size: LARGE)
            }
            introductionName
            introductionText
            mainvisualSliderImage {
              sliderImage {
                sourceUrl(size: LARGE)
              }
            }
            tombText
            yogaImage {
              sourceUrl(size: LARGE)
            }
            yogaText
          }
        }
      }
    }
  }
`;

export type SdkFunctionWrapper = <T>(
  action: (requestHeaders?: Record<string, string>) => Promise<T>,
  operationName: string,
  operationType?: string,
) => Promise<T>;

const defaultWrapper: SdkFunctionWrapper = (
  action,
  _operationName,
  _operationType,
) => action();

export function getSdk(
  client: GraphQLClient,
  withWrapper: SdkFunctionWrapper = defaultWrapper,
) {
  return {
    fetchHomePageQuery(
      variables?: FetchHomePageQueryQueryVariables,
      requestHeaders?: Dom.RequestInit['headers'],
    ): Promise<FetchHomePageQueryQuery> {
      return withWrapper(
        (wrappedRequestHeaders) =>
          client.request<FetchHomePageQueryQuery>(
            FetchHomePageQueryDocument,
            variables,
            { ...requestHeaders, ...wrappedRequestHeaders },
          ),
        'fetchHomePageQuery',
        'query',
      );
    },
  };
}
export type Sdk = ReturnType<typeof getSdk>;
API
はじめは、Next.jsのAPI RoutesでAPIを作ろうと考えていたのですがNext.jsのSGではAPI Routesを使用できないみたいなのでNest.jsで作る事にしました。
Nest.jsを選んだ理由としては
TypeScriptで開発できる。
業務でNode.jsを使用しているので勉強の為。
ディレクトリ構成
modulesというディレクトリを追加してその中に各モジュールを入れる構成にしています。
ディレクトリ構成
src
 ├── app.module.ts
 ├── main.ts
 └── modules
     └── contact
         ├── contact.controller.ts
         ├── contact.dto.ts
         ├── contact.module.ts
         ├── contact.service.ts
         └── validation.pipe.ts
ホスティングサービス
ホスティングサービスはrenderを選択しました。
はじめは、Herokuを使用しようと考えていたのですがは無償プランが廃止されるという事なのでrenderにしました。
今後の課題
- renderがスリープするのでお問い合わせに時間がかかる。
- パフォーマンスの改善。画像の最適化、遅延読み込み、バンドルサイズの削減。
- お問い合わせに関して今回は既存のWordPressを使いまわしたのでContact Form 7を使用したがSendGridなどのサービスを利用した方が良いか検討する。
などなど。
Discussion